When you install WordPress on your Hostinger hosting plan, two plugins are automatically added to your WordPress admin panel: Hostinger Tools and Hostinger Easy Onboarding. Each plugin serves a different purpose — this article explains what they do and how to use them.
Hostinger Tools
Hostinger Tools is an all-in-one plugin designed to help you manage essential settings for your WordPress site directly from the WordPress admin panel.
The plugin is installed automatically on all new WordPress instances. Once the plugin is installed, go to Hostinger → Tools in your WordPress admin panel.

Features
Basic Info
- Displays your current WordPress version and alerts you when an update is available.
- Shows your current PHP version and alerts you when an update is available.
Maintenance Mode
- Enable or disable maintenance mode for your site while you make changes.
- Set a bypass URL so selected users can still access the site during maintenance.
Security
- Enable or disable XML-RPC requests to improve your site’s security.
Redirects
- Force all URLs to use HTTPS for secure browsing.
- Force all URLs to use WWW for consistent site access.
Note: Check more about the features of this plugin in this guide: How to use the Hostinger Tools plugin for WordPress maintenance
Hostinger Easy Onboarding
Hostinger Easy Onboarding is a beginner-friendly plugin that guides you through the first steps of building your WordPress website. It is available exclusively to Hostinger customers.
Once the plugin is installed, the onboarding panel appears automatically in your WordPress admin panel. You can also access it from the Hostinger menu.

This helpful tool will walk you through the basic actions to create your website:
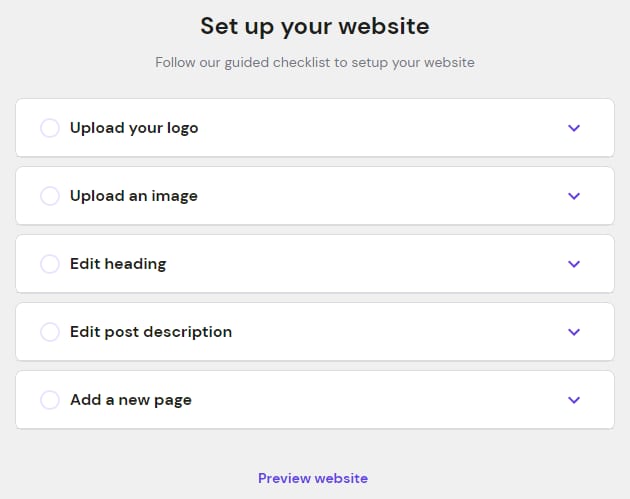
Let’s go over each one in detail:
Upload your logo
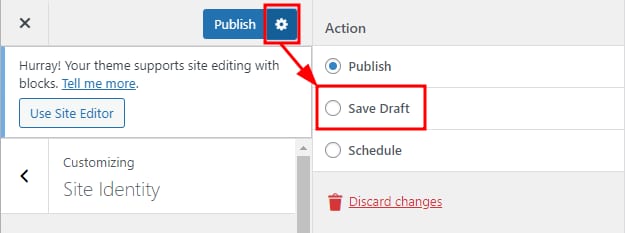
You will see the option to create a logo using our amazing Logo Maker. If you already have an image, click on Take me there to open the Customize page on a new window and upload your logo:

On the Customize page, after making the changes, you can either publish right away or click on the gear icon to publish later by choosing Save Draft:
Once done, go back to the Hostinger plugin window and click on Got it! This step will be marked as completed, and the next one will be shown 😊
Upload an image
Click on Take me there to open the WordPress Media Library, where you will be able to upload an image as well as apply some basic edits to it.
Edit heading
Clicking on Take me there will take you once again to the Customize page. There, click on Use Site Editor to build a custom header for your website:

When all is good to go, save the changes and head to the next step.
Edit post description
Click on Take me there to create your first new page, or edit one of the pre-generated ones. Make sure to click on Publish or Save draft when you’re done to apply the changes.
Add a new page
The Take me there button will open a new window to create a new post for your website. Add the title and content and publish it or save it as a draft for later.
Preview website
You can see the progress live on your website at any time or after completing all the steps by clicking on Preview website.
That’s it, you have successfully published your website!
Additional resources:
-
Feel free to check our selection of articles on WordPress management