How to Check Disk Space Usage in Linux
Mar 25, 2025
/
Domantas G.
/
7 min Read
In Linux, monitoring disk space is crucial for maintaining system performance and preventing insufficient storage issues, such as system crashes, data loss, and interrupted services.
We recommend regularly checking your Linux disk space if you manage a virtual private server (VPS), maintain databases, and run large-scale applications.
This article presents various commands and tools to check disk space usage in Linux. By reading this article, you can keep your system running efficiently and avoid potential problems.

Prerequisites
Before learning different methods to check disk space in Linux, you should have the following:
- Linux CLI knowledge. A basic understanding of the Linux command-line interface will help you navigate through the commands and interpret their outputs.
- Permission to run commands. Having administrative or root access is often required to execute some of the disk space management commands.
- Terminal or SSH client applications. If you manage a remote or virtual server, make sure to use a terminal or an SSH client like PuTTY to access the server.
How to Check Disk Space in Linux
Here are some Linux commands, their basic syntax, and use cases to check your system’s disk space. We’ll also go over a dedicated method to monitor disk space for Hostinger VPS customers.
How to Check Disk Space in Linux Using the df Command
The df command, short for disk free, is a standard Unix command used to display the amount of available disk space on file systems. The basic syntax of the df command is as follows:
df [OPTIONS] [FILE]
Some useful options include:
- -h. Prints sizes in a human-readable format, such as KB, MB, and GB.
- -a. Includes dummy file systems.
- -T. Displays the file system type.
As an example, let’s use:
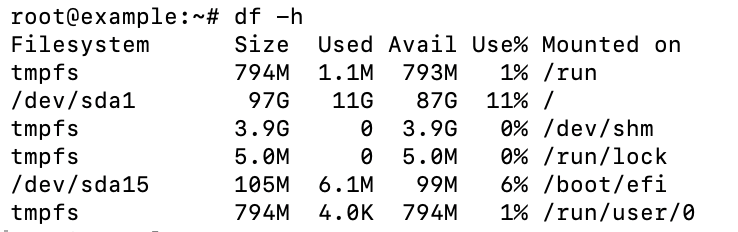
df -h
This will output something like:
Filesystem      Size  Used Avail Use% Mounted on
/dev/sda1       100G   50G   45G  60% /
tmpfs           1.9G  1.2M  1.9G   1% /dev/shm
/dev/sda2       200G  100G   90G  53% /home
Here is an explanation of each field:
- Filesystem. The file system’s name.
- Size. The file system’s total size.
- Used. The amount of space used.
- Avail. The amount of available space.
- Use%. The percentage of space used.
- Mounted on. The mount point of the file system.
How to Check File Space Usage in Linux Using the du Command
The du, or disk usage command, estimates file space usage in Linux. It provides detailed information about the disk space used by files and directories.
The basic syntax of the du command is:
du [OPTIONS] [FILE/DIR]
Here are some useful options you can apply:
- -h. Shows sizes in a human-readable format.
- -s. Summarizes the total for each argument.
- -a. Includes files as well as directories.
To check the disk usage of a specific directory, use:
du -h /path/to/directory
This command will list the sizes of all files and subdirectories within the specified directory.
For instance, if you run:
du -h /home/user
You should see the following output:
4.0K    /home/user/Documents
2.0M    /home/user/Downloads
500K    /home/user/Pictures
2.5M    /home/user
If you only want to summarize the total disk usage of a directory, execute the following:
du -sh /path/to/directory
This command provides a single total size for the specified directory.
Here’s an example of its usage:
du -sh /home/user
The output should resemble the following:
2.5M /home/user
How to Check Disk Usage in Linux Using the pydf Command
The Python-based pydf command displays the amount of disk space used and is available on all mounted file systems. Compared to the traditional df command, it provides a colorful and more readable output.
To install pydf, you can use your Linux distribution’s package manager. For example, on Debian or Ubuntu-based systems, run:
sudo apt-get install pydf
For Red Hat or CentOS-based systems, you might need to enable the EPEL repository beforehand:
sudo yum install epel-release
sudo yum install pydf
Once installed, familiarize yourself with its basic syntax:
pydf [OPTIONS]
Some common options to use include:
- -h. Prints sizes in KB, MB, or GB.
- -v. Displays the version information.
To check disk usage with pydf, you can execute:
pydf -h
This will produce an output similar to:

Meanwhile, the df command produces:
The pydf command’s output is more colorful, which can be more user-friendly for those who prefer a visual representation of disk usage.
How to Check Disk Usage in Linux Using the ncdu Command
The NCurses Disk Usage (ncdu) command is a disk usage analyzer with an ncurses interface. It provides an interactive way to view and manage disk usage, suitable for identifying large files and directories.
To install ncdu on Debian or Ubuntu, run:
sudo apt-get install ncdu
If you use a Red Hat or CentOS-based distribution, use:
sudo yum install ncdu
The basic syntax of the ncdu command is:
ncdu [OPTIONS] [DIRECTORY]
To start ncdu and analyze the current directory, you can run:
ncdu
This will launch ncdu in interactive mode, where you can access directories and view disk usage with the following keys:
- Up/down arrows. Navigate through the list of files and directories.
- Enter. Open a directory to view its contents.
- D. Delete the selected file or directory.
- Q. Quit ncdu.
For instance, if you run:
ncdu /home/user
It will produce:
--- /home/user --------------------
. 2.5 GiB [##########] /Downloads
. 1.5 GiB [######....] /Documents
. 500 MiB [##........] /Pictures
. 100 MiB [..........] /Music
How to List Block Devices in Linux Using the lsblk Command
The lsblk command displays information about all available or specified block devices. While its primary purpose is to show your system’s storage configuration, lsblk can also provide details about disk space and partition sizes.
Here’s the basic syntax of the lsblk command:
lsblk [OPTIONS]
Some options you can add include:
- -a. Lists all devices, including empty ones.
- -f. Displays file system information.
- -l. Uses list format output.
- -o. Specifies which columns to display.
For instance, running lsblk -f will produce an output similar to:
NAME   MAJ:MIN RM   SIZE RO TYPE MOUNTPOINT
sda      8:0    0  100G  0 disk
├─sda1   8:1    0   50G  0 part /
└─sda2   8:2    0   50G  0 part /home
sdb      8:16   0  200G  0 disk
└─sdb1   8:17   0  200G  0 part /data
Here’s an explanation of each field:
- NAME. The device’s name.
- MAJ:MIN. The major and minor device numbers.
- RM. Indicates if the device is removable (1) or not (0).
- SIZE. The device’s size.
- RO. Indicates if the device is read-only (1) or not (0).
- TYPE. The device’s type, such as disk or part.
- MOUNTPOINT. Where the device is mounted in the file system.
How to Get Detailed File Information in Linux Using the stat Command
The stat command presents detailed information about specific files and file systems. It provides various metadata, such as file size, access permissions, and modification time, making it a powerful tool for analyzing files.
Its basic syntax is as follows:
stat [OPTIONS] [FILE]
There are some options you can append to stat, such as:
- -c. Allows custom formatting of the output.
- -f. Displays information about the file system instead of the file.
To get detailed information about a file system, execute the following:
stat -f /path/to/mountpoint
For example:
stat -f /
It will display details about the file system where the root directory is mounted:
File: "/"
ID: 1234abcd5678ef90 Namelen: 255     Type: ext4
Block size: 4096       Fundamental block size: 4096
Blocks: Total: 5242880  Free: 1024000   Available: 1000000
Inodes: Total: 2621440  Free: 2000000
Here are the fields and their explanations:
- File. The file system’s name.
- ID. The file system ID in the hexadecimal format.
- Namelen. The maximum length of file names.
- Type. The file system’s type, such as ext4 or xfs.
- Block size. Each block’s size in bytes.
- Blocks: Total. The file system’s total number of blocks.
- Free. The number of free blocks in the file system in KB or MB.
- Available. The number of available blocks for non-superusers in KB or MB.
- Inodes: Total. The total number of inodes in the file system.
- Free. The number of free inodes in the file system.
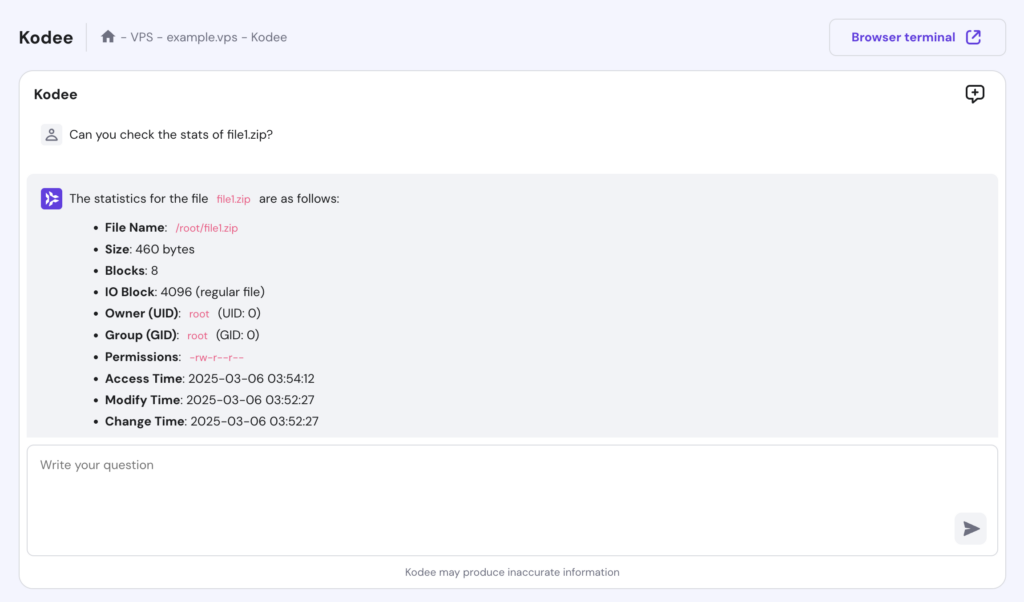
Alternatively, use Kodee AI assistant to check your file’s stats. To access the tool, open hPanel and click Manage on your VPS. Navigate to the sidebar and select Kodee. In the prompt field, simply ask a question like “Can you check the stats of file1.zip?”
How to Check Disk Space in Hostinger VPS
Our clients can easily check their Linux server’s disk space usage through hPanel. Here are the steps:
- Log in to hPanel with your Hostinger account and go to VPS → Manage.
- On the Overview screen, locate the Disk usage panel to see an overview of free and total disk usage.
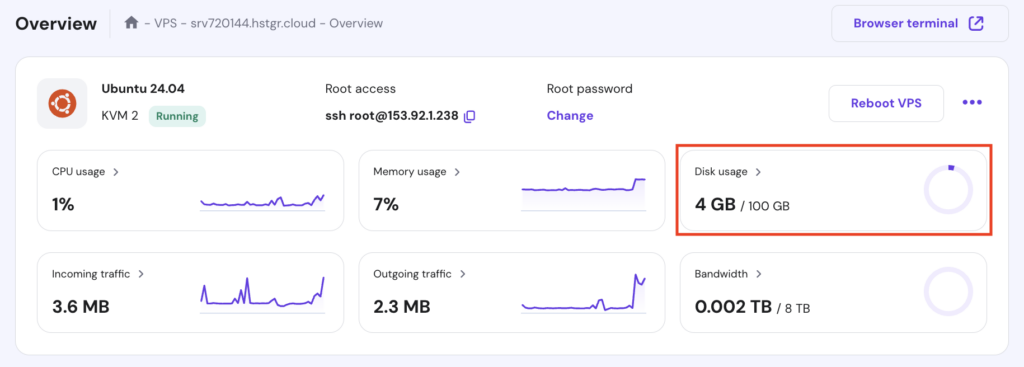
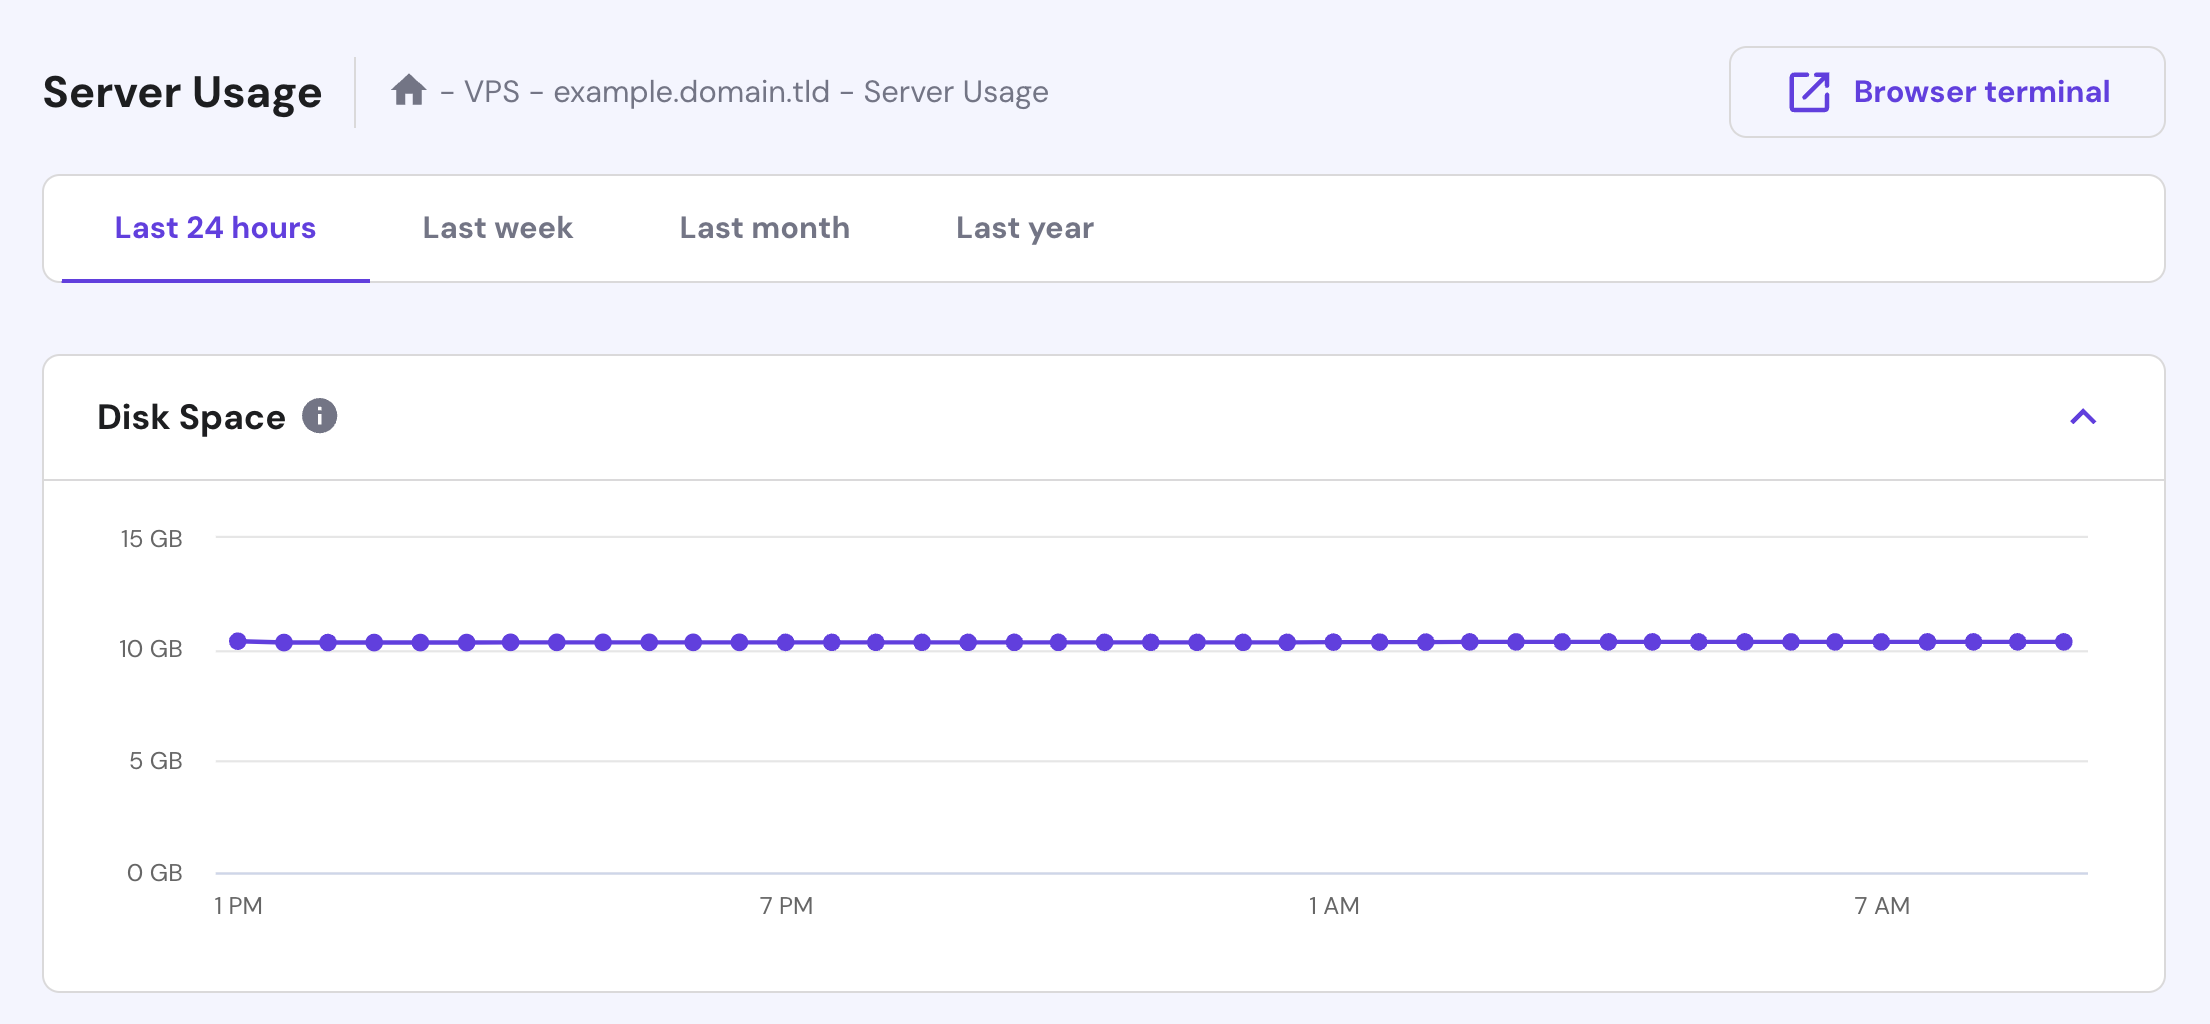
- Click the Disk Usage section to monitor disk space usage over specific periods, such as daily, weekly, monthly, and annually.
You can also ask Kodee questions like “Check the current disk usage of my VPS” or “Check the block devices on my VPS.”
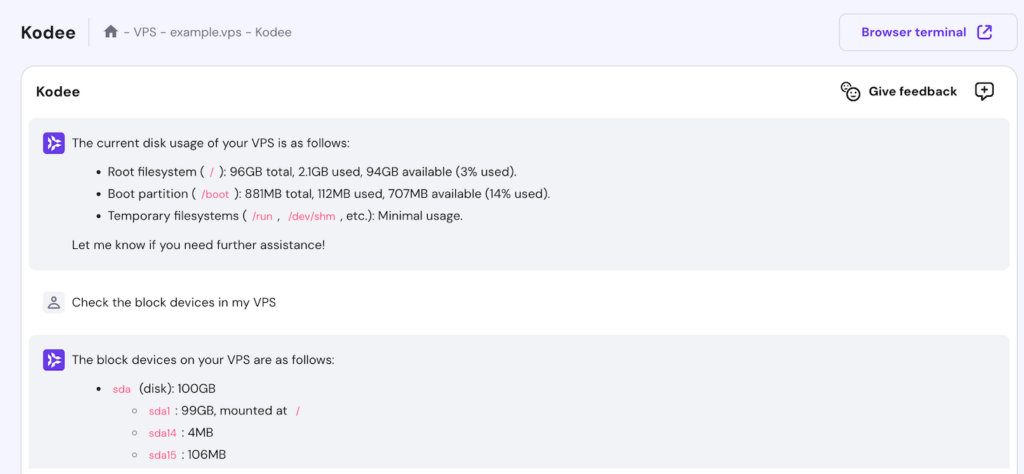
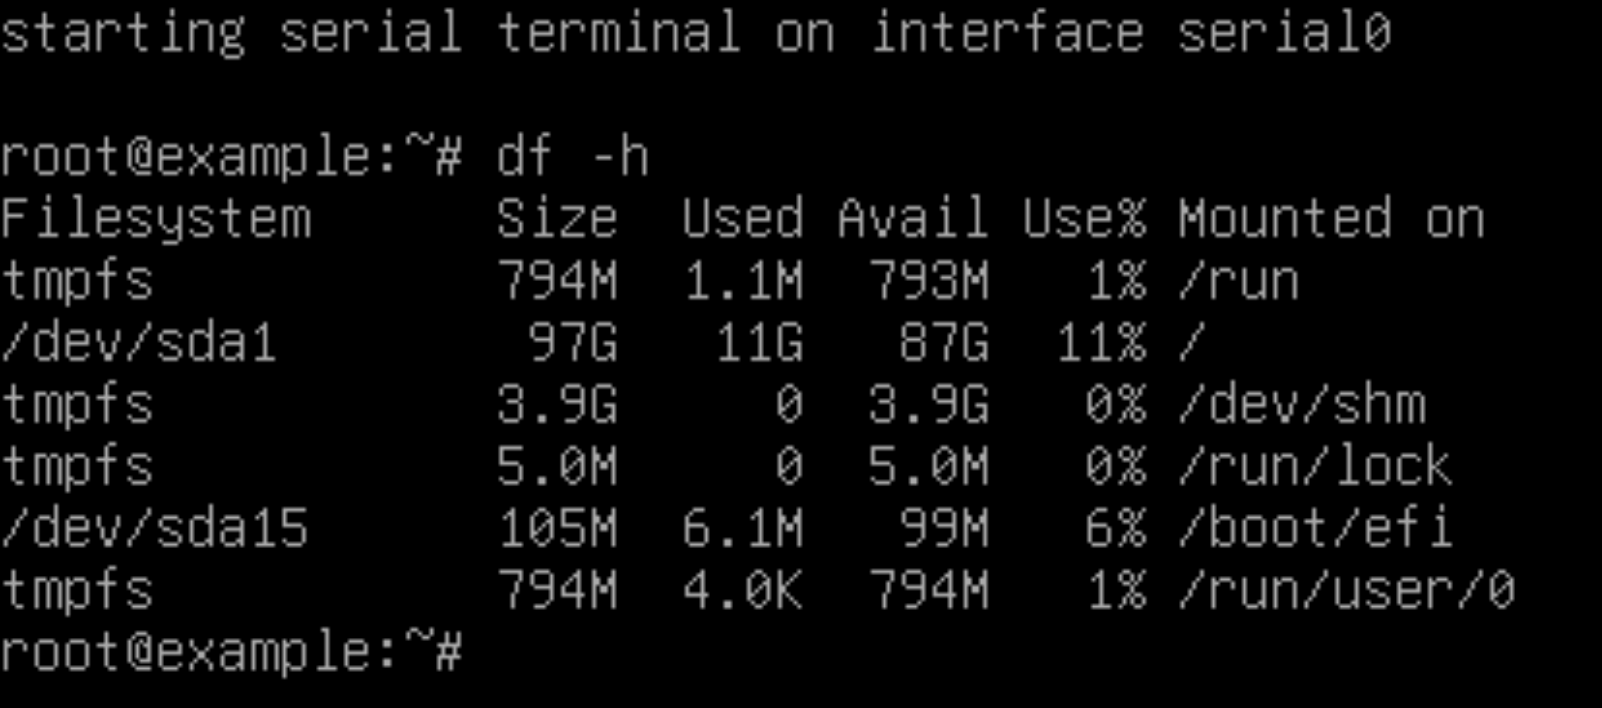
If you prefer to run Linux commands to check your server’s disk space, you can use our built-in Browser terminal. Here, you can execute commands similar to those used in Terminal or SSH applications.

To access it, click Browser terminal in your VPS dashboard. Then, log in using your SSH credentials and start executing the commands.

How to Combine Commands When Checking Disk Space
Combining commands can provide more detailed and customized information about your disk space usage. Here are some examples you can follow:
How to Sort Files by Size
To sort files by size, you can run the du command to list files and folders in a readable format. Then, pipe the result to the sort command with the -rh option to sort them in descending order by size.
Here’s how the combination looks when targeting the /home/user directory:
du -h /home/user | sort -rh
You can also add the tail command to display the smallest files and folders. For example, run the following to display the three items with the lowest size:
du -h /home/user | sort -rh | tail -3
Here’s the expected output:
200M    /home/user/Images
500M    /home/user/Documents
1.5G    /home/user/Projects
How to Exclude Files by Size
If you want to see all files beyond a specific size, consider combining the du and grep commands. This allows you to filter out files based on their size.
For instance, to list all files larger than 1 GB in the /home/user directory, execute:
du -h /home/user | grep '^\s*[0-9\.]\+G'
If you want to list files larger than 1 MB, replace G with M:
du -h /home/user | grep '^\s*[0-9\.]\+M'
You should see:
500M    /home/user/Documents
200M    /home/user/Images
How to Exclude File Types
If you want to exclude a particular file type from the search results, you can use the du command with the –exclude option. Here’s an example:
du -h /home/user --exclude= "*.txt"
The output will display all file formats in /home/user except TXT documents:
2.0G    /home/user/Videos
1.5G    /home/user/Projects
500M    /home/user/Documents
200M    /home/user/Images
Conclusion
In this article, we covered various commands to check disk space usage in Linux. The df and pydf commands provide an overview of storage usage, while du helps you see the space used by specific directories and files.
We also discussed how to combine commands for more detailed analysis, such as using du and grep to exclude files by size. By practicing these commands, you can efficiently manage your space, keep your Linux system running smoothly, and prevent storage-related issues.
All of the tutorial content on this website is subject to Hostinger's rigorous editorial standards and values.

Domantas leads the content and SEO teams forward with fresh ideas and out of the box approaches. Armed with extensive SEO and marketing knowledge, he aims to spread the word of Hostinger to every corner of the world. During his free time, Domantas likes to hone his web development skills and travel to exotic places.


Comments
June 23 2020
sudo du -a / 2>/dev/null | sort -n -r | head -n 20