How to install WordPress using hPanel, softaculous, and manually + troubleshooting tips
May 04, 2026
/
Jordana A. & Marco C.
/
10 min Read
WordPress is a popular open-source content management system (CMS) known for its versatility and scalability. Since it’s free, simply install it to start creating your WordPress website.
This WordPress tutorial will guide you through installing WordPress on web hosting. The first two methods we will cover are specifically tailored for users with websites hosted on Hostinger.
We will also address common problems you might encounter during the WordPress installation procedure and provide solutions to fix them.
What Do You Need Before Installing WordPress
Here are the WordPress requirements you must meet to install the CMS:
Web Hosting
While WordPress is free, it requires hosting to store website files and data due to its self-hosted nature. You can buy a hosting plan from hosting providers like Hostinger at varying prices.
For optimal performance, opt for a web host that supports the following programming language and database management system:
- PHP version 7.4+
- MySQL version 5.7+ or MariaDB version 10.4+
- HTTPS support
Hostinger’s WordPress website hosting exceeds the necessary requirements as it’s configured for optimal performance. Starting at CA$ 4.19/month, you also get a one-click WordPress installer, unlimited free SSL for website security, advanced protection against malware and DDoS attacks, and up to 200 GB of NVMe storage.

Domain Name
A domain name is your website’s unique address on the internet, making it easy for others to find and visit your site. You can search for a domain name through a domain registrar or get a hosting plan that includes a free one for easier management.
Hostinger bundles all managed WordPress hosting plans with a one-year free domain registration. It also includes WHOIS privacy protection to safeguard your personal information.
Your domain name significantly impacts your web presence, so pick one that reflects your brand or online identity. Check out our guide for more tips on choosing your website’s domain name.
WordPress Installation Files and Tools
The following are additional necessities depending on your preferred installation method:
- A WordPress package from WordPress.org for manual installation.
- An FTP client or a file manager to transfer WordPress core files to the web server.
- A code editor to edit WordPress core files.
How to Install WordPress
With Hostinger, you have two options to install WordPress ‒ through the onboarding flow or using the auto installer. Non-Hostinger users can leverage Softaculous for a seamless installation or choose manual installation instead.
This section of the tutorial will guide you through each method. Feel free to choose the best one for your needs.
How to Install WordPress Using hPanel’s WordPress Onboarding
Hostinger users on Business and cloud website hosting plans can set up their new WordPress website during the onboarding flow. With the built-in AI tools for fast content creation, this method is geared toward beginners and those wanting to launch their site quickly.
Here’s how to install WordPress on Hostinger through the WordPress onboarding flow:
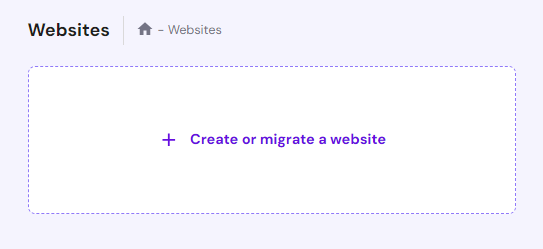
- Log in to hPanel, Hostinger’s custom control panel, and navigate to Websites. Select Create or migrate a website.
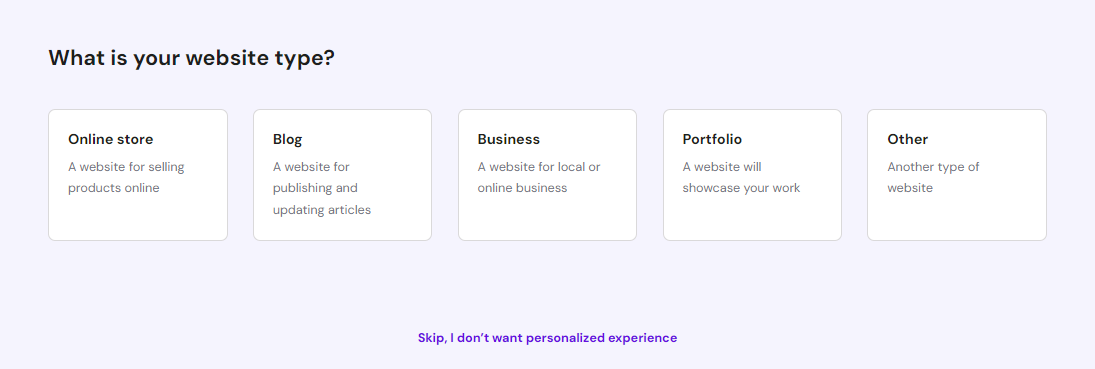
- Pick the type of website you want to create.
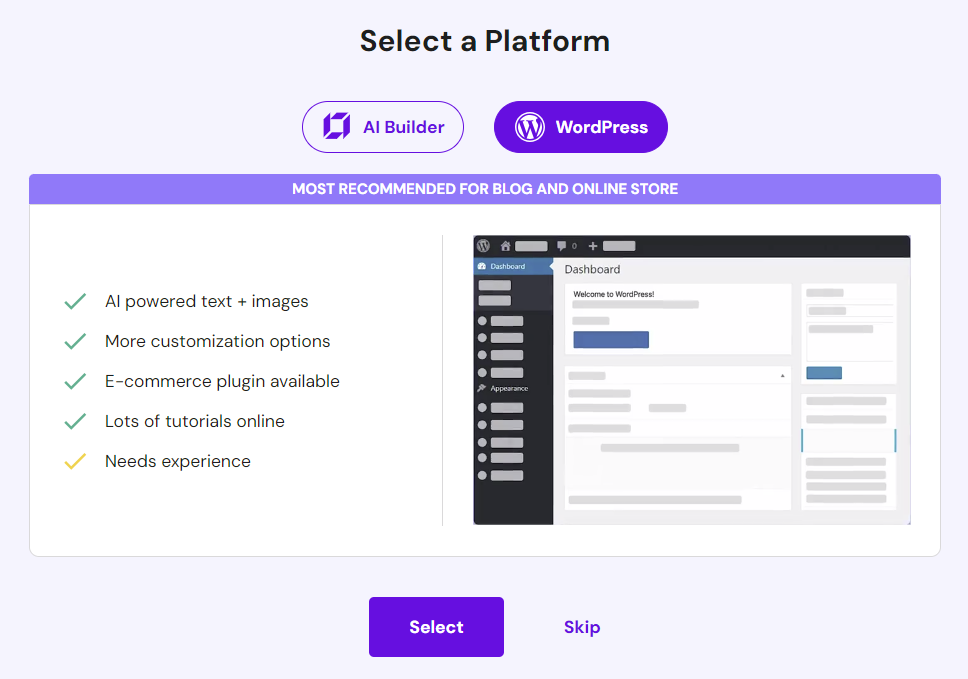
- Choose Create a new website and select WordPress as your platform.
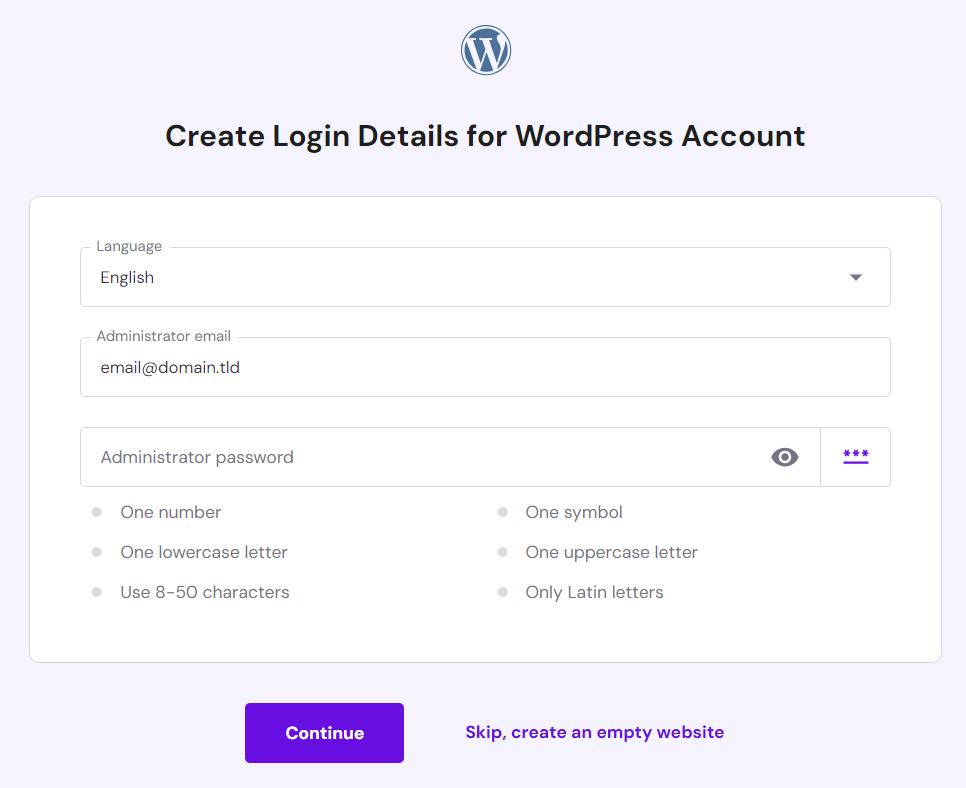
- Pick your preferred language and enter the login details for your new WordPress account. They don’t need to be the same as the web hosting login information, but choose a strong password to prevent security breaches. Click Continue once you’re done.
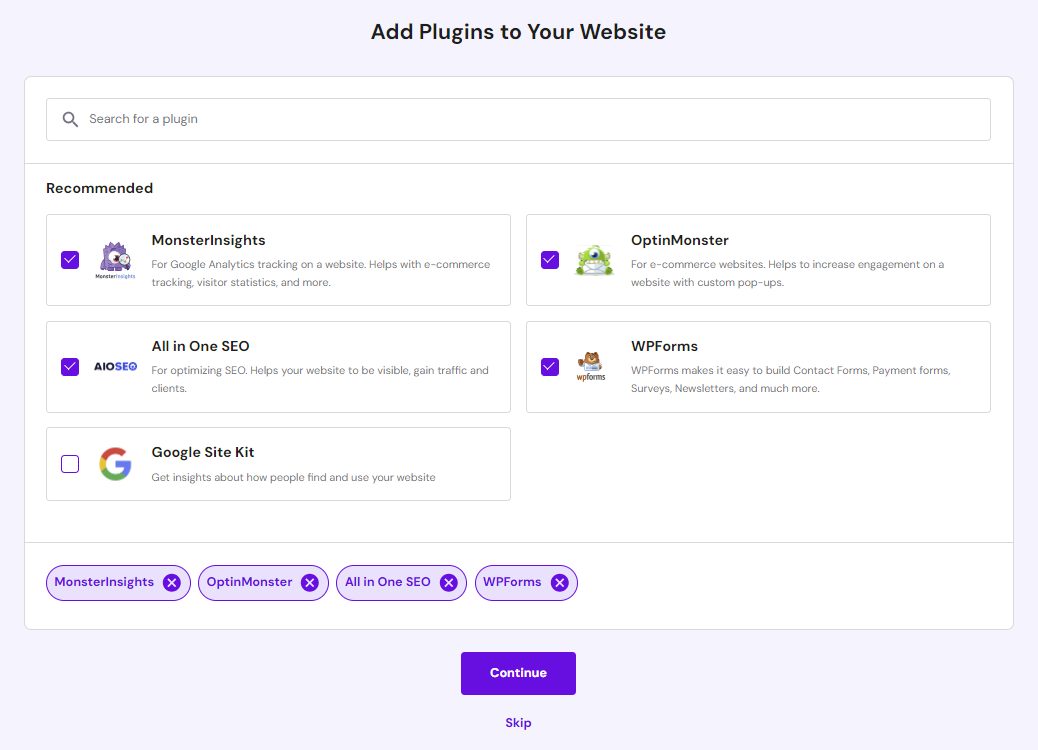
- Search for WordPress plugins you want to automatically install and uncheck the ones you don’t need. Then, hit Continue.
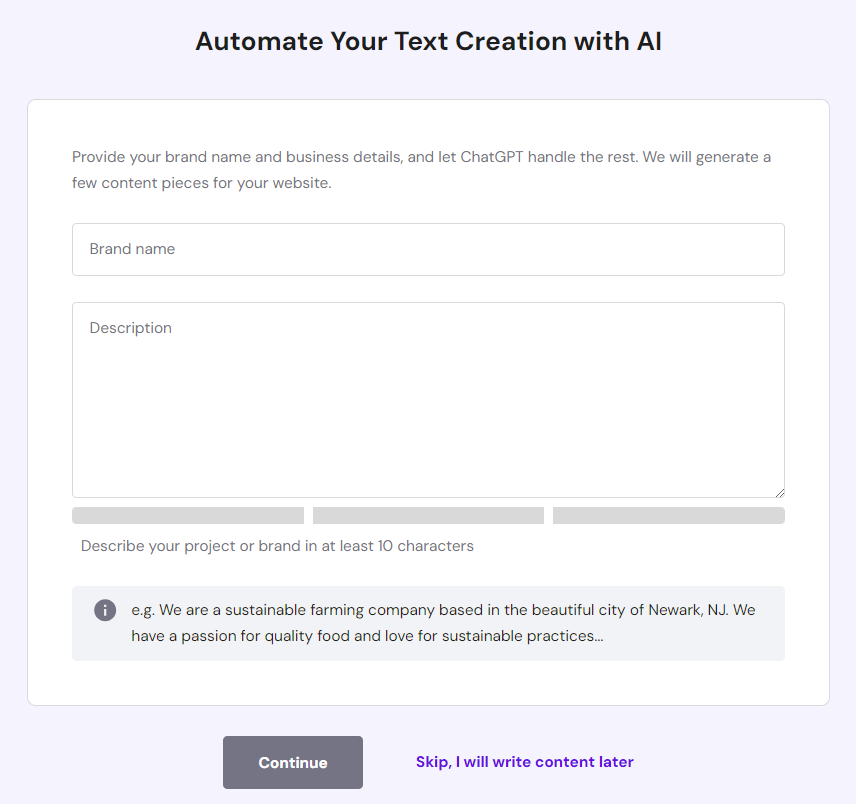
- After choosing a WordPress theme, you’ll see a form to automate text creation with AI. Enter your brand name and describe what you do. Our WordPress AI tools will use this information as a guide when populating your website with content. Click Continue.
- Register a new domain name or pick an existing one from the dropdown field to start the installation process, which may take several minutes to complete.
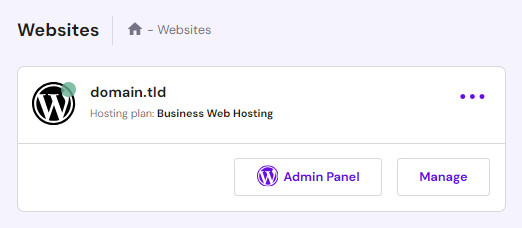
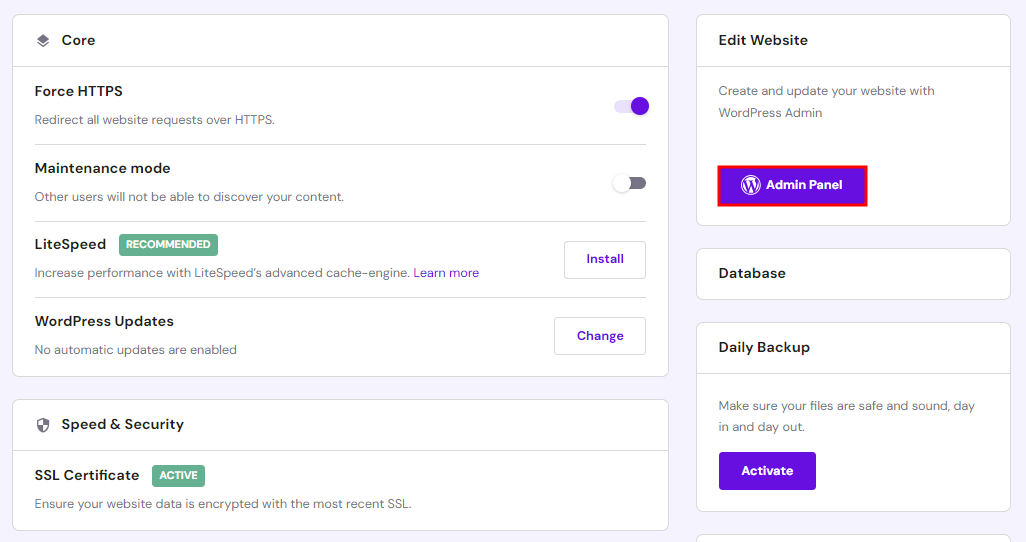
- Once you’ve installed WordPress, return to Websites in hPanel and select Admin Panel to access your WordPress dashboard.
How to Install WordPress Using hPanel’s Auto Installer
This method works best for installing an older WordPress version. It’s also ideal for installing WordPress on a subdomain without affecting the parent domain, serving as an extension of the main website.
Here’s how to install WordPress using hPanel’s Auto Installer:
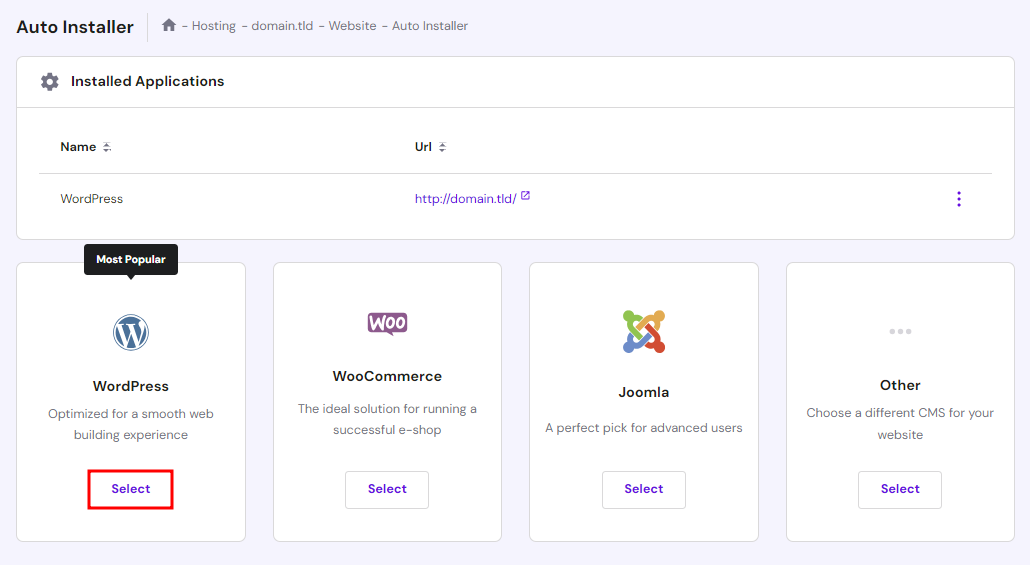
- Go to Website → Auto Installer from hPanel and select WordPress.
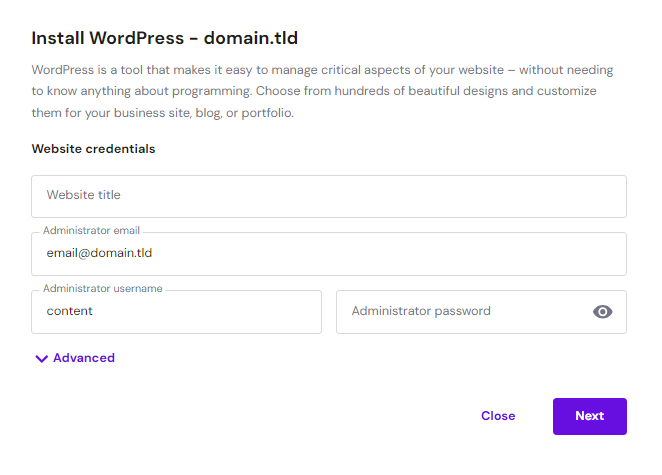
- Enter the site title, email address, username, and password for WordPress login. Hit Next.
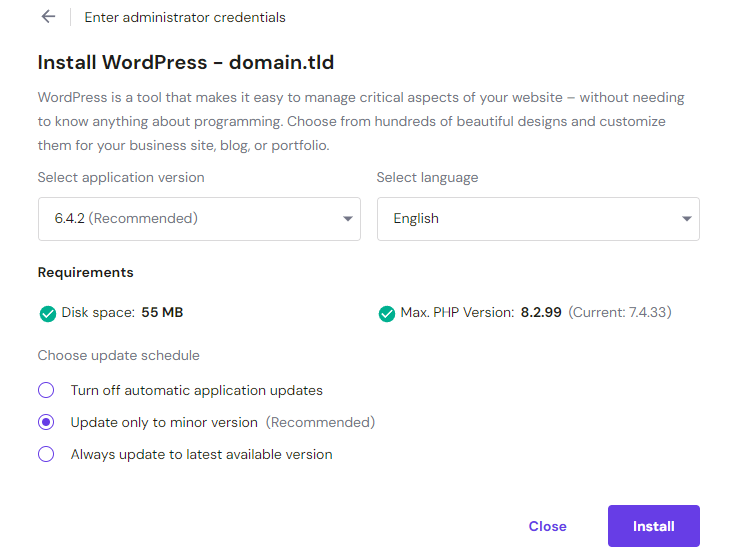
- Set your preferred application version, language, and update schedule. We recommend choosing the Update only to minor version option for automatic updates. Once done, click Install.
- Your installed WordPress instance will appear in the Installed Applications section. Click on the three dots next to your WordPress URL and select Manage to access the hosting dashboard area.

- Click the Admin Panel button to access the WordPress admin dashboard.
How to Install WordPress Using Softaculous
Non-Hostinger users can install WordPress using Softaculous. This popular auto installer script library integrates with cPanel, Plesk, DirectAdmin, and InterWorx control panels.
Here’s how to install WordPress from cPanel:
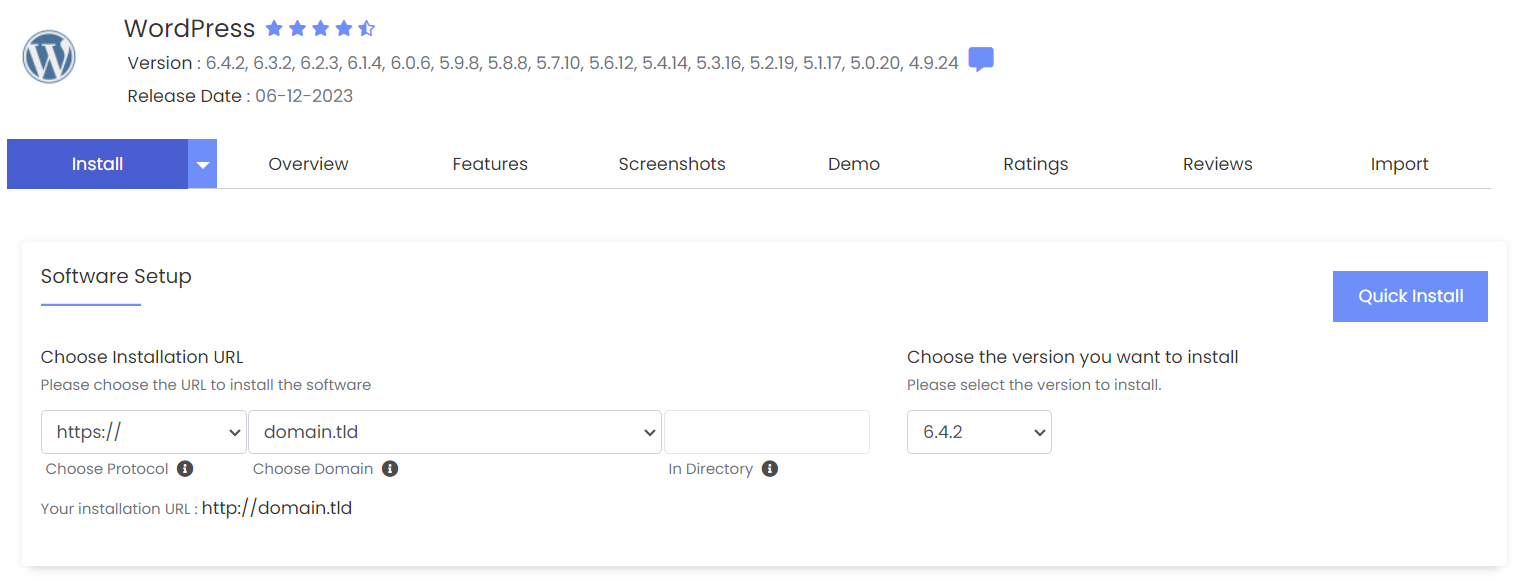
- Navigate to Softaculous Apps Installer from your cPanel account and select the install WordPress button.
- Choose the encryption protocol and WordPress version you want to install. If your hosting plan comes with a free SSL certificate, pick the https:// option to enable HTTPS protocol. Check out our guide to learn the difference between HTTP and HTTPS.
- Enter your site name, site description, admin username, password, and email address. Check the Enable Multisite option if you want to install WordPress with a network of subsites.

- Select your preferred language from the drop-down menu and add the necessary plugins. For this tutorial, we’ll only install the recommended LiteSpeed Cache plugin.
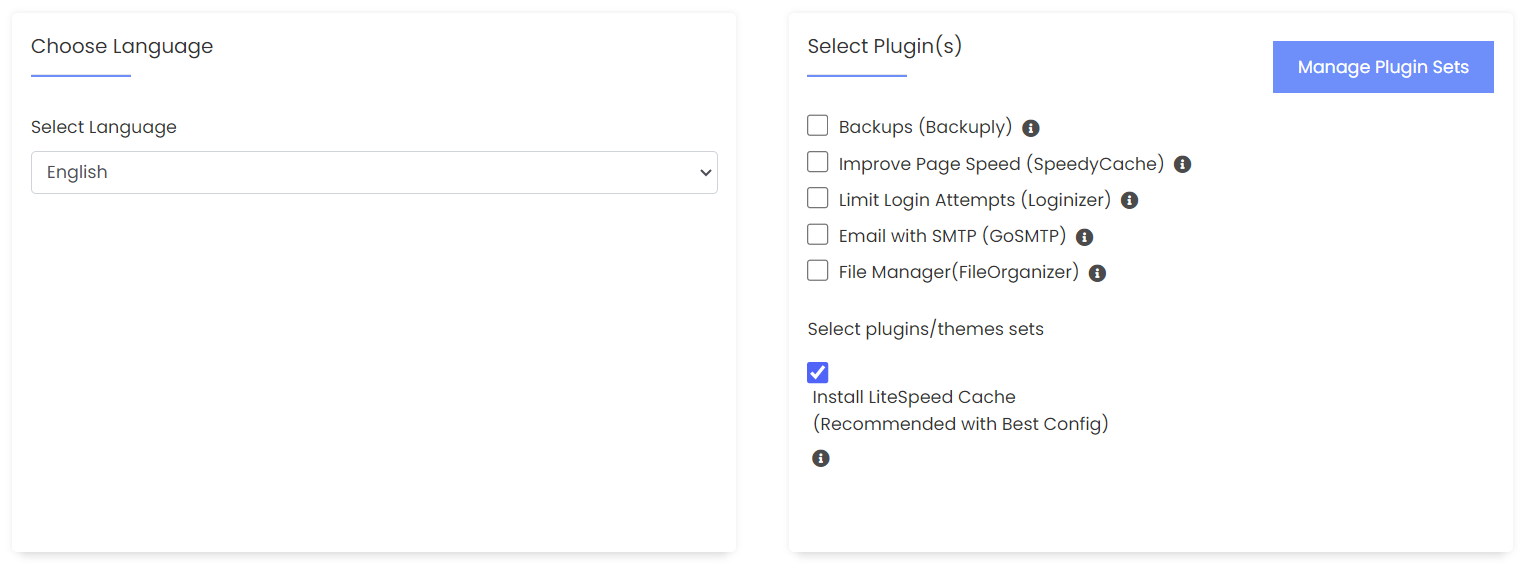
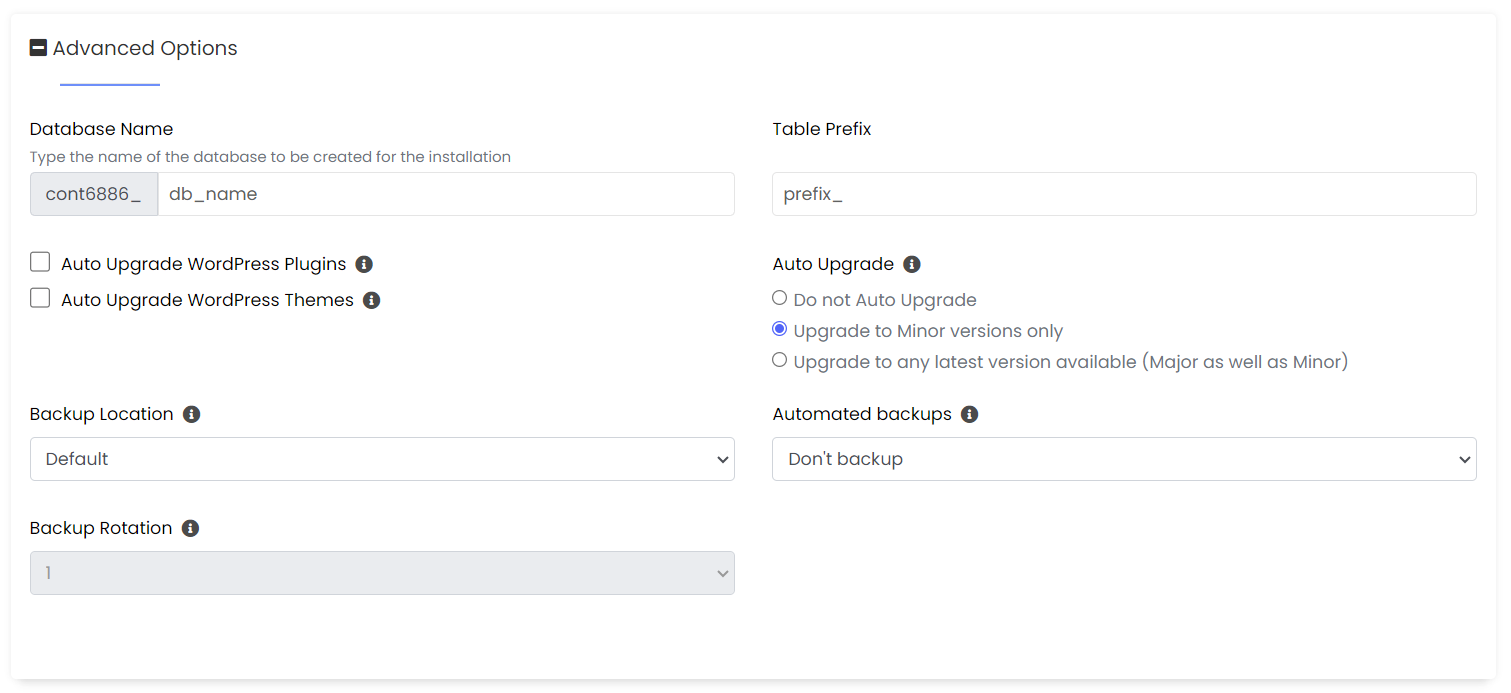
- The database and backup settings are available in the Advanced Options section. We’ll use the default settings for now.
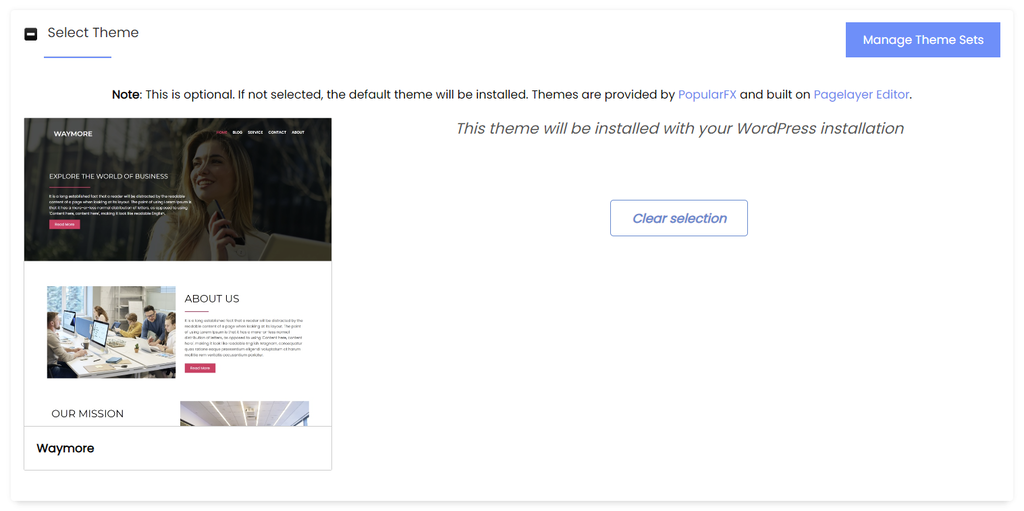
- Pick a theme from the available options and click Select Theme. Hit Clear selection if you want to change your choice.
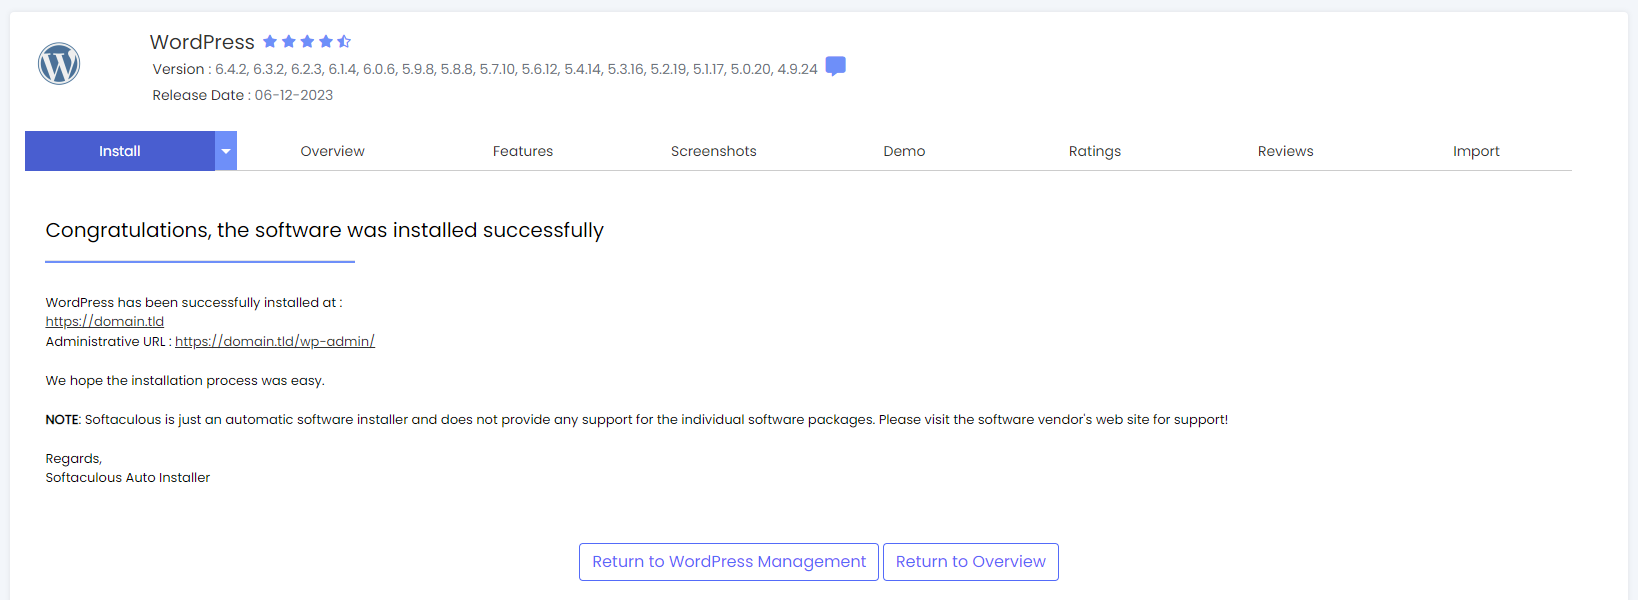
- Once you’re happy with all the settings, hit the Install button at the bottom of the page. The following display will appear if the setup process is successful. Click on the administrative link (domain.tld/wp-admin) to access the admin dashboard.
How to Install WordPress Manually
If the previous methods fail or your hosting provider lacks an auto installer, you can install WordPress manually.
This method involves uploading WordPress files to your hosting account. Though longer, the process is still relatively straightforward to follow, even for beginners.
Upload WordPress Files to the Web Server
Here’s how to upload WordPress installation files to your hosting account using Hostinger’s File Manager:
- Download the latest version of the WordPress package from the official website.
- Navigate to Files → File Manager from hPanel.
- Upload the ZIP file into the root directory (public_html). Right-click on the file and select Extract.

Here’s how to upload files to your web server with an FTP client:
- Download the WordPress package from the official website and extract it on your computer.
- Navigate to Files → FTP Accounts from hPanel and create a new FTP account.
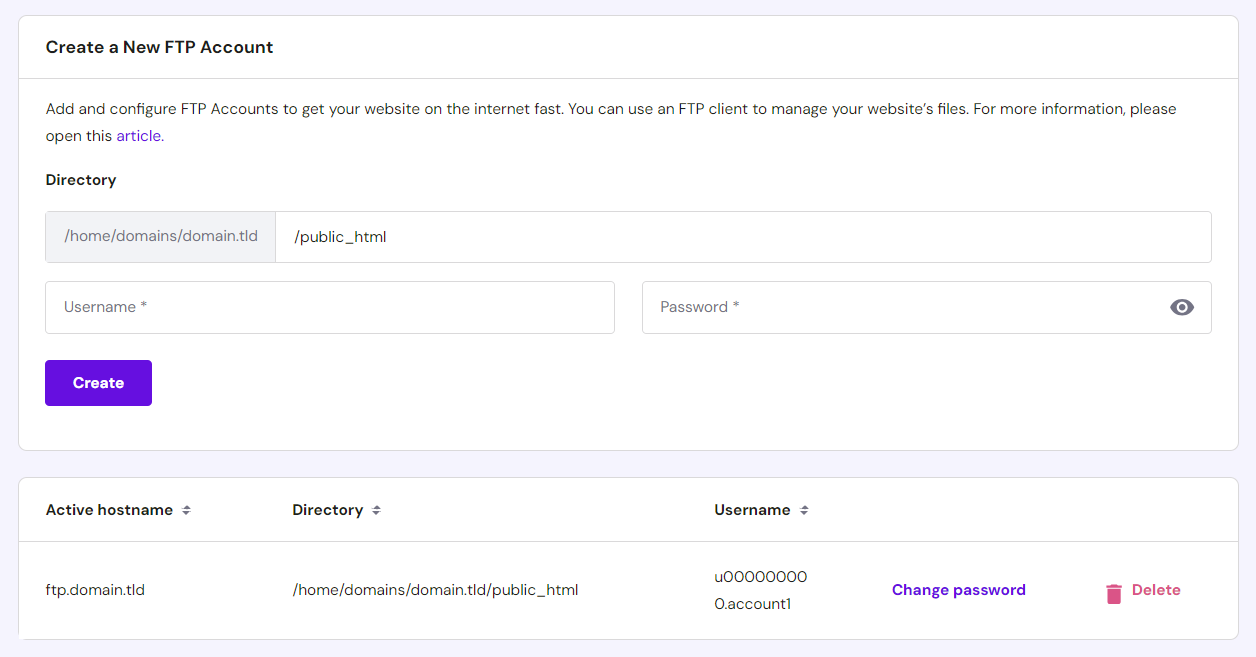
- Open an FTP client like FileZilla and connect to the FTP server using your web host’s details. Get Hostinger’s FTP details from Files → FTP Accounts in your hosting account.
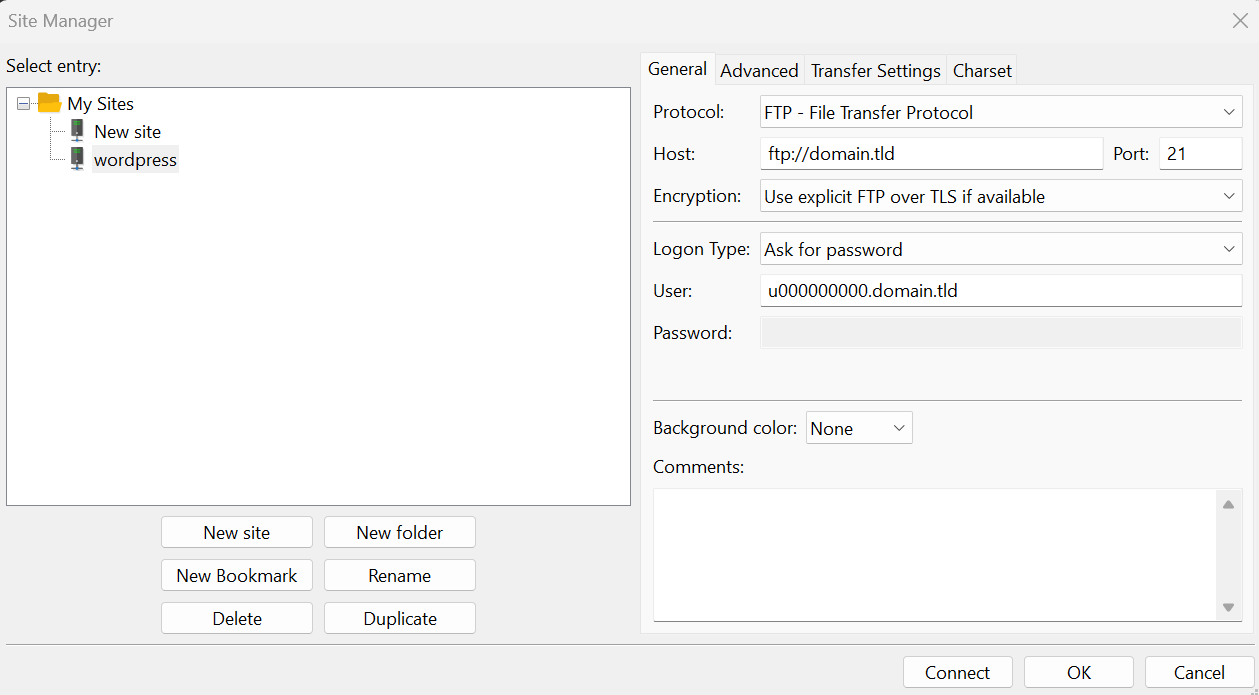
- Upload the extracted WordPress directory into the root directory (public_html).
Create MySQL Database and User
A database is the central storage hub for a website’s data. It stores all website essentials, including user info, site settings, and content like posts and pages. A database user has access and permission to interact with the database. MySQL is the database management system that WordPress uses.
Check out our guide if you want to learn how the WordPress database works and the best practices to manage it.
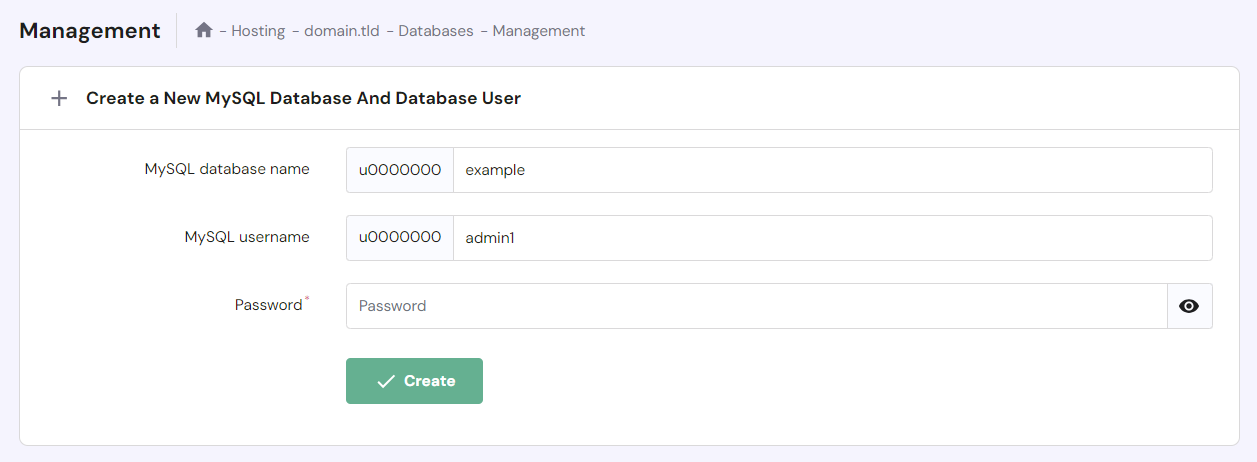
Follow these steps to create a database and user for your WordPress manual installation:
- Go to Databases → Management from hPanel.
- Enter the new MySQL database name, username, and password for your WordPress setup, then click Create. Make a note of your MySQL database details for later use.
Configure wp-config.php
wp-config.php is a core installation file that contains important settings, including the database name, username, password, and web server information. Configuring the wp-config file with your database connection details allows WordPress to access and interact with your newly created database.
Here are the steps to configure the wp-config file for your new WordPress installation:
- Access your root directory using a file manager or an FTP client.
- Open the WordPress folder containing the installation files. Locate the sample configuration file, wp-config-sample.php, and rename it to wp-config.php.

- Right-click on the file and select Edit. Once open, look for the following code snippet:
// ** MySQL settings - You can get this info from your web host ** //
/** The name of the database for WordPress */
define( 'DB_NAME', 'database_name_here' );
/** MySQL database username */
define( 'DB_USER', 'username_here' );
/** MySQL database password */
define( 'DB_PASSWORD', 'password_here' );
/** MySQL hostname */
define( 'DB_HOST', 'localhost' );
- Replace the database_name_here, username_here, and password_here values with your MySQL credentials. Remember to include the alphanumeric strings as they’re case-sensitive.
- Once you’ve finished editing, click Save.
Run the WordPress Install Script
Now that everything is set, you can start the WordPress installation process. Follow these installation instructions to set up your WordPress environment:
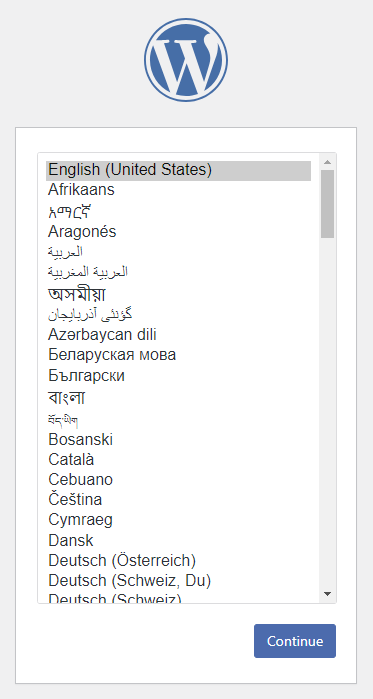
- Open a browser window and enter domain.tld/wp-admin/install.php or domain.tld/subdirectory_name/wp-admin/install.php if you uploaded WordPress to a subdirectory. This step runs the WordPress installation script.
- Choose a language for your new WordPress site, then click Continue.
- Enter the site title and set the username, password, and email address for logging in to the WordPress admin area. Check the Search engine visibility option if you don’t want search engines to index your WordPress site and make it visible in search results.

- Click Install WordPress to start the setup process.
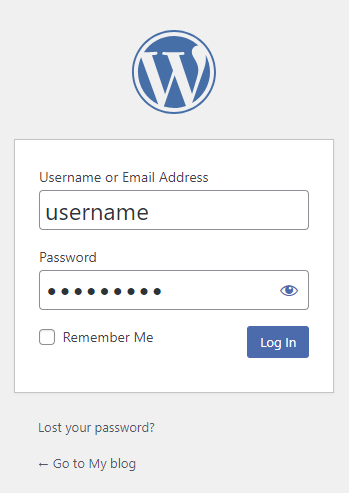
- Once you’ve finished installing WordPress, a popup will redirect you to the login page. Enter your credentials and hit Log In to access the admin dashboard.
Sometimes, WordPress might ask to collect your MySQL database information after selecting a language. Since you already have them, press Let’s go! and follow these instructions:
- Enter your MySQL database details, but leave the Database Host and the Table Prefix fields as they are. Only change them if you want to run multiple installations with one database. Click Submit.
- WordPress will check if it can connect to your WordPress database. After completing the verification process, select Run the installation.
Can I Install WordPress on a Local Computer?
Installing WordPress locally is a common practice for testing WordPress themes, plugins, and web designs without impacting the live website. Check out our guide for the WordPress installation steps on Windows and Mac operating systems.
Common WordPress Installation Problems
Installing WordPress can sometimes lead to errors, especially if you do it manually. This section will cover some of the common WordPress installation issues and provide solutions to resolve them.
Error Connecting to Database
The “Error Establishing a Database Connection” message indicates a database error that prevents your website from retrieving the necessary information to render the page. It’s usually caused by invalid database information or a corrupted database.
To fix the issue, verify the login credentials in wp-config.php and ensure they match your MySQL credentials.
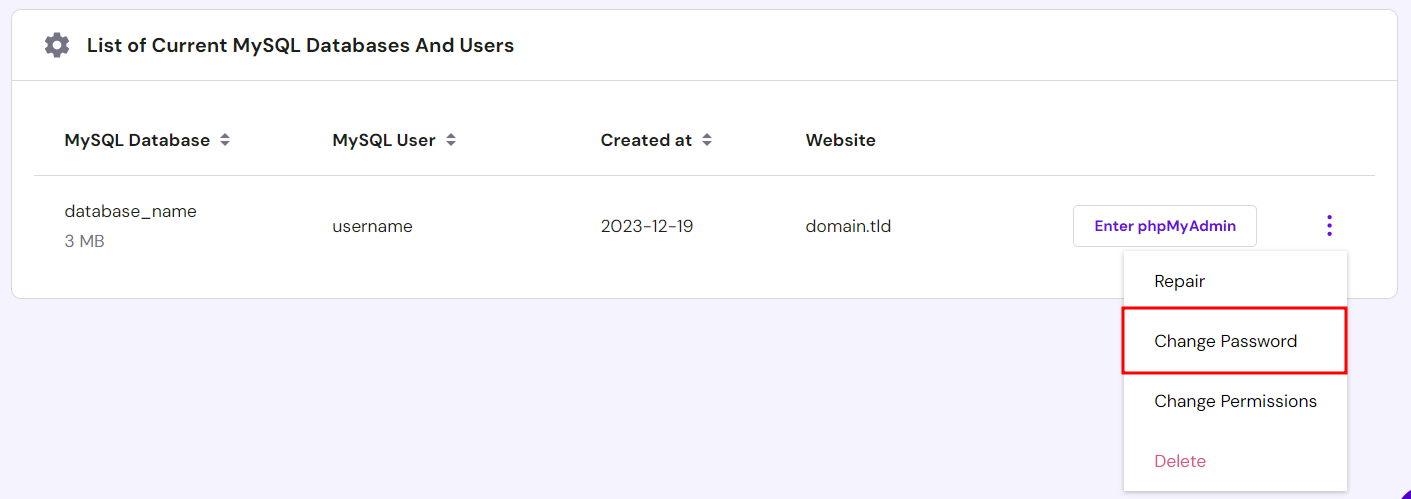
If you’re sure the database information is correct, reset your MySQL password. Head to Databases → Management on hPanel, click the three dots icon, and select Change Password.
If the error persists, remove the MySQL database and create a new one. Add the new database information to wp-config.php and retry the installation process.
WordPress White Screen of Death
The white screen of death is a common error where the browser window displays a blank white screen without any error message. Common causes include exceeded memory limits and corrupted core files, such as functions.php, wp-config.php, and .htaccess.
Here are several effective methods to troubleshoot this WordPress error:
- If you recently modified a core file, revert the changes and refresh the page. Alternatively, redownload and reupload the WordPress files to your hosting account.
- Increase the WordPress memory limit to ensure your website has enough PHP memory to execute tasks and handle traffic. Hostinger users can change the limit through Advanced → PHP Configuration from hPanel. Click the drop-down menu and select the highest value.

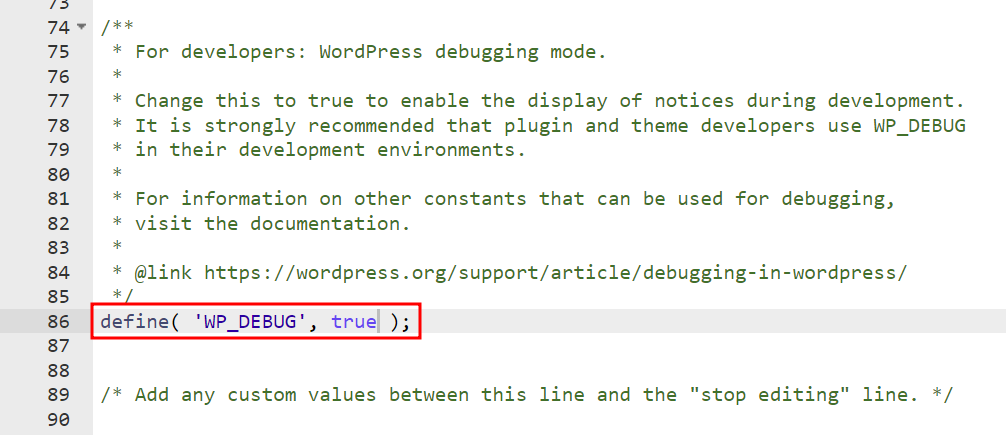
- Set WP_DEBUG in wp-config.php to true to enable debug mode. This WordPress feature shows site errors, warnings, and notices, helping you identify the issue.
Cannot Modify Header Information Error
This error typically occurs when there’s extra whitespace or characters before or after the PHP opening <?php and closing ?> tags in wp-config.php.
To fix this error, start by downloading the wp-config.php file. Open it in a text editor and check that the first line is <?php without any preceding whitespace or characters, and the last line is ?> with nothing after it. Hostinger users can edit the file directly using File Manager.
Once you’re done, save the file and re-upload it to your WordPress directory. Reload the website to see if the error is resolved.
The Website Shows a Directory Listing Instead of a Web Page
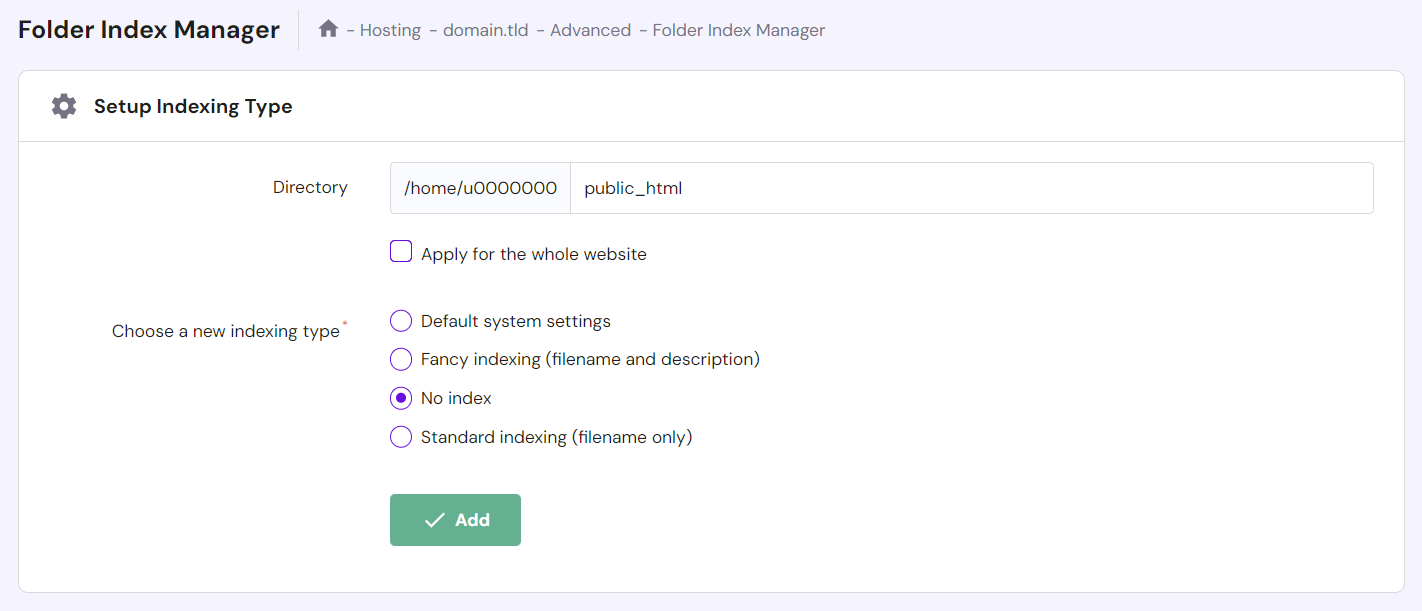
When your website shows a list of files and directories instead of the expected web page, it indicates that the web server can’t retrieve the index.php file as the default document.
Disable the directory listing to fix the issue. Head to Advanced → Folder Index Manager from hPanel and enter the public_html folder in the directory field. Set the indexing type to No index and click Add.
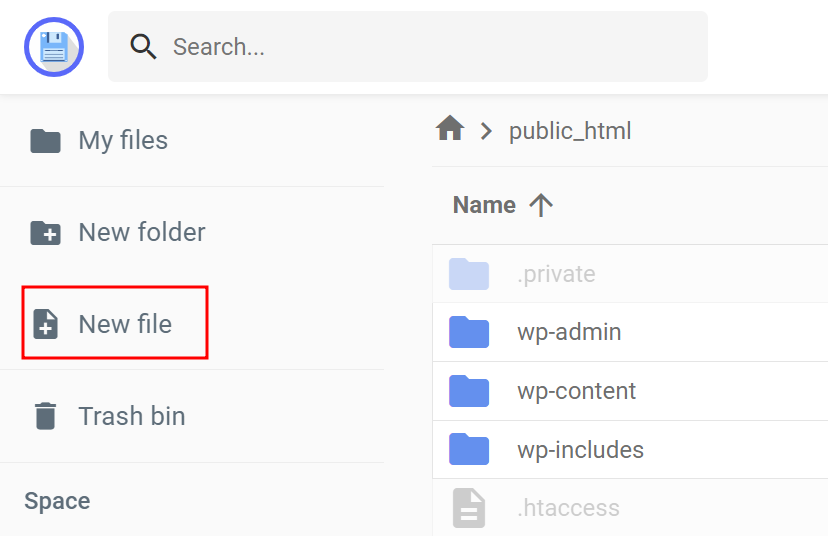
Alternatively, create a new index.php file in the public_html folder using File Manager’s file creation feature.
The WordPress Site Page Displays Code Instead
If your WordPress site shows raw PHP code instead of rendering content, it usually indicates an issue with PHP processing on your server. Incorrect PHP installation or configuration usually causes this error.
Apply these troubleshooting methods to fix this error:
- Make sure your hosting provider supports PHP. Avoid this issue entirely by getting WordPress hosting from Hostinger.
- Check the MySQL credentials in the wp-config.php file.
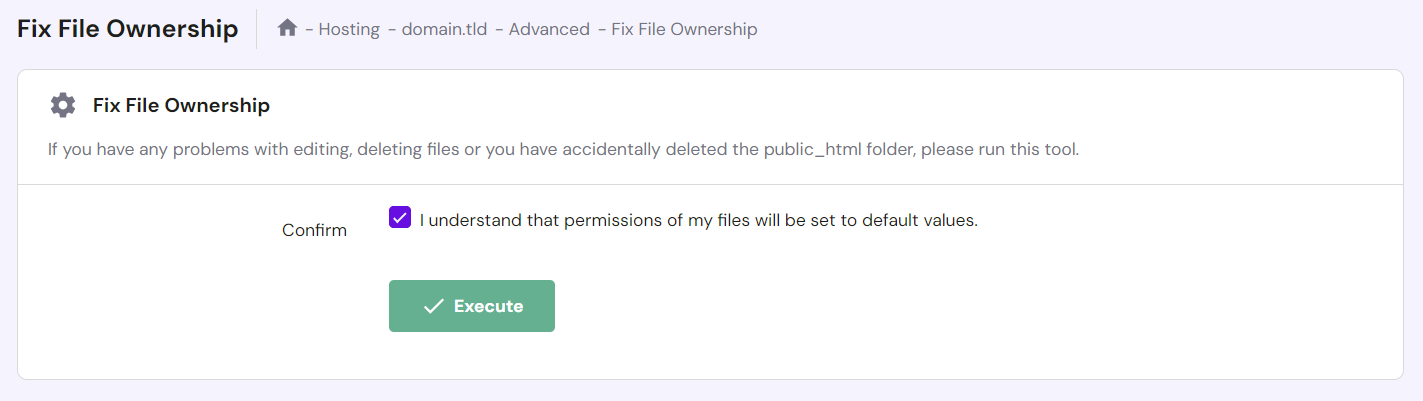
- Navigate to Advanced → Fix File Ownership from hPanel and set the files and folders to default permissions, which is 644 for files and 755 for folders. File permissions 644 let the owner read and write, while permissions 755 enable the owner to read, write, and execute the file or directory.
If the previous methods don’t resolve the error, our Customer Success team is ready to help. Our live chat support is available 24/7 via hPanel.
How to Install WordPress – Video Tutorial
Learn how to install WordPress and start your online journey with our video tutorial.

Conclusion
WordPress’ ease of use and flexibility are reflected in various aspects, including its installation methods. Users of all technical levels can leverage this powerful CMS without being hindered by the setup process.
Let’s recap the four effective ways to install WordPress in a shared hosting environment:
- Through the WordPress onboarding flow. The easiest method of the four, it is available for Hostinger users on Business and cloud hosting plans.
- Using hPanel’s Auto Installer. Ideal for Hostinger users who want to install WordPress on a subdomain or its older version.
- Using Softaculous. The best method for cPanel, Plesk, DirectAdmin, and InterWorx control panel users.
- Manually. Involves more steps but offers full control over the installation procedure, ideal for testing and setting up a local website.
We hope this article eases your WordPress installation journey. Read our FAQ section or leave a comment if you have any questions. Good luck!
How to Install WordPress FAQ
This section will answer common questions about installing WordPress.
Why Should I Choose WordPress?
WordPress is free and easy to use, catering to users of all technical levels. Its vast selection of plugins and themes makes the CMS extremely flexible and powerful. While WordPress has a learning curve, plenty of tutorials are available due to its popularity.
Is WordPress Free?
Yes, WordPress.org is a free, open-source CMS. However, you still need hosting and a domain name to launch a WordPress website and make it available online.
How Do I Install WordPress?
Hostinger users can follow the WordPress onboarding flow or use the built-in auto installer in their hPanel. Alternatively, use Softaculous in other hosting control panels or manually install WordPress by uploading the core files to your hosting account and running the installation script on a browser.
Do I Need to Install WordPress On My Computer?
You don’t have to install WordPress on your computer, but it’s great for learning and testing features before pushing your updates to the live website. For general use, you just need to install WordPress on a hosting account.

Jordana is a Senior Content Writer with a background in Information Systems. She has over five years of experience in WordPress and is casually dabbling with PHP and MySQL. Her passion for writing and technology drives her to create tutorials for anyone wanting to build their online presence. Follow her on LinkedIn.

Marco Chiesi is the Head of WordPress at Hostinger, with over 20 years of experience as a software engineer in the web industry. He specializes in open-source technologies and the WordPress ecosystem, where he has contributed in different areas: Plugin Developer (with over 10 million downloads), WordCamp speaker and organizer, Meetup organizer, Translator, and Core Contributor. He is passionate about leading his team to create innovative solutions for Hostinger's web hosting product, which hosts over 5 million WordPress installations. Follow him on LinkedIn.