How to make a Minecraft server: setting up a server on Linux, Windows, and macOS
May 07, 2026
/
Aris S. & Valentinas C.
/
9 min Read
Running a private Minecraft server lets you create a custom world and play with your friends online. What’s better than that? Although setting up a Minecraft server may seem daunting at first, it only takes minutes with the right tools.
Using a virtual private server (VPS) is the easiest way to set up a Minecraft server. This article will cover how to make a Minecraft server with Hostinger, specifically focusing on Minecraft: Java Edition.
Additionally, it will cover how to create a local Minecraft server on different operating systems and avoid common errors during the initial setup process.
Video tutorial on how to make a Minecraft server
Watch this video to learn how to create your own Minecraft server.

TL;DR
- To make a Minecraft server, choose Hostinger VPS with Game Panel for a no-command setup or configure the server manually on Linux, Windows, or macOS.
- The Game Panel method involves choosing a hosting plan, setting up the VPS, creating a Minecraft Java Edition instance, accepting the EULA, and copying the connection endpoint.
- Manual setup requires Java, the Minecraft server JAR file, EULA acceptance, a startup command or script, and troubleshooting for connection or whitelist errors.
How to make a Minecraft server on Hostinger VPS
In this section, we will show you how to make a Minecraft server on Hostinger’s virtual private server (VPS) using Game Panel. We recommend this method for beginners since it requires no commands.
1. Choose a Minecraft hosting plan
Purchasing Minecraft server hosting will save you money and time. The hosting provider will set up your server, manage its back end, and ensure optimal uptime, allowing you to focus on the in-game configuration.
When choosing a hosting provider, make sure it offers various features and suits your budget. Hostinger offers four Minecraft server hosting plans with these features starting at CA$ 9.09/month:
- Abundant server resources. Get up to 32 GB of RAM and 8 vCPU, enough to support over 20 players.
- Robust security features. Protect your Minecraft server from cyber attacks with robust security tools, like built-in Distributed denial of service (DDoS) protection and the Monarx automatic malware scanner.
- Free weekly backups. Enjoy automatic Minecraft server backups to ensure data safety in case of cyber attacks or accidents.
- Custom Game Panel. Use various tools and a graphical user interface (GUI) to help simplify Minecraft server management tasks, including installing mods.
- Global data center. Choose from multiple server locations across the globe. A server close to your location ensures minimal latency and responsive gameplay.
- Kodee AI assistant. Ask for commands, code, or instructions for Minecraft server administration using simple prompts.

2. Set up your Minecraft hosting
After purchasing a plan from Hostinger, set up your virtual private server by going to hPanel → VPS and selecting your new Minecraft server hosting plan.
Enter information including your server name, Game Panel password, and preferred server location. We recommend choosing the server location closest to your player base.
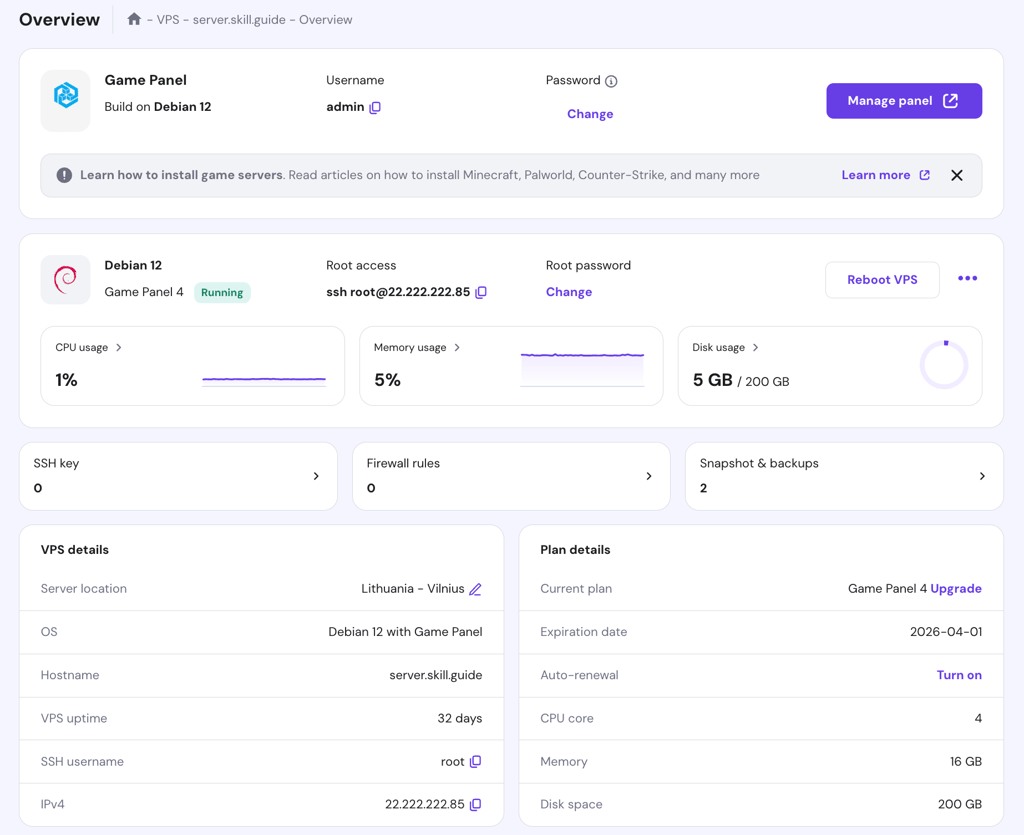
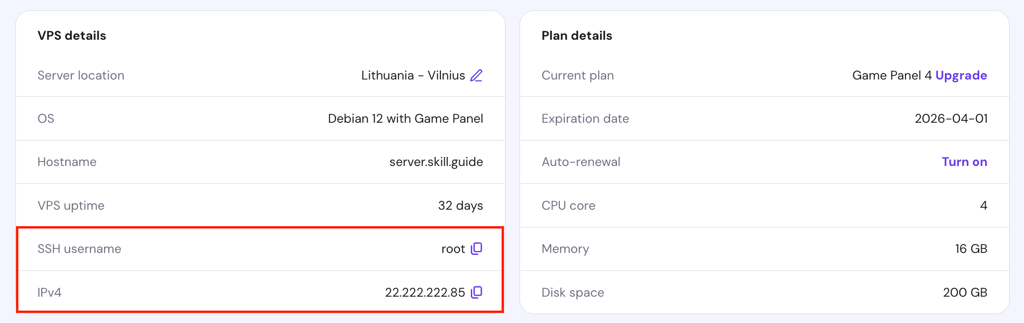
Then, access your server via the VPS Overview page. You can view information like server resource usage, operating system, panel access, IP address, and SSH login credentials.
3. Configure your Minecraft Game Panel
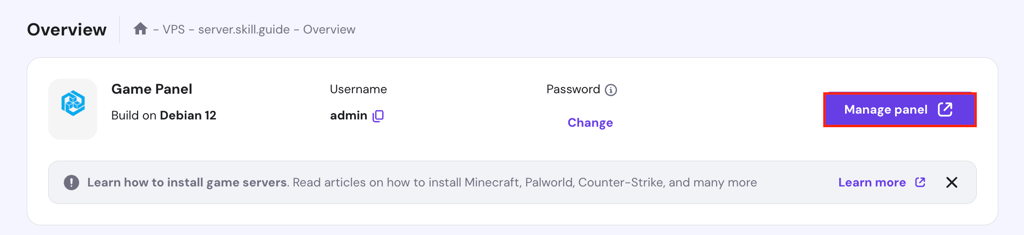
To configure the Minecraft server in Game Panel, open the same Overview page. Click the Manage panel button and enter your login credentials.
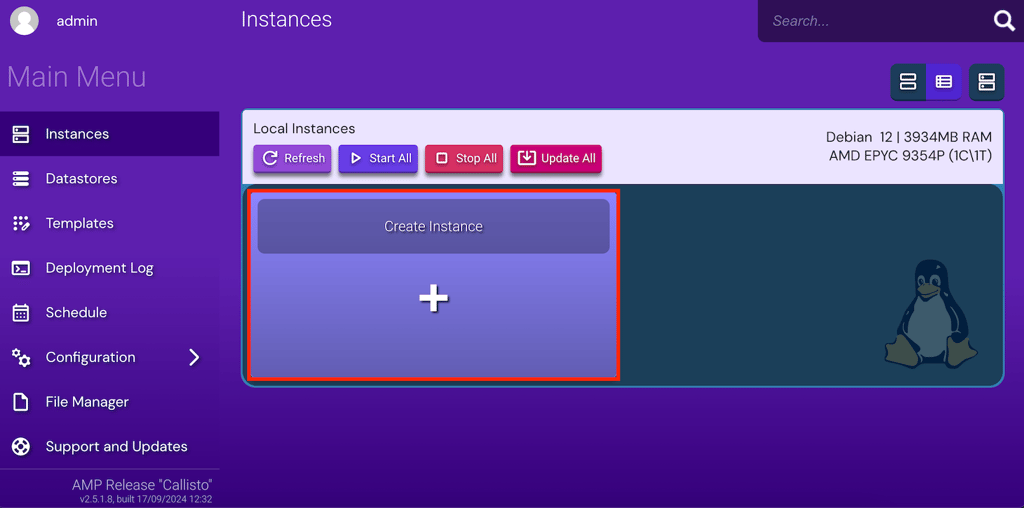
On the main menu, follow these steps:
- Click Create Instance.
- Select Minecraft Java Edition from the drop-down menu. Game Panel will set up the version for this game, which is 1.21 Tricky Trials.
- Select the default instance behavior from the After Creation section.
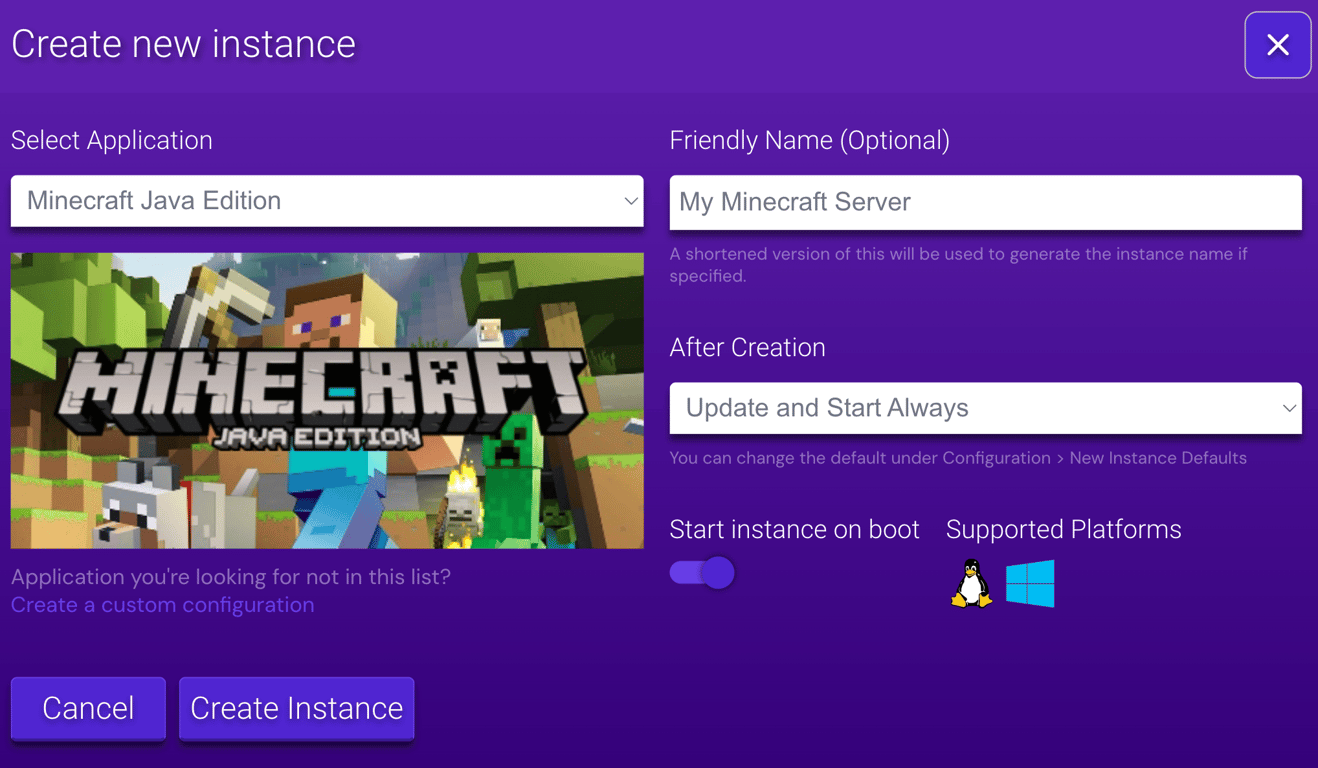
- Click Create Instance and wait a few moments until the new instance shows up. It’s normal for the server to show an “Error Running” message at first because we haven’t accepted Minecraft’s license agreement yet.
- Select Manage, then click Accept on the Minecraft Server EULA pop-up.
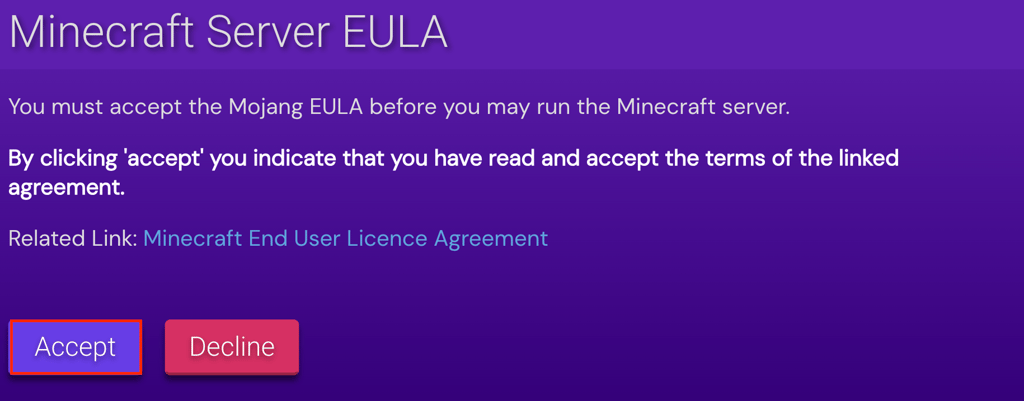
- The instance will start running. Copy the endpoint from the Connection Info section.
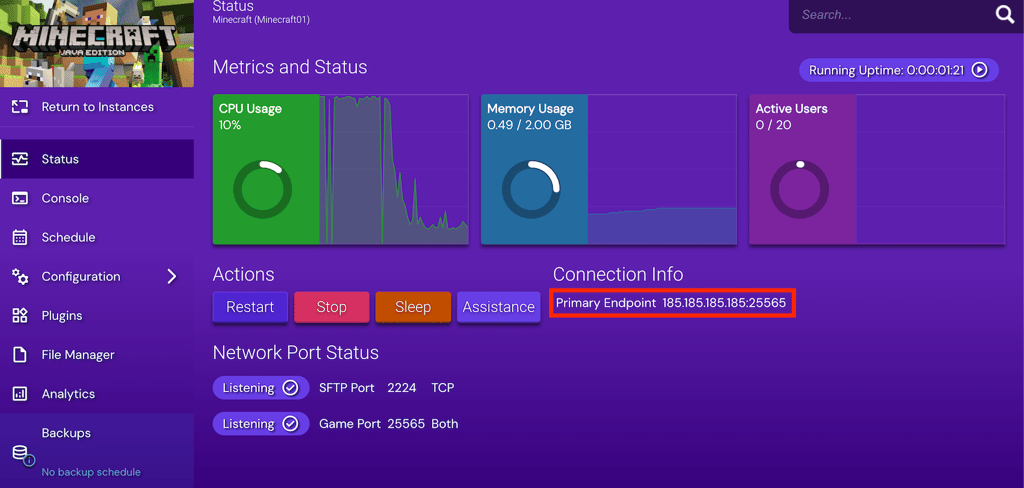
- Start inviting your friends to join the server by using the above credentials.
Using the same steps, you can also host other games with dedicated servers on your Hostinger Game Panel. You can set up multiple titles on one VPS as long as you have enough computing resources.
4. Enhance your Minecraft server
Before playing Minecraft, consider taking additional steps to enhance your server.
For example, enable port forwarding to allow users outside your network to join the game using the public IP address. However, we recommend deactivating it if you are playing on a local network since it exposes your server to security risks.
Another tip is installing Minecraft mods to improve the overall gameplay experience. Many Minecraft mods are available for all sorts of different upgrades and adventures, including boosting performance, adding new mobs, and modifying game mechanics.
How to make a Minecraft server on a Linux VPS
This section will show you how to manually create a Minecraft multiplayer server on different Linux distributions. If you want to learn more about what each command does, we recommend downloading the following cheat sheet or asking our Kodee AI assistant.

1. Install Java, Screen, and wget
Java, Linux Screen, and wget are essential software for your Minecraft server installation. Here are their functions:
- Java – runs Minecraft and the server JAR files.
- Screen – maintains remote terminal sessions in case of connectivity issues to keep the Minecraft server running in the background.&;
- wget – retrieves files from a remote server via a terminal.
If you use Hostinger’s VPS, obtain the server IP address and SSH login credentials via hPanel. Then, connect to your remote server via SSH using PuTTY or Terminal and proceed with the installation.
Debian and its derivatives
If you use Debian or its derivatives like Ubuntu, download and install the latest version of Java, Screen, and wget using these commands. While you can use different Java runtime environments, we will use OpenJDK since it’s the simplest to install:
apt update
apt install software-properties-common screen wget apt-transport-https gnupg
wget https://download.oracle.com/java/21/latest/jdk-21_linux-x64_bin.deb
deb -i install jdk-21_linux-x64_bin.deb
Red Hat Enterprise Linux (RHEL) and its derivatives
Run the following commands to install all the required software packages in a RHEL-based operating system, like CentOS or AlmaLinux:
dnf update
dnf install epel-release
dnf install screen wget
wget https://download.oracle.com/java/21/latest/jdk-21_linux-x64_bin.rpm
dpkg -i --nosignature jdk-21_linux-x64_bin.rpm
2. Configure the Minecraft server
After installing the packages, follow these steps to set up the game server:
- Run this command to create a new folder for your Minecraft server configuration files:
mkdir minecraft
- Enter this command to move to the Minecraft server folder:
cd minecraft
- Use wget to download the server setup file from the Minecraft website:
wget https://piston-data.mojang.com/v1/objects/59353fb40c36d304f2035d51e7d6e6baa98dc05c/server.jar
- Use this command to run the Minecraft server software setup file. Omit nogui if you want a GUI. If the command doesn’t work, change the file name to server.jar:
java -Xmx1024M -Xms1024M -jar server.jar nogui
- The server will create an EULA file. To accept it, run this command to open the eula.txt file with the Nano text editor:
nano eula.txt
- Modify the eula value from false to true and save the changes.
- Activate Screen to allow the server to run in the background.
screen -S "Minecraft server 1"
Important! Make sure your Minecraft installation matches the server version. In our case, it is 1.21.x.
3. Run your Minecraft server
Enter this command to run the Minecraft: Java Edition server. Remember to change the Minecraft version number accordingly.
java -Xmx1024M -Xms1024M -jar minecraft_server.1.21.jar nogui
We entered 1024M since the server requires at least 1024 MB or 1 GB of RAM. Feel free to change the number according to your server resource.
The server window will remain open in the background. Press CTRL + A, then D to leave Screen. Enter the following in the server command line to reopen it:
screen -r
We recommend using the default server configuration to avoid issues. If you want to modify it, run the following to open the server properties file with Nano:
nano ~/minecraft/server.properties
Minecraft players can join the server via Multiplayer → Add server. Then, enter the server name and public IP address.
How to make a Minecraft server on a personal computer
If you don’t want to manage another system, you can set up a Minecraft server on your personal computer as long it meets the minimum hardware requirements. In this section, we will explain how to do so on Windows and MacOS.
How to set up a Minecraft server on Windows
Here’s how to set up a basic server on Windows:
- Press Win + R and enter cmd to open Windows Command Prompt. Then, run this command to check the currently installed Java version:
java -version
- Minecraft and its servers require Java SE Development Kit 21 or higher. If you have an older release, download the latest version from the official Java website.
- Download the Minecraft: Java Edition JAR server software.
- Create a new Minecraft server folder and move the JAR file there.
- Double-click the file to generate an EULA in the server folder.
- Open eula.txt using a text editor like Notepad and change the eula value from false to true. You must accept the Minecraft EULA to start the game.
- In the same folder, create a new text document.
- Open the new text file and paste this script to run Minecraft. -Xms256M and -Xmx1G are the server’s minimum and maximum RAM for the game.
@echo off
start "My Server" /min java -Xms256M -Xmx1G -jar server.jar nogui
- Choose Save As. Rename the file to run.bat and select All types.
- Double-click the batch file to start the server. If the firewall permission window pops up, click Allow.
You can run the server manually instead of using the BAT file. To do so, open Command Prompt and navigate to the Minecraft folder. For example:
cd Documents/Minecraft
Then, run the command manually to execute the server JAR file:
java -Xmx256M -Xms1024M -jar server.jar nogui
If you want to change the server settings, like the default Minecraft port, game mode, and maximum player slots, edit the server.properties file in the same folder.
To connect to the server, open Minecraft and click Multiplayer → Direct Connection. Enter localhost or your server’s local IP address in the Server Address field and click Join Server.
If you are joining the server from another device, enter your Windows server IP address. To find out the value, enter ipconfig /all in Command Prompt and check the IPv4 address.
How to make a Minecraft server on macOS
Setting up a Minecraft server in macOS involves steps similar to those in Windows. Here’s how to do it:
- The newer macOS version should have Java installed by default. To check if it’s already installed, run this command in Terminal:
java -version
- Skip this step if the command outputs the version number. Otherwise, download and install a legacy version of Java.
- Create a folder for your Minecraft server files.
- Download and move the Minecraft server setup file to that directory.
- Open TextEdit and click Format → Make Plain Text. Copy and paste the following lines:
!/bin/bash
cd "$(dirname "$0")"
exec java -Xms1024M -Xmx1024M -jar server.jar nogui
- Save this file as startmc.command in the same directory as the server file.
- Open Terminal and navigate to your Minecraft folder. For example:
cd Documents/MinecraftServer
- Change the file permissions using the chmod command to make startmc.command executable:
chmod a+x startmc.command
- Double-click the COMMAND file to start the server in a new terminal window.
A missing file or directory warning might appear when you run a Minecraft server for the first time. You can ignore them since the launch command should automatically download them.
If the script fails to download the missing files or folders, try fetching them manually. Alternatively, reinstall the Minecraft server component.
Minecraft server troubleshooting
Configuration and internet connection issues may cause Minecraft server errors. Here are some of the most common problems and their solutions.
How to fix “This server responded with an invalid server key” error
This Server Responded With An Invalid Server Key indicates that the server or the Minecraft launcher might be outdated. If it’s your server, try accessing the localhost address and restarting the client.
Since this error commonly occurs when starting the server using the EXE file, try the JAR file instead.
How to fix “you are not whitelisted on this server” error
A whitelist includes the list of players with access to the server. The You Are Not Whitelisted On This Server error means that the server operator hasn’t included the player in the whitelist.
To solve it, run the following command to enable the Minecraft server whitelist management.
whitelist on
Then, add the player to the whitelist. Replace playername with their username.
whitelist add playername
Here’s the command to see the list of players on the whitelist:
whitelist list
If you want to use these server commands in-game, add a slash symbol at the beginning. Here’s an example:
/whitelist add playername
How to fix “Connection refused connect” error
The Connection Refused: Connect error message appears when Minecraft servers drop or cancel users’ connection requests. Here are several solutions for this error:
- Join the server via a different internet connection. Your internet issue may prevent you from connecting. If the problem persists after reconnecting, it’s likely a server error.
- Add Minecraft and the game launcher to the firewall exception list. The system firewall may block your connection. Configure your Linux firewall to allow the Java binary or javaw.exe.
- Reinstall your client and restart the server. Check if you can connect to other Minecraft servers. If there are no issues, your own client and server may be misconfigured and must be reinstalled.
Conclusion
Hosting your own server lets you design a unique Minecraft world and enjoy online adventures with friends. The easiest way to do this is by getting a VPS from a hosting service like Hostinger. Here’s a quick guide on setting up a server using the Hostinger Game Panel.
- Choose a Minecraft server hosting plan.
- Enter your server name, set a password, and select the closest server location.
- Open the Game Panel and create a new instance.
- Configure the instance and copy the endpoint to connect to the server.
Alternatively, create the server on the Linux VPS manually via SSH. However, this option takes longer and requires slightly more technical knowledge.
You can also make your own server on your own Windows or macOS personal computer. To do so, install Java and the Minecraft server file using the terminal emulator of your choice. Then, create an executable file to start the server.
Enabling your Minecraft server port forwarding and installing mods will improve the overall gameplay experience. You can also need to reconfigure the server to troubleshoot issues like invalid keys, whitelisting errors, and refused connections.
How to make a Minecraft server FAQ
How can I limit access to my server to only my friends?
You can set up a whitelist that includes only your friends. Alternatively, disable port forwarding and keep the server’s IP address private among your friends.
How do I protect my Minecraft server against DDoS attacks?
Choose a web host with built-in DDoS protection in their server, such as Hostinger. Alternatively, get a DDoS protection service from a third-party company like Cloudflare.
Can I run a Minecraft server for free?
Yes. However, free Minecraft hosting plans tend to have limited server hardware resources and features, resulting in a poor gameplay experience. Self-hosting your own Minecraft server costs less than using a third-party service, but it requires some technical knowledge.

Aris is a Content Writer specializing in Linux and WordPress development. He has a passion for networking, front-end web development, and server administration. By combining his IT and writing experience, Aris creates content that helps people easily understand complex technical topics to start their online journey. Follow him on LinkedIn.

Valentinas Čirba, Hostinger's Head of VPS, is a seasoned product leader specializing in VPS products with over ten years of experience. He's an expert at setting product strategy, leading cross-functional teams, and making smart decisions to deliver innovative solutions. Valentinas is committed to creating products that not only meet business objectives but also truly serve the customer. Follow him on LinkedIn.