How to change font size in WordPress: 4 methods
Oct 14, 2026
/
By Leonardus N.
/
5 min Read
To change the font size in WordPress, select a text block and adjust its size under Typography in the block editor. You can choose a preset size or enter a custom value without installing a plugin.
For site-wide changes, the method depends on your WordPress theme. Block themes let you adjust typography through Appearance → Editor → Styles, while classic themes may offer font settings in the Customizer or require custom CSS.
You can also use the Advanced Editor Tools plugin if you prefer the Classic Editor. The following methods cover individual text changes, site-wide font sizes, and plugin-based customization.
How to change font size in the WordPress block editor
The WordPress block editor lets you change the font size of individual text blocks without installing plugins or writing CSS. You can choose from preset sizes or enter a custom value for paragraphs, headings, and other supported blocks.
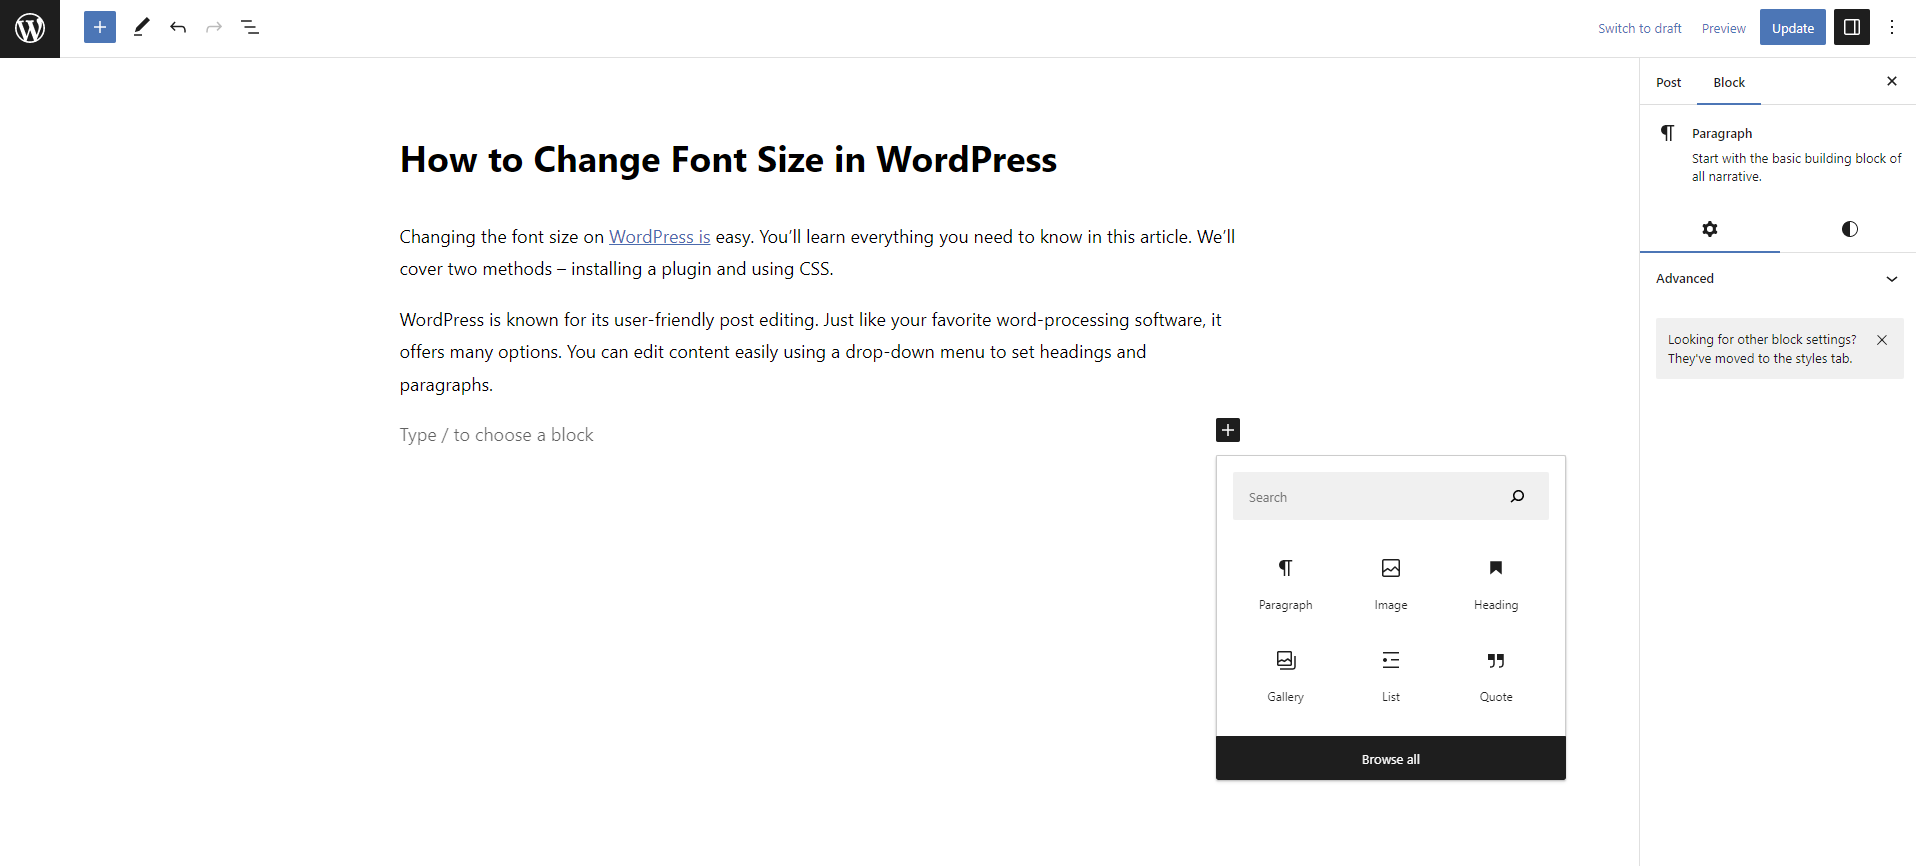
To change font size using the WordPress block editor:
To change font sizes using the Gutenberg editor, follow these easy steps:
1. Open your WordPress dashboard and navigate to Posts or Pages. Select an existing page or post to edit, or create a new one.
2. Click the Paragraph or Heading block whose font size you want to change.
3. Open the Settings sidebar in the upper-right corner if it isn’t already visible, and select the Block settings.
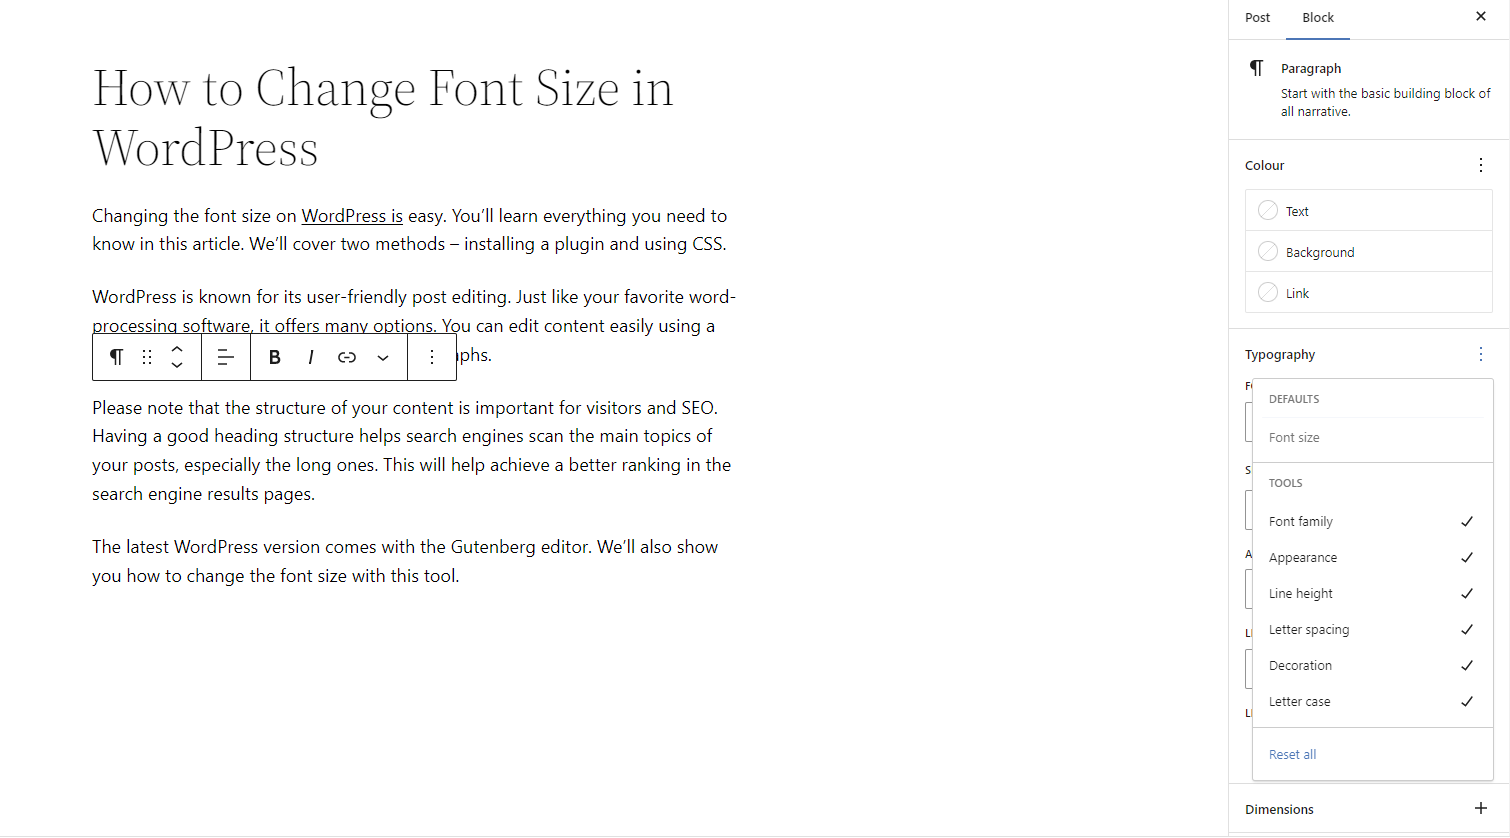
4. Find the Typography section. If Font size isn’t visible, click the three-dot menu next to Typography and enable it.

5. Under Font size, choose a preset size such as Small, Medium, Large, or Extra Large. To enter a custom value, switch to the custom size control and specify a value using px, em, or rem.

6. Preview your changes, then click Save or Update to apply the new font size.
The change applies to the selected block rather than every paragraph or heading on your website. For consistent font sizes across multiple pages, adjust your theme’s global typography settings instead.
Available font size presets and controls may vary depending on your WordPress theme and the selected block.
How to change font size across your WordPress website
To change font sizes across your entire WordPress website, use your theme’s typography settings. This lets you apply consistent font sizes to headings, paragraphs, and other text elements without editing each page individually.
The method depends on your WordPress theme:
- Block themes: Use Appearance → Editor → Styles to manage site-wide typography.
- Classic themes: Use Appearance → Customize if your theme provides typography controls, or apply custom CSS.
Change font size using the WordPress Site Editor
Block themes let you customize font sizes across your website using the built-in Site Editor.
Follow these steps:
- Open your WordPress dashboard and navigate to Appearance → Editor.
- Open Styles, then select Typography.
- Choose the element you want to customize, such as Text or Headings.
- Adjust the font size using the available presets or enter a custom value. You can also configure individual heading levels, such as H1 and H2.
- Preview your changes and click Save to apply them across your website.
You can also use Styles → Blocks to configure typography for specific block types, such as Paragraph or Heading, throughout your website.
These settings help maintain consistent typography without changing individual blocks. However, existing blocks with custom font sizes may override your global settings.
Change font size using a classic WordPress theme
Classic WordPress themes may provide typography settings through the Theme Customizer, although the available options depend on the theme.
To check your theme’s settings:
- Navigate to Appearance → Customize in your WordPress dashboard.
- Look for a Typography, Fonts, or similar section.
- Adjust the available font sizes and preview your changes.
- Click Publish to save your settings.
If your theme doesn’t include typography controls, you can change font sizes using custom CSS, as explained in the following section.
How to change font size in WordPress using CSS
Custom CSS lets you change font sizes across your WordPress website when your theme’s built-in typography settings don’t provide enough control. You can target specific elements, such as paragraphs, headings, or sidebar text, without editing each page individually.
The steps depend on your theme:
- Classic themes: Navigate to Appearance → Customize → Additional CSS.
- Block themes: Navigate to Appearance → Editor → Styles, open the three-dot menu, and select Additional CSS.
- Add your CSS rules to the editor and preview the changes.
- Click Publish or Save, depending on your editor, to apply the changes.
For example, you can adjust paragraph and heading font sizes using the following CSS:
p {
  font-size: 1.125rem;
}

h2 {
  font-size: 1.75rem;
}
The first rule sets paragraph text to 1.125 times the root font size, while the second sets H2 headings to 1.75 times the root font size.
CSS supports several font-size units:
- Pixels (
px): A fixed CSS unit that doesn’t scale with the parent element’s font size. - Root em (
rem): Relative to the root element’s font size, making it useful for consistent typography. - Em (
em): Relative to the inherited font size, allowing text to scale with its context. - Percentages (
%): Define font size relative to the parent element’s font size.
For most websites, rem is a practical choice for consistent font sizing. You can also use CSS media queries to adjust text sizes for different screen widths.
Keep in mind that theme styles or custom settings on individual blocks may override your CSS rules. For more advanced customization, adding custom CSS to WordPress lets you control specific elements and layouts without modifying your theme’s original files.
How to change font size using Advanced Editor Tools
Advanced Editor Tools, formerly TinyMCE Advanced, is a WordPress plugin that adds formatting options to the Classic Editor and Classic blocks. It lets you change text sizes using a toolbar rather than writing custom CSS.
This method is useful if you prefer the Classic Editor or need additional formatting controls for individual paragraphs.
To change font size using Advanced Editor Tools:
1. Install and activate the plugin from your WordPress dashboard.
2. Open the plugin’s settings and configure the toolbar for the Classic Editor or Classic Paragraph block. Make sure the Font Sizes dropdown is enabled.
3. Open an existing post or page, or create a new one.
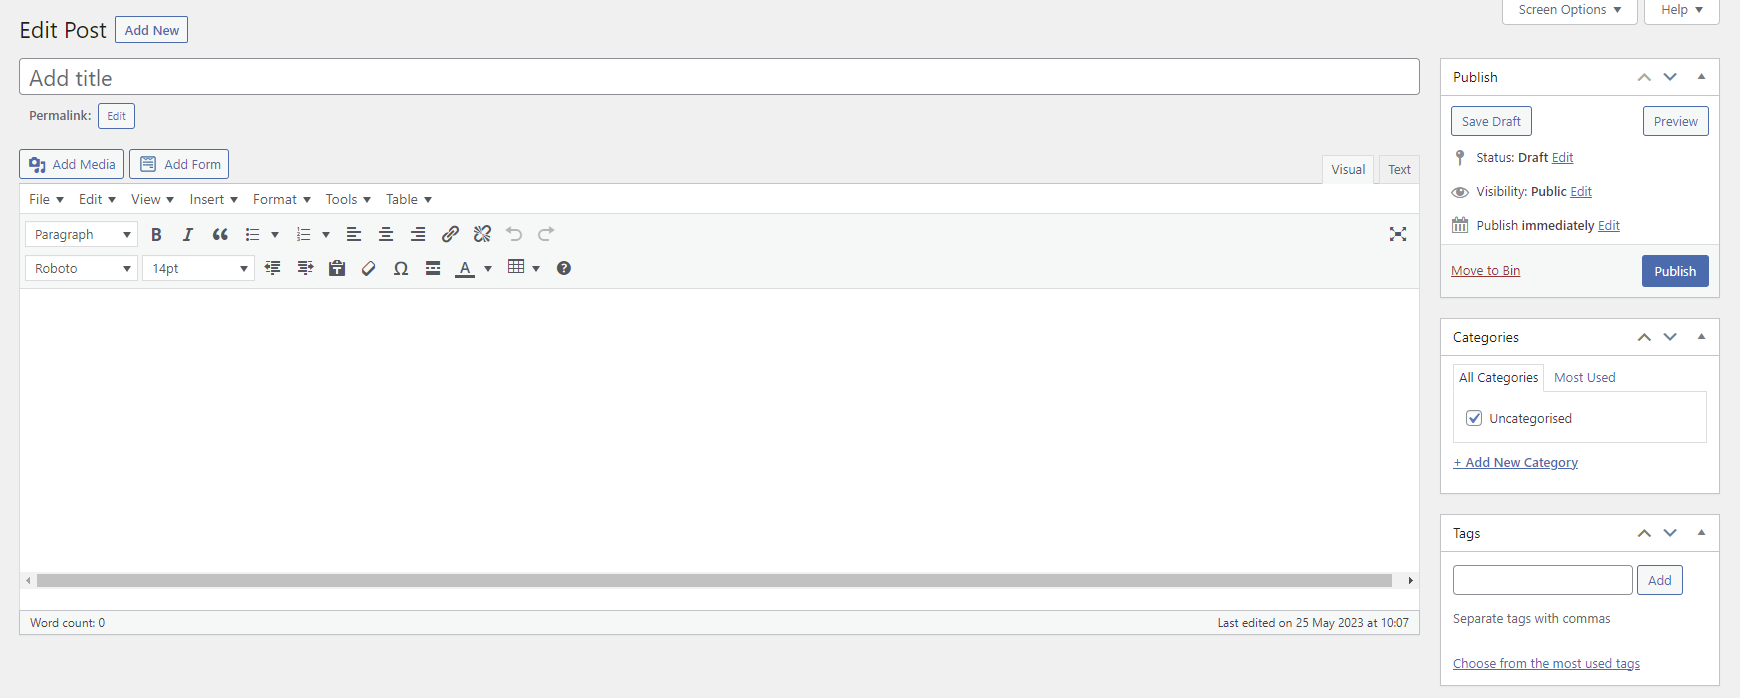
4. Select the text you want to resize in the Classic Editor or Classic Paragraph block.
5. Choose your preferred size from the Font Sizes dropdown.
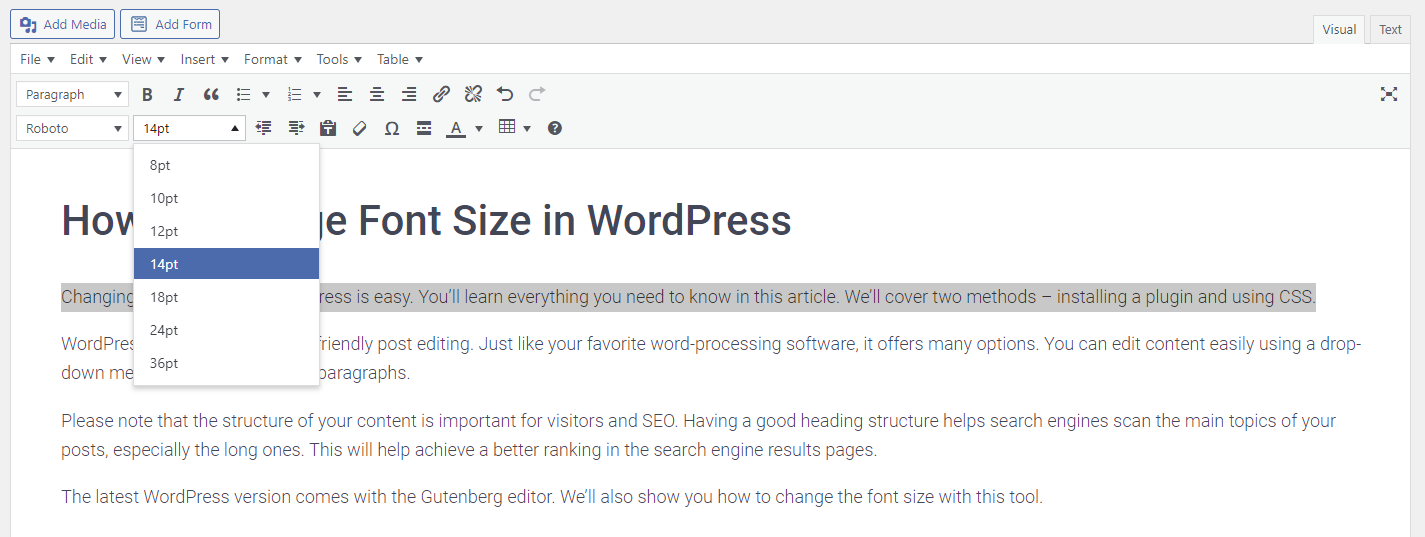
6. Preview your changes and click Update or Publish to save them.
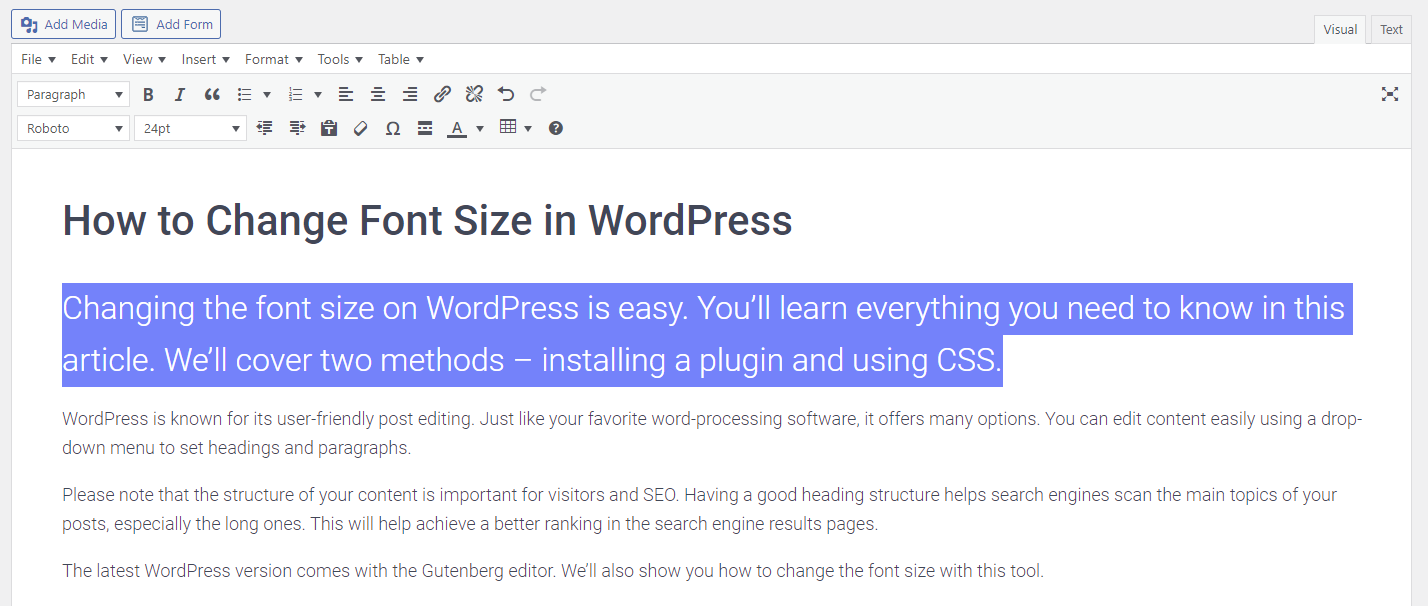
Advanced Editor Tools also supports other text formatting options, including font families and colors. However, these changes apply only to the selected content, not to your entire website.
If you’re using the default WordPress block editor, you don’t need this plugin to change font sizes. The built-in Typography settings provide that functionality.

How to make your WordPress typography consistent
After changing your WordPress font sizes, check that your text remains readable and consistent across different pages and screen sizes. Typography settings that look good on desktops may need adjustments for mobile devices.
Before finishing, take these steps:
- Review your main pages. Check that headings, paragraphs, and other text elements follow a consistent size hierarchy.
- Test mobile readability. Preview your website on smaller screens to ensure text is comfortable to read without horizontal scrolling or unnecessary zooming.
- Check global typography settings. Make sure individual block adjustments don’t conflict with your theme’s site-wide styles.
Font size is only one part of website typography. If your current typeface doesn’t suit your website, you can also add custom fonts to WordPress to create a more consistent design.
This article is a localized version of How to change font size in WordPress: 4 methods, originally published in English.

Leo is a Content SEO Specialist and WordPress contributor. Armed with his experience as a WordPress Release Co-Lead and Documentation Team Representative, he loves sharing his knowledge to help people build successful websites. Follow him on LinkedIn.