How to start a craft business in 8 steps
Aug 26, 2026
/
By Ariffud M. & Miglė C.
/
10 min Read

To start a craft business, choose a niche, develop a small product range, build a brand, register your business, choose sales channels, set prices, photograph your products, and market them.
If you’re starting from scratch, test demand before buying supplies in bulk. Keep your first product range small so you can learn what customers want without investing too much upfront.
You can sell your crafts through your own online store, marketplaces, craft fairs, farmers’ markets, pop-up events, local retailers, or a mix of these channels.
Follow these eight steps to start your craft business:
- Choose your craft niche. Decide what you want to make, who you want to sell to, and whether there’s enough demand for your products.
- Develop your craft products. Create prototypes, test their quality, collect feedback, and make sure you can produce each item consistently.
- Build your craft brand. Create a name, brand positioning, visual identity, packaging, and tone that fit your products and target customers.
- Register your craft business. Choose a suitable business structure, complete the required registrations, set up taxes and banking, and obtain any necessary licenses and insurance.
- Choose where to sell your crafts. Compare options such as your own online store, marketplaces, craft fairs, farmers’ markets, pop-up events, and local retailers.
- Price your craft products. Factor in materials, labor, packaging, overhead costs, selling fees, and your desired profit.
- Photograph your craft products. Take photos that clearly show each product’s appearance, details, size, and how customers can use it.
- Market your craft business. Reach potential customers through social media, Pinterest, video content, email marketing, local events, customer reviews, and useful content.
1. Choose your craft niche
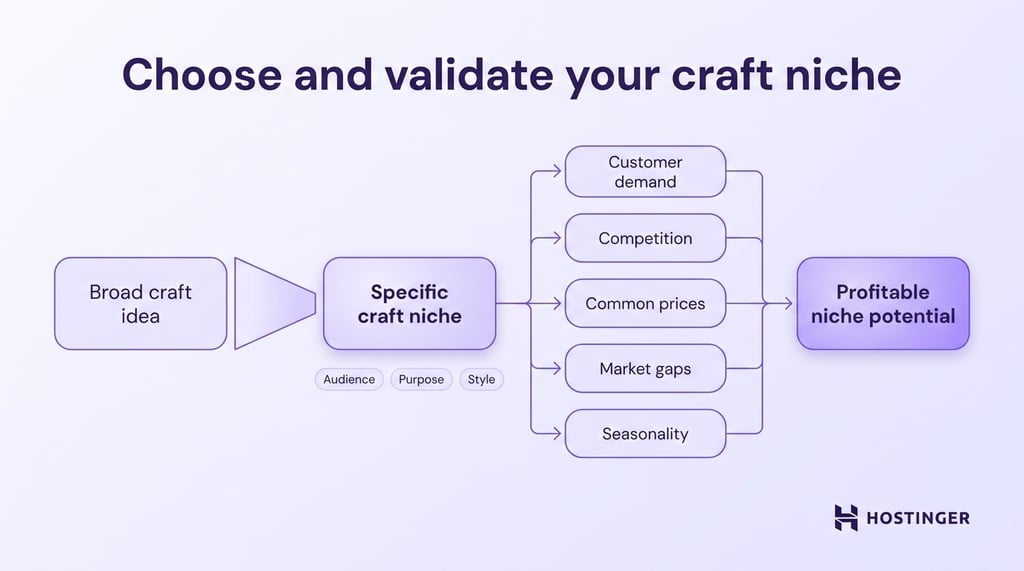
Start by deciding what you’ll make, who you’ll sell it to, and whether there’s enough demand. Instead of choosing a broad category like jewelry or home decor, narrow your niche by audience, style, purpose, or occasion.
For example, rather than selling jewelry in general, you could make minimalist graduation necklaces, colorful clay earrings for festival-goers, or personalized bracelets for pet owners.
As you start your small business, define who you want to sell to and how your products fit their needs.
Next, validate your niche. Search marketplaces and social platforms, read reviews of similar products, and visit local craft fairs or markets. Look at:
- Customer demand. Check whether people actively buy, search for, or ask about similar products.
- Competition. See how many sellers already target the same customers or needs.
- Common prices. Check what buyers typically pay for similar products.
- Market gaps. Look for recurring complaints, underserved customers, or features that competing products don’t offer.
- Seasonality. Consider whether demand stays steady or peaks around occasions such as weddings, holidays, or graduations.
The U.S. Small Business Administration also recommends assessing factors such as demand, market saturation, and pricing when researching a business idea.
The best craft business to start is one with enough demand that you can produce efficiently enough to sell at a profit.
There’s no single type of homemade craft that always makes the most money. Profitability depends on factors such as material costs, production time, selling fees, and what customers are willing to pay.
If you’re deciding between several products, compare craft ideas to sell, then shortlist two or three based on demand, competition, production effort, and potential selling price.
2. Develop your craft products
Turn your shortlisted ideas into prototypes or small test batches before making larger quantities. This gives you a chance to improve each product and make sure you can produce it consistently.
Show your prototypes to people who fit your target customer profile. Ask specific questions about the design, size, function, and quality. Instead of only asking whether they like the product, find out what works, what doesn’t, and what they’d change.
Next, test each product under normal use. For example, wear jewelry for several days, wash textiles according to their care instructions, or check how evenly a candle burns. Fix any issues before adding the product to your range.
Track the materials, quantities, tools, and time you need to make each item. Make the same product several times to see whether you can maintain consistent quality, size, and finish.
If the results vary or production takes too long, adjust the design or your process.
Before selling, check whether your product has specific safety, testing, or labeling requirements. These rules vary by product type and location, so make sure you understand the requirements that apply to your business.
Once the product meets your quality standards and you can consistently reproduce that quality, start planning larger batches. Avoid buying materials in bulk until you’ve finalized the design and production process and seen evidence of demand.
3. Build your craft brand
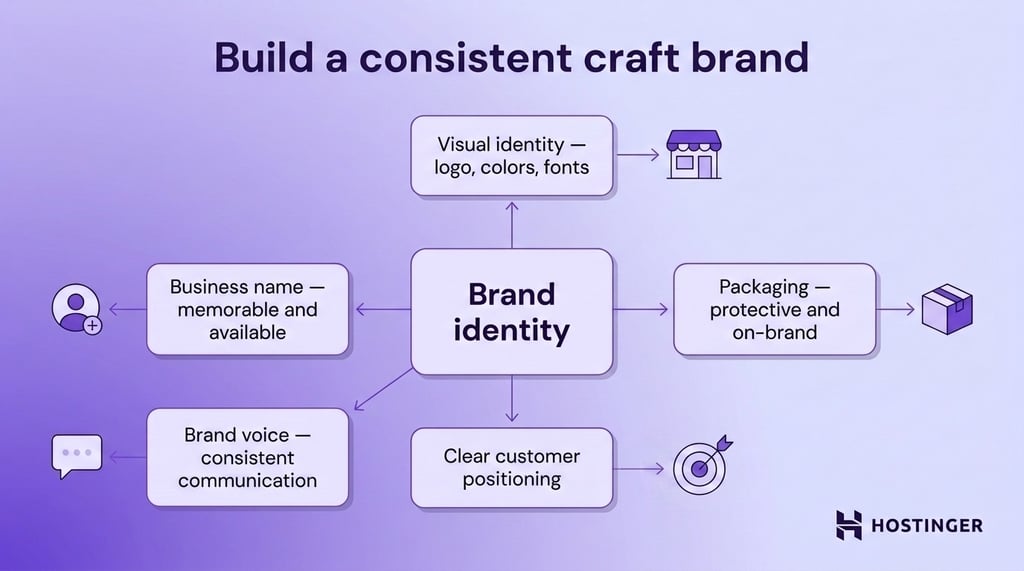
Build your brand around the products you sell and the customers you want to reach. Your business name, visuals, packaging, and tone should all support the same overall identity.
Choose a name that fits what you sell without tying the brand to one product forever. When you come up with a business name, keep it easy to remember, spell, and pronounce.
Before you commit to a name, check whether the matching domain and social media handles are available. You should also search relevant trademarks for similar marks that could create confusion, but note that a database search alone does not guarantee a name is legally clear to use.
Next, define how you want customers to see your business. In one sentence, describe who your products are for, what you make, and what sets them apart.
For example, “hand-painted nursery signs personalized for new parents” gives customers a clearer idea of what you sell than “unique handmade home decor.”
Then, build a simple visual identity by creating a logo that works at different sizes, a small color palette, readable fonts, and a consistent photography style. Apply these elements across your store, social profiles, packaging, and in-person displays.
Choose packaging that protects your products and matches your brand. For example, ceramic products may require sturdy boxes and protective filler, while stationery offers more flexibility with colored mailers, stickers, or printed inserts.
Finally, decide how you want your brand to sound. Keep a consistent tone across product listings, emails, social posts, packaging, and other customer communications.
4. Register your craft business
Register your craft business according to the rules where you operate. Requirements vary based on your location, business structure, and business activities.
Start by choosing a business structure. In the U.S., common options for small businesses include a sole proprietorship and a limited liability company (LLC). Your choice affects factors such as taxes, paperwork, and personal liability.
You don’t need to form an LLC just because you sell crafts. An LLC can protect personal assets from business liabilities in many cases, while a sole proprietorship is simpler to form but does not create a separate legal entity.
Next, register your business or trade name if required, then check which licenses and permits apply to you. Whether you need a business license to sell online depends on your location and business activities.
You may also need local permits or licenses if you run your business from home or sell at markets and events.
Check your federal, state, and local tax obligations as well. For sales tax, check with your state tax authority to find out whether you need to register and collect it.
If you’re in the U.S., check whether you need an Employer Identification Number (EIN), which is a federal tax ID number that identifies your business.
Whether you need an EIN depends on your business structure and federal tax obligations. The Internal Revenue Service (IRS) requires one in situations such as having employees or operating certain types of entities, and you can apply for one for free directly through the IRS.
Finally, keep your business income and expenses separate from your personal finances. A dedicated business bank account can make your ecommerce bookkeeping easier.
Depending on what you sell and how you operate, you may also want to consider business or product liability insurance.
5. Choose where to sell crafts
Choose where to sell your crafts based on where your customers shop, what each channel costs, how much work it takes, and how much control you want over the selling experience.
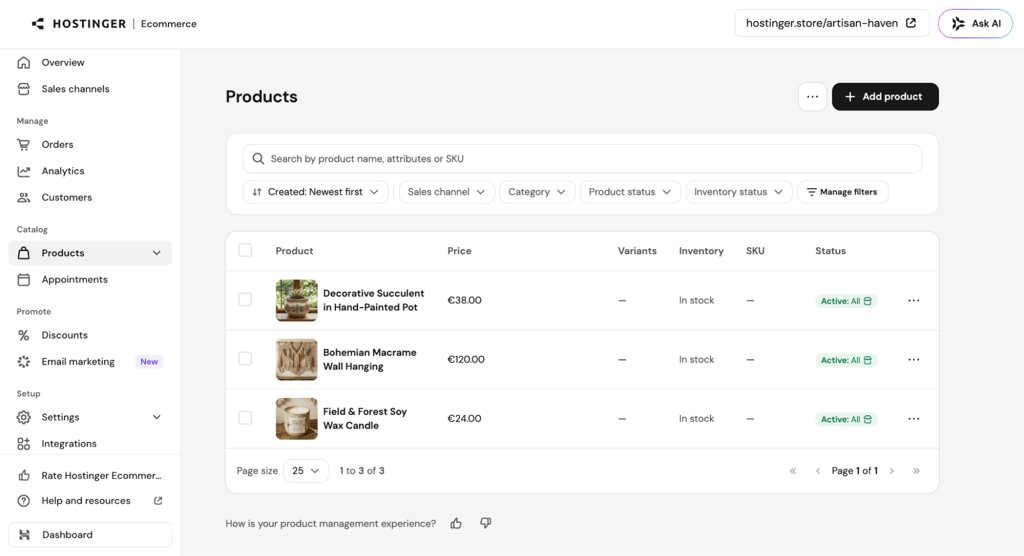
Your own ecommerce store gives you more control over your branding, product presentation, pricing, and customer relationships. The trade-off is that you’ll need to attract visitors instead of relying on an established marketplace audience.
Hostinger Ecommerce is one option if you want your own storefront and a single place to manage products, inventory, orders, and payments.
This way, you can keep shoppers focused on your products instead of showing them alongside competing sellers on marketplaces. It also gives you more room to explain materials, customization options, care instructions, and the work that goes into your pricing.
Hostinger Ecommerce charges 0% platform transaction fees, so Hostinger doesn’t take a percentage of each sale.
You can also accept 100+ payment methods globally, depending on your location and currency, although payment providers may still charge processing fees.
Online marketplaces such as Etsy can put your products in front of people who already shop on the platform. In exchange for that existing audience, you’ll typically face more competition, selling fees, platform rules, and less control over the customer experience.
Etsy, for example, currently charges a $0.20 listing fee per listing and a 6.5% transaction fee on the total order amount. Payment processing and other fees may also apply. Compare online selling platforms based on their audience, costs, and seller requirements.
Craft fairs and farmers’ markets let customers see your products in person and give you direct feedback on what catches their attention. However, you’ll need to account for booth fees, travel costs, setup time, and unsold inventory.
Pop-up events also let you sell in person without committing to permanent retail space. They can help you test a location or seasonal collection, but your results will depend heavily on the event’s audience and foot traffic.
Local retailers can help you reach customers who already shop at boutiques, gift shops, and other nearby stores.
With wholesale, a retailer buys your products upfront at a lower price per item. With consignment, the retailer displays your products, and you typically get paid only after an item sells.
Both options often give you a smaller margin per item and less control over how your products are sold, so compare their terms before committing.
Since you’re just starting your craft business, keep your setup manageable. For example, you could pair an online store with occasional local markets. Customers can discover your products in person, then reorder online later.

6. Set prices for your craft products
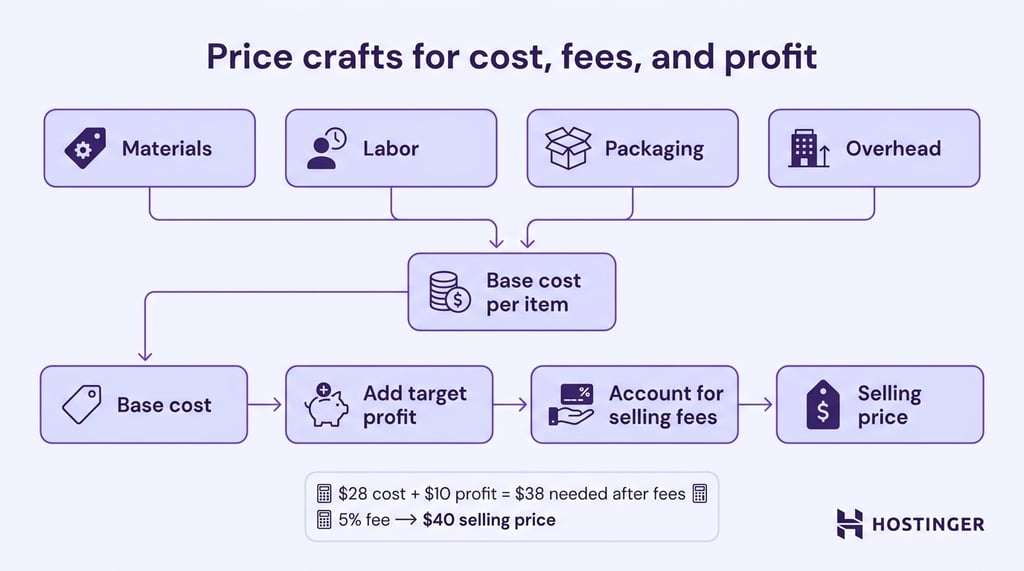
Set prices that cover the full cost of making and selling your products while leaving room for profit. Don’t base your prices only on material costs or copy what similar sellers charge without checking whether those prices work for your business.
When pricing your products, start by calculating the cost of producing one item:
Materials + labor + packaging + overhead = base cost per item
- Materials. Include everything you use to make the finished product, such as fabric, beads, clasps, wax, glue, or other components.
- Labor. Set an hourly labor rate, then multiply it by the time it takes you to make one item.
- Packaging. Include boxes, mailers, labels, tissue paper, protective filling, and other materials you use to prepare the product for sale.
- Overhead. Add a share of expenses that support your business but aren’t tied to a single product, such as equipment, workspace, software, insurance, or website costs.
Next, decide how much profit you want to make and account for selling fees. Your costs can vary by sales channel, so include any marketplace, payment processing, event, or retailer fees that reduce how much you keep from each sale.
Be careful with percentage-based fees because they’re taken from the final selling price. For example, say one product costs $28 to make, and you want to earn $10 in profit. That means you need to keep $38 after fees.
If your sales channel charges a 5% fee, you keep 95% of the selling price. Divide $38 by 0.95, which gives you $40. At that price, $2 goes to the fee, $28 covers your costs, and $10 is your profit.
Finally, compare your calculated price with what your target customers typically pay for similar products.
If you can’t charge enough to cover your costs and make a worthwhile profit, look for ways to lower material costs or production time.
You may also need different prices for direct sales, marketplaces, craft fairs, and wholesale, as each channel has different costs.
7. Photograph your craft products
Take clear product photos that show customers what your crafts look like, how big they are, and which details they might miss when shopping online.
You don’t need expensive equipment to get started. A smartphone with a decent camera can work well if you have good lighting.
Place your product near a window with soft, indirect daylight. Avoid direct sunlight and flash, which can create harsh shadows, glare, or inaccurate colors.
Before you start, clean the product and your camera lens. Remove dust, fingerprints, loose threads, or anything else that could distract from the item. Use a simple background that keeps the focus on your product.
Take several photos of each item so customers can view it from different angles:
- Main product shot. Show the whole item clearly against a simple background.
- Detail shot. Get close enough to show texture, stitching, engraving, finishes, or other handmade details.
- Multiple-angle shots. Show the front, back, sides, and any other views that help customers inspect the product.
- Scale shot. Place the item next to a familiar object, hold it in your hand, or show it in its intended setting so customers can judge its size.
- Lifestyle shot. Show the product being worn, displayed, or used so customers can picture how it fits into everyday life.
After taking the photos, adjust the cropping, brightness, white balance, and colors as needed. Keep your edits realistic so the product still looks like what customers will receive. Avoid heavy filters that alter the item’s color, shape, texture, or finish.
If you use AI-assisted tools to clean up a background or make similar edits, check that they haven’t changed the product itself or added details that won’t appear in the item customers receive.
Before publishing, check your photos on both a phone and a larger screen. Make sure the important details are easy to see, and the colors still look accurate.
8. Market your craft business
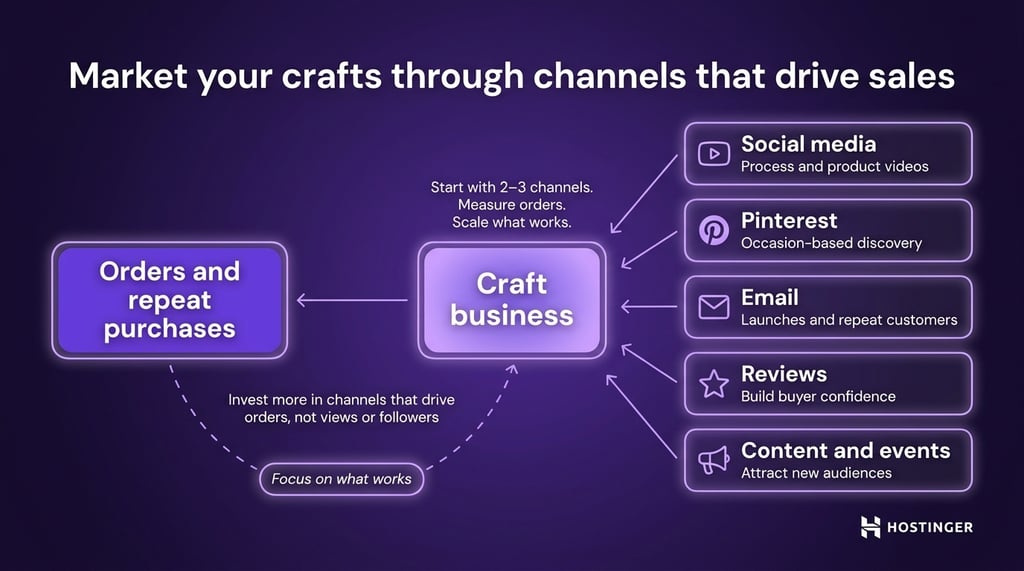
Market your craft business by showing potential customers why your products are worth buying and giving them reasons to come back.
Start with one or two channels where your target customers already spend time, then focus on the ones that bring you sales.
On social media, go beyond posting finished products. Share making-process videos, works in progress, product demonstrations, packaging clips, and finished-product reveals.
Short videos are especially useful for crafts because you can focus on one satisfying step, transformation, product detail, or use case at a time.
Use Pinterest to reach people looking for products and ideas for specific occasions. Create Pins around topics such as handmade wedding gifts, teacher gifts, seasonal decor, or holiday collections, then link each one to the most relevant product or collection page.
Build an email list from customers and visitors who choose to hear from you. Use it to announce new products, restocks, seasonal collections, upcoming events, and occasional offers without depending entirely on social media to reach previous shoppers.
Using an email marketing platform like Hostinger Reach can make this easier by syncing subscribers from your site and letting you email them from one place.
Ask customers to leave reviews after their orders arrive. Reviews that mention quality, size, packaging, or how colors and materials look in person can answer common questions and give potential buyers more context before they order.
Local events let more people discover your business. Promote your appearance before the event, and make your store or social profiles easy to find afterward so interested visitors can stay connected.
Content marketing can help you reach people searching for ideas or advice related to what you sell. You could start a craft blog with gift guides, product care advice, material guides, tutorials, and other topics that naturally lead readers to relevant products.
Finally, track which channels actually drive orders rather than judging your marketing by views or follower counts alone. Compare orders, repeat purchases, and revenue across channels, then spend more time on what works.
As your traffic grows, you can also test other ways to increase online sales, such as bundling related products or setting a free-shipping threshold.

Next steps for growing your craft business
To grow your craft business, focus on your most profitable products, make production easier to manage, and expand only when demand supports it.
Once orders become consistent, compare how much profit each product generates with the time it takes you to make it. Prioritize products that sell well and generate strong profit for the production time involved, and consider discontinuing items that require too much work for too little profit.
Next, make it easier to handle more orders. Keep enough materials on hand for your bestsellers, plan purchases around supplier lead times, and batch repetitive tasks such as making similar products or packing orders.
You can also save time on routine work by using AI for your small business, such as drafting routine customer replies, organizing ideas, summarizing recurring feedback, or creating first drafts of product descriptions.
Always review AI output to ensure it’s accurate, fits your brand, and doesn’t introduce unverified details.
When your current setup can reliably handle demand, you can scale your ecommerce business by adding another product or sales channel. Expand one thing at a time so you can see whether it increases profit or simply adds more inventory and admin work.
This article is a localized version of How to start a craft business in 8 steps, originally published in English.

Ariffud is a Technical Content Writer with an educational background in Informatics. He has extensive expertise in Linux and VPS, authoring over 200 articles on server management and web development. Follow him on LinkedIn.

Miglė Cicėnaitė-Jocė is a Product Manager for Hostinger's Website Builder. She is on a mission to redefine website creation, focusing on the AI flow and its features, and is always eager for product feedback and market insights to improve the user experience. Follow her on LinkedIn.