How to change domain name on WordPress: using cPanel and hPanel
Mar 09, 2026
/
Domantas G.
/
10 min Read
As businesses start offering new products or services, or entering new markets, changing the business strategy might become inevitable. This includes aligning your domain name with your brand value.
In addition to providing a readable address, a domain name is the unique address for a website and it also represents your brand. With that in mind, the domain should reflect your brand’s goals and missions.
Fortunately, changing a domain name is a straightforward process. This article will show you how to do so for a WordPress site.
Things to Do Before You Change Your Domain Name
For the most part, the steps to change the WordPress domain are simple, but some tasks will require you to tweak your site’s PHP code. Thus, before we start, we recommend completing these three preliminary tasks.
1. Backup Your Current Site
Back up your website before making any big changes. Doing so will allow you to get your site back whenever an error occurs. Otherwise, you risk losing all your data and having to start from scratch.
A WordPress website consists of two main components – website files and databases. Hence, before transferring your site content onto the new domain, execute a full backup of your entire site.
Convenient one-click restore and backup systems that let you back up your WordPress site via the hosting dashboard are available for Hostinger users with these services:
Alternatively, several WordPress plugins enable you to perform a backup with just a few clicks. Some of the most popular choices are VaultPress, UpdraftPlus, and BackWPup.

2. Access to a Hosting Dashboard or an FTP Client
If you want to change the WordPress domain, you’ll need access to your hosting account dashboard – this is where you will add your new domain address. Hostinger users can log into the hPanel dashboard and head to the Domain section for domain management.
Alternatively, use an FTP client to upload your site backup. To do so, you will need to configure FileZilla Client beforehand. Once everything is set, you can upload and manage larger files remotely from a local computer.
3. Research for a New Domain Name
Make sure to do proper research before buying a new domain name, from finding a credible hosting registrar to deciding a suitable extension for your site address. Many people are using .com domain names for their website names. A good rule of thumb is to make a list of potential domain names and check their availability via a domain name finder.
If you’re looking to start your online presence cost-effectively, you might want to explore options for a free domain name. This can be a great way to get started without upfront costs.
Now, if you have all the prerequisites ready, it’s time to take action. The following section will walk you through the easy methods of changing your WordPress site address.
How to Change Domain Name in WordPress
Now, let’s move on to the process of changing your WordPress site’s domain name. We have divided the process into six steps, and here’s a quick overview:
- Purchase a new domain name
The first step is to secure the new domain name for your new WordPress website.
- Add the new domain name to the new website
Set up a new WordPress website with the new domain name.
- Copy your WordPress core files
Copy your website files, including the WordPress core files, from the backup you made earlier from the old domain’s site.
- Change the site’s URL and address
Set the site’s URL to the new domain name. You can do this either from the WordPress admin dashboard, the wp-config file, or the database.
- Reset URL structure
Ensure that the new website follows the same URL structure as the old one to prevent broken permalinks and 404 errors.
- Create a permanent redirect from the old domain to the new one
Prevent losing traffic and backlinks by creating a 301 permanent redirection from the old domain to the new domain.
Let’s dive deeper into each step.
1. Purchase a New Domain Name
First, head to Hostinger’s domain checker and type in your preferred domain. You’ll find out if this option is available, and get some suggestions on alternative domain names as well as their costs.
Domain Name Checker
Instantly check domain name availability.
If your desired domain name and its alternatives are already taken, try contacting the domain owner and negotiate a fair price for that particular domain. Use the domain lookup tool to find who owns the domain along with the owner’s information, such as phone number and email address.
However, if your desired domain address is available, simply add the domain to the cart, and proceed to check out.
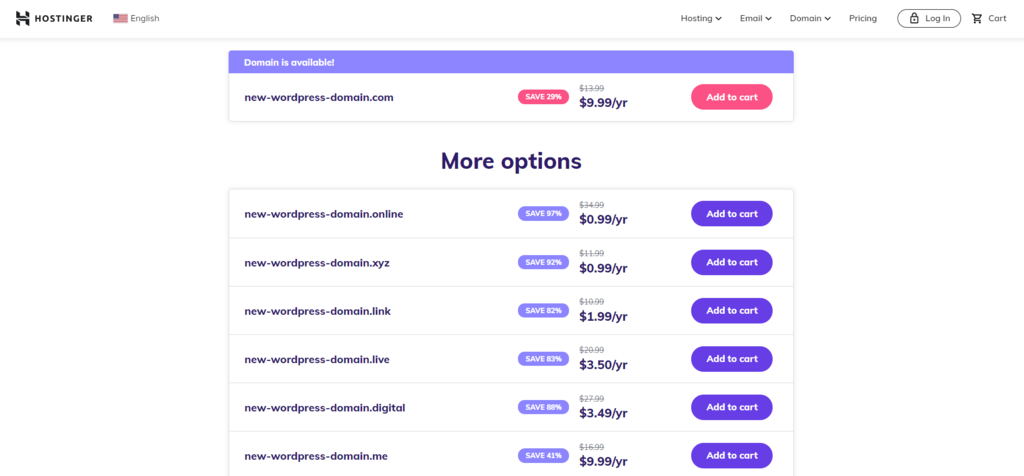
During the checkout process, you will also need to specify the domain registration period. There are several registration periods, ranging from one to ten years. However, most domain registrars will require you to pay for at least one year.
At Hostinger, we offer up to a three-year registration period. If you purchase Hostinger’s annual Premium or Business hosting plans, you will get a free domain for the first year.
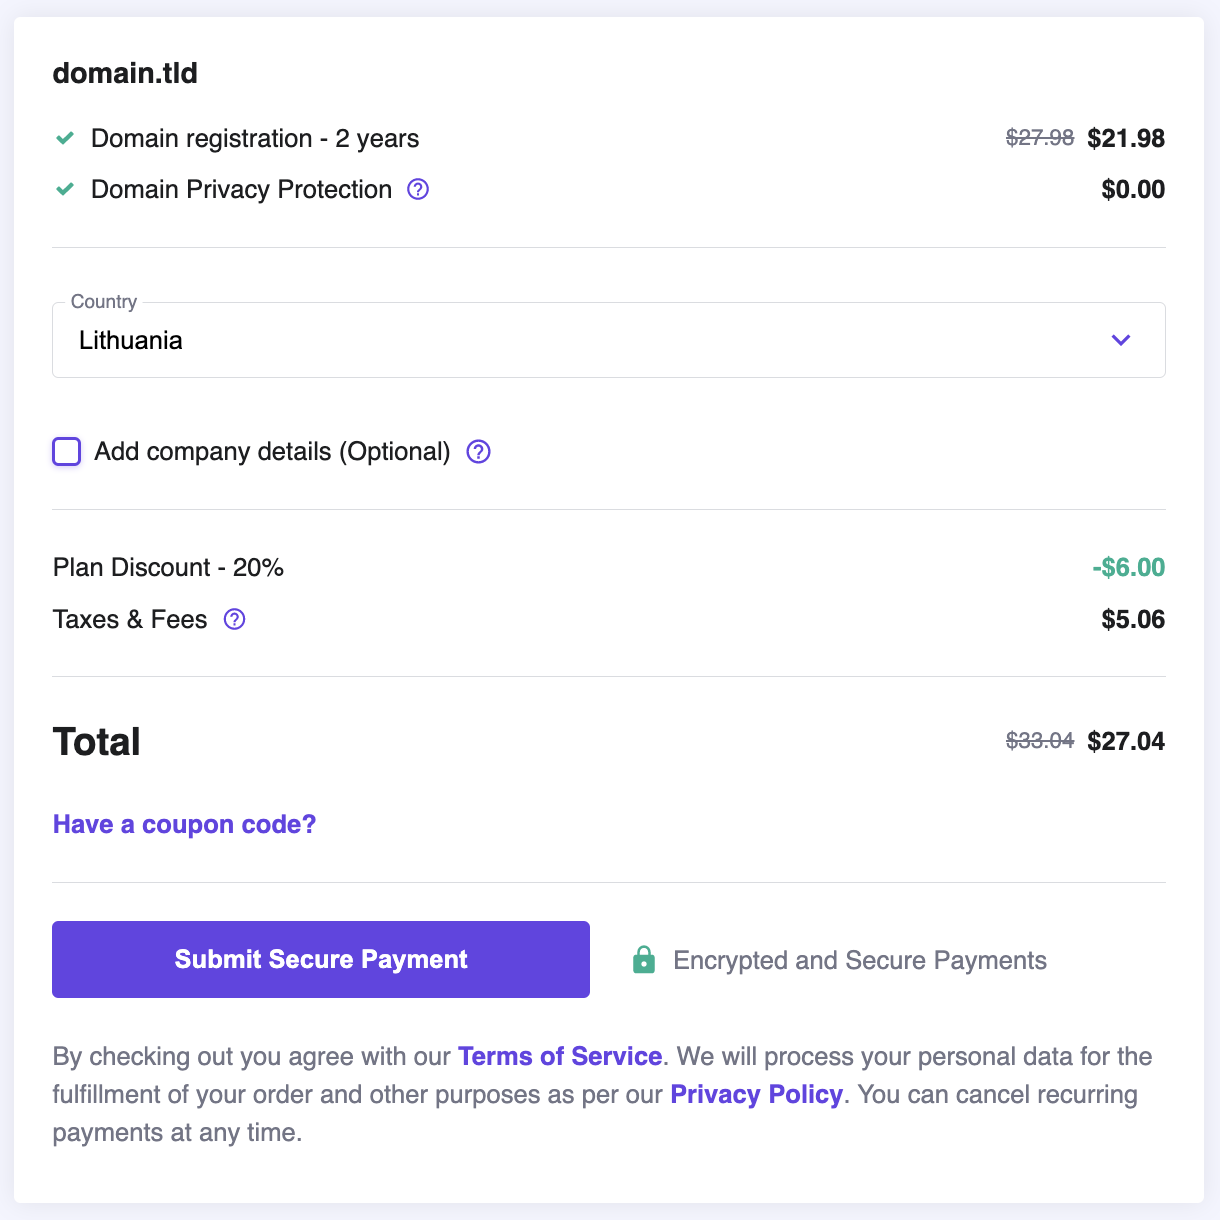
Proceed to click the Submit Secure Payment button to finalize your order.
Read our “How to Buy a Domain Name” guide for more detailed instructions.
2. Add the New Domain Name and Upload the Backup
The next step is adding the new domain name to your existing hosting plan. Below, we will go over the steps for both hPanel and cPanel.
Using hPanel
- Navigate to Website → Add Website and select WordPress.

- A pop-up will appear. Select your preferred hosting plan from the drop-down menu.
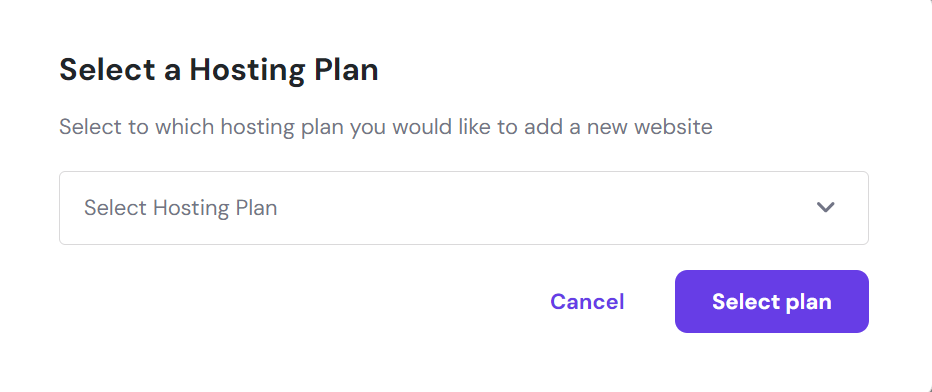
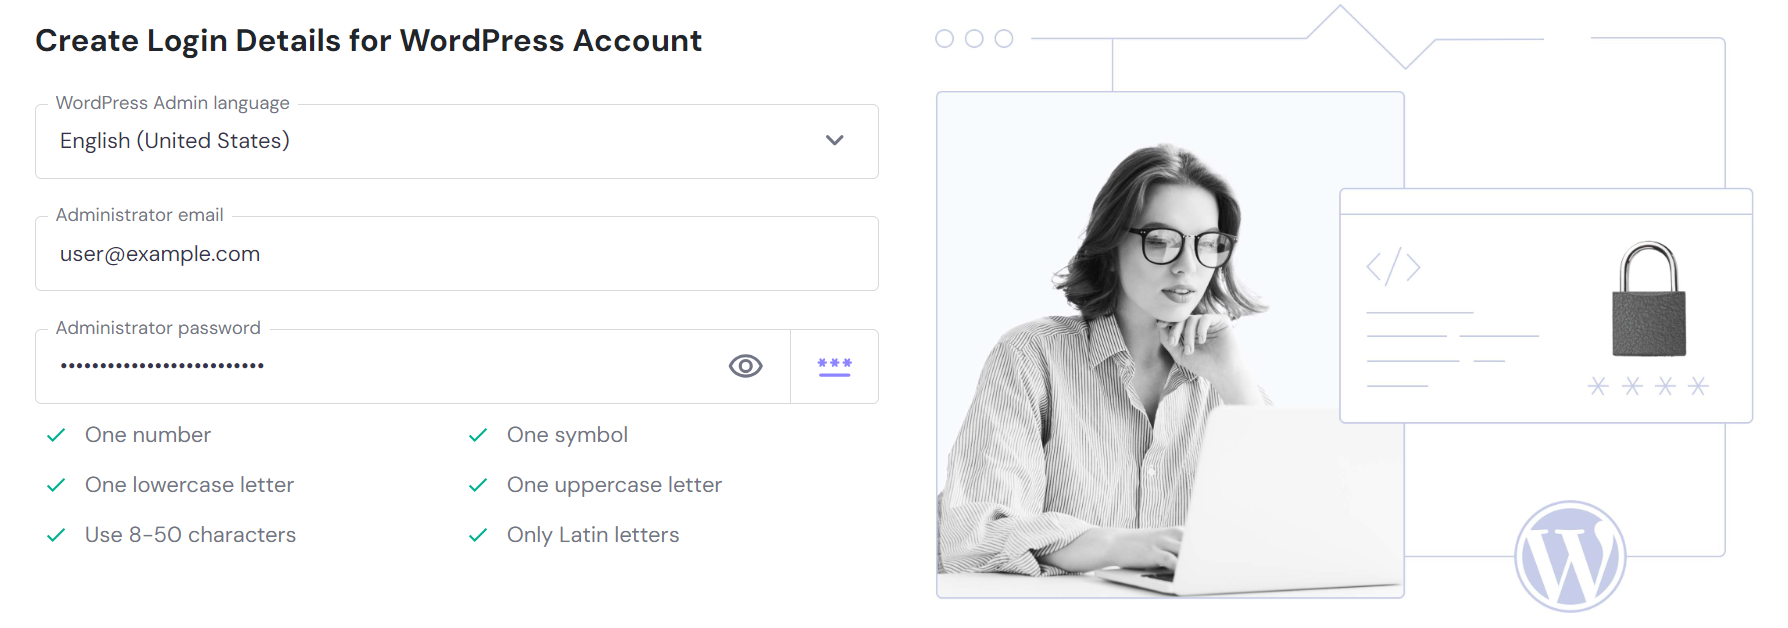
- Create login details for your new WordPress account.
- Choose the type of website you want to build from the drop-down menu.

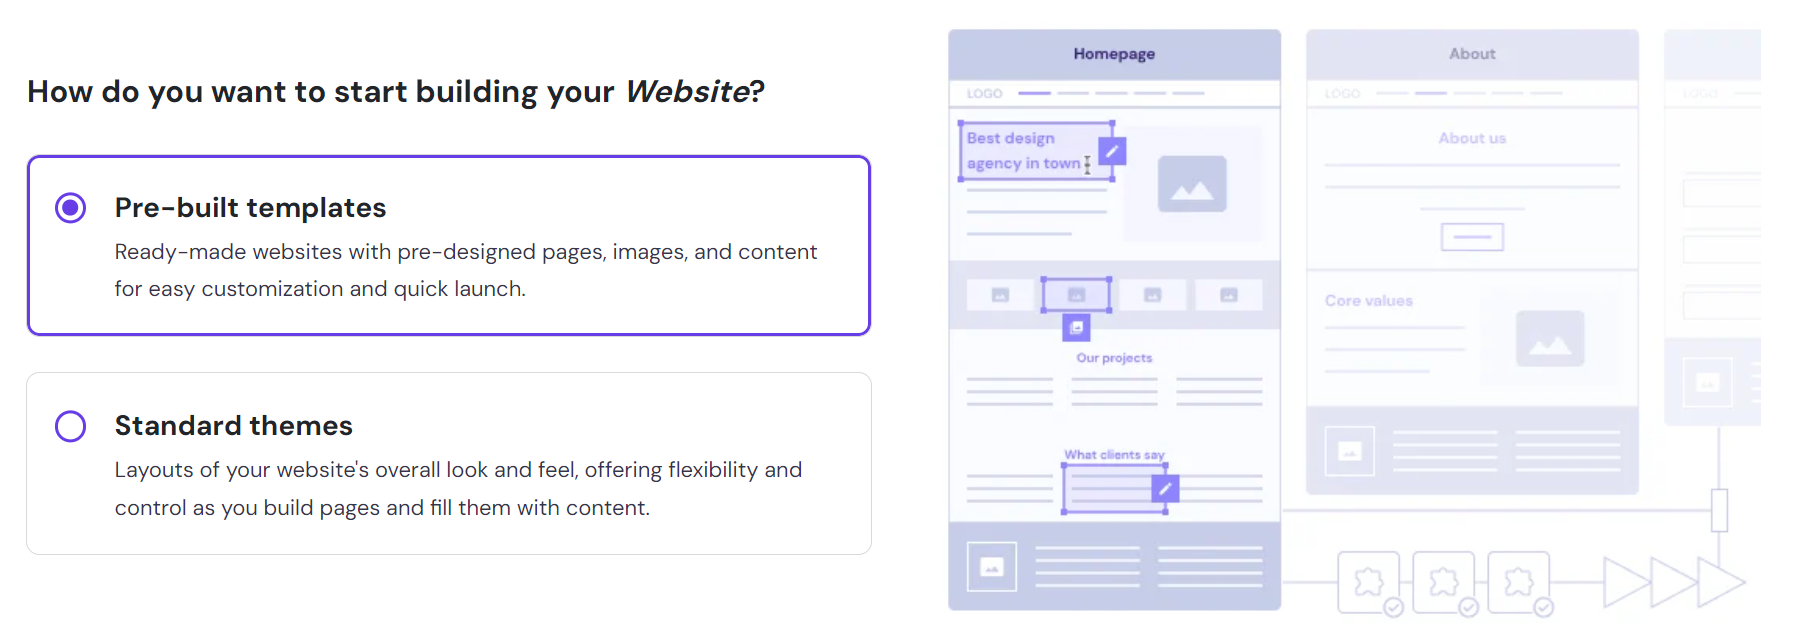
- Follow the rest of the new website onboarding process, starting with choosing whether you want to use pre-built templates or standard themes. You can also Skip some of these steps and set them up later.
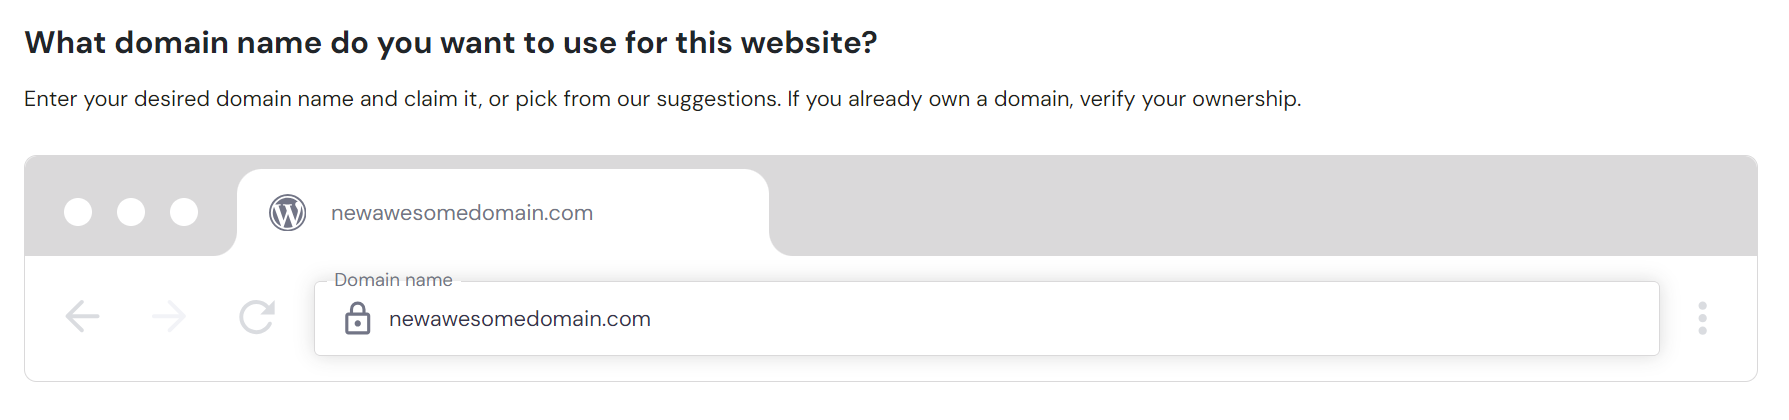
- Once you get to the Choose a Domain step, pick the domain you previously purchased.
Wait until the website setup process is finished.
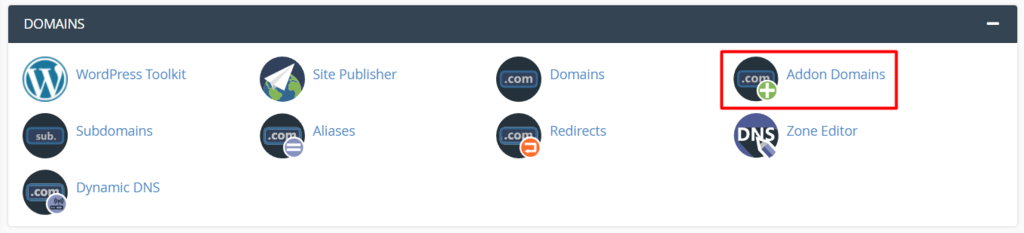
Using cPanel
- Log into your cPanel account, navigate to Domains → Addon Domains.
- Under the Create an Addon Domain section, fill out the new domain address. The subdomain and the document root will get filled automatically.
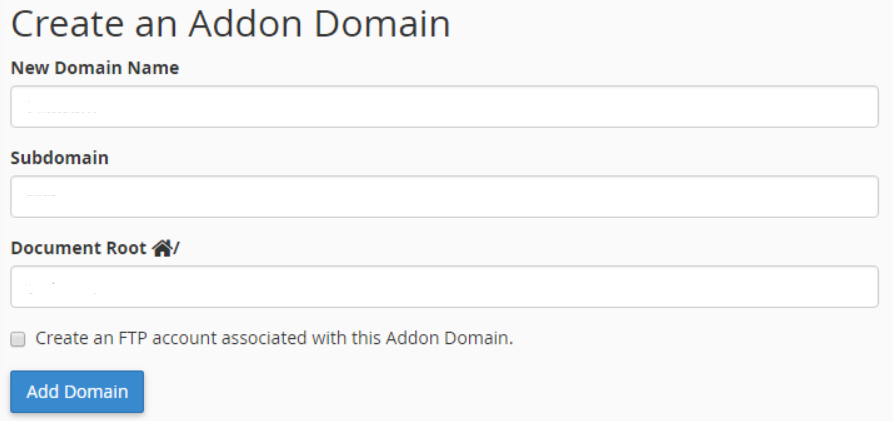
- If you want to create an FTP account for the new addon domain, simply check the Create an FTP account associated with this Addon Domain box. Doing so will bring up additional settings, such as username and password.
- Once you have filled in all settings, click Add Domain.
Keep in mind that addon domains will not work unless you add the correct DNS records. One of the most efficient ways to look for DNS records is to use the nslookup commands.
Alternatively, you can use an online DNS checker to find different types of DNS records.
3. Copy All WordPress Core Files From Your Old Domain
Moving all website content from your old site to the new domain is easy with the help of backup. Especially, when you don’t switch to a new hosting provider.
Download your backup file from the hosting dashboard or directly copy your old domain folder to the new one.
Below, we will walk you through the steps of moving your website content to a new domain via Hostinger’s File Manager. Before applying the following steps, ensure that your add on domain is successfully added to your account.
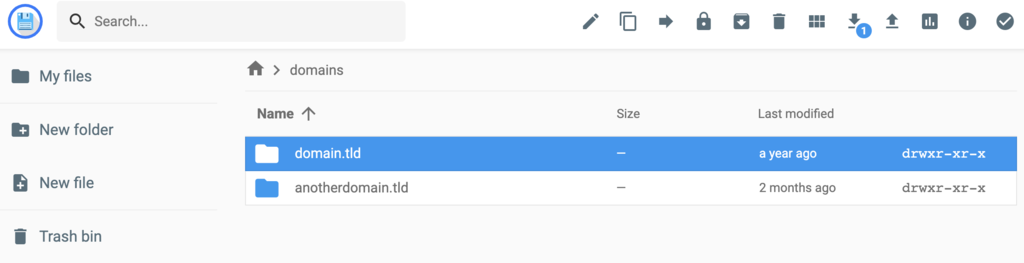
- Access your hPanel dashboard, navigate to Files → File Manager, and select the Access all files of Your Hosting button.
- Check whether you have both domain folders in the File Manager.
- Click on the domain folder you want to move your content from and open the public_html directory.
- Select all files – click on the Copy button if you want to leave a copy of the files on the old domain name. Otherwise, click Move to completely transfer all content to your new WordPress address.
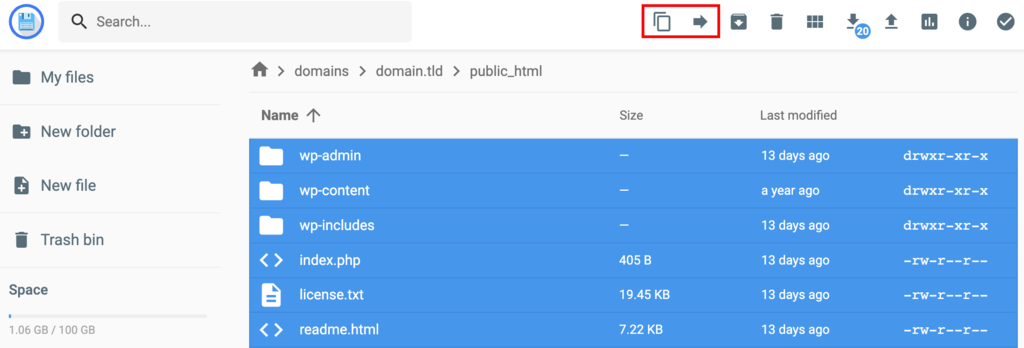
- Clicking on either option will trigger the following pop-up window.
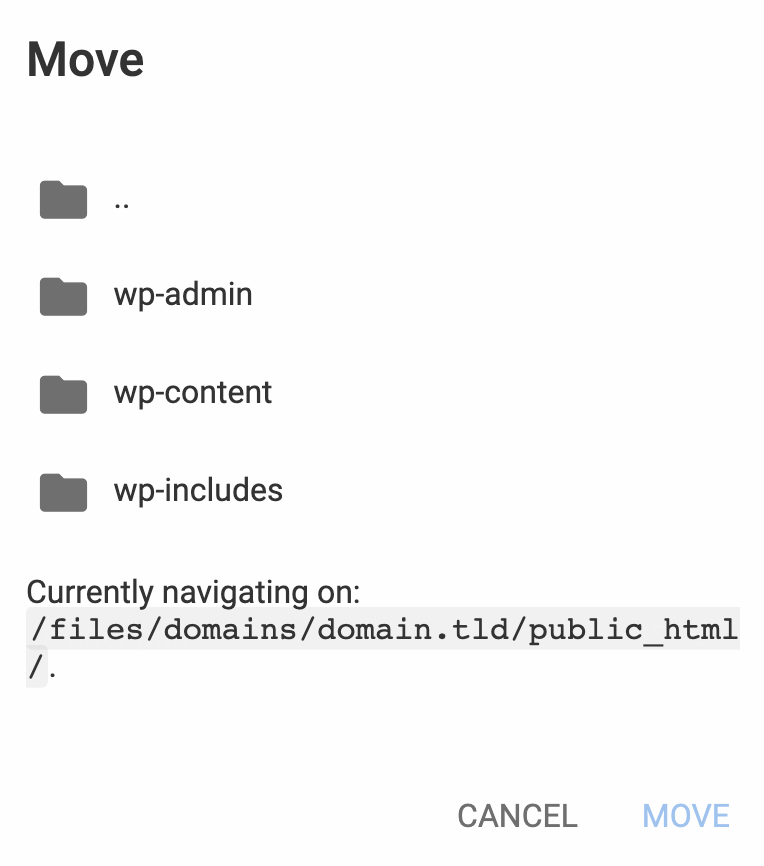
- Navigate to the path to your new domain folder. The new domain path should look like this: domains/newdomain.tld/public_html
Alternatively, you can download your backup and upload it via the cPanel’s File Manager or an FTP client.
Important! If you are moving the website to another hosting, you will need to import the database and configure the database information in the wp-config.php file. Read our detailed instructions on how to move a WordPress site to a new server.
4. Change the URL and Site Address
The next step in changing your WordPress address is to update the existing URL and site address. This helps provide a smooth user experience for your visitors and makes it easier for web crawlers to find and index content.
There are several options to do so, from accessing your WordPress admin dashboard to updating your WordPress database via phpMyAdmin. Let’s go over the methods one by one.
1. Use the WordPress Admin Dashboard
The first and most common method is to add your new address to the WordPress General Settings. This is the easiest method if you can access the WordPress admin dashboard.
To do that, go to Settings → General. Then, replace your current WordPress Address (URL) and Site Address (URL) with your new URL.
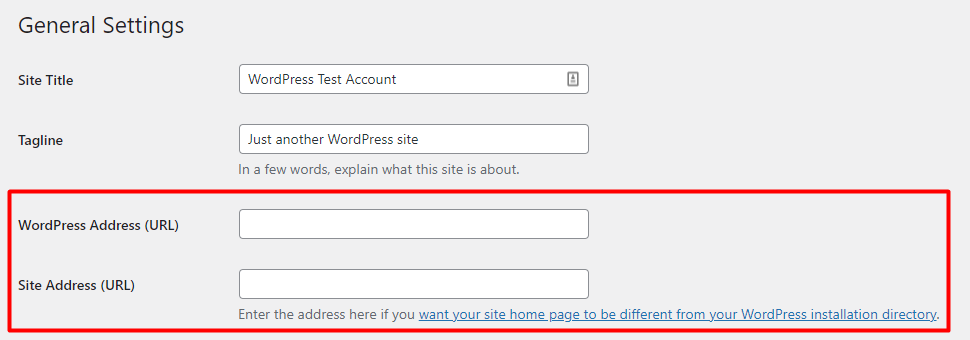
Ensure that both addresses match unless you’re setting a designated home page for your WordPress site. Once done, click Save Changes.
However, those fields might be grayed out due to set fixed values in your wp-config file. In this case, follow the steps in the section below.
2. Using the wp-config.php File
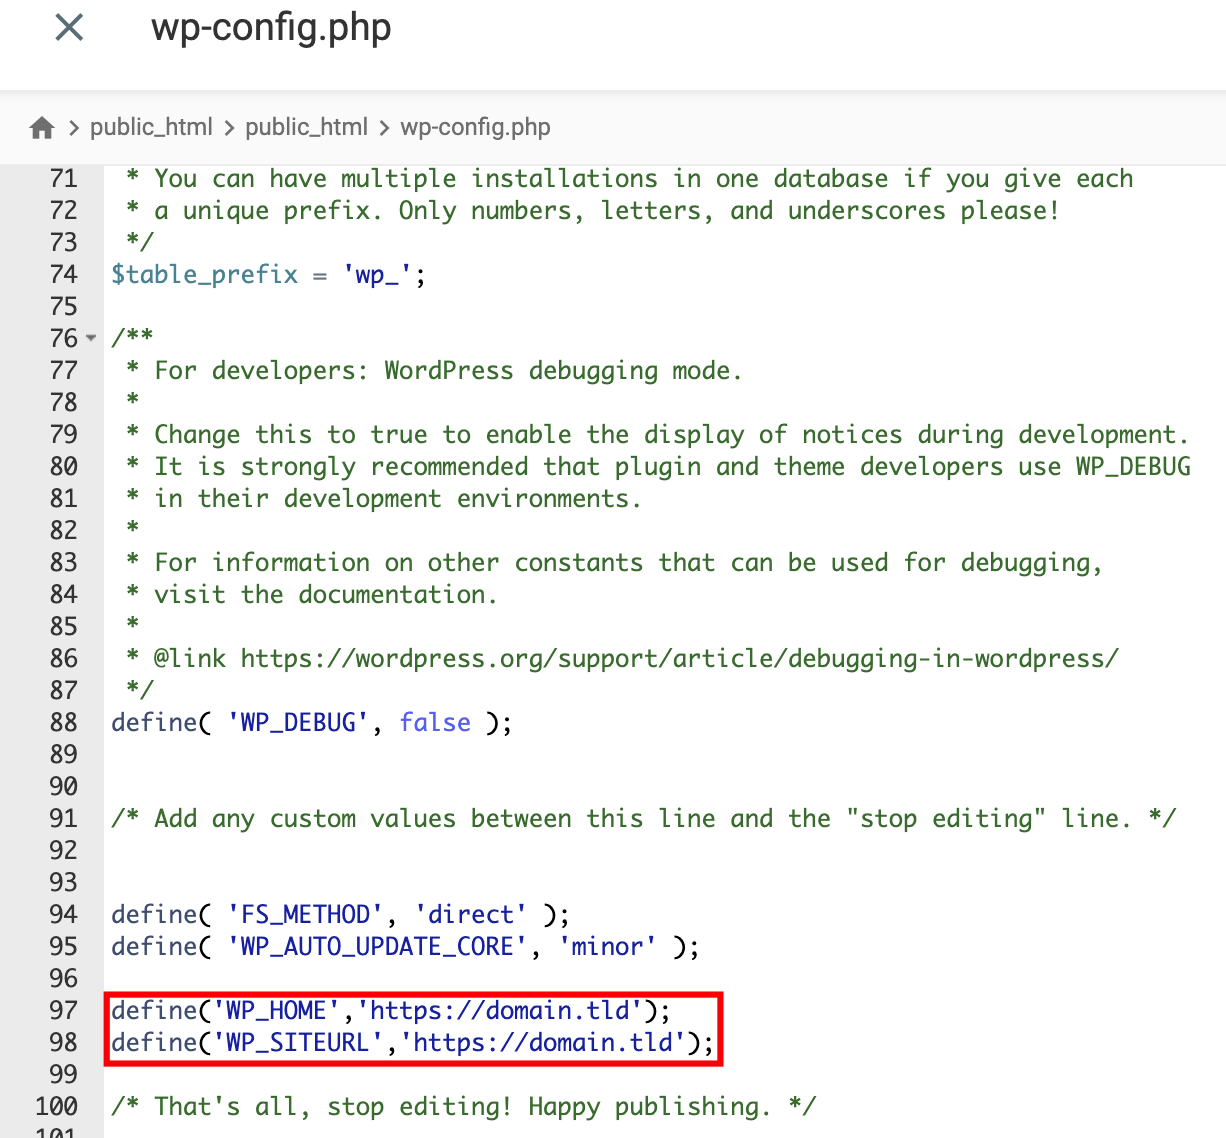
If you are moving your website and can’t access your WordPress dashboard, you can change the settings via the wp-config.php file.
This file is usually located under the root directory of your WordPress site – simply access it through the hPanel’s file manager. Alternatively, open it via FTP, SSH, or WP-CLI.
In this example, we will show you how to edit the wp-config.php file in the hPanel dashboard:
- Head to hPanel → Files → File Manager.
- Choose the domain folder and click Go to File Manager.
- Locate the wp-config file in the public_html folder.
- Right-click and select Edit.
- In the following code, replace http://yoursitename.com with your new site URL:
define('WP_HOME','https://domain.tld');
define('WP_SITEURL','https://domain.tld');- Insert it into the file and press the Save button. Your wp-config.php file should look like this:
If you prefer using an FTP client, the process will be almost identical. You’ll just need to use the FTP account credentials to access the site files.
3. From the Database Using phpMyAdmin
Another option to choose when changing your WordPress address URL is to directly edit the database in phpMyAdmin. To do so, follow these steps:
- Navigate to hPanel → Databases → phpMyAdmin.
- Choose the database where your WordPress files are located and click Enter phpMyAdmin.
- On the phpMyAdmin page, find the wp-option file.
- Select Edit on the site URL and home rows.
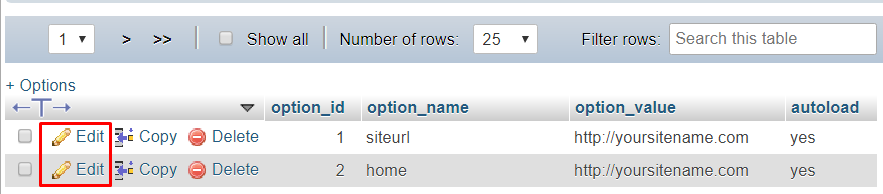
- Replace the old URL with your new site address URL and press Go. The system will automatically save changes.
5. Reset URL Structure
Now that you have changed your site address and URL, the next step is to update your URL structure. If you keep the same structure, the posts and pages might show the 404 error whenever visitors try to access them.
This error happens when the server cannot fetch requested posts or pages due to missing resources. Therefore, it is important to modify the site address URL structure to make your content accessible to your visitors.
There are several ways to reset your URL structure:
Reset Permalinks via the WordPress Dashboard
To do this, log in to the WordPress dashboard and go to Settings → Permalinks.
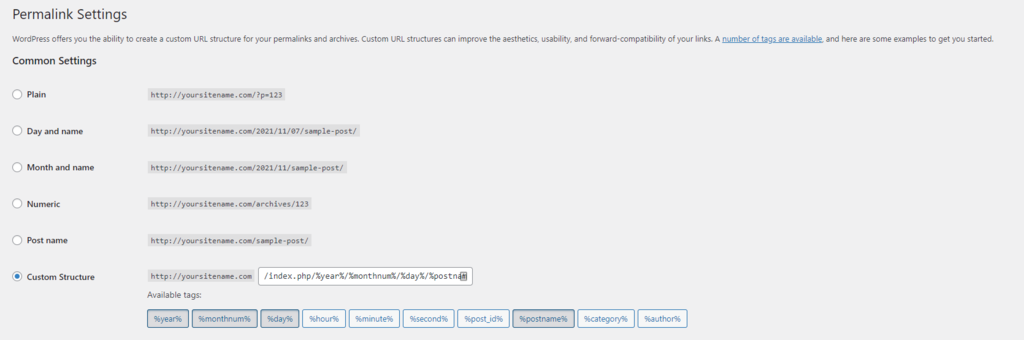
By default, WordPress uses the Plain permalink structure. However, this structure doesn’t contain any information about your content, making it the least ideal option for SEO.
Other URL structure options are as follow:
- Day and name – includes the full publishing date as well as the post name.
- Month and name – displays the month and year along with the post name.
- Numeric – uses the post ID written in numbers.
- Post name – shows the post slug in the URL.
- Custom structure – allows you to customize what goes into your site URL with available tags, such as author and category.
The post name option is arguably the best URL structure since it’s short and straightforward. However, feel free to choose the permalink structure as you need. By resetting broken permalinks in WordPress, the system will automatically redirect visitors from your old site to your new address.
Search and Replace
Another way to edit the WordPress URL structure is by using your database’s search and replace command. Replace the value carefully since these changes will be irreversible.
If you’re not comfortable with coding, perform this action is by using a plugin. We will show you how to do so with Better Search Replace.
Before we get into the steps, install the plugin. Now, let’s get started:
- From your WordPress admin dashboard, go to Tools → Better Search Replace.
- On the Search/Replace, add the text string you want to search for and then add the replacement.
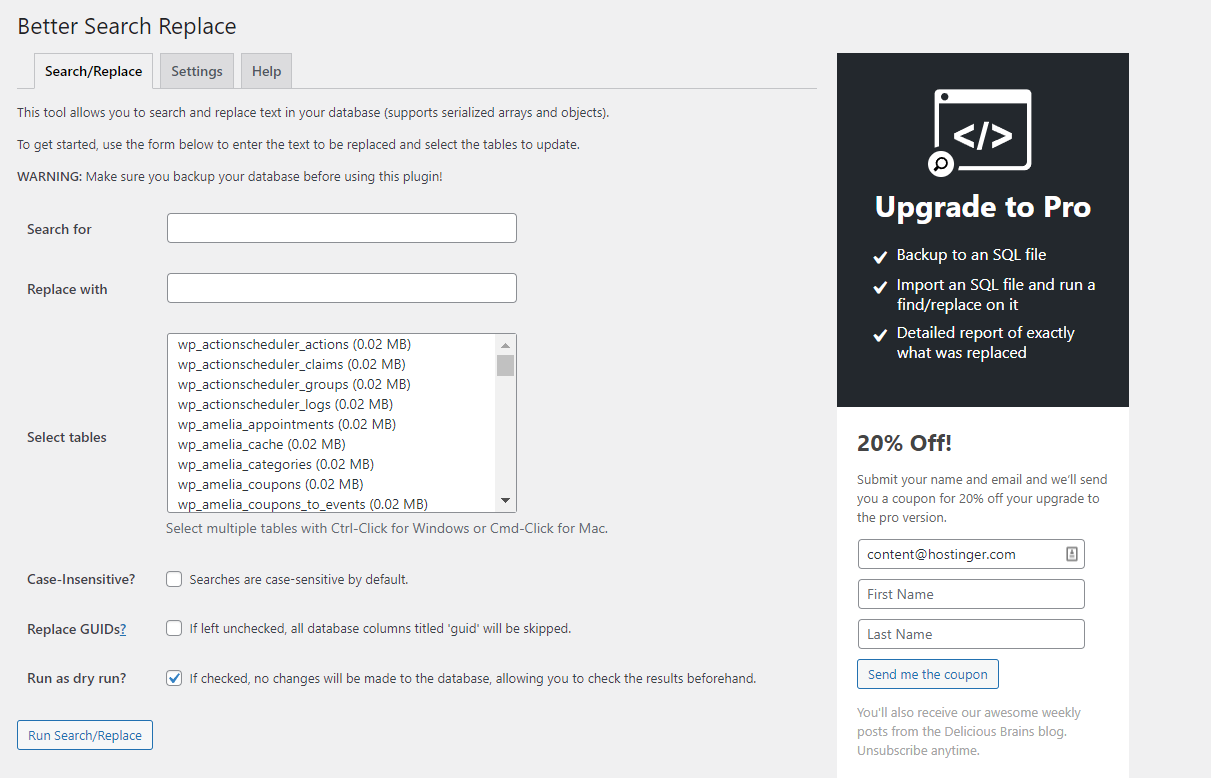
- Next, select the database table you want to modify. It is also possible to select multiple tables.
- If you want to review changes in your database before applying them, simply tick the Run as dry run? button.
- Once everything is set, click Run Search/Replace.
6. Redirect an Old WordPress Domain Permanently
The final step when changing the WordPress domain is to create a 301 redirect – a URL redirection from your old domain to the new one. The redirect will carry over page ranking values, ensuring that your SEO efforts won’t be lost when moving to a new domain.
We recommend keeping your old domain active for a while. This will allow users not aware of the domain change to reach the site and help notify search engines about the redirection.
Let’s dive into the hPanel to edit the .htaccess file and create a 301 redirect:
- Go to hPanel → Files → File Manager.
- Select your old domain and click Go to File Manager.
- Find the .htaccess file in the public_html directory.
- Right-click and choose Edit.
- Replace http://yoursitename.com with your new domain, and insert the following code.
#Options +FollowSymLinks
RewriteEngine on
RewriteRule ^(.*)$ http://yoursitename.com/$1 [R=301,L]
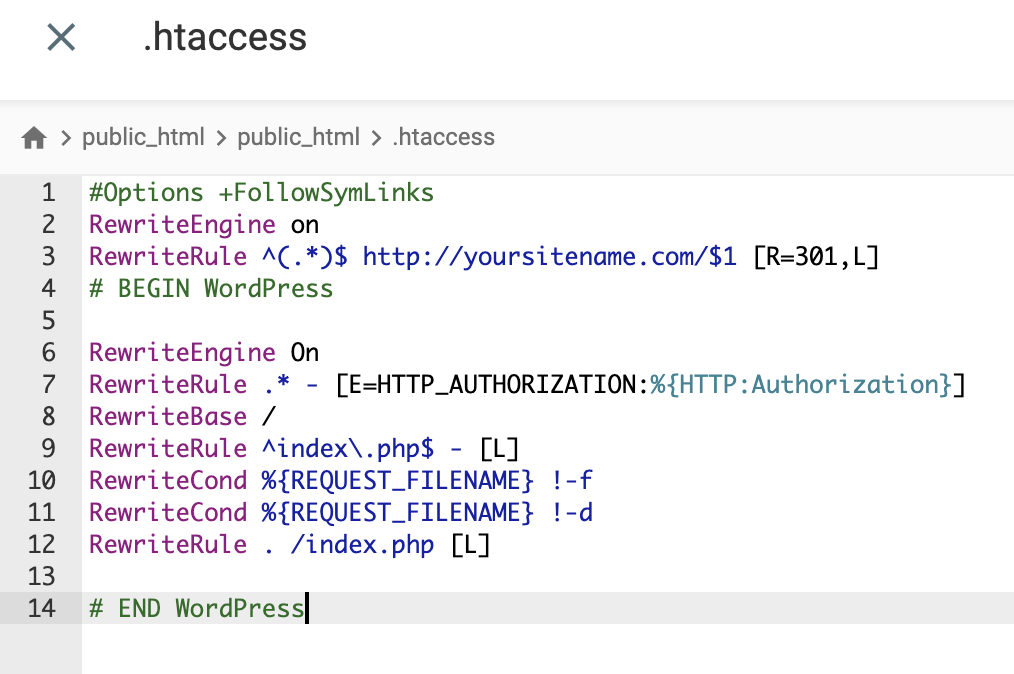
- Press the Save button.
Similar to modifying wp-config.php, you can complete this step with an FTP client.
Why Change Your Domain Name
Generally, most businesses and companies stick to their initial domain name and build their marketing strategies around it. However, sometimes changing a domain name is necessary.
Here are the most common reasons:
- Rebranding – whether for new management or a new target audience, sometimes businesses need to be rebranded. A site address is one of the most important business identities, so you should align it with your new brand.
- Domain extension change – if you’re using an industry-specific subdomain like .shop or a country-code extension like .uk or .co.uk domain and want to use a more generic one, swapping to a new domain name extension like .com, .net, or .online TLD might be a great idea.
- Create a user-friendly site URL – the simpler a domain name, the more memorable. Perhaps your old domain has complicated characters. In this case, change it to a more user-friendly address. A good rule of thumb is to keep it around 12 characters.
- Merging multiple domains – maybe your old domain name has already gained authority, and you want to merge it with your new domain. Merging domains lets you garner SEO benefits and link juice from the old website. It also helps with consistent branding and makes it easier to improve your SEO efforts.
No matter the reason, changing a domain name has its own pros and cons. For example, a domain change can decrease web traffic and lower page rankings.
This is because Google and other search engines will need time to crawl and index content on your new site address. As long as you implement the best WordPress SEO practices, you should be able to gain positions in the search engine result pages.
Pro Tip
Do not postpone changing your domain name. The sooner you do this, the smaller the risk of losing your SEO values.

Conclusion
There could be many reasons to change the WordPress domain name. Luckily, WordPress provides built-in URL address settings. This functionality allows you to manually tweak the PHP code through a file manager or an FTP client to change your domain effectively.
There are a lot of steps involved when changing your WordPress domain. With the correct implementation, you won’t lose any SEO benefits either. Whichever method you end up using, we recommend following best SEO practices to ensure that your new domain will rank high on the SERPs.
Learn What Else You Can Do With WordPresss
What is WordPress Sidebar
How to Delete All Comments in WordPress
How to Embed a Video in WordPress
Guide to WordPress Security
How to Export WordPress Users
How to Setup WordPress Auto-Update
Guide to WordPress Private Pages and Posts

Domantas leads the content and SEO teams forward with fresh ideas and out of the box approaches. Armed with extensive SEO and marketing knowledge, he aims to spread the word of Hostinger to every corner of the world. During his free time, Domantas likes to hone his web development skills and travel to exotic places.

Comments
29 responses