How to set up email on iPhone: Adding another email account to the mail app
May 22, 2026
/
Jordana A.
/
6 min Read
Adding your email to the iPhone’s Mail app keeps you connected and organized.
It’s convenient for managing emails anywhere, integrates with iOS for easy sharing and syncing, and sends real-time notifications for new messages. The app also ensures email security, making it a practical choice for iPhone users.
This article will guide you on how to configure email on iPhone manually and automatically. We will also explore common issues you may encounter when setting up SMTP emails on an iOS device and how to troubleshoot them.
Download glossary for web beginners
How to Set Up Email on iPhone Manually
Here are the steps for manual email account configuration on iOS devices, specifically for an iPhone.
1. Locate Your Email Settings
Before you start, make sure you have your email address, password, and mail server settings ready. Get the required information from your email hosting provider.
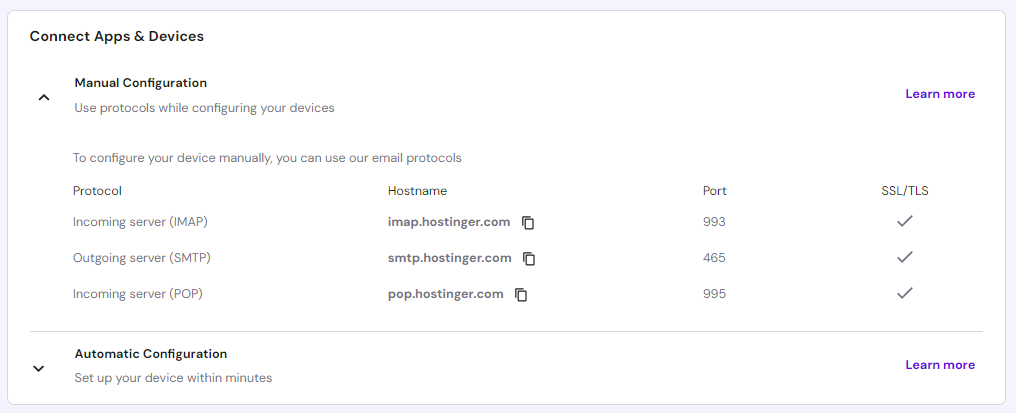
Here’s how to find Hostinger’s email settings. Keep in mind that this only works with a custom email:
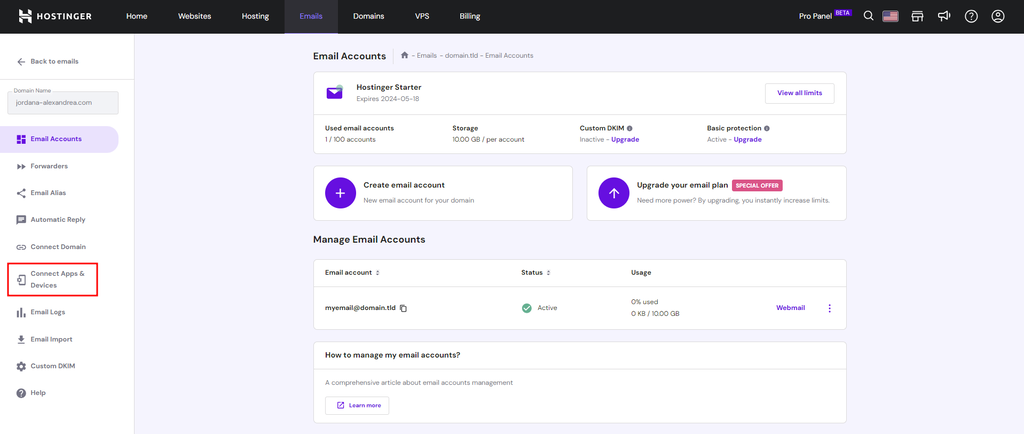
- Go to Emails from hPanel and click Manage next to the email domain.
- Select Connect Apps & Devices from the left sidebar.
- You’ll find the IMAP, SMTP, and POP protocol settings under Manual Configuration. Take note of them for later use.

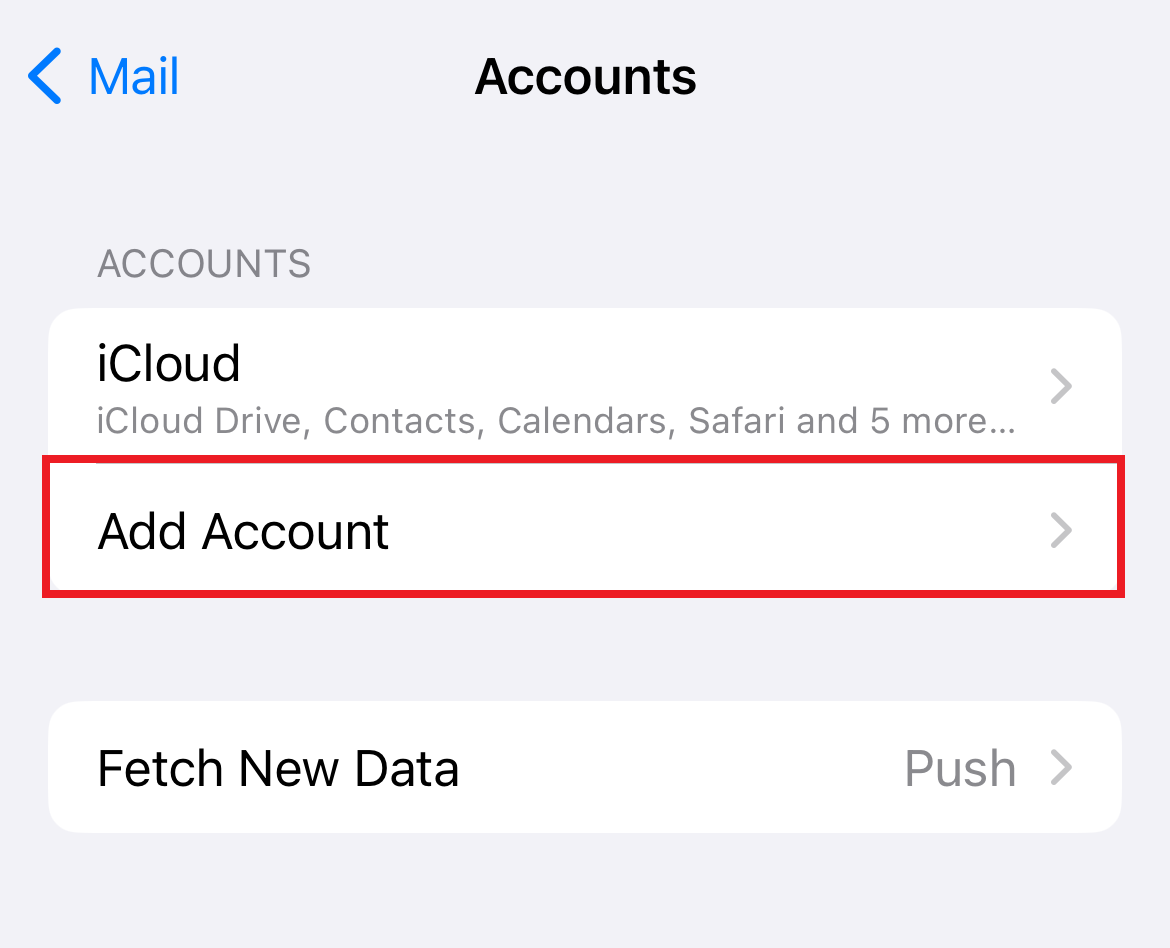
2. Navigate to the iPhone’s Mail Settings
After gathering the email settings from your email provider, it’s time to configure your iPhone’s Mail account settings.
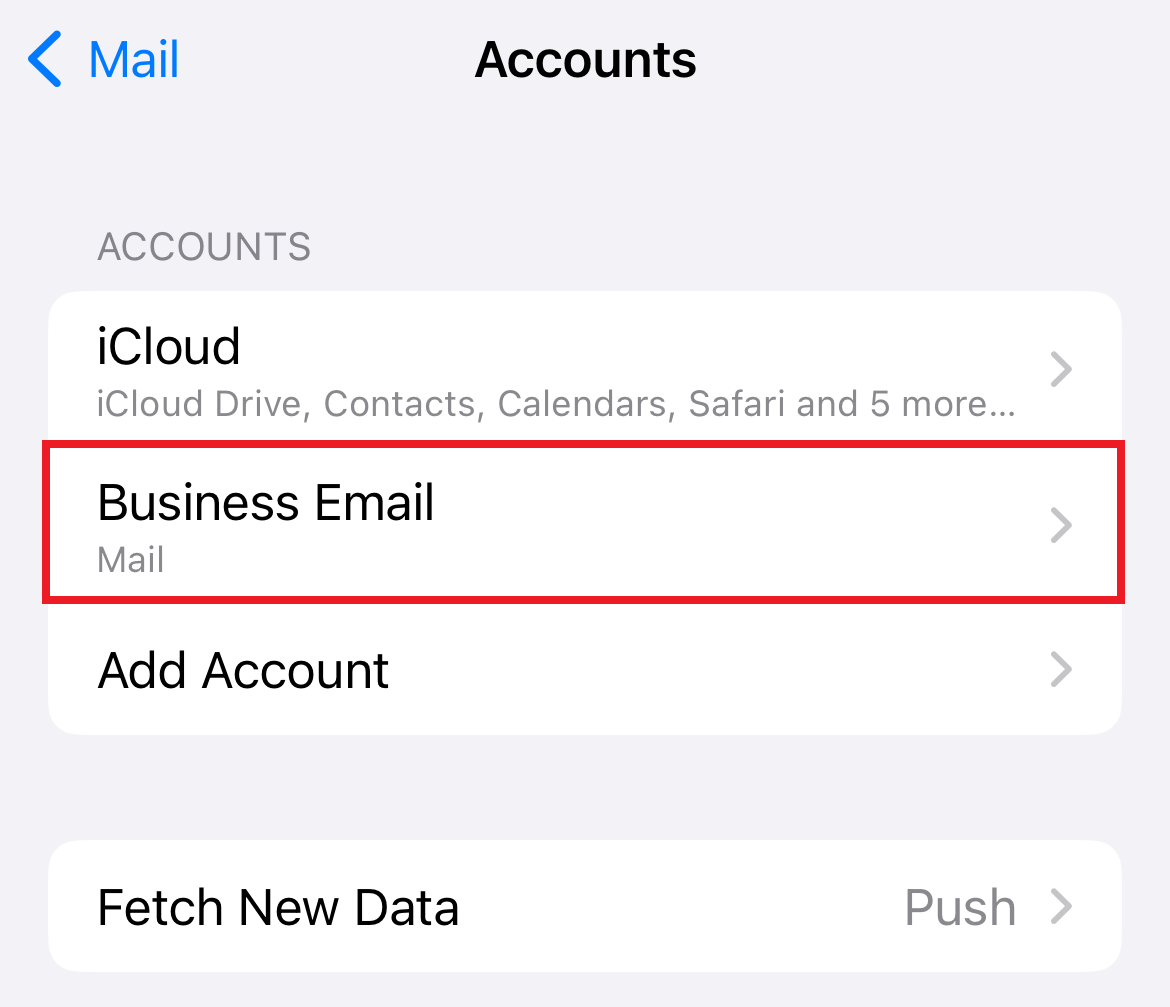
To do so, open the Settings app and tap Mail → Accounts.
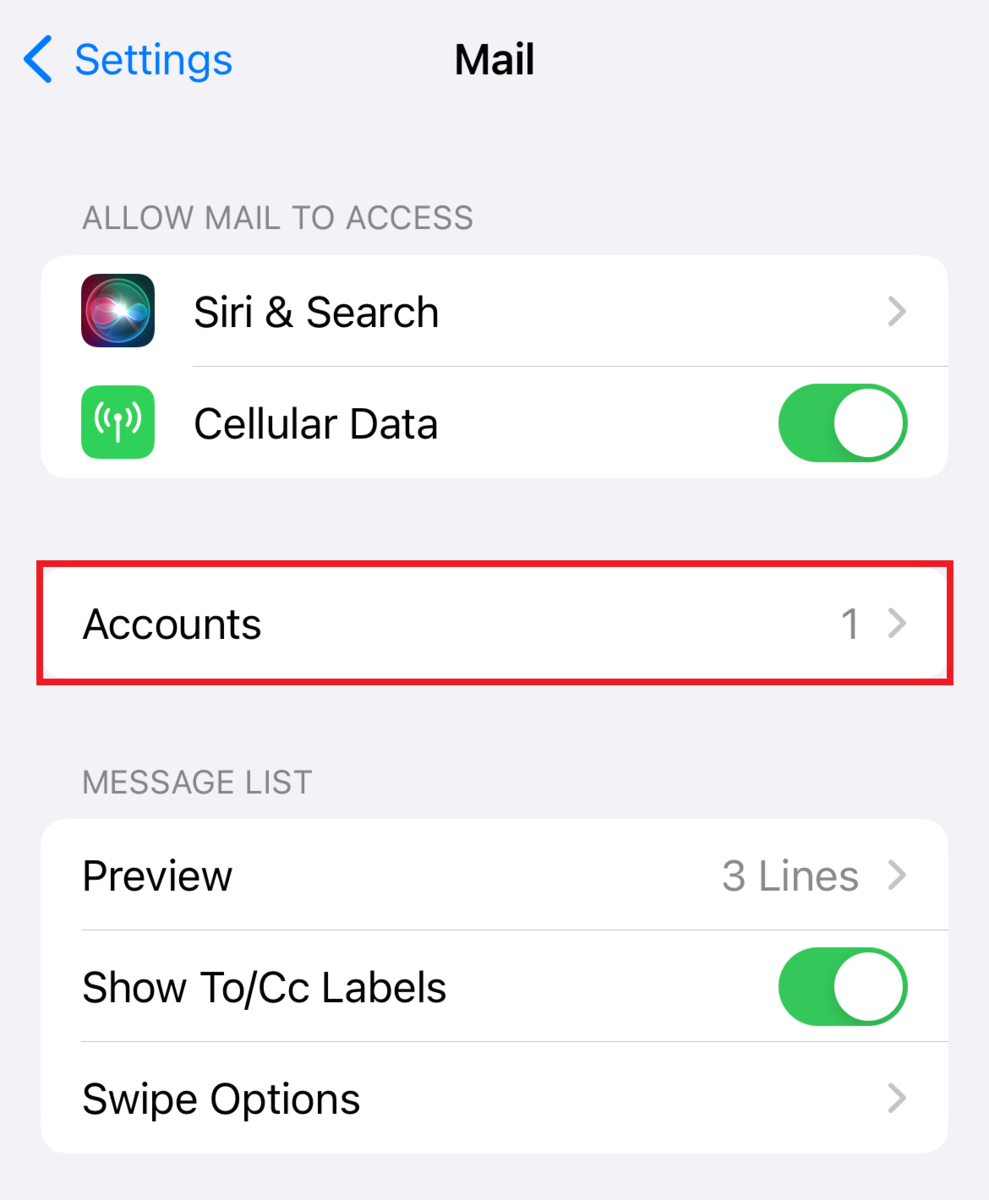
Tap Add Account and proceed to the next step.
3. Choose the Account Type
Choose an email provider from the list on the Add Account page.

Here’s a short guideline of the types of emails each provider supports:
- iCloud ‒ caters to icloud.com, me.com, and mac.com email addresses.
- Microsoft Exchange ‒ suitable for Exchange-based corporate email addresses and onmicrosoft.com accounts.
- Google ‒ best for gmail.com email addresses.
- Yahoo ‒ covers yahoo.com email addresses.
- Aol. ‒ includes aol.com, aim.com, and verizon.net emails.
- Outlook.com ‒ ideal for outlook.com, hotmail.com, and live.com email addresses.
If iOS supports your preferred email provider, it will prompt you to sign in on its page. Users of other email providers like Hostinger can manually add their account to iPhones through the Others option.
4. Enter Your Email Credentials
Tap Add Mail Account and enter the required data into the New Account form to start the iPhone email synchronization process:
- Name ‒ the sender’s name.
- Email ‒ the email address you want to add to your iPhone.
- Password – the email password you use to log in to your mail account.
- Description ‒ additional account information visible only to you.
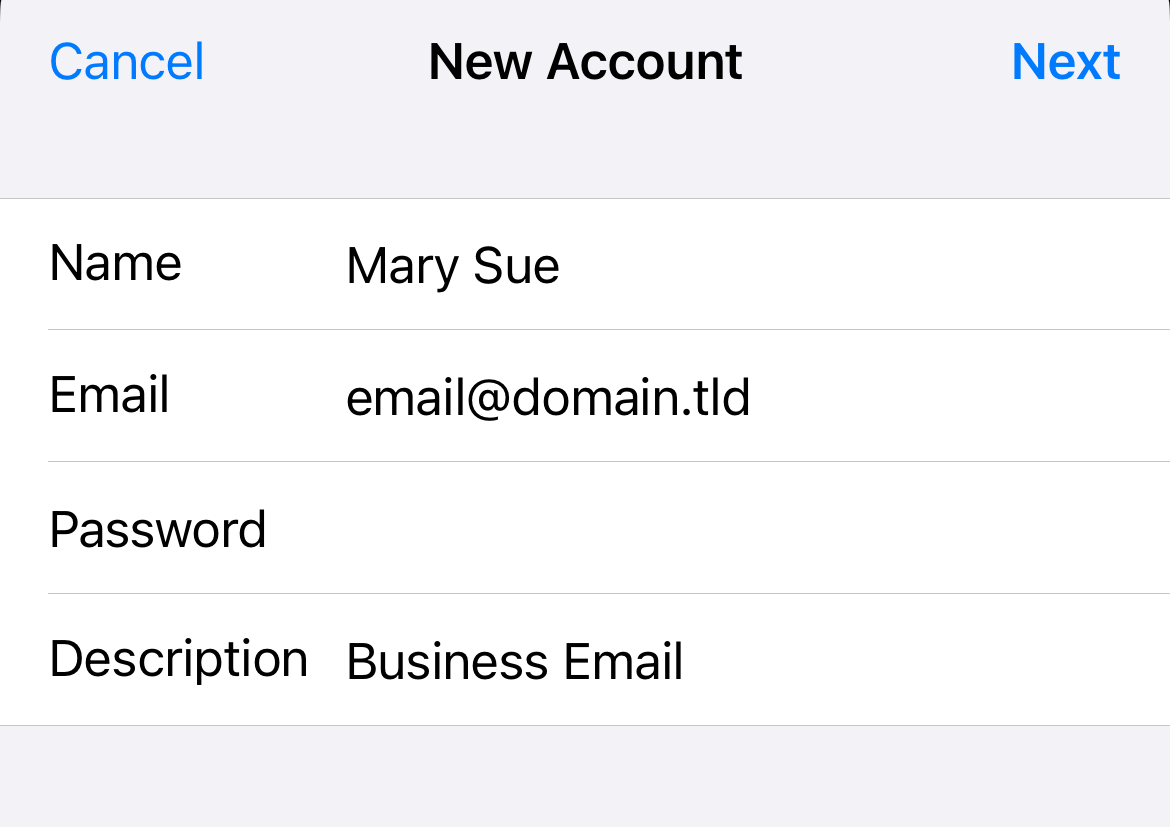
If Mail can’t find your email server settings, tap Next and proceed to the next step.
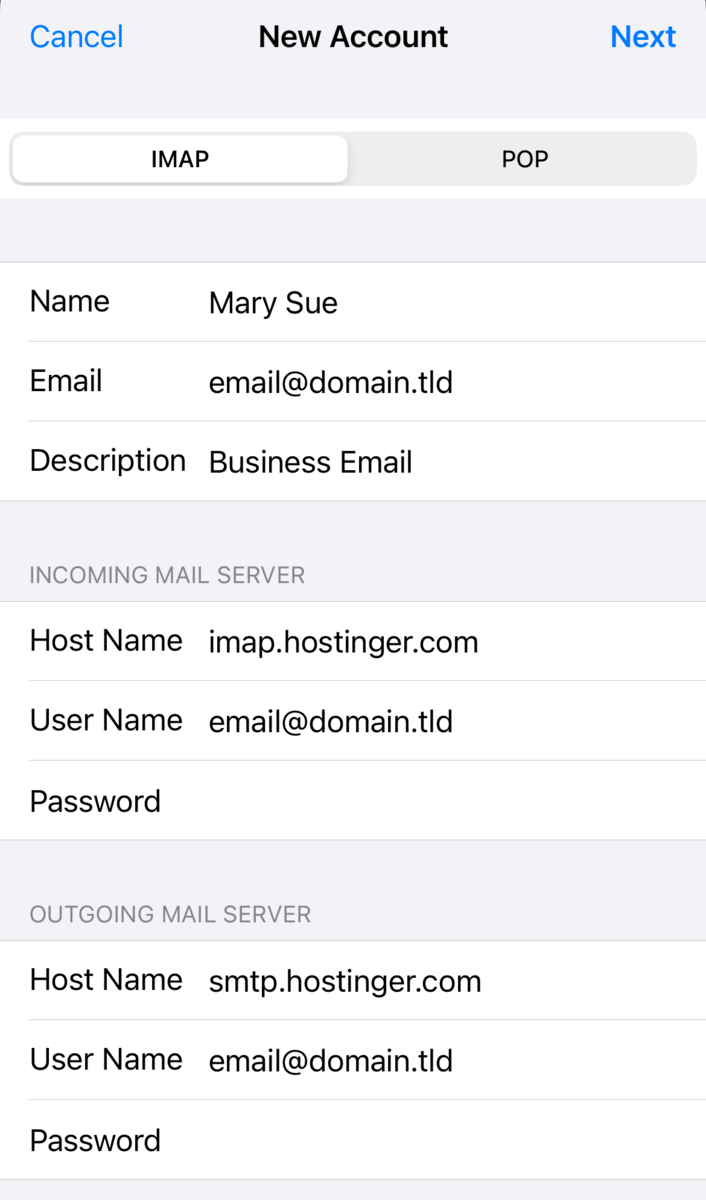
5. Input SMTP and IMAP Server Details
This step prompts you to configure incoming and outgoing mail servers, which are key components for sending and receiving emails.
The incoming mail server usually employs the IMAP protocol to handle email reception and synchronization across devices. Meanwhile, the outgoing mail server uses the SMTP protocol to send emails to the recipient’s incoming server.
During this step, you can choose between IMAP and POP. In this example, we’ll go with IMAP. Enter your email server settings from the previous section as follows:
- Host Name – the format is imap.domain.com for the incoming mail server and smtp.domain.com for the outgoing mail server.
- User Name – add your email address.
- Password – input your email password.
Important! The User Name and Password fields must be filled even if labeled optional.
6. Complete the Setup and Verify the Account
Once you enter the server details, click Next to start the verification process.
If it’s successful, you will see a prompt asking if you want to integrate your email account with the Mail app, the Notes app, or both. Make your selection and tap Save to complete the setup process.
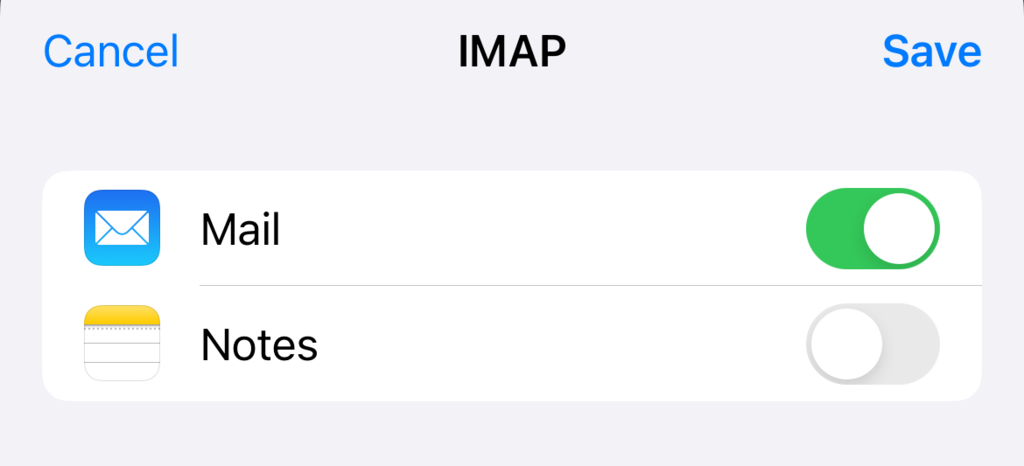
Your new email account will appear on the Accounts page.
Verify the iOS email account configuration by forwarding an email or sending a test email from the Mail app. Ensure the sender’s email address is linked to your new account. The test is successful if the email doesn’t appear in the Outbox.
Are You Working on Mac?
Adding an email account to Mac Mail follows similar steps. Check out our guide if you need help with the setup process.
How to Add Email Account to iPhone Automatically
Hostinger users can leverage the auto-configuration feature to streamline the email setup process on iOS devices. Keep in mind that this method only works for emails created with Hostinger Email and when your domain pointing to our hosting.
Before jumping into the steps for setting up Hostinger email on iPhone, check out our guide on creating an email account if you don’t have one yet.
Here’s how to add email to your iPhone using Hostinger’s Apple auto-configuration feature:
- Log in to your Hostinger account using the Safari browser.
- Go to Emails from hPanel and click Manage next to the email domain you want to add to the iPhone.

- From Email Accounts, navigate to Connect Apps & Devices on the left sidebar.
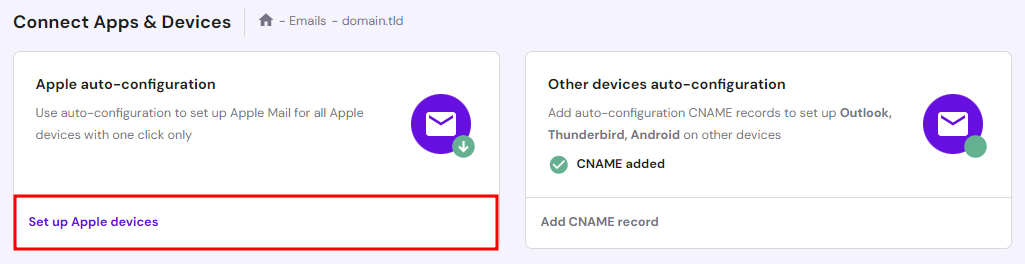
- Hit Set up Apple devices under the Apple auto-configuration section.
- Enter your name and email address, then click Continue.
- Scan the QR code or select Download profile to save the configuration profile on your iPhone. Remember to use Safari when doing this step to ensure a successful download.
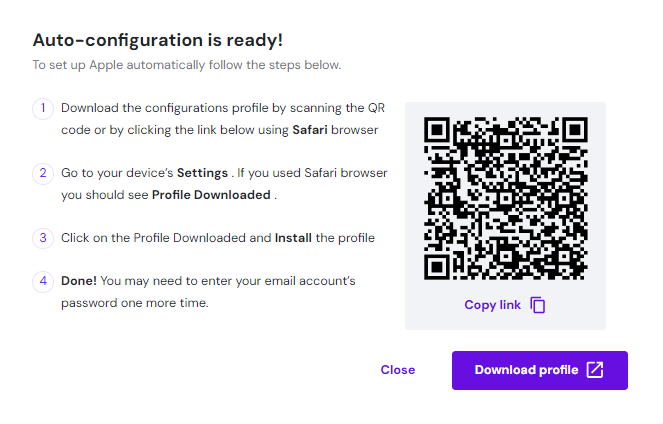
- Open your iPhone’s Settings app and tap Profile Downloaded. Follow the instructions to install the configuration profile.
Why You Should Use Hostinger
All Hostinger hosting plans come with free email. Take advantage of our 30-day money-back guarantee to test our hosting and mailing features.
Troubleshooting iPhone Mail Setup Issues
Incorrect mail server configuration and syncing are common causes of email issues with iOS devices. Here are some solutions for troubleshooting iPhone email setup errors:
Can’t Connect to the Email Server
The “Cannot Get Mail: The connection to the server failed” error appears when a connectivity issue prevents the email app from connecting to the server. Incorrect iPhone mail server settings, problems with your internet connection, or temporary server outages are common causes.
Follow these steps to resolve the connectivity issue:
- Verify internet connectivity ‒ ensure your iPhone has a stable internet connection. Try loading a web page to confirm.
- Restart Mail ‒ sometimes, simply closing and reopening the app can resolve connectivity issues.
- Re-enter server details ‒ remove and re-add your email account. Double-check the incoming and outgoing server details to ensure they’re correct.
Password and Authentication Errors
The “Incorrect password” or “Authentication failed” error indicates an issue with your password entry or the authentication method used. It can occur due to server issues or recent iOS updates.
Resolve this error by checking the authentication setting. Make sure your account uses the correct authentication method.
Here’s how to do it:
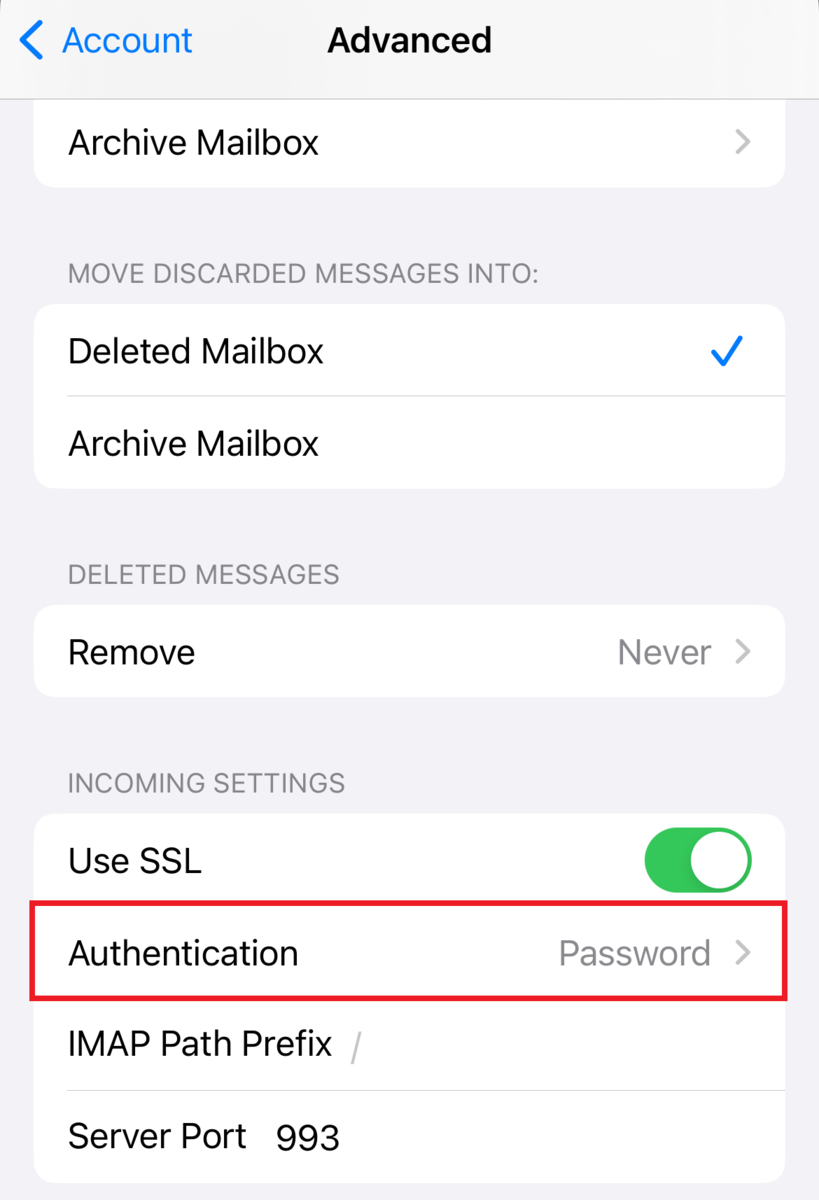
- Open the Settings app and tap Mail.
- Tap Accounts and enter your newly created email account.
- Tap Account and open the Advanced section.
- Scroll down until you see Incoming Settings. Check if Authentication is set to Password. If not, change it by tapping on the field.
You might enter the wrong email password if you encounter the “Cannot Get Mail: no password provided for [email address]” error during the email setup process. Consider resetting it if you’re unsure of the correct password.
Hostinger users can follow these steps to reset their email password:
- Go to Emails from hPanel and click Manage.
- In Email Accounts, find your email address within the Manage Email Accounts list and select the three-dot menu next to it. Hit Change Password.
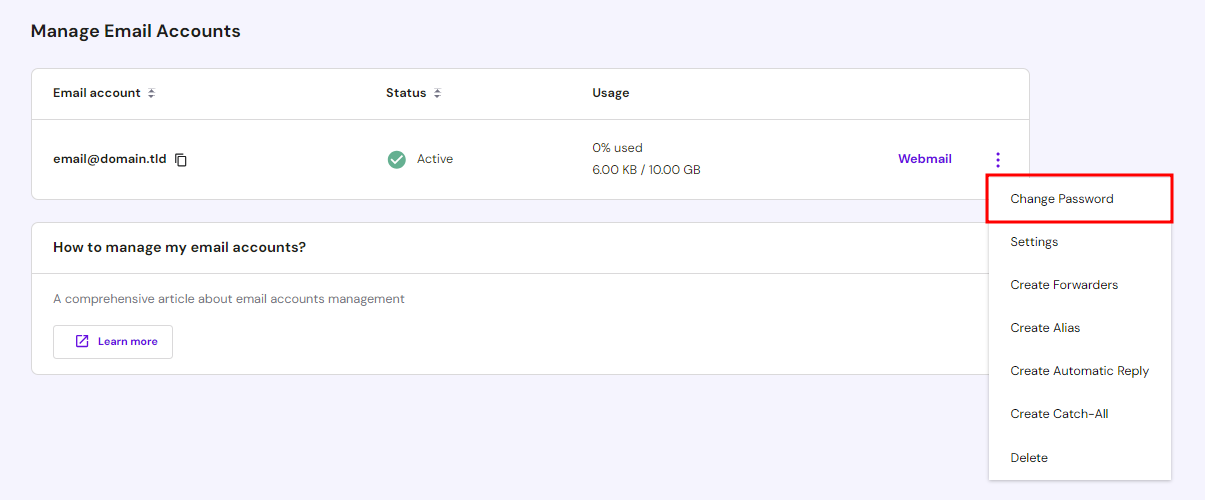
- Enter the new password and click Update. Make sure your password meets Hostinger’s standard security requirements.
If the authentication error persists, remove and re-add the email account manually. This method should resolve issues caused by a misconfigured SMTP port.
Incorrect SMTP and IMAP Settings Configuration
Seeing “Cannot Get Mail: the user name or password for SMTP is incorrect” implies SMTP or IMAP account setting issues.
To fix this misconfiguration, start by verifying your mail server settings in the Settings app. Tap Mail → Accounts and open your email account. Double-check the host name and user name for the incoming server.
Next, select Advanced and verify whether the Server Port is correct.
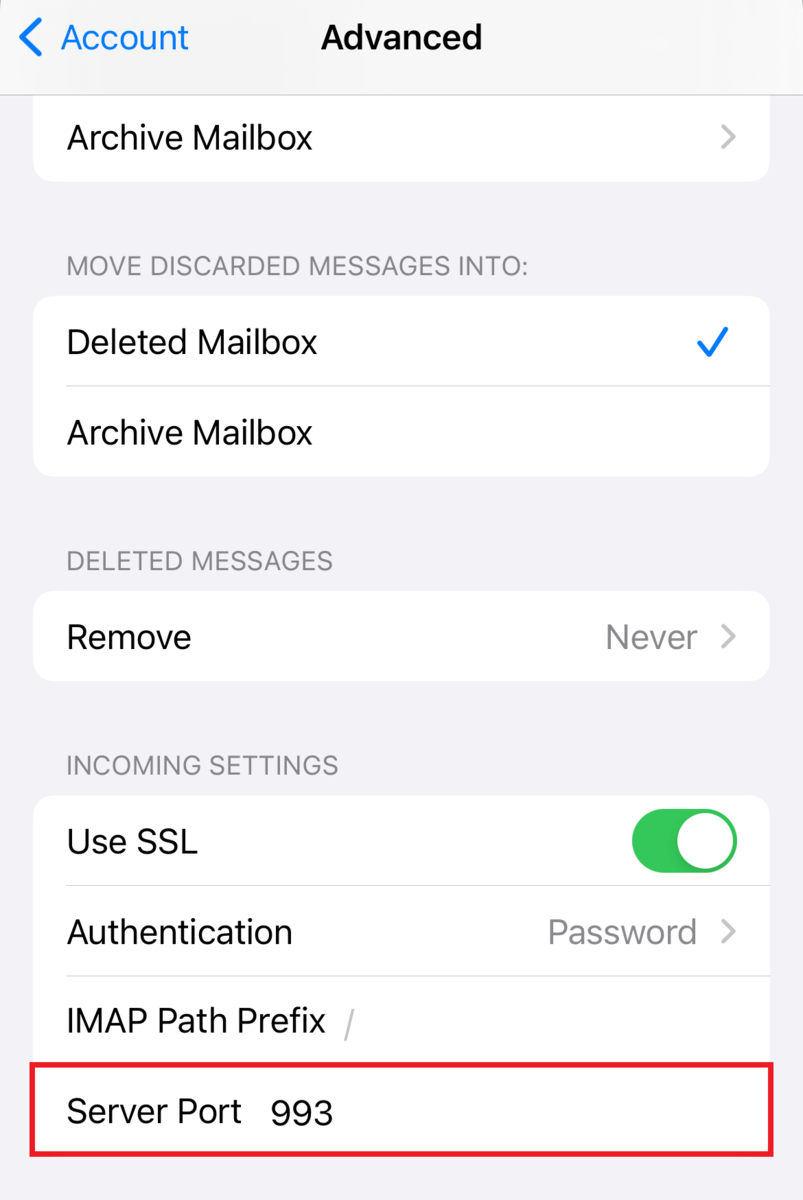
The SMTP protocol uses multiple ports, such as port 587, 465, and 2525, while IMAP employs port 993 with SSL. Contact your email provider to confirm the host name and port numbers to use.
Syncing Issues With the Mail App
Common syncing issues include email messages not updating, sent emails not appearing in the Sent folder, and new emails not showing up promptly.
To resolve syncing issues, check how often your iPhone retrieves new data. Most email services send new data from the server whenever possible by setting it to Push. Your email account will default to Fetch if it isn’t available as a setting.
Here’s how to verify it:
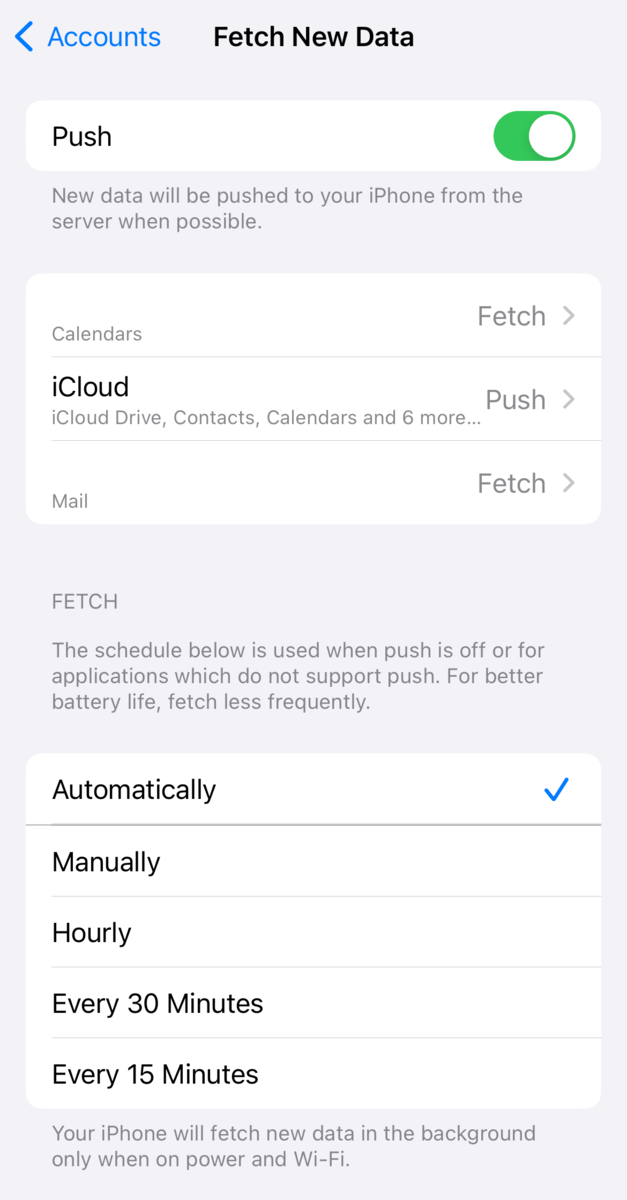
- Open the Settings app and tap Mail.
- Tap Accounts and open Fetch New Data.
- Ensure the Push toggle is on.
- The Fetch setting is set to Automatically by default, prompting your iPhone to retrieve new data when charging and connecting to WiFi. Adjust the schedule to suit your mailing workflow if necessary.
If reconfiguring the Push and Fetch settings doesn’t fix the syncing issue, try removing and re-adding your email account.
Conclusion
Successfully setting up your email account on an Apple iPhone helps you stay connected and productive on the go. Gain seamless email access by entering the right email settings, using secure ports, and ensuring correct server details.
As an email provider, Hostinger offers Apple auto-configuration that streamlines the process to add email to iPhone or an iOS device. If you’re not a Hostinger user, follow these steps to manually configure email on your iPhone:
- Locate your email settings.
- Navigate to the iPhone’s Mail settings.
- Choose the account type.
- Enter your email credentials.
- Add SMTP and IMAP server details.
- Verify the account.
We hope this article provided helpful insights on iPhone Mail app configuration. Leave a comment below if you still have questions about setting up email on iPhone devices.

Jordana is a Senior Content Writer with a background in Information Systems. She has over five years of experience in WordPress and is casually dabbling with PHP and MySQL. Her passion for writing and technology drives her to create tutorials for anyone wanting to build their online presence. Follow her on LinkedIn.