How to deploy a website from Cursor
Oct 07, 2026
/
By Ariffud M.
/
8 min Read
To deploy a website from Cursor, push your code to a GitHub repository and connect that repository to a hosting provider, which handles the build and publishing steps.
Cursor itself is an AI-first code editor built on the Visual Studio Code (VS Code) codebase, letting you write, edit, and scaffold entire projects through natural language prompts – but it doesn’t include built-in hosting.
Here’s how to go from Cursor to a live site in six steps:
- Prepare your project for production by running a build command and fixing any errors that Cursor’s AI flags.
- Push your code to a GitHub repository from Cursor.
- Connect the repository to your hosting provider.
- Configure the build settings so the hosting provider knows how to compile and serve your project.
- Deploy your website and wait for the hosting provider to publish it.
- Test the live site across devices to confirm everything works as expected.
For Hostinger customers, the Hostinger Connector plugin lets you deploy directly from Cursor Chat with a single prompt instead of managing Git, build settings, and hosting dashboards separately.
If neither of these methods fits your setup, you can still deploy your website from Cursor using a CLI tool like Vercel or Netlify for quick one-command deployments, GitHub Pages for free static hosting, or Cursor-generated files that you upload manually through your host’s file manager.
Regardless of the method, if something fails along the way, paste the error output into Cursor Chat. The AI reads the error, and either suggests a fix or rewrites the problematic file for you.
Prerequisites for deploying a website from Cursor
To deploy a website from Cursor, you need Cursor and Git installed on your computer, plus an active GitHub account and a web hosting plan. The requirements are similar to deploying websites from other integrated development environments (IDEs).
To do this, you’ll need:
- Cursor. Download the desktop app from cursor.com for Windows, macOS, or Linux, then sign in to your account.
- Git. This version control tool lets you push your code from Cursor to GitHub. Install Git if you haven’t already.
You’ll also need these accounts and services:
- GitHub account. Use GitHub to store your project in a repository that your hosting provider can access to publish your site. A free account is enough.
- Web hosting plan. This is where you host your website and make it accessible to visitors.
How to deploy a website from Cursor using GitHub
To deploy a website from Cursor through GitHub, push your code to a GitHub repository and connect it to a hosting provider. The hosting provider then pulls your code and publishes your site.
If you’ve deployed a website from VS Code before, the process is nearly identical because both editors use the same Git system.
They also have their own AI chat features. You can use them for similar tasks, such as preparing your project, pushing it to GitHub, and troubleshooting issues.
The difference is that Cursor puts AI at the center of every workflow, while VS Code treats it as a companion tool. This makes Cursor a natural fit if you built your project primarily through prompts, also known as vibe coding.
1. Prepare your project for deployment
To prepare your project, open Cursor Chat and ask the AI to check everything before you push:
Review this project for deployment readiness, fix any problems, and run the production build.
If your project uses a build tool like React, Vue, Next.js, or another Node.js framework, Cursor scans your code, resolves common problems like missing build configurations or hardcoded localhost references, and runs npm run build for you. If the build fails, it reads the error and suggests a fix.
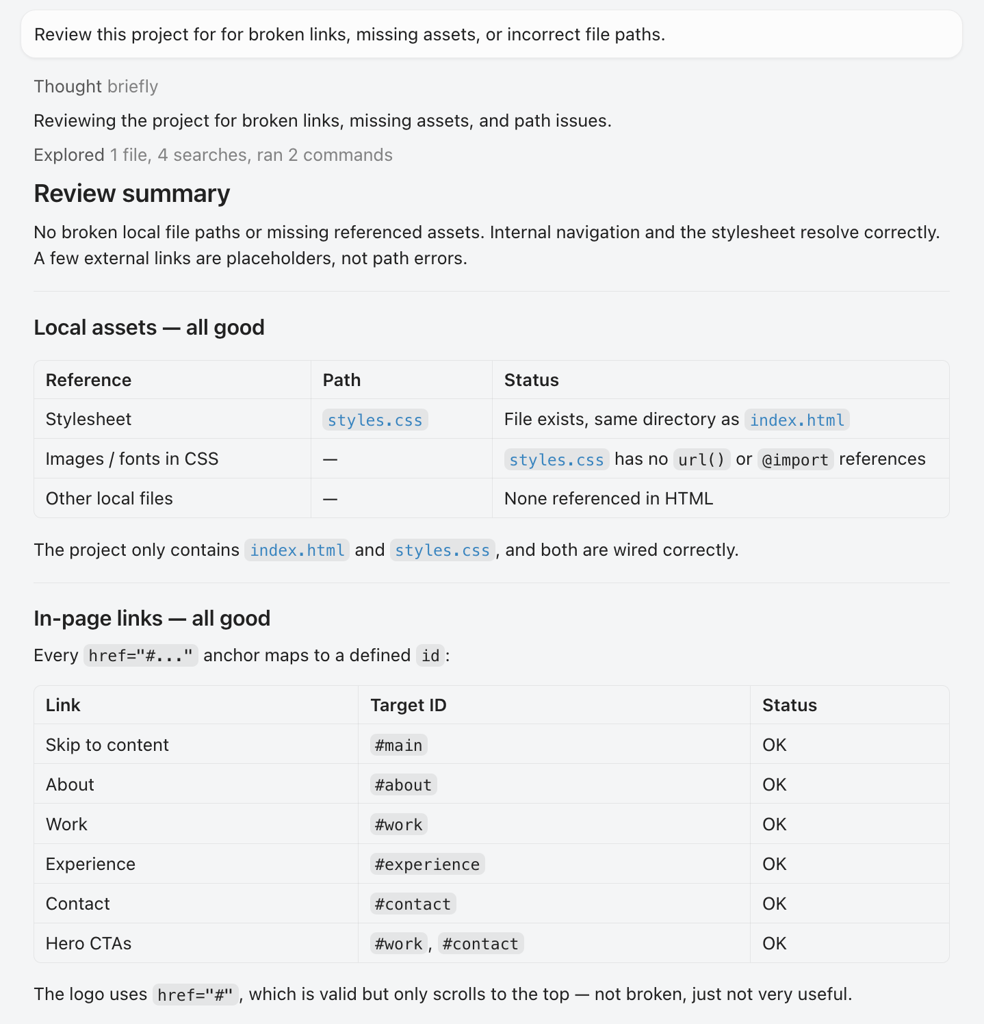
For plain HTML and CSS sites, you can still ask Cursor to review for broken links, missing assets, or incorrect file paths before you push.
2. Push your code to GitHub
To push your code, tell Cursor your GitHub username and preferred repository name in the chat:
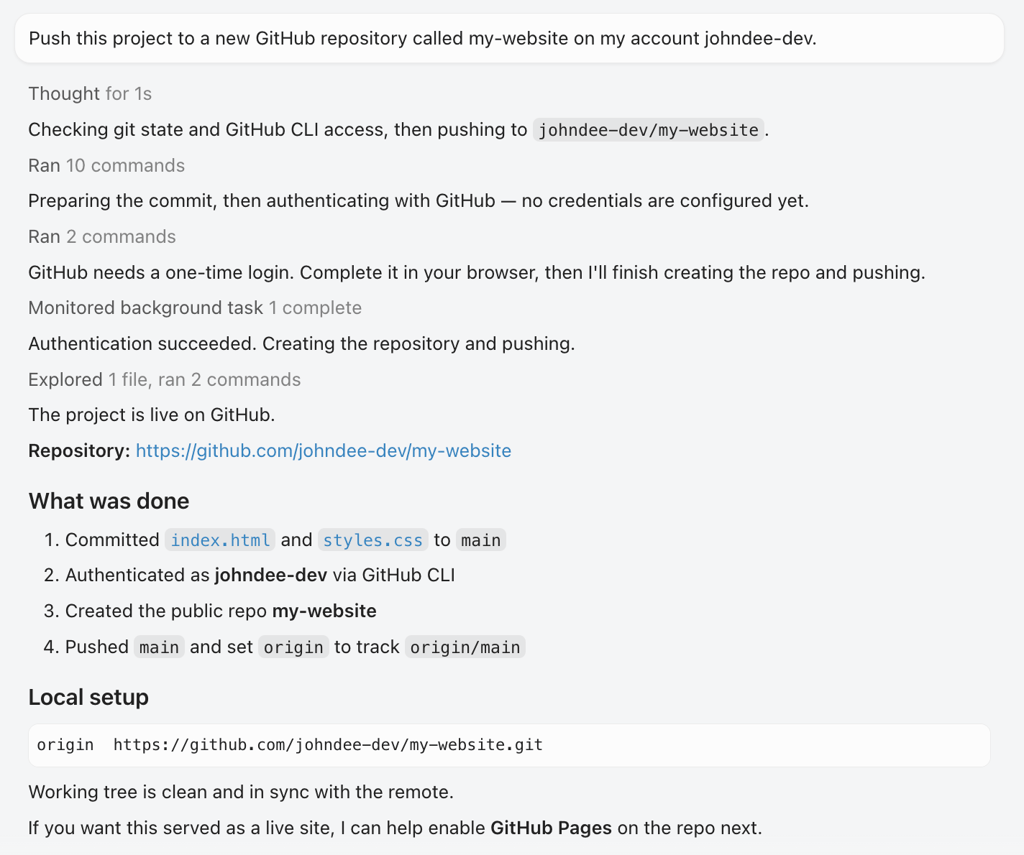
Push this project to a new GitHub repository called my-website on my account your-username.
Cursor runs the Git commands, creates the commit, and pushes your code. If this is your first push, GitHub opens a browser window asking you to sign in and authorize access.
If you’d rather run the commands yourself, open the terminal by going to View → Terminal, then run:
git init

git add .

git commit -m "Initial commit"

git remote add origin https://github.com/your-username/my-website.git

git push -u origin main
Replace your-username with your GitHub username. If you use this method, create an empty repository on GitHub with no README file beforehand.
3. Connect your GitHub repository to a hosting provider
You typically connect a hosting provider to a GitHub repository from the host’s dashboard. Look for the deployment settings, Git settings, or GitHub integration menu. Then, authorize GitHub access so the host can access your repository.
On Hostinger’s Business web hosting plan and above, for example, you can connect to GitHub in two ways, depending on your project type.
If you’re deploying a Node.js app, including apps built with Node-based frameworks like React or Express, go to Hostinger dashboard → Websites → Create Website → Web App.
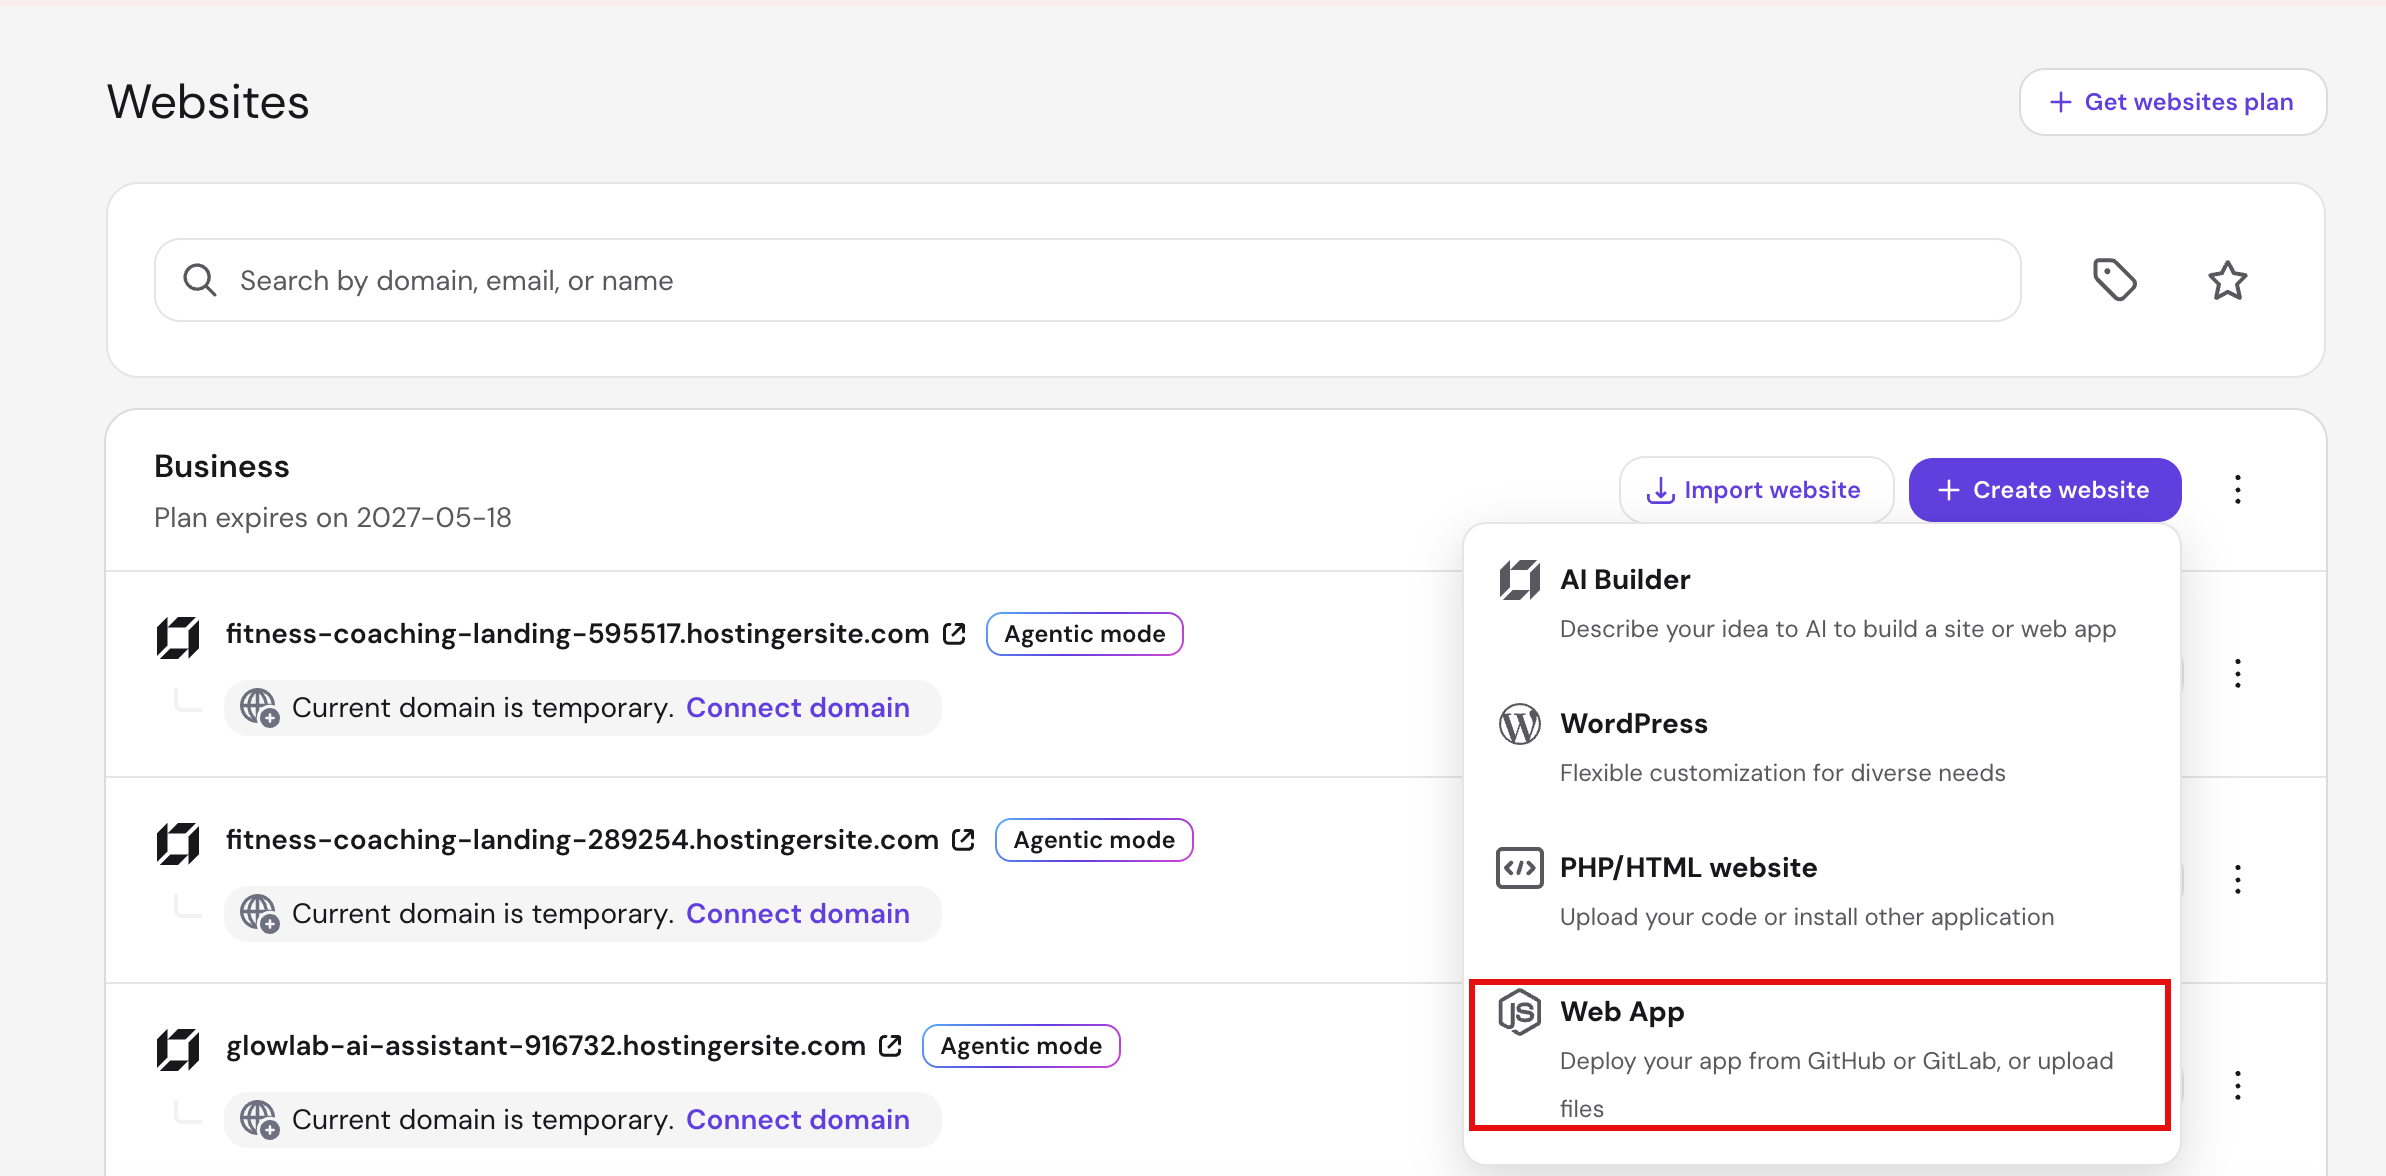
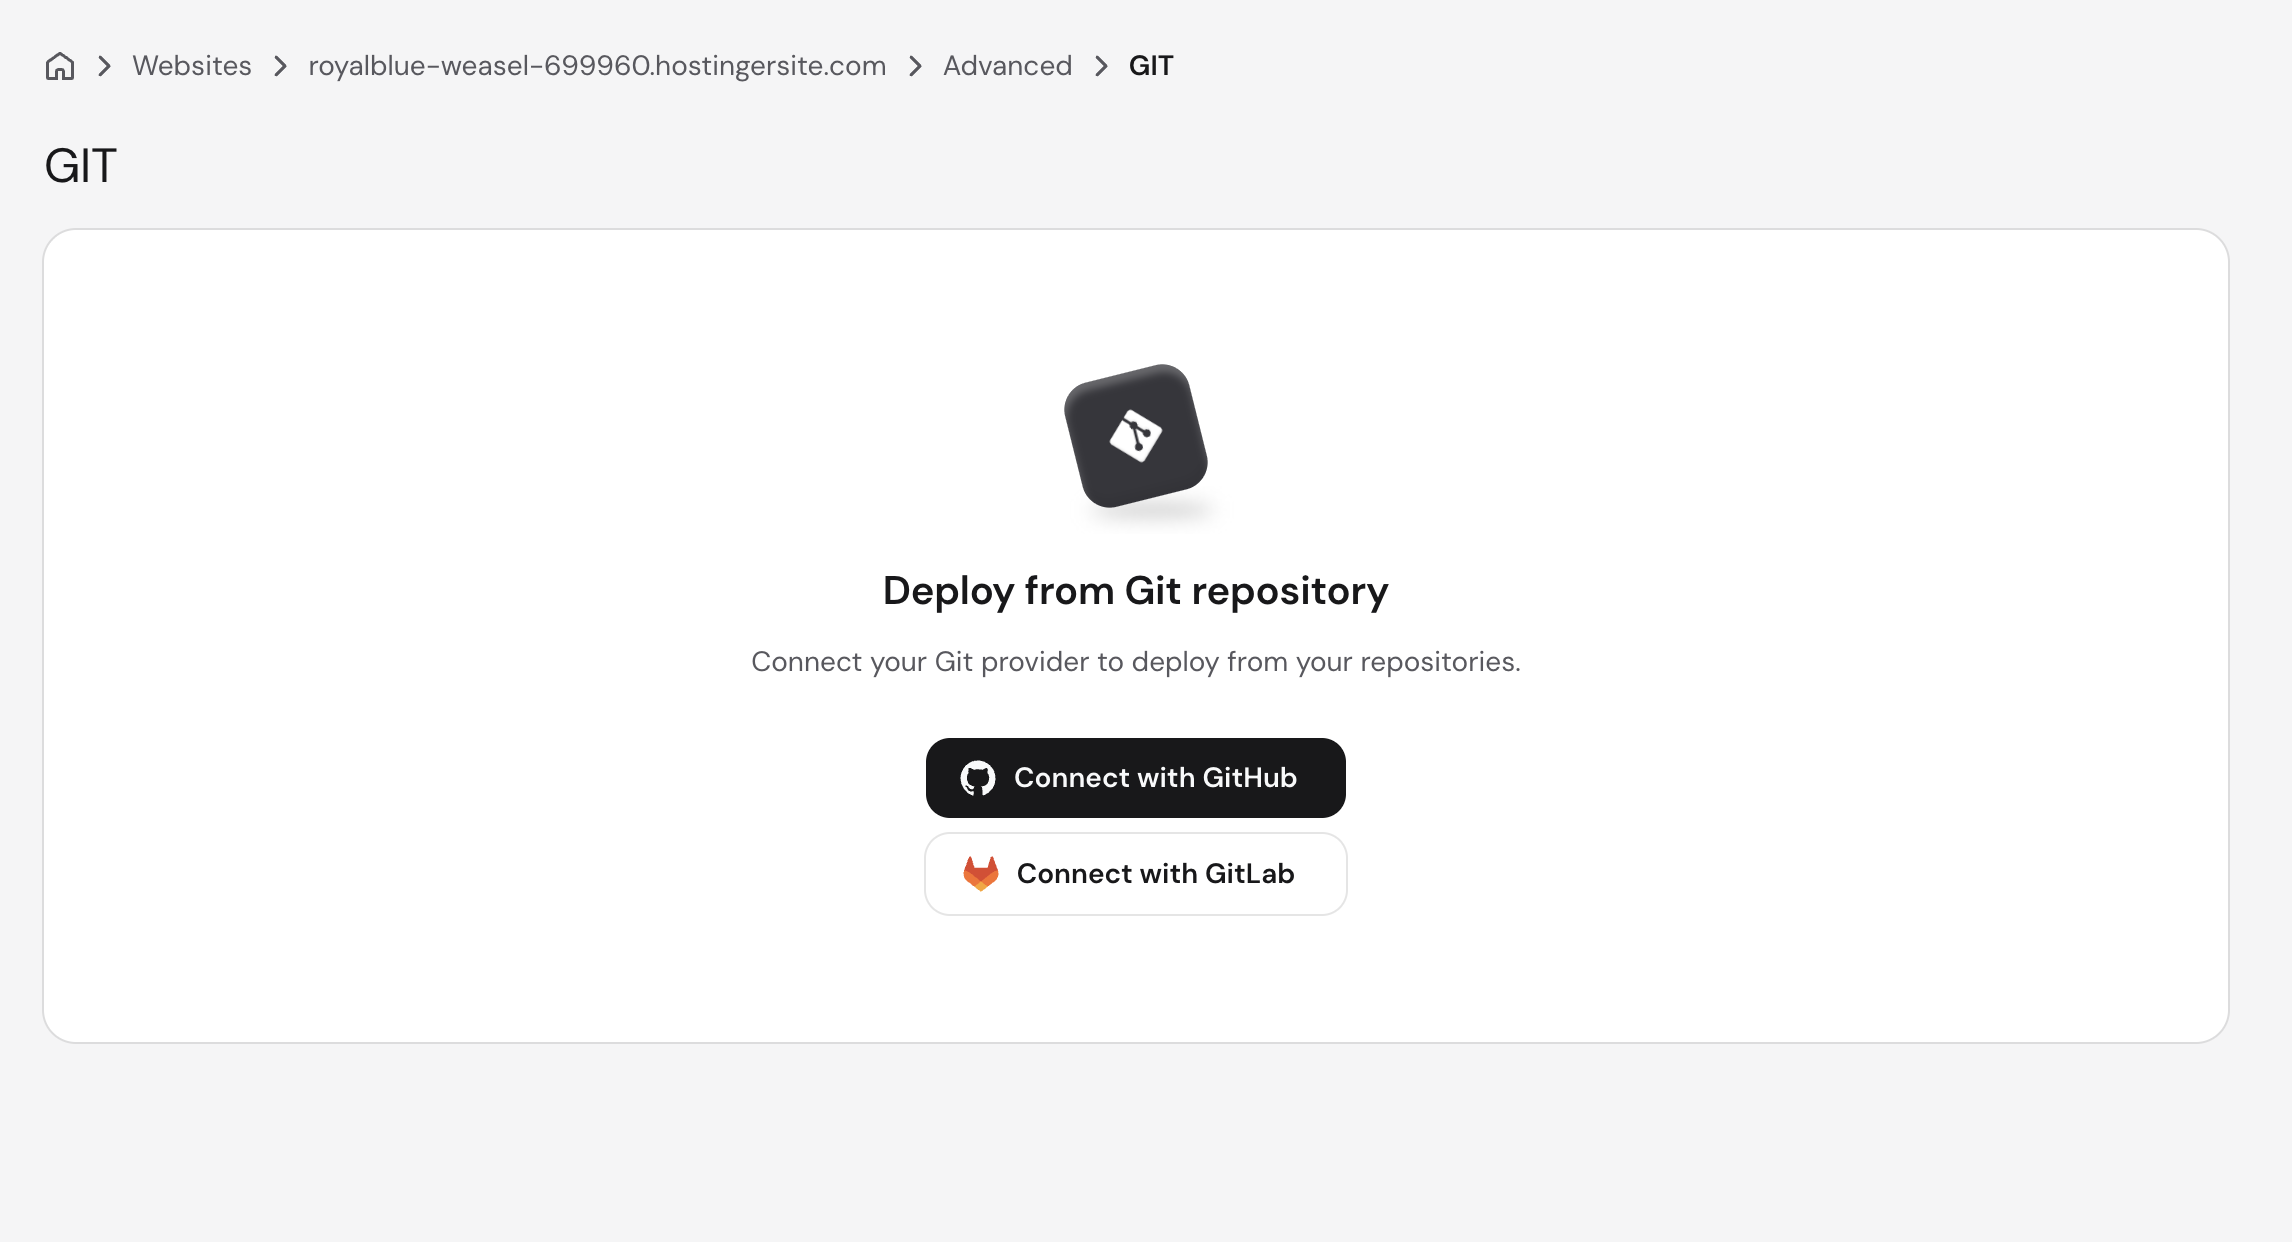
You’ll be prompted to enter your custom domain or use a free temporary domain and asked to choose your hosting location. Once you do that, you simply click Connect with GitHub to grant access.
For a static site built with HTML, CSS, and JavaScript, a PHP project, or a WordPress site, navigate to Hostinger dashboard → Websites → select the site → Dashboard → Advanced → Git. Then, click Continue with GitHub and authorize the integration.

4. Configure your build settings
After connecting GitHub to your hosting provider, you’ll typically need to specify how your provider should build and serve your project. For static sites, you can skip this step.
For framework-based projects, you need to fill in three fields:
- Build command. The command that compiles your code into production files. React and Vite use npm run build. Next.js uses next build.
- Output directory. The folder where the build command places the finished files. Vite outputs to dist, Create React App to build, and Next.js to .next. If you enter the wrong folder, your hosting provider may publish an empty page.
- Start command. For a Node.js app, the command that launches your server is typically npm start or node server.js.
On Hostinger, the system automatically detects the correct build and start settings. You can still adjust these settings if needed.
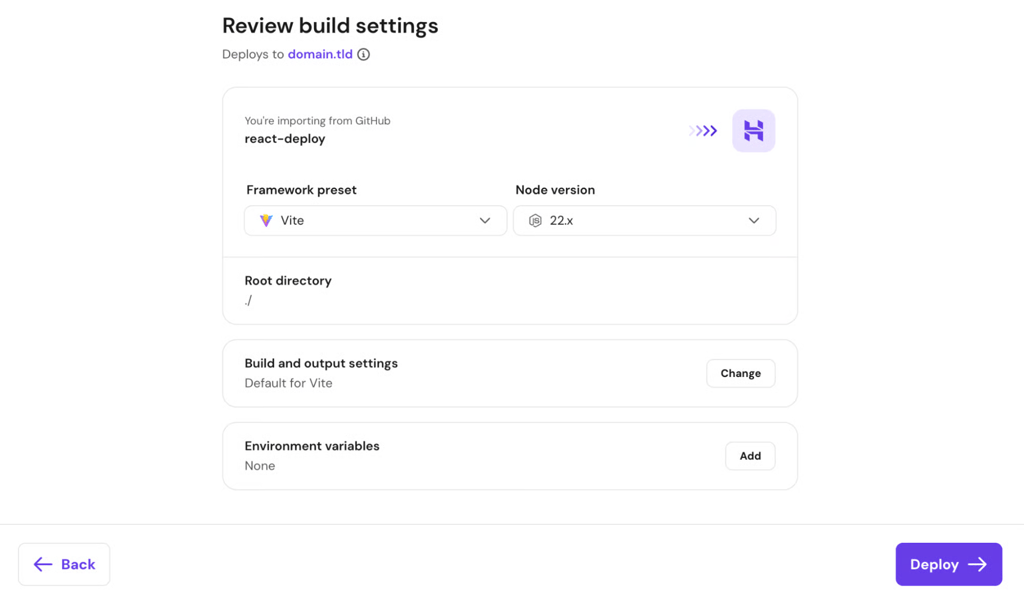
If you’re not sure what values to use, ask Cursor Chat something like, “What are the build command, output directory, and start command for my project?” The AI reads your package.json and framework configuration to give you the answers.
5. Deploy your website
Once you’ve configured the build settings, follow the on-screen instructions in your hosting dashboard and wait for the build to finish. Most providers show a real-time log that lets you track progress.
When the build succeeds, you’ll see a confirmation message and a URL to your live site, like this:
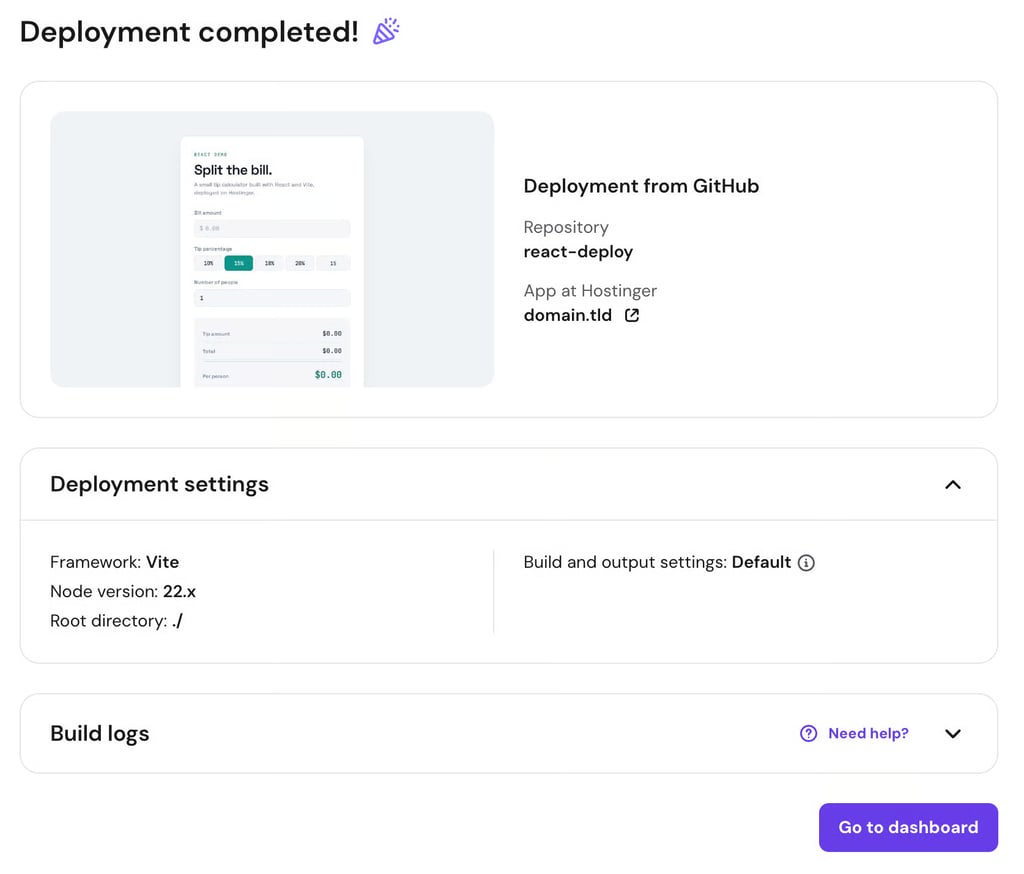
If the build fails, the log shows what went wrong. Paste the error into Cursor Chat, let the AI fix the issue, and push the changes to GitHub. Then, redeploy your project from your hosting dashboard.
6. Test your live site
Your website deployment is complete, but it’s worth checking that everything works as expected. Open the URL in your browser and click through every page to confirm that images load, forms submit, and links point to the right destinations.
Test on a phone and tablet too, since layouts can behave differently on smaller screens. Also, confirm that your SSL certificate is active by checking that the site loads over HTTPS and shows a secure connection status in the address bar.
If something looks off, describe the issue in Cursor Chat and attach a screenshot if needed so that the AI can analyze and fix it. Then, ask it to push the changes to GitHub.
Some providers, including Hostinger, support automatic redeployment, so your site updates every time you push new code to GitHub. Confirm with your provider whether this feature is available on your plan.
How to deploy a website from Cursor with Hostinger Connector
To deploy a website from Cursor using Hostinger Connector, install the plugin in Cursor, connect your Hostinger account with an API token, and ask Cursor’s AI to publish your project to your hosting plan.
Hostinger Connector is an extension (or plugin in Cursor’s terms) that gives your AI agent direct access to more than 100 Hostinger tools for website deployment, domain management, DNS configuration, VPS monitoring, and account billing.
With Hostinger Connector, you can handle the entire deployment from a single Cursor Chat prompt instead of pushing your code to GitHub and opening Hostinger dashboard to connect the repository and deploy your site.
To use it, you only need an active Hostinger account. For tasks like website deployment, make sure you have an active Hostinger service, such as a hosting plan.
1. Set up Hostinger Connector in Cursor
To set up Hostinger Connector, open Cursor Chat and type:
/add-plugin https://github.com/hostinger/hostinger-cursor-plugin
Cursor downloads the plugin and sets up the Hostinger MCP server in your project. Once it finishes, you’ll see a confirmation listing everything it installed, including deployment skills and the MCP server configuration.
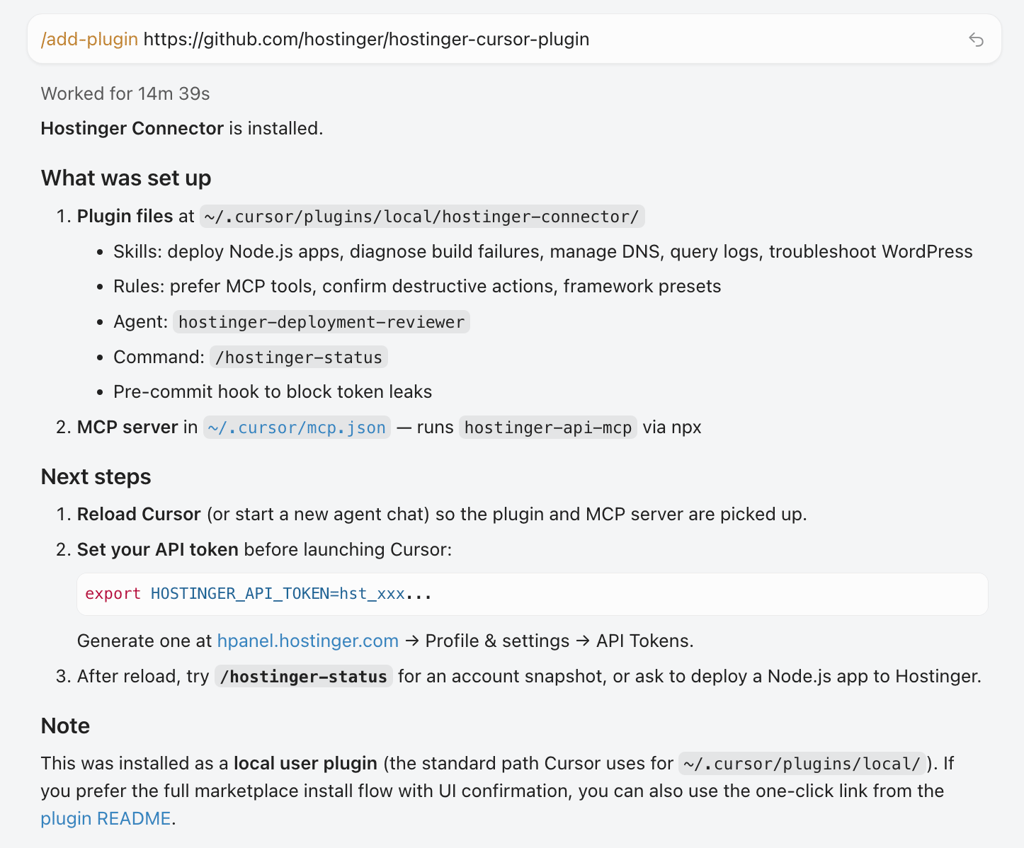
The same confirmation also tells you what to do next, including how to set your Hostinger API token and restart Cursor to apply the new configuration.
2. Connect your Hostinger account
After installing Hostinger Connector, connect the plugin to your Hostinger account with an API token. Here’s how to get one:
- Log in to Hostinger dashboard and go to Dev tools → API from the left sidebar.
- Click Generate new token, enter a name, and choose an expiration date.
- Click Generate and copy the token right away, since Hostinger dashboard only shows it once.
After you copy the token, open your computer’s built-in terminal (not Cursor) and set it as an environment variable.
On macOS or Linux:
export HOSTINGER_API_TOKEN=your-token-here
On Windows:
setx HOSTINGER_API_TOKEN "your-token-here"
Replace your-token-here with the token you copied earlier.
Then, fully quit Cursor with Cmd+Q on macOS or File → Exit on Windows, and reopen it.
Start a new chat and type /hostinger-status to confirm the connection is working. If you see your active services listed in the response, you’re connected.
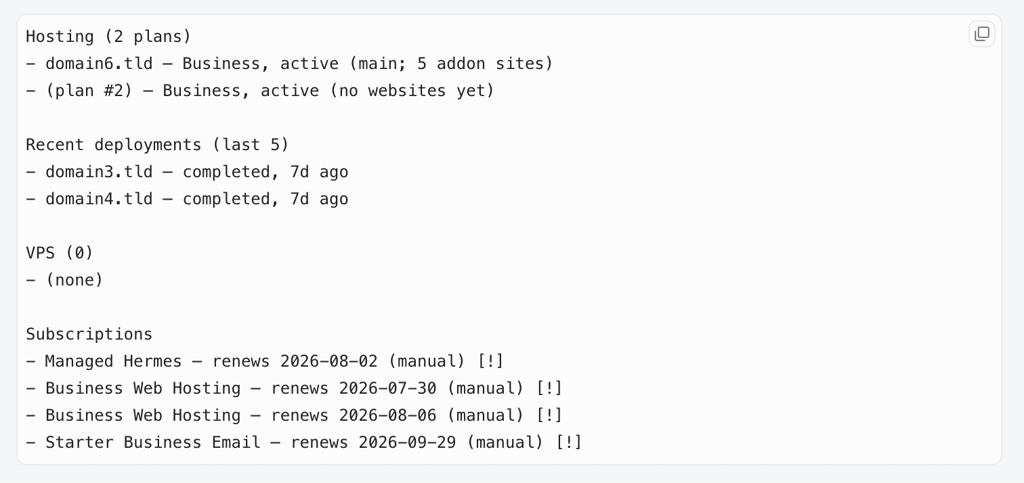
You can also verify this by going to Settings → Tools & MCPs and checking that the hostinger server shows a green status.
3. Deploy your project to Hostinger
To deploy your project to Hostinger, open it in Cursor, then ask the AI to launch it with a prompt like:
Deploy this project to my Hostinger Business hosting plan on domain.tld.
Cursor reads your project, runs the build if needed, and pushes the files to your Hostinger account. Once the deployment finishes, you’ll get a link to your live site directly in the chat.
Since Cursor lets you build entire projects through vibe coding, you can also develop and deploy in a single prompt:
Build a personal portfolio site with a hero section, about page, and contact form. Deploy it to any of my active hosting plans on Hostinger using a temporary domain.
This works well for simple projects. For anything more complex, you’ll likely go through a few rounds of prompting and refinement before deployment, but the process stays the same.
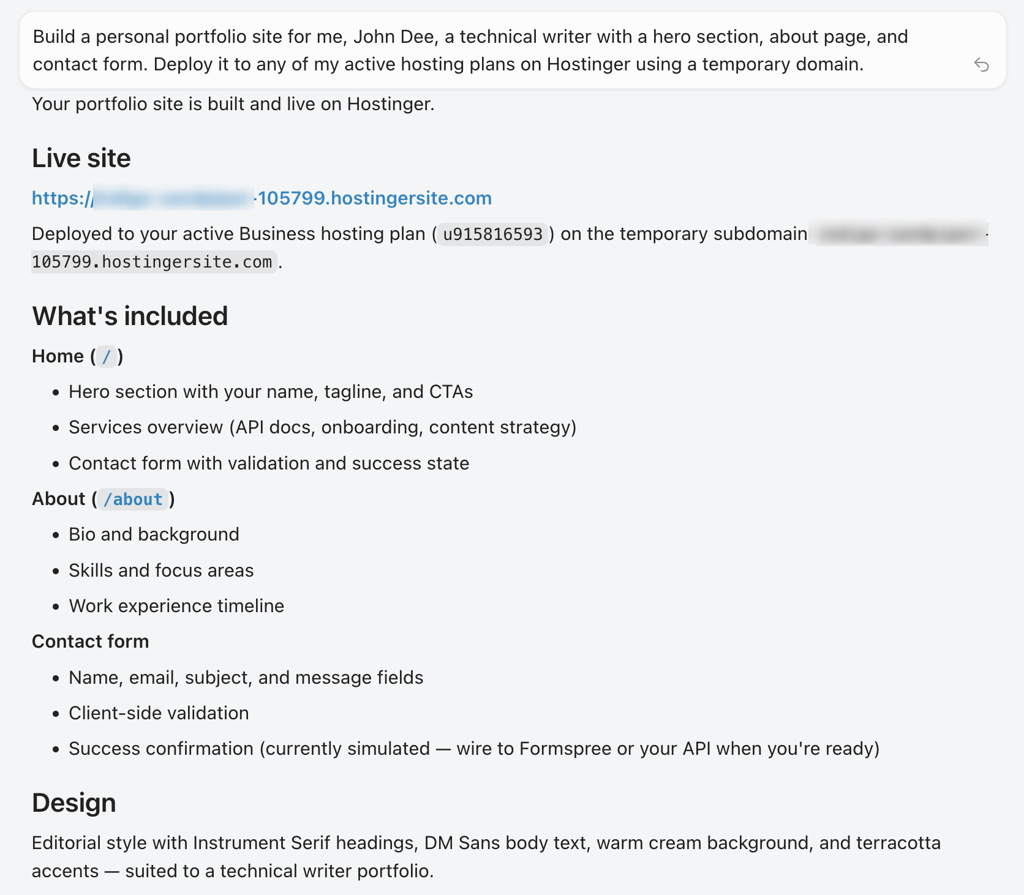
If something fails during deployment, type:
Diagnose my last build failure.
The plugin pulls the build logs from Hostinger and identifies the problem. From there, ask the AI to fix the issue and redeploy.
Alternative ways to deploy a website from Cursor
You can publish a website from Cursor using a CLI tool like Vercel or Netlify, GitHub Pages for static sites, or manual file uploads through your web host.
These alternatives are useful if your hosting provider doesn’t support GitHub integration or if you’re not a Hostinger customer and can’t use Hostinger Connector.
How to deploy directly from Cursor’s terminal using a CLI tool
Some hosting platforms, like Vercel and Netlify, support direct deployment to their servers via their own CLI tools.
On Vercel, open Cursor’s terminal by going to View → Terminal, then run:
npm i -g vercel

vercel login

vercel
For Netlify, the process is similar:
npm i -g netlify-cli

netlify login

netlify deploy
These tools open a browser window the first time you run them so you can sign in.
After the deployment finishes, you’ll get a live URL to access your site. Both platforms let you connect a Git repository once you’re set up, so future pushes can trigger automatic redeployments.
How to publish a static site to GitHub Pages from Cursor
GitHub Pages lets you host a static site for free directly from a GitHub repository.
It works best for projects like portfolios, documentation sites, and landing pages. If your project uses server-side code or a database, GitHub Pages won’t work.
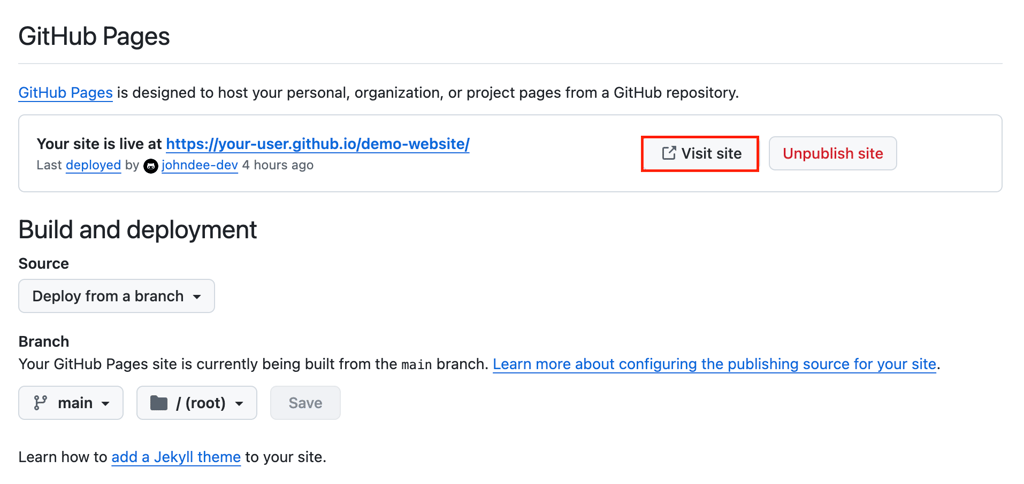
To set it up, push your code to GitHub from Cursor as usual, then open the repository on GitHub. Go to Settings → Code and automation → Pages, then choose your branch under Build and deployment. To view your published site, click Visit site.
How to deploy from Cursor by uploading files manually
If you don’t want to set up Git or install additional tools, you can upload your website files directly through your hosting provider’s file manager.
You can ask Cursor to package your project into an upload-ready format, such as a .zip file, based on what your hosting provider accepts. It saves the file directly in your project folder.
From there, upload the file through your web host’s file manager. You’ll need to repeat this process every time you update your site because this method doesn’t support automatic redeployment.
What’s next after your first deployment
After your first deployment from Cursor, connect a custom domain if you haven’t already, set up backups to protect your site as you keep building, and add error tracking to catch issues from visitors.
- Connect a custom domain. If your site is still on a temporary URL or default subdomain, buy a domain and point its DNS settings to your hosting provider. If you get your domain and hosting from the same provider, they’ll typically connect automatically.
- Keep iterating. The deployment process stays the same every time, so treat your live site as a work in progress. Ask Cursor to add new pages, redesign sections, or build new features, then push your changes.
- Set up backups. Create backups of your site so you can roll back if a future deployment introduces a bug. Most hosting providers, including Hostinger, offer automated daily backups, and some let you create a manual snapshot before major changes.
- Add error tracking. Tools like Sentry can capture errors that real visitors encounter, even ones you can’t reproduce on your own computer. You can then paste the error reports into Cursor Chat for AI-assisted debugging.
This article is a localized version of How to deploy a website from Cursor, originally published in English.
All of the tutorial content on this website is subject to Hostinger's rigorous editorial standards and values.

Ariffud is a Technical Content Writer with an educational background in Informatics. He has extensive expertise in Linux and VPS, authoring over 200 articles on server management and web development. Follow him on LinkedIn.