How to redesign a WordPress website
Sep 30, 2026
/
By Aris S. & Alma
/
13 min Read
To redesign a WordPress website, plan the changes first, build them on a copy of your site, and publish only after you’ve tested everything.
A redesign means updating how an existing site looks and works instead of building a new one. It can involve visual changes such as colors and typography, structural changes such as navigation and page layouts, or improvements to content, mobile usability, and performance.
Because these changes can affect your URLs, content, navigation, and technical setup, decide what to preserve during the planning process.
Here’s the full process of a WordPress website redesign, from preparation through launch:
- Audit your website.
- Set goals and plan the new structure.
- Choose a redesign method.
- Create a staging copy.
- Build and update the redesigned site.
- Test the site and protect its SEO.
- Publish and monitor the results.
How to prepare for a WordPress website redesign
Prepare for a WordPress redesign by auditing the current site, setting goals, planning the new structure, backing up your files, and choosing how you’ll rebuild it.
The audit shows you what needs attention, the goals define what you want to improve, and the plan turns those findings into specific changes to the site.
Audit your current website
Audit your WordPress site to find out which pages load slowly, where visitors leave, which content drives traffic, and where the design or navigation creates friction.
Check these areas:
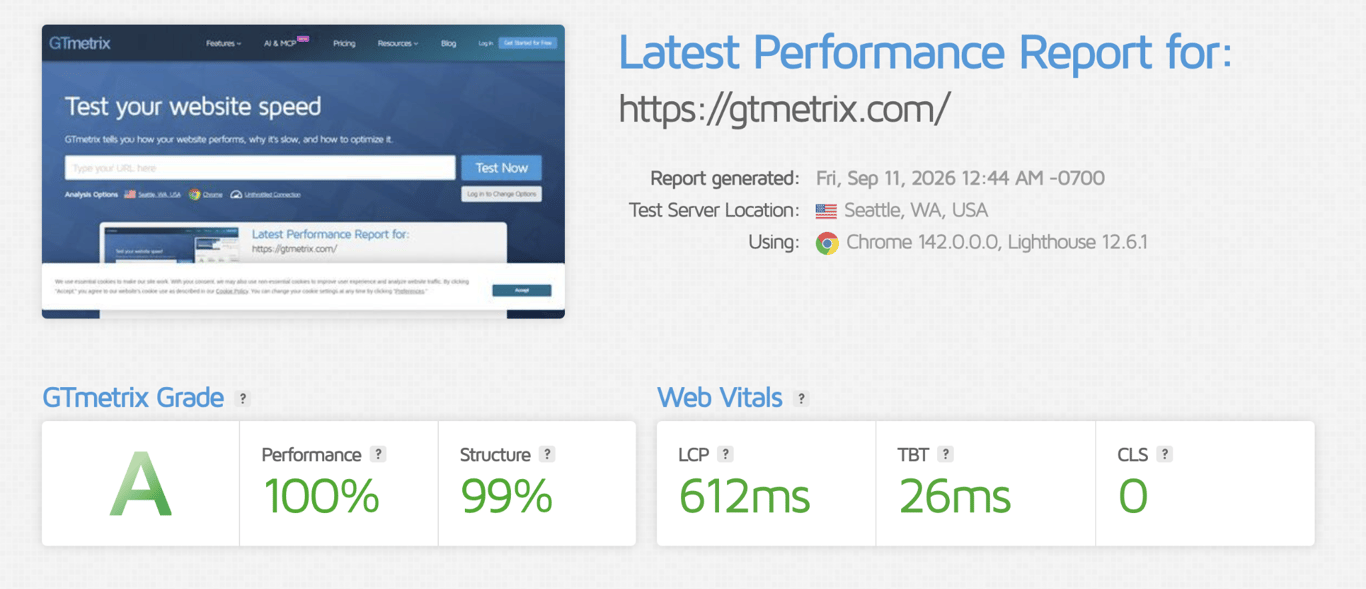
Page speed. Run your site through GTmetrix or Google PageSpeed Insights. Note how long the main content takes to appear (Largest Contentful Paint also called LCP), total page load time, and page size.
Traffic and engagement. Open Google Analytics and check which pages get the most visits, where visitors drop off, and how long they stay. Preserve high-performing pages unless the audit identifies a specific reason to change them.
Mobile usability. Test your site on a phone. Look for text that’s too small, buttons too close together, and layouts that break on narrow screens. Google retired Search Console’s Mobile Usability report, so check the mobile tab in PageSpeed Insights or preview different screen sizes in Chrome (right-click → Inspect → the phone icon).
Conversions. Track how many visitors complete key actions, such as filling out a contact form, signing up for a newsletter, or making a purchase.
SEO health. Check the site for SEO issues like broken links, missing meta descriptions, slow pages, and crawl errors. Google Search Console’s Page indexing flags pages that Google can’t add to search results.
Record the results, so you have a baseline for setting goals and measuring the redesign’s impact after launch.
Set your redesign goals
Set specific redesign goals based on the problems you found during the audit. Choose what you want to improve, such as page speed, mobile usability, navigation, conversions, or branding, so you know what the redesign needs to accomplish.
Turn those goals into clear targets with baseline data. For example:
- Reduce page load time from 3.5 seconds to 2.5 seconds.
- Increase mobile conversion rate from 2% to 3%.
- Fix the errors that stop Google from reading important pages.
- Reduce form submission errors from 5% to 2%.
Not every goal needs a number. You might want to update your color scheme to match new branding, add a blog section, or simplify your navigation menu. For example:
- Replace the old color palette with your new brand colors across all page templates.
- Add a blog section with categories and a link in the main navigation.
- Reduce the main navigation from eight items to five so visitors can find key pages more easily.
Define a clear outcome for each change so you can check whether the redesign achieved it.
Once you know what the redesign needs to achieve, decide which pages to keep, which URLs to change, and how the navigation and layout should look.
Plan the layout, branding, and website structure
Plan how the redesigned site will be organized and how it will look before you start building. Work through these areas:
- Site structure and navigation. List every page on your current site. Decide which to keep, merge, remove, or add. Sketch how the main navigation, footer links, and internal links connect them. A simple spreadsheet or a tool like GlooMaps works well for this.
- URL decisions. Write down any page URLs you plan to change. You’ll need to set up 301 redirects for those later, so search engines and bookmarks still find the right pages. Keeping important existing URLs where possible reduces redirect work and helps preserve their existing search visibility. SEO preservation starts here, not at launch.
- Wireframes. A wireframe is a rough sketch of a page’s layout, with no colors or final text. For major layout changes, sketch where key elements go on each page type: header, hero section, content area, sidebar, calls to action, and footer. Figma, Canva, or pen and paper all work.
- Branding elements. Lock in your color palette, fonts, button styles, and image treatment before you start customizing. Changing your mind about colors after you’ve already styled 15 pages in the WordPress editor means going back through every one.
After you’ve decided what the new site should look like and which pages and URLs need to change, back up the current site before you start building.
Back up the website and customizations
Back up your database, WordPress files, theme settings, and plugins before you change anything. A full backup gives you a restore point if a theme change, plugin update, or custom code breaks the site. Create a complete WordPress backup that includes your database, all WordPress files, theme settings, and plugins.
Hostinger users on Unlimited or cloud hosting plans can create manual backups directly from Hostinger dashboard. You can also use a plugin like UpdraftPlus or All-in-One WP Migration. Plugin-based backups are managed separately from Hostinger’s own backup system.
If you’ve added custom code or styling, make a separate copy of those changes before switching themes or editing files. Check your theme’s functions.php for custom snippets, your style.css for custom styling, and any code you’ve added through a snippets plugin.
If your customizations are stored in a child theme, back up that child theme folder as well.
With the current site backed up, choose the approach you’ll use to build the new version.

Which WordPress redesign method should you use?
The best WordPress redesign method depends on how much you want to change, your budget, and your comfort level with WordPress. You have four options:
Customize your existing theme. Keep your current theme and adjust colors, fonts, layouts, and spacing. This keeps your existing site structure in place and works well when the changes are mainly visual.
You’re limited to whatever options the theme provides, so you can’t change the page structure or add features the theme wasn’t built for. But because you’re working within a familiar setup, the learning curve is low.
Switch to a new theme. Choose a WordPress theme that supports the layouts, features, and performance targets from your plan, then install and activate it on your staging site.
This gives you a fresh starting point with a new set of layout options, but you’re still working within what that theme offers. The difficulty comes from rebuilding – you’ll need to set up your pages, menus, widgets, and settings again.
Use a page builder. You can build layouts with a page builder like Elementor or Beaver Builder without writing code. The built-in WordPress block editor does this for block themes, too. You can control exactly where each element appears on the page, making this the most flexible option short of custom code.
The trade-off is a steeper learning curve than theme customization, plus performance overhead and a dependency on the plugin.
Hire a developer or agency. A professional can build a custom theme or heavily modify an existing one. Custom code can do anything WordPress supports, so nothing in the design is off-limits. The difficulty isn’t technical – the developer handles that – but you’ll need to communicate your requirements clearly and manage the project.
Costs range from nothing for a DIY redesign with free themes and plugins to several thousand dollars for custom development, depending on your site’s size and how much new functionality you need.
Method | Difficulty | Flexibility | Cost | Best for |
Customize existing theme | Low | Limited to theme options | Free or low (theme cost) | Minor refreshes |
Switch themes | Medium | Moderate | Free to $100+ (premium themes) | Visual overhauls |
Page builder | Medium | High | Free to $100+/year (pro plans) | Non-developers, complex layouts |
Custom development | High | Unlimited | Highest upfront cost | Businesses, custom functionality |
How to redesign a WordPress website
Redesign your WordPress website by working through seven steps, from creating a staging copy and rebuilding the design to testing, protecting SEO, and publishing the finished site. Keep the live site unchanged until the redesigned version has passed your tests.
1. Create a staging version of your website
Create a staging copy of your WordPress site before making any redesign changes. A staging site is a private duplicate where you can work without affecting what visitors see. Nothing goes live until you’re ready.
Hostinger users on Unlimited or cloud hosting plans can create one directly from the Hostinger dashboard (formerly hPanel):
- Go to Websites → select your site → Dashboard.
- In the left sidebar, click WordPress → Staging.
- Click Create staging → enter a subdomain name for the staging copy → click Create.
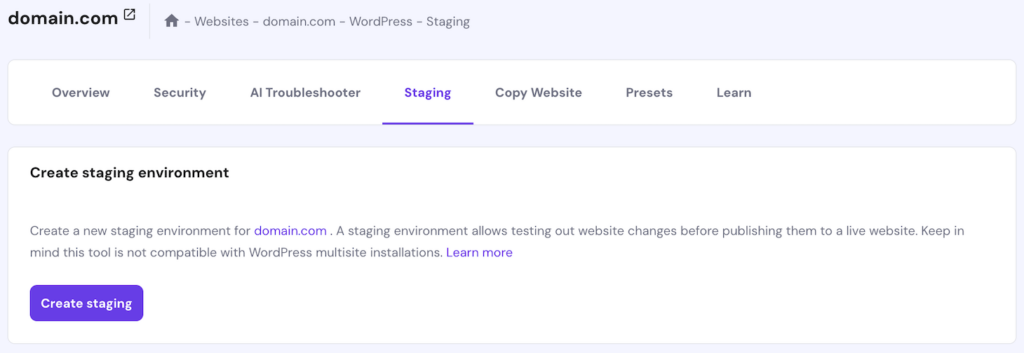
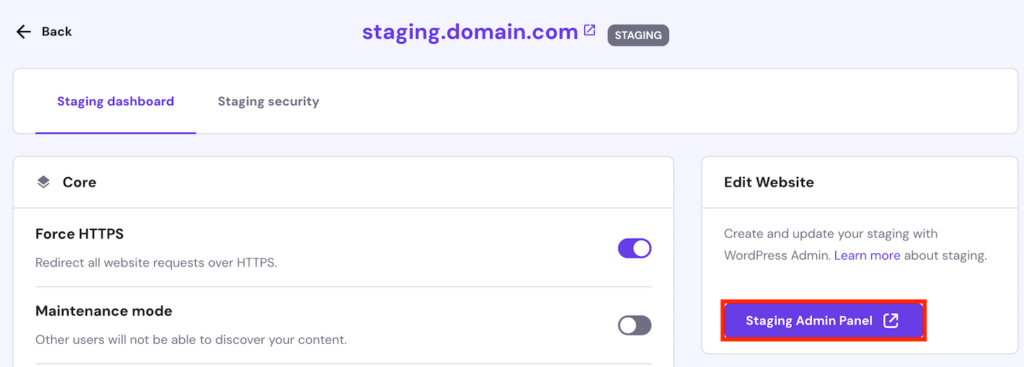
The staging site appears in the list after a few minutes. Click Manage staging → Staging Admin Panel to open its WordPress dashboard, where you’ll make all your redesign changes.
If you prefer to work on your own computer, you can also build and test WordPress locally with a tool like LocalWP.
2. Build and customize the new design
Apply your planned design changes on the staging site, not the live one. How you do this depends on whether you’re adjusting your current theme, switching to a new one, or using a page builder.
Customizing your existing theme. Open the WordPress Customizer or the Full Site Editor (for block themes) from Appearance → Editor. Update colors, fonts, spacing, header layout, and footer to match the branding decisions you made earlier.
Switching themes. Install and activate the new theme on your staging site. Go to Appearance → Themes → Add New Theme, find or upload the theme you want, click Install, then Activate. Activating a new theme resets menus, widgets, and Customizer settings, so check those immediately after switching WordPress themes.
Using a page builder. Install the builder plugin on staging and start rebuilding your pages. Create templates for your main page types (homepage, blog post, standard page) first, then apply them across the site.
As you build, keep these points in mind:
- Keep custom code and styling separate from the parent theme where your setup supports it. If you’re using a child theme, make changes there so parent-theme updates don’t overwrite them.
- Match your wireframes. Refer back to the layout plan from the preparation phase.
- When your theme options aren’t enough, custom CSS gives you more control over spacing, font sizes, and element positioning.
- Check each page on both desktop and mobile as you go. Don’t wait until testing to discover layout problems.
If you need to edit theme files directly, do it in the child theme so the parent theme stays untouched.
3. Update content and media
Use the content decisions from your redesign plan to decide what stays, what needs updating, and what should be removed.
Keep high-performing pages as they are. Rewriting pages that already drive traffic and conversions just to make the site feel “new” risks losing the search rankings those pages have built.
Focus your updates on:
- Outdated information. Update stats, dates, pricing, screenshots, and references that are no longer accurate.
- Calls to action. Make sure CTAs match the redesign goals. If you’re redesigning to improve conversions, test new CTA text and placement.
- Images and media. Replace low-quality images, update screenshots to match the new design, and add new visuals where they help.
- New image performance. Optimize new images for faster loading before uploading them. Compress files, use modern formats like WebP, and set proper dimensions so WordPress doesn’t serve oversized images.
Once the pages and media are in place, review the plugins and functionality that support them.
4. Review plugins and website functionality
Review your WordPress plugins during the redesign to decide which ones you still need and whether they’re compatible with your new theme and WordPress version. Poorly maintained plugins can also create security and performance risks.
Go through each installed plugin and check:
- Is the plugin still needed for the redesigned site?
- Is it actively maintained and compatible with your current WordPress version?
- Does it work with your new theme and other plugins?
Delete any plugins you no longer need. Leaving them installed but inactive still leaves unpatched code on your server, which is a security risk.
If you add new plugins, install them one at a time and test the site after each installation. This makes it easier to identify which plugin caused a problem if something breaks.
After you’ve reviewed the plugins, test the features they support, such as contact forms, ecommerce checkout, membership logins, search, and other custom functionality. Once those individual features work, run the full-site test in the next step before publishing.
5. Test the redesigned website
Test every major page template, form, and feature on staging before publishing. Work through these checks:
- Page speed. Run your staging site through GTmetrix or PageSpeed Insights and compare your site’s Core Web Vitals against the audit baseline. LCP should be under 2.5 seconds, and Cumulative Layout Shift (CLS) should stay below 0.1.
- Mobile responsiveness. Check every major page template on a phone and tablet. Look for overflowing text, broken layouts, tiny tap targets, and images that don’t resize.
- Browser compatibility. Open the site in Chrome, Firefox, Safari, and Edge. Check that fonts load, layouts display correctly, and interactive elements work.
- Navigation and links. Click through menus, footer links, and in-content links. Make sure every link goes where it should and nothing returns a 404.
- Forms and interactive features. Submit every form. Test search, login, comments, and any other interactive elements. If you run an online store, place a test order through the full checkout flow.
- Tracking and analytics. Confirm that Google Analytics, Google Tag Manager, and any conversion tracking still fire correctly. Redesign changes can break tracking, so verify it rather than assuming.
Compare your results against the baseline. If page speed gets worse or layouts are broken on mobile, fix them before publishing.
Once the redesigned site passes functional and performance testing, check that the changes haven’t affected its search visibility.
6. Protect SEO before launching the redesign
Protect your SEO before launch by keeping existing URLs, redirecting the ones that changed, and checking that your page titles, descriptions, and search engine settings survived the rebuild. A redesign doesn’t hurt your rankings on its own – lost URLs and missing redirects do.
Keep your URLs the same wherever possible. Every URL that changes needs a redirect, and redirects add complexity. If your page was at /services/web-design and it still covers the same topic, keep that URL.
Set up 301 redirects for any URLs that have changed. A 301 redirect tells search engines the page has permanently moved to a new address and helps preserve the old page’s search visibility. You can add 301 redirects in WordPress with a plugin like Redirection or by editing your .htaccess file.
Build your redirect map in a spreadsheet with two columns: old URL and new URL. Map each changed URL to its closest match on the redesigned site.
Avoid these common redirect mistakes:
- Redirecting all old pages to the homepage. Redirect each changed URL to its closest relevant replacement instead.
- Creating redirect chains (page A → page B → page C). Each extra step slows the page down and makes it harder for search engines to follow. Point every redirect straight to the final URL.
- Using 302 (temporary) redirects instead of 301 (permanent). Use 301 redirects for permanent URL changes.
Check your titles, meta descriptions, canonicals, and heading structure. Make sure the redesign hasn’t removed or changed these elements on your important pages. Confirm that canonical URLs still point to the intended versions of your pages. Each page’s main heading should still describe the page clearly and include the keyword it targets.
Verify your staging settings. WordPress has a “Discourage search engines from indexing this site” option under Settings → Reading. If this was turned on for staging, make sure it’s turned off when you publish to production. Leaving it on tells search engines not to index your live site.
Update your XML sitemap. If you’ve added, removed, or moved pages, your sitemap needs to reflect those changes. Most SEO plugins like Yoast or Rank Math regenerate it automatically. After launch, resubmit the sitemap in Google Search Console under Sitemaps → Add a new sitemap.
Check for broken internal links. Run your staging site through a link checker like Broken Link Checker or Screaming Frog to catch links pointing to pages that no longer exist. Fix these before launch.
Once the staging site passes your SEO checks, you’re ready to publish the redesigned version.
7. Publish the redesigned website
Publish the redesigned site by pushing the tested staging version to your live WordPress installation. Take a final backup first so you have a rollback point if something goes wrong.
Before you publish, make sure no one is making changes to the live site. Publishing the staging site replaces the live site’s files and database, so any changes made on the live site after the staging copy was created will be overwritten.
For Hostinger users:
- Go to Websites → select your site → Dashboard.
- In the left sidebar, click WordPress → Staging.
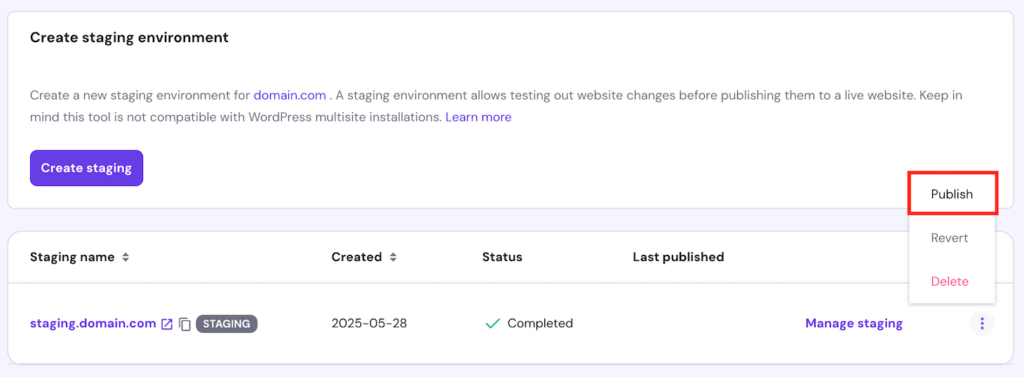
- Click the three-dot menu (⋮) next to your staging site → Publish.
- Review the confirmation and click Publish.
After publishing, open your live site immediately and confirm the homepage loads, the navigation works, and forms and login still work.
If anything is broken, revert using the backup you took before publishing.
Those checks confirm that the site launched correctly. Ongoing monitoring shows whether the redesign actually improved it.
What to do after redesigning your WordPress website
Monitor the redesigned site for a few weeks after launch to see whether it improved the speed, usability, search visibility, and conversions you measured before the redesign. Work through these checks:
- Check the live site and tracking. Go through the main pages, forms, redirects, mobile layouts, and other important features you tested on staging. Open Google Analytics and confirm that pageviews, events, and conversion tracking are still recording data.
- Check Google Search Console. Look for new 404 errors, pages Google treats as missing even though they load (soft 404s), or pages that aren’t being indexed as expected. If you changed URLs, check that the redirects work correctly. Also confirm that your updated XML sitemap is live and that the “Discourage search engines” setting from staging didn’t carry over to your live site.
- Compare the results with your baseline. Four weeks after launch, pull the same metrics you recorded during the audit, such as page speed, conversions, and search performance. Compare the first 28 days after the redesign with a similar 28-day period before launch to see which goals you achieved and where the site still needs work. Check page speed immediately after launch as well, and continue monitoring search performance beyond the four-week mark because rankings can take longer to settle.
- Fix problems based on the data. If a page is slower, a form has a higher error rate, or engagement has dropped, investigate that specific change and make a targeted fix rather than changing the whole site again.
When should you redesign your WordPress website?
Redesign your WordPress website when it no longer meets your needs for usability, performance, conversions, or branding. If a problem affects one page, fix that page. If the same problem shows up across your templates, navigation, or layout, a redesign is the more efficient fix.
Here are the signs:
- Outdated design or branding mismatch. Your site looks noticeably older than competitors or no longer reflects your current brand.
- Poor mobile experience. Menus are hard to tap, text is too small to read, or the layout doesn’t adapt to smaller screens.
- Slow page speed despite basic fixes. Pages load slowly even after image compression and caching.
- Declining conversions or traffic. Visitors arrive but don’t take action, or organic traffic has been dropping for months without a clear SEO cause. Both often point to a navigation, layout, or UX problem that content alone won’t fix.
- A major change in your business. A rebrand, new audience, or change in what you offer can require a different site structure or visual identity.
- A site that’s difficult to update. Rigid themes or outdated page builders can make even simple changes unnecessarily difficult.
- Structural SEO problems. Falling rankings tied to site structure, navigation, or technical issues can point to a need for broader changes rather than more content.
There is no fixed schedule for redesigning a WordPress website. Check your analytics, run a speed test, and review the mobile experience. If the same problems affect multiple parts of the site and smaller updates aren’t enough, it’s time to redesign.
Alternative redesign option: Recreate a website with AI
If you want to move away from WordPress, you can use Hostinger’s AI Website Cloner to recreate your existing site in Hostinger AI Builder. The cloner uses your site’s URL to create a new website based on its existing pages and content.
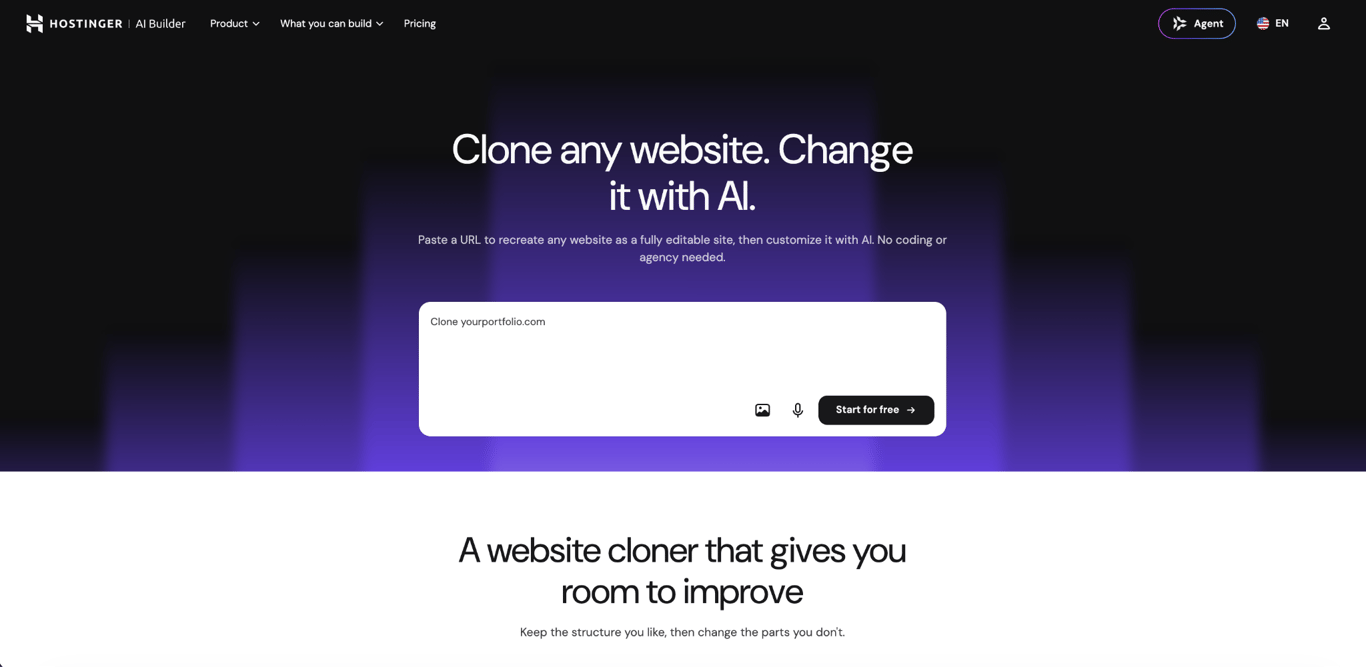
You can then edit the new site in the visual editor or with AI chat. Change the text, images, colors, layouts, and other page elements to match your brand and goals. The new site is separate from your WordPress installation, so your existing WordPress site stays unchanged.
The cloner recreates the pages and content visitors can see, but it doesn’t transfer your WordPress database, user accounts, forms, or other behind-the-scenes features. If your site relies on any of these, you’ll need to recreate them separately.
This approach works well if you:
- Own the website and want to move to a simpler platform.
- Want to rebuild a client’s site with their permission.
- Are migrating from another platform and want an editable starting point based on your current design.
Only use the cloner on websites you own or have permission to use as a starting point. If you like the design of a third-party site, use its layout and structure as inspiration rather than copying it. Customize the result to match your brand, content, and goals before publishing.
This article is a localized version of How to redesign a WordPress website, originally published in English.

Aris is a Content Writer specializing in Linux and WordPress development. He has a passion for networking, front-end web development, and server administration. By combining his IT and writing experience, Aris creates content that helps people easily understand complex technical topics to start their online journey. Follow him on LinkedIn.

Alma is an AI Content Editor with 9+ years of experience helping ideas take shape across SEO, marketing, and content. She loves working with words, structure, and strategy to make content both useful and enjoyable to read. Off the clock, she can be found gaming, drawing, or diving into her latest D&D adventure.