How to deploy a Codex-built app
Jun 12, 2026
/
Larassatti D.
/
7 min Read
You can deploy a Codex-built app in several ways, including via CLI tools and container-based platforms, CI/CD pipelines, or Git-based deployments, depending on the hosting platform you choose.
With Hostinger, you can deploy a Node.js-based Codex app by importing a GitHub repository or uploading a ZIP file through the Node.js Web App setup flow in hPanel. Hostinger handles framework detection, the build process, and deployment automatically, so there’s no manual server configuration needed.
Here’s how you can deploy a Codex-built app on Hostinger:
- Prepare your Codex project for deployment. Export your project from Codex via GitHub or as a ZIP file, and ensure it includes a package.json file before you deploy.
- Deploy your app. After securing a Node.js hosting plan, connect a GitHub repository for automatic redeployments or upload a ZIP file for a quicker, one-time setup.
- Add environment variables. If your app relies on API keys, database URLs, or authentication secrets, you can add them as environment variables in hPanel instead of hardcoding them in your project.
- Test the live version of your Codex app. Open the live URL and test that your app loads correctly and core features work as expected.
- Manage your deployed app. Monitor resource usage, update environment variables, fix vulnerabilities, and redeploy new versions as your app evolves.
- Monitor vulnerabilities and update dependencies. Hostinger automatically scans your deployed app for vulnerable npm packages. For GitHub-connected apps, you can use the auto-fix feature to patch vulnerabilities without reviewing each dependency manually.
Once your project is deployed, it’s worth reviewing the codebase regularly, as Codex is an AI agent that can generate and modify code quickly. Reviewing what it produces before each deployment helps you catch errors or unintended changes before they reach your users.
1. Prepare your Codex-built app for deployment
If you connected a GitHub repository during your build session, Codex can push your code directly to it. Alternatively, download the project files from Codex and package them into a ZIP archive if you’d rather not connect to a repository.
Either way, make sure your exported project includes a package.json file before you deploy. Hostinger uses this file to detect your framework, identify dependencies, and determine the correct build process.
Without it, automatic framework detection may fail, and you may need to manually specify values such as the output directory, build command, or application entry point. You can find these values in your package.json file or framework configuration files.
Hostinger supports various Node.js frameworks: Angular, Astro, Next.js, Nuxt, Parcel, React, React Router, Svelte, SvelteKit, Vite, Vue.js, Express, Fastify, and Hono. Supported Node.js versions are 18.x, 20.x, 22.x, and 24.x.
Verifying compatibility beforehand can help you avoid issues when you deploy a Node.js app.
Additionally, gather any required environment variables, API keys, database credentials, and other configuration values you need before starting.
2. Deploy your Codex-built app
To get started, you’ll need Node.js web app hosting. If you already have a Hostinger Business or Cloud hosting plan, you can simply log in to hPanel. Then, go to Websites → Add website → Node.js Web App.
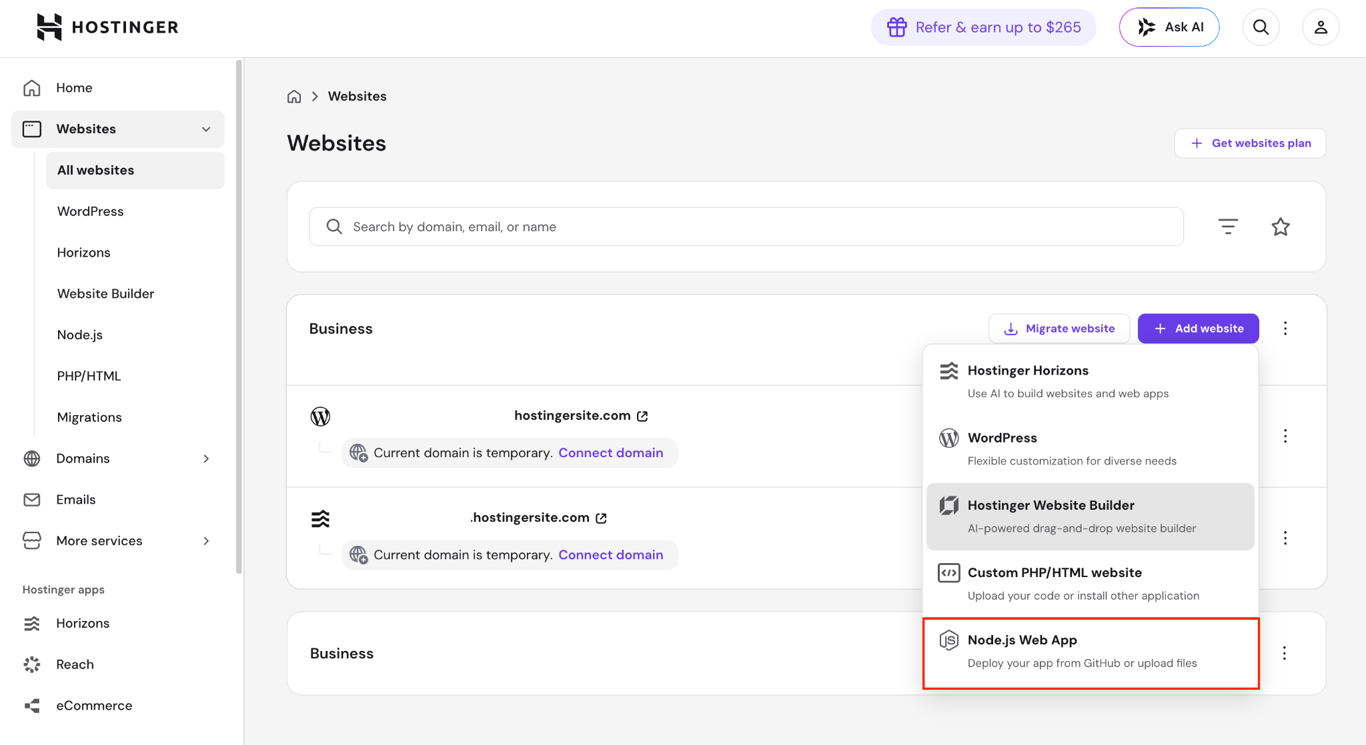
Alternatively, visit our hosting for Codex app page to purchase a plan if this is your first time hosting a web app with Hostinger.
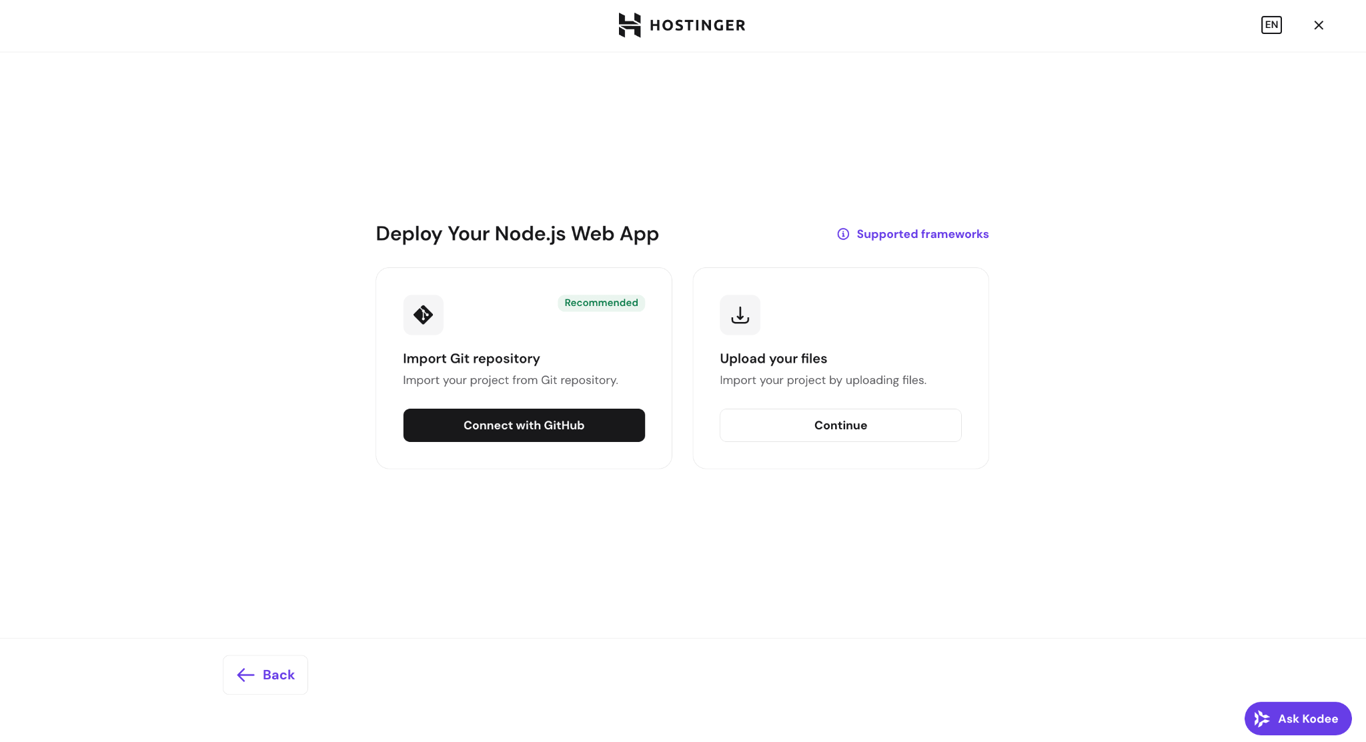
When you’re in the Node.js app hosting flow, you’ll be prompted to choose a domain name to connect with your project, or you can use a randomized temporary domain name.

Then, select a preferred method to deploy a Codex app:
- GitHub repository. Connect your repo directly to Hostinger. After the initial setup, pushing changes to the connected branch automatically triggers redeployment. Best for projects you’ll continue to update.
- ZIP file upload. Upload your Codex project files as a compressed archive. No GitHub connection needed. Best for prototypes or one-time deployments.
Whichever method you choose, Hostinger will read your package.json file and auto-detect your framework and build settings. For most projects, the suggested configuration works as is, so you can simply click Deploy.
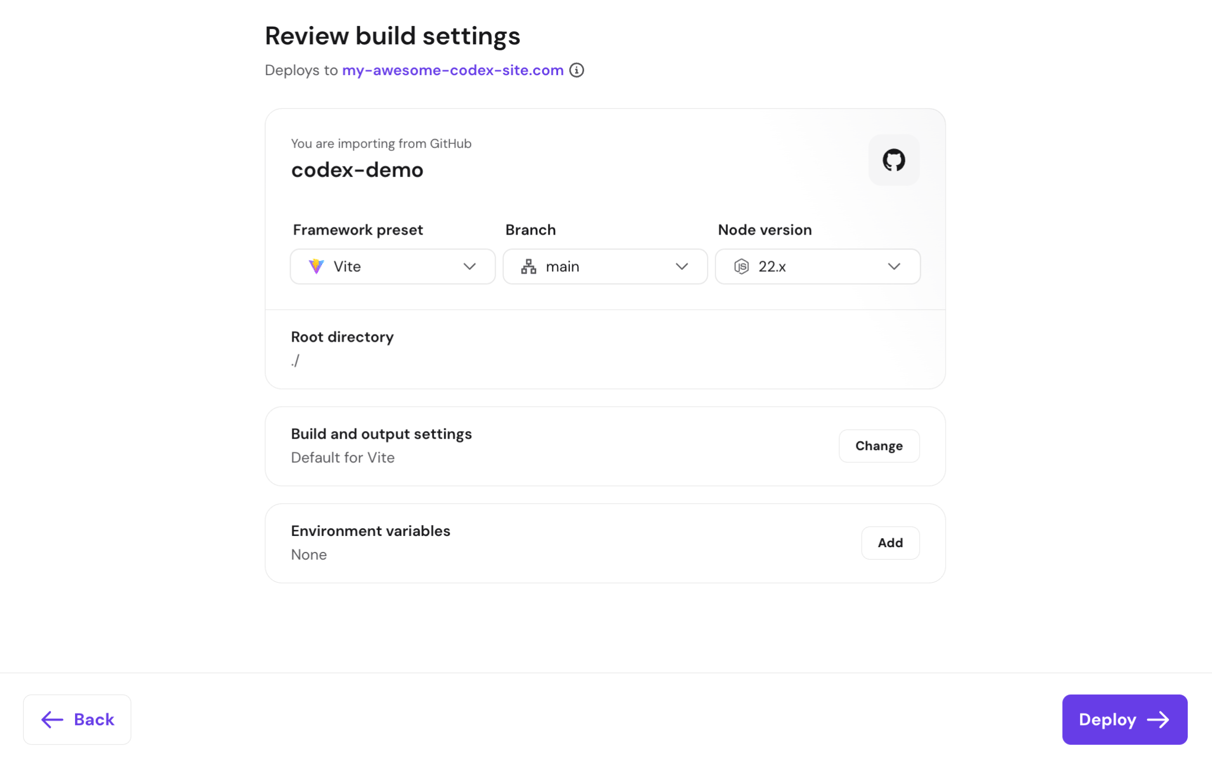
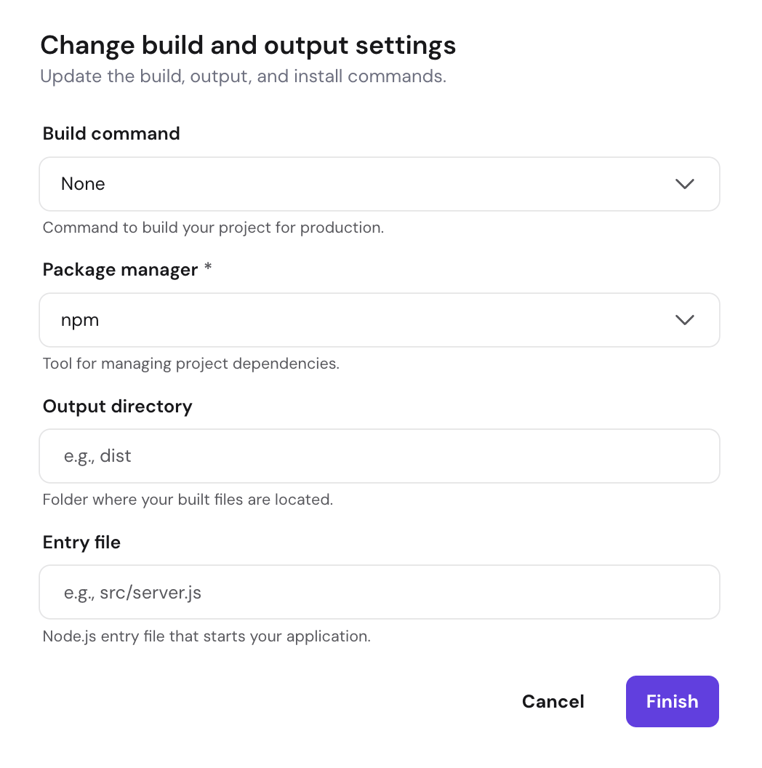
If your framework isn’t detected and gets classified as Other, you’ll need to enter the output directory and entry file manually before deploying.
For the complete step-by-step walkthrough, read our guide on how to deploy apps built with Codex on Hostinger.
3. Add environment variables
Many Codex-built apps rely on environment variables to function, particularly apps that connect to external databases, handle user authentication, process payments, or call third-party APIs.
If your app does any of these, it will expect values like API keys, database URLs, or authentication secrets to be available at runtime.
You can add these values via hPanel instead of hardcoding them in your project. This keeps sensitive data out of your codebase and makes it easier to update values without redeploying.
Check the Codex-generated code for the variable names your app expects. For Next.js apps, common examples include DATABASE_URL, API_KEY, and NEXT_PUBLIC_*.
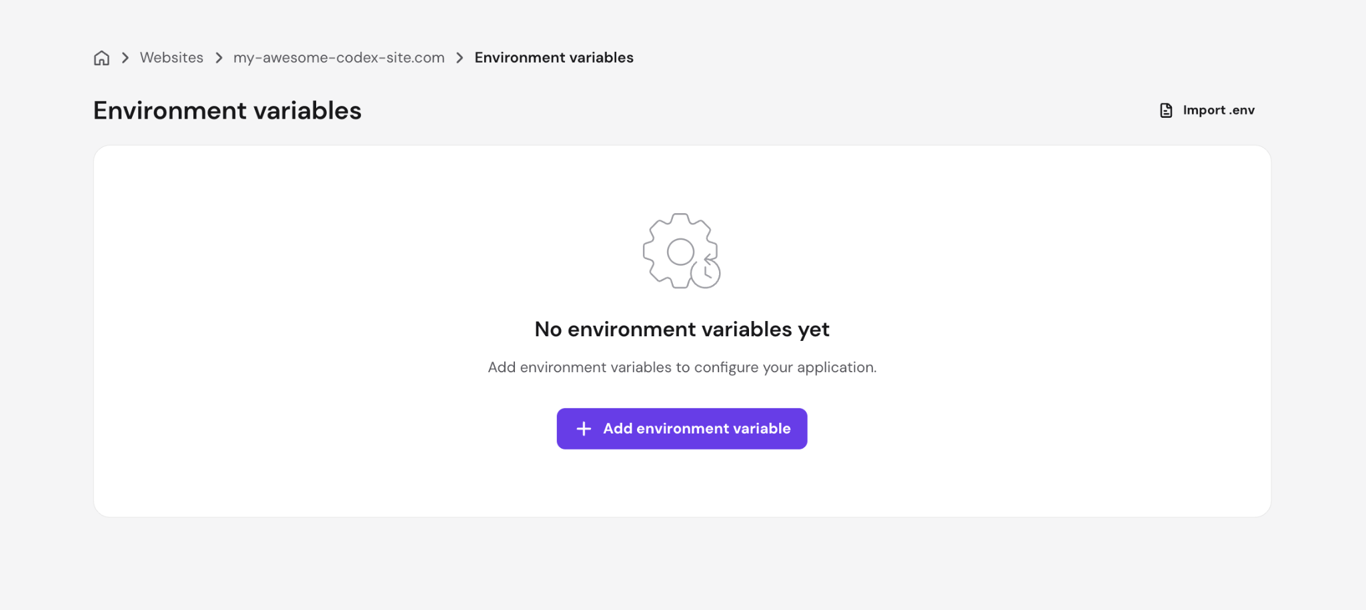
Add any variable you need by going to the Environment variables section in the left sidebar menu of your Node.js dashboard and clicking Add environment variable. From there, you’ll be prompted to add the key and value.
For database connections specifically, Hostinger’s Node.js dashboard includes a built-in connection wizard for Supabase and MongoDB Atlas. Open your Node.js dashboard, find the Database menu, click Connect, and choose the database provider you want.
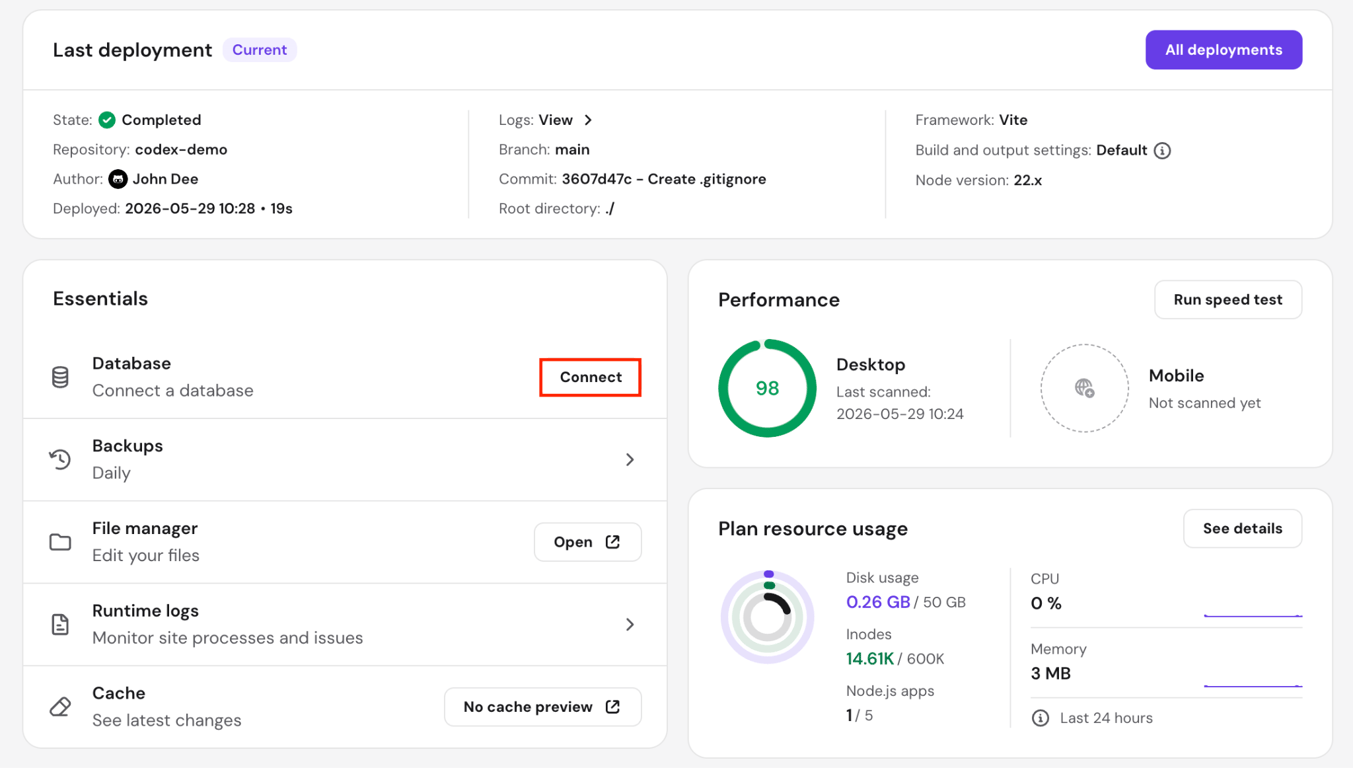
Then, follow the on-screen prompts to enter your connection details. Hostinger automatically stores them as environment variables and rebuilds your project so the updated configuration takes effect immediately.
4. Test your live Codex-built app
Once the deployment is complete and the environment variables are connected, access your app’s live URL and verify that everything works as expected.
Start by checking if the app loads correctly and all pages are accessible. Then test the core functionality of your application, including forms, buttons, authentication flows, API integrations, database-powered features, and other critical user interactions.
If your app uses environment variables or external services, confirm that those connections are working properly as well. If you encounter any issues, review the deployment logs in hPanel for more information. Check them for the specific error message, update your project or build settings as needed, and redeploy the application.
Continue testing after each deployment to confirm that the issue has been resolved.
5. Manage your deployed Codex-built app
After deployment, you can manage your Codex app from the Node.js dashboard in hPanel. This dashboard provides a central place to monitor your app, update its configuration, troubleshoot issues, and redeploy the app when needed.
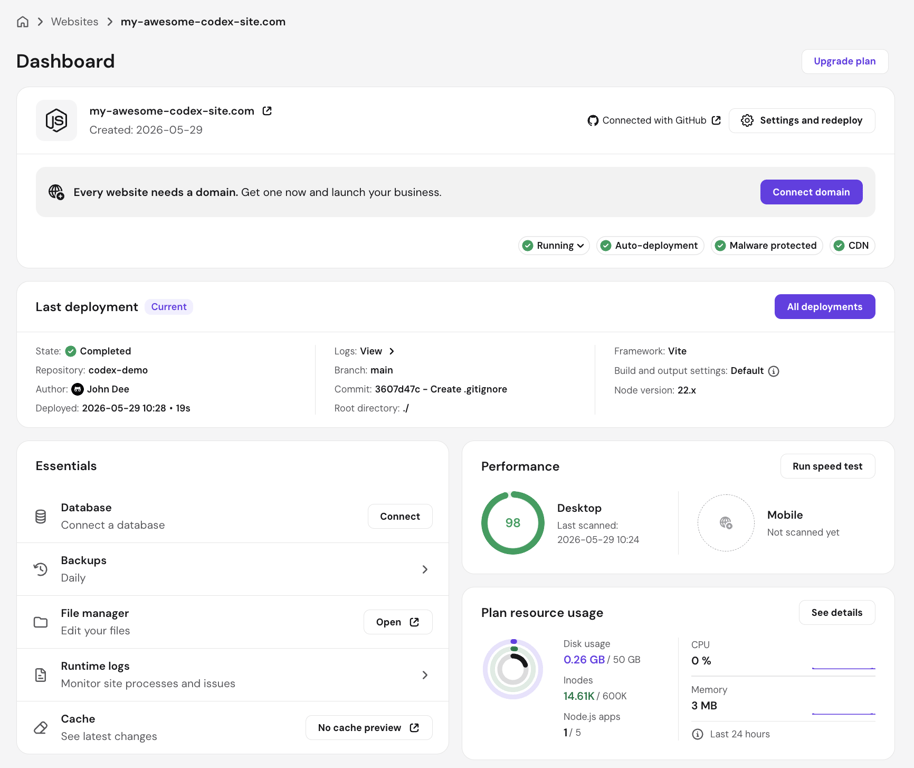
From the dashboard, you can access:
- GitHub repository quick link. If you deployed via GitHub, you’ll see a direct link to the repository you connected.
- Last deployment status. View whether the most recent deployment succeeded or failed, along with a timestamp and access to the deployment logs.
- Deployment logs. Review detailed build and deployment output for troubleshooting.
- Environment variables. Add, edit, or remove environment variables used by your application.
- Settings and redeployment. Update build settings and redeploy the app after making changes.
- File manager. Browse and manage deployed files directly from hPanel.
- Resource usage graphs. Monitor CPU, RAM, and I/O consumption.
There will also be a Restart option for server-side applications that run a persistent process, such as Express.js, Next.js, and NestJS apps.
It’s a good idea to monitor resource usage as your app grows. If traffic increases or your application begins handling more intensive workloads, regularly check the CPU, RAM, and I/O graphs in the dashboard.
Once the usage approaches your hosting plan’s limits, consider optimizing your application or upgrading your hosting resources to maintain reliable performance.
6. Monitor vulnerabilities and update dependencies
Deploying your app is only the beginning. Since Codex-built apps often rely on npm packages, it’s important to monitor for vulnerabilities and keep dependencies up to date regularly.
Hostinger scans deployed Codex apps for known npm vulnerabilities and generates reports showing the affected package names, severity levels, and available fixed versions.
You can access these reports by navigating to Security → Vulnerabilities in your Node.js dashboard.
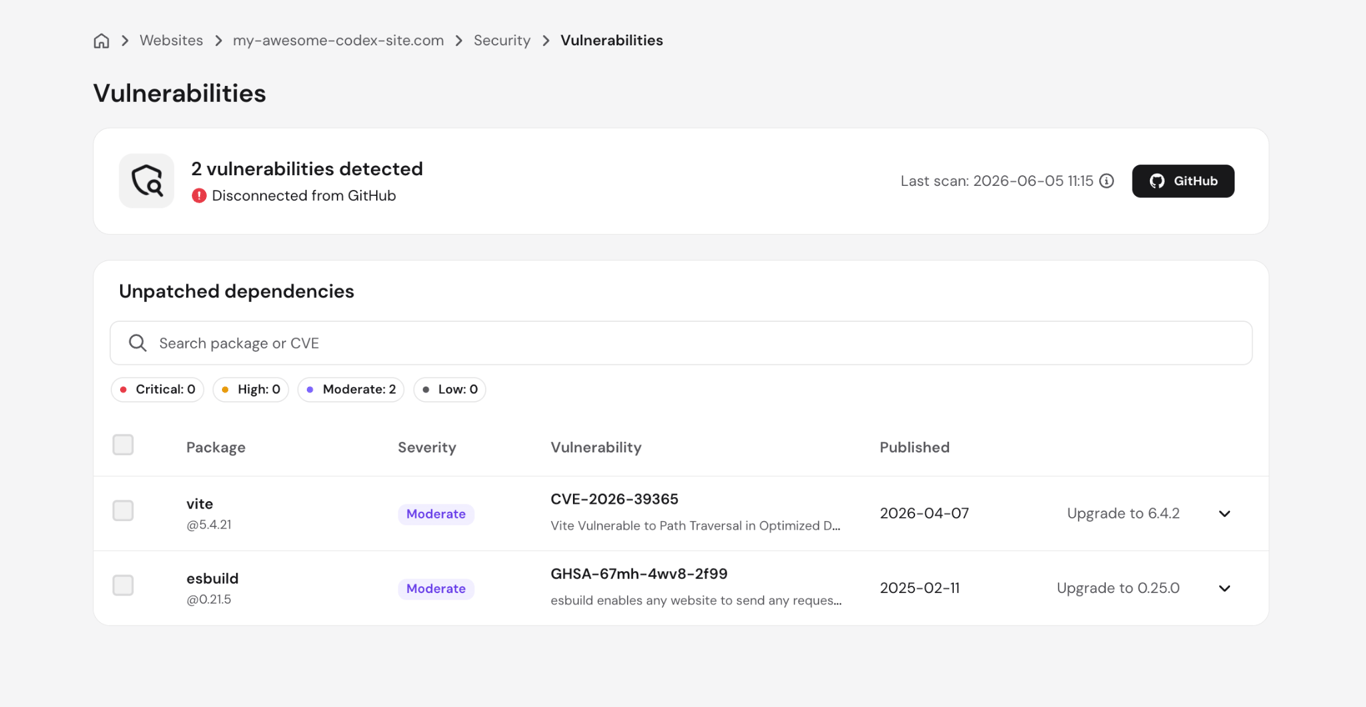
When a vulnerability is detected, update the affected dependency to the recommended version and redeploy the app. Regular dependency updates help reduce security risks, improve stability, and keep your application running smoothly.
If no automated fix is available for a particular vulnerability, you’ll need to update the affected package manually and redeploy.
For apps deployed through GitHub, Hostinger also offers an auto-fix feature that simplifies the update process. Instead of manually updating packages, you can generate a GitHub pull request containing the recommended fixes directly from hPanel.
Once the pull request is created, you can review the proposed changes, merge them if you’re satisfied, and automatically trigger a new deployment.
Keep in mind that auto-fix is only available for Codex apps deployed via GitHub. The feature also requires the Hostinger GitHub App to have write access to your repository.
If the necessary permissions haven’t been granted, you’ll see an error when attempting to create a pull request. In that case, GitHub will send an email on Hostinger’s behalf, prompting you to approve the permission update.
Hostinger never merges changes or pushes updates directly to your branches. Every fix is submitted as a pull request for you to review and approve.
The auto-fix process is limited to dependency updates and doesn’t provide access to your repository secrets or environment variables, ensuring you remain in control of both your code and configuration.
For additional security best practices, check out our guide on keeping your web app secure.
Common issues when deploying a Codex-built app
If your Codex-built app doesn’t deploy or run correctly, the issue is often related to project configuration, build settings, dependencies, or missing environment variables.
The table below covers the most common problems when deploying Codex with Hostinger, and how to resolve them:
Potential issue | Solution |
Missing package.json file | Make sure package.json is in the root of your project before uploading or pushing to GitHub |
The app builds successfully, but doesn’t serve the expected files due to a wrong output directory | Check your framework’s config file or package.json for the correct output path and update it in the build settings |
Missing environment variables, making the app load, but features depending on APIs or databases fail | Make sure all the required environment variables are added, then redeploy |
Incorrect entry file, so server-side apps may not start after deployment | Confirm the correct entry file in your package.json and update it in the build settings |
Dependencies fail to install or build due to an unsupported or mismatched Node.js version | Select a supported Node.js version in the build settings that matches your project’s requirements |
Large or incomplete ZIP file | Ensure the ZIP file contains the full project structure or exclude node_modules to keep the file size manageable |
403 error after redeployment | A 403 error after redeployment can occur due to a caching issue. Redeploying the app clears it. |
GitHub deployment vs ZIP upload: Which method should you choose?
Both methods get your Codex-built app live. The right choice depends on how you plan to manage and update the app.
GitHub deployment is the better choice for any project you plan to iterate on. ZIP upload is a perfectly valid option for simpler use cases, as it’s faster to set up and doesn’t require a GitHub account.
The table below shows in more detail how GitHub deployment differs from uploading a ZIP archive:
Feature | GitHub deployment | ZIP file upload |
Ease of updates | Redeployment and updates can trigger automatically | Upload a new ZIP file each time you make changes to the app |
Automatic redeployment | Yes, on push to the connected branch | No, manual redeployment required |
Private repository support | Yes | Not applicable |
Vulnerability auto-fix | Yes | Not applicable – no repository connection |
Best use case | Ongoing projects, apps that will be updated regularly, or Codex workflows that push code to GitHub | Quick prototypes, one-time deployments, or projects where GitHub integration isn’t needed |
What can you do after deploying a Codex-built app?
Deploying your Codex-built app is where AI-generated code becomes a real product with a live URL. You can share the app with real users and start gathering feedback in an actual live environment.
If your app is connected to GitHub, you can keep improving it directly in Codex – it can handle multiple improvement tasks in parallel, commit changes, and open pull requests for your review.
With Hostinger, merging a PR triggers an automatic redeployment, so your build-and-ship cycle stays tight. You can also connect external databases and APIs, monitor resource usage, and fix dependency vulnerabilities using the built-in scanning tools on hPanel.
Codex-generated code is a strong starting point, but always review your code before going to production. Use the live environment to test thoroughly and treat each deployment as part of an ongoing build cycle, not a one-time handoff.
Looking for inspiration on what to build? Check out our guide on the best Codex app use cases.


Larassatti Dharma is a content writer with 4+ years of experience in the web hosting industry. She has populated the internet with over 100 YouTube scripts and articles around web hosting, digital marketing, and email marketing. When she's not writing, Laras enjoys solo traveling around the globe or trying new recipes in her kitchen. Follow her on LinkedIn