How to speed up a WordPress website: 12 performance optimization methods
Mar 10, 2026
/
Domantas G.
/
16 min Read
Search engines like Google consider page speed a ranking factor as it affects the overall user experience. WordPress offers various tools and features that influence your page speed. We will demonstrate how to utilize those features to speed up WordPress.
Improving a site’s loading time can help:
- Increase rankings on search engines.
- Reduce bounce rate.
- Get higher conversions.
This guide will share 12 actionable steps that can significantly speed up your WordPress site. Backed by expert insights, you will learn valuable tips and understand WordPress speed optimization better.
How to Speed Up WordPress – Video Tutorial
Do you prefer video content? In our video, you will find simple ways to speed up a WordPress website!

12 Methods to Speed Up WordPress Website
We are listing the following based on their difficulty level. Some beginner-friendly methods include choosing the right hosting plan and using a WordPress caching plugin. The more advanced solutions involve delivering content over HTTP/2.

1. Pick a Suitable Hosting Plan For Your WordPress Website
Web hosting providers and their plans highly influence site speed. Therefore, identifying your website’s needs is essential when choosing the right web hosting.
Some factors to consider when choosing a web hosting provider to upload or migrate a website are:
- Fast web server – influences the loading speed for all websites using the hosting provider. For example, Hostinger uses LiteSpeed Web Servers (LSWS) as the main web server, which comes with an advanced cache engine. Instead of creating a new request every time, LiteSpeed stores compressed cache files, optimizing your WordPress page speed.
- Include WordPress features – helps to speed up WordPress websites specifically. For instance, Hostinger automatically installs the LiteSpeed Cache plugin for all WordPress users.
- Reliable customer support – ensures that your web hosting won’t slow down your WordPress site. In addition, responsive customer support is essential to fix any issues right away, including downtime or slow loading time.
Once you’ve chosen a hosting provider, it’s time to select the most suitable plan for your WordPress site. In general, hosting providers offer a variety of hosting types for WordPress:
- Web hosting. An entry-level type of hosting that supports multiple websites on the same server, sharing its resources. Hostinger’s managed hosting plans start at CA$ 4.19/month.
- Cloud hosting. A premium type of hosting that offers dedicated resources from a network of multiple servers. It’s as simple to use as shared hosting. Hostinger’s lineup of cloud hosting plans starts at CA$ 11.19/month.
- Virtual private server (VPS) hosting. A type of hosting that gives users root access and dedicated resources. It requires some technical expertise to set up and maintain. Hostinger’s VPS hosting prices start at CA$ 9.09/month.
- WordPress hosting. A type of hosting specifically designed for WordPress performance optimization and security. Take a look at the following table for a detailed breakdown of Hostinger’s WordPress hosting plans – from the pricing to allocated hosting server resources:
Consider the amount of content you want to upload and your anticipated traffic in advance to get the best WordPress site performance. Ideally, the plan should have enough resources for daily use and leave a little headroom for unexpected high traffic spikes and upgrades.
Pro Tip
Hostinger users can test a better web hosting plan without commitment. We especially recommend doing this when you want to handle large traffic spikes and import large amounts of data faster. Simply activate the Plan Boosting feature from your hPanel and enjoy your new plan for free for 24 hours.
While it’s only natural to want to save money when you can, hosting should be a top priority in your budget. It’s a fundamental investment that can help boost your site’s performance in general.
2. Choose the Closest Server Location
The location of your server determines how fast it can transfer and receive requests to load your website. The bigger the physical distance between you and the server, the longer it will take to receive and process a request. Choosing the right server location can reduce latency.
High latency slows down the website, which worsens the overall user experience. Websites with lots of content often have high latency, especially as those with many images, animations, and videos.
Choose the server location closest to your target audience when signing up for a hosting plan.
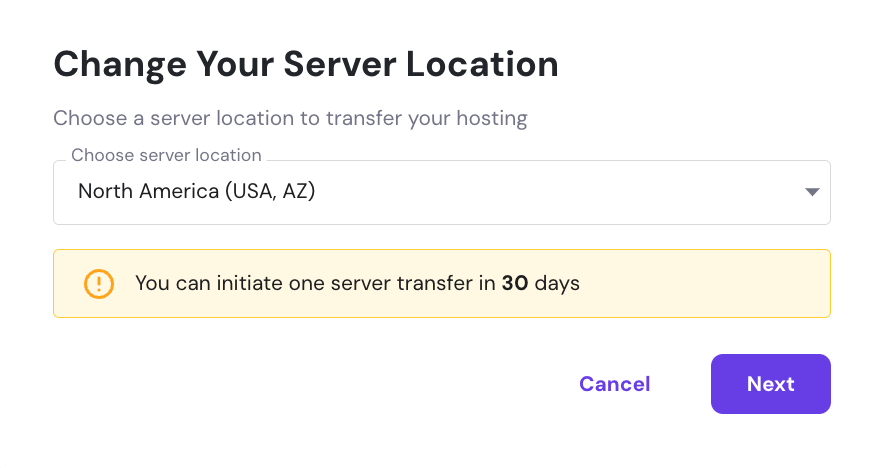
Hostinger has 10 data centers in Europe, North and South America, and Asia. Contact your hosting provider if you already own a website and would like to change your server location. Hostinger has simplified this process on its hPanel dashboard:
1. Access your hPanel dashboard, open the Plan details section, and find the Server location window. Click on the Edit icon.
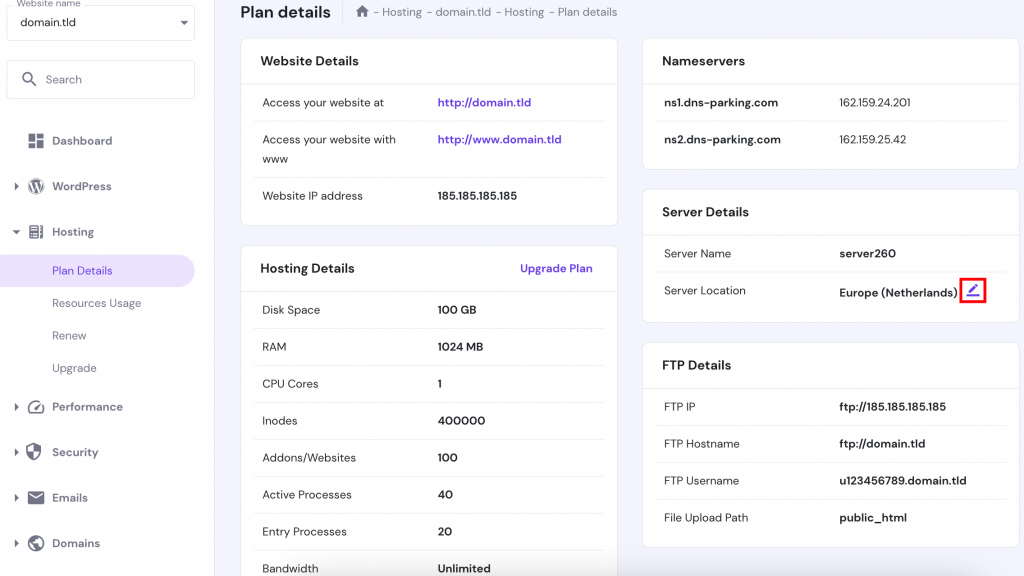
2. A new window will pop up. Select the server location to migrate from the drop-down menu. Note that you’re only allowed to initiate one server transfer per 30 days. Click Next and then Start to request the transfer.
Important! Note that it can take up to 24 hours before the server migration is complete. We don’t recommend making changes to your WordPress site during the process.
Once Hostinger has fully transferred the website to the new server, it will renew the IP address associated with your hosting plan. Make sure to check if your domain is pointing to the right provider.
Use an analytics tool if you are not aware of the location of the majority of your audience. The most commonly used Google Analytics plugin on WordPress sites is MonsterInsights. Installing MonsterInsights will show your website traffic metrics straight from the WordPress dashboard.
We recommend choosing the closest server to your target audience if you do not have a content delivery network (CDN). If you use a CDN, choose the nearest server to your physical location, as it will speed up your uploading process.
3. Use a Content Delivery Network
A CDN is a network of geographically distributed servers that work together to speed up the process of delivering websites to users’ browsers.
It’s the perfect solution for a global WordPress site with target audiences located in different locations. A CDN shortens the distance between the user and the server, significantly reducing latency and increasing your WordPress page speed.
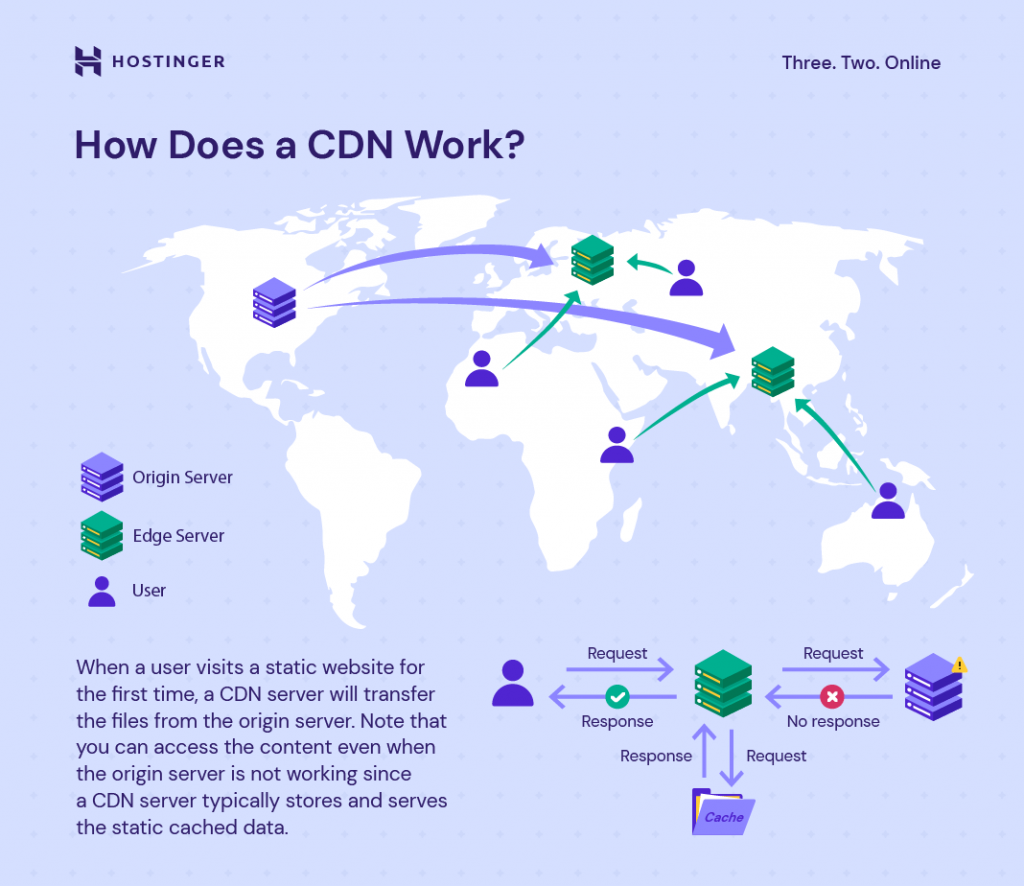
A CDN works by saving copies of a website’s static content in the cache. When a user visits the website, the server closest to them will load the content, reducing the number of external HTTP requests.
WordPress works well with various CDN options. Some hosting providers offer CDN bundles with their plans.
Pro Tip
Hostinger offers its own CDN solution – Hostinger CDN. It's available for clients of Business Web Hosting and above.
4. Install a WordPress Caching Plugin
When making changes to your WordPress website, your content might not update automatically on the front-end. Users will often need to clear the cache to see the updates. However, web caching speeds up WordPress websites.
Therefore, WordPress caching plugins can help manage your cache better. The right tool and configurations can even significantly boost your site’s performance. One of the most popular WordPress caching plugins is LiteSpeed Cache.
Unlike other caching plugins, LiteSpeed directly integrates with the web server. It remembers entries and analyzes dependencies for more intelligent cache management.
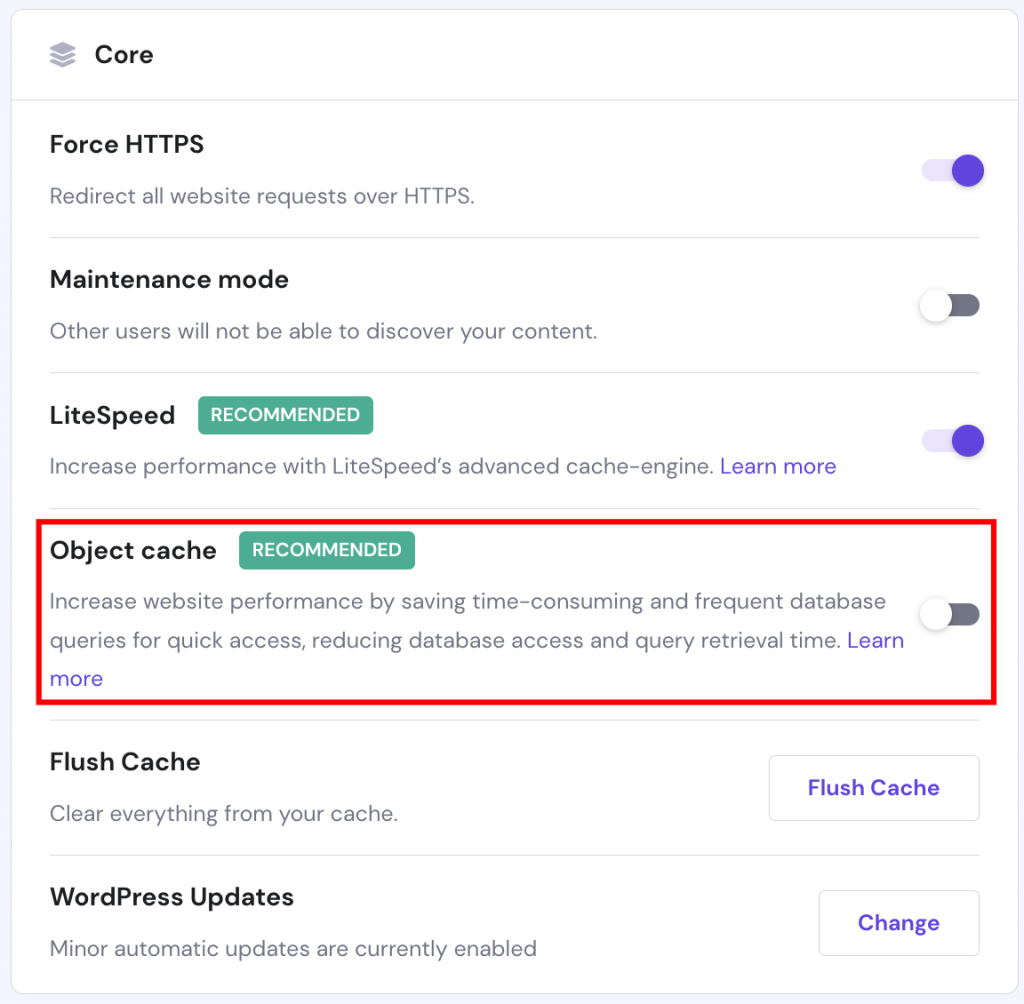
In addition, LiteSpeed also offers object cache (LSMCD). It is a feature that improves website response time by up to 10% and greatly reduces the time it takes to retrieve query results.
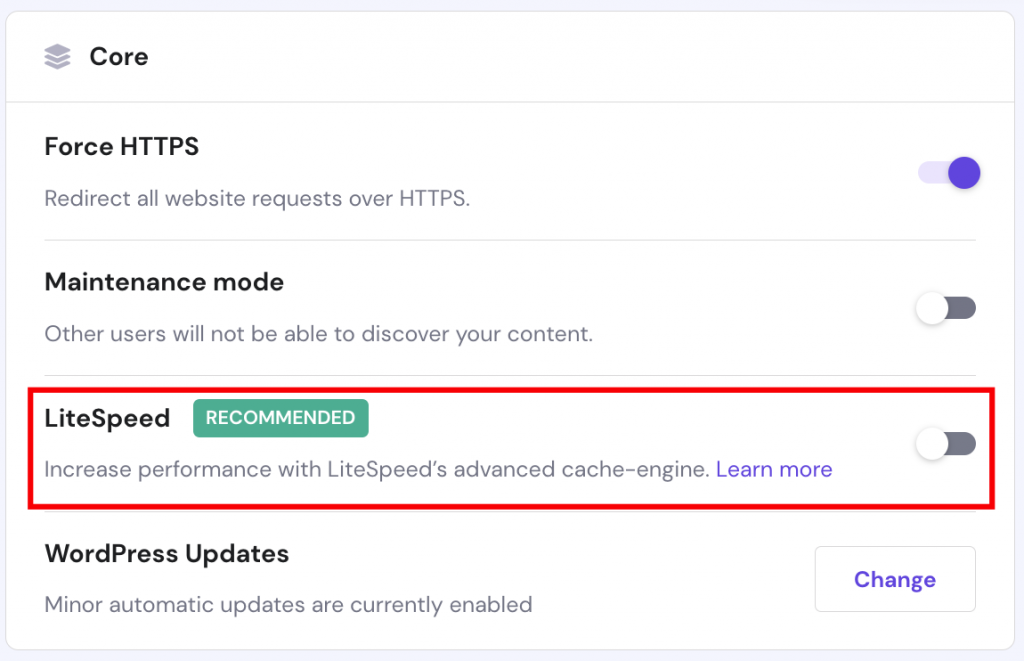
To install LiteSpeed using Hostinger, follow these steps:
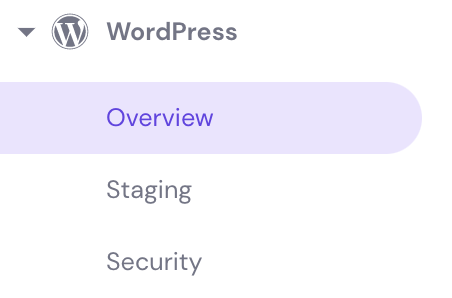
1. Click Overview under the WordPress section.
2. Toggle the button next to LiteSpeed to the right.
3. Lastly, enable Object cache for even better results:
5. Choose an Optimized WordPress Theme
The WordPress theme you use can influence your website’s speed. Choosing a well-optimized theme to speed up your WordPress site is essential.
Look out for the following criteria to choose a fast WordPress theme:
- Optimized code. The theme’s code should abide by the World Wide Web Consortium (W3C) and WordPress standards to prevent performance or security issues. Use tools like the HTML Markup Validation Service and the free plugin Theme Check to validate a theme’s code quickly.
- Lightweight. A lightweight theme only comes with the necessary features. Its code should have minimal clutter, and the JavaScript and CSS file sizes should ideally be under 100 KB. The default WordPress themes generally fall into this category.
- Browser compatibility. Unfortunately, not all WordPress themes can perform well across different browsers. Choosing a cross-browser compatible theme lets you offer the best experience for any user.
- Mobile responsiveness. When a theme is mobile responsive, it can adapt to mobile screens without slowing down. With over half of all web traffic originating on mobile devices, responsiveness is essential to ensure accessibility and attract visitors.
- AMP-ready. The Accelerated Mobile Pages (AMP) technology lets WordPress sites load faster on mobile devices. Choosing an AMP-ready theme can significantly improve the speed of your mobile site.
One WordPress theme that utilizes all these criteria is the Astra theme. It is built from the ground up to be lightning-fast and easy to use while delivering the features and aesthetics we look for in a theme.
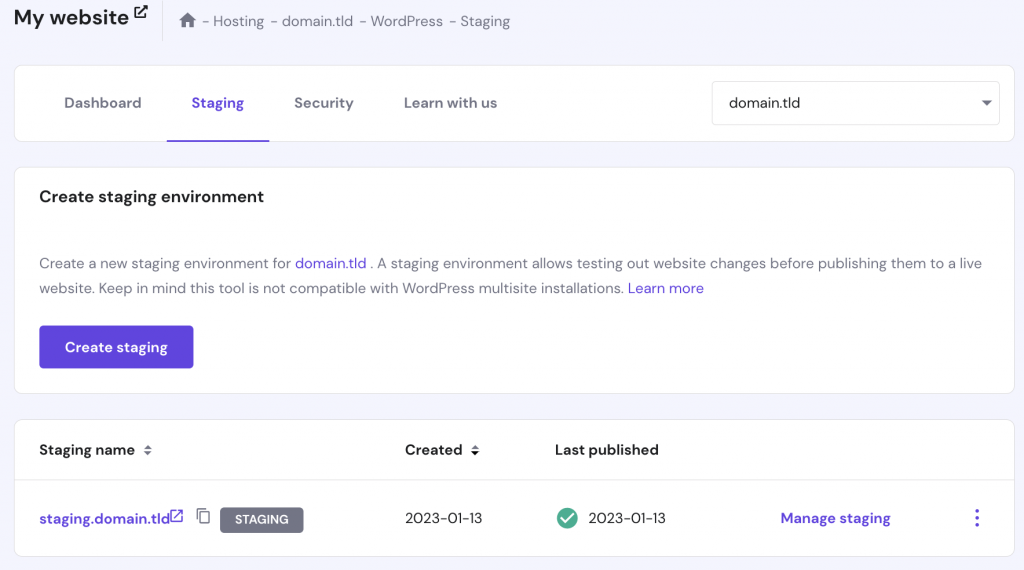
Use WordPress staging to test your theme speed. With WordPress staging, try out different themes before choosing one for your live website. Here are the steps to set up your staging website with Hostinger:
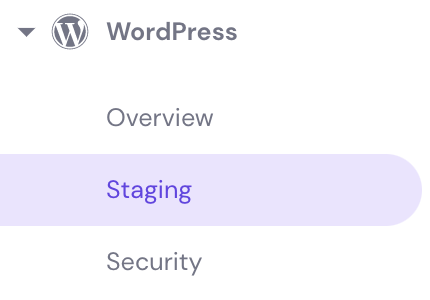
1. Select Staging under the WordPress section on your hPanel.
2. Click on the Create staging button and insert a subdomain to continue.
3. After a staging site is created, you will be able to freely manage it from the same page
Make sure to install the theme properly once you’ve made a decision.
Pro Tip
Make sure to do a speed test every time you try a different theme.
6. Optimize Images
Images are vital for a website’s aesthetics. They’re one of the best ways to attract attention, show off a product, or evoke a particular emotion.
However, large images can significantly contribute to a page’s size, slowing down the loading time. In fact, images make up around 45% of an average page’s total size.
Here are some tips to optimize images for WordPress sites:
- Make sure the file size is 500 KB or less. Before uploading any image, check its file size. In general, images larger than 500 KB load noticeably slower. Use a tool like TinyPNG to compress images.
- Use the recommended file format. Different image formats use different file compression methods. As a result, some file formats are more suitable for specific uses than others. Here are some of the most common image file formats and what they’re best for:
- JPEG – uses lossy compression, which means that the image loses some information in favor of a smaller size. Progressive JPEGs can improve user experience and website performance.
- PNG – uses lossless compression that retains all information within an image, ensuring the best resolution. PNG is the recommended format for graphics and drawings.
- WebP – this file format is gaining popularity due to combining lossy and lossless compression. By using WebP, you can offer a high-resolution image smaller than a JPEG or PNG file.
- Lazy load images. When WordPress lazy loading is enabled, images on a page will load on demand. This method improves site speed because the website doesn’t have to load all the images simultaneously. Only when the user scrolls down to view them.
We recommend installing a WordPress plugin for speed optimization, like WP Smush, for a quick and straightforward image solution. WP Smush lets you compress and resize images in your WordPress media library in bulk and features lazy loading.
Additionally, the Pro version of WP Smush lets you convert images to WebP.
Suggested Reading
Read our article on comparing lossy vs lossless images to see which one can improve the loading speed of your site!
7. Uninstall Deactivated Plugins
A WordPress plugin helps extend the functionality of your site’s features and functionality. However, some plugins can be resource-intensive or have high usage of the admin-ajax.php file, taking a toll on the performance.
You should avoid having too many WordPress plugins, making sure to remove the ones you no longer use.
Deactivating a plugin is not enough because it’s still attached to your site. A WordPress plugin optimization trick is to delete unused plugins from your dashboard completely.
Fortunately, removing most plugins is simple. From your dashboard, go to Plugins, locate the deactivated plugin, and select Remove.
Inactive plugins may leave some leftover database queries and WordPress configuration, requiring extra steps to remove them completely. This situation is common with security or caching plugins.
Before you remove a deactivated plugin, check the plugin’s official documentation that covers how to uninstall it properly. For example, Yoast SEO has a comprehensive article about how to uninstall their plugin completely.
If the plugin doesn’t have an in-depth uninstallation guide, you’ll have to remove the leftover settings and database files manually.
To avoid uninstalling WordPress plugins frequently, try to be more selective and intentional about which plugins to use in the first place:
- Always vet the developer first. Ideally, the developer should have a track record of creating trustworthy plugins and responding to user feedback. They should also update the plugin regularly.
- Use trustworthy marketplaces. If you want to install a plugin from a third-party source, make sure it is reliable. CodeCanyon is a good example. Unreliable sources are more likely to feature poor-quality plugins that include malware.
- Only install the necessary plugins. Before installing any plugin, ask yourself whether it’s essential to your website. The fewer plugins you have, the lighter and faster your WordPress site will be.
Fewer plugins result in better performance. However, plugin quality is equally as important. In fact, a single poor-quality plugin can cause serious performance issues. Therefore, it’s imperative to conduct proper research beforehand.
8. Use the Latest PHP Version
PHP is a scripting language that lets developers create dynamic, interactive websites. According to W3Techs, 76.2% of all websites use PHP with an identifiable server scripting language. The WordPress CMS and all websites built on it are written in PHP.
PHP has gone through constant updates since its first release, like any other software. Each new version of PHP introduces performance and security enhancements.
According to a benchmark test by Phoronix, PHP 8.0 performs 10% better than its predecessor, PHP 7.4. It comes with many new features and optimizations, improving the language’s efficiency.
One key new feature of PHP 8.0 is the just-in-time (JIT) compilation. In simple terms, JIT lets PHP 8.0 compile a program into machine code immediately before execution. With tracing JIT compilation enabled, PHP 8.0 performance on WordPress is even faster.
Currently, WordPress supports PHP 7.4 or higher. Unfortunately, 13.8% of WordPress websites are still using a version of PHP that WordPress no longer supports. Additionally, less than 3% of WordPress websites use the latest version of PHP.
If you’re still using an old version of PHP, you are missing out on new features, performance improvements, and security patches. In addition to increasing your WordPress site’s speed, updating PHP will also ensure its overall security.
Most WordPress hosting providers allow you to change your PHP version from the hosting control panel. Follow these steps to change the PHP version in Hostinger:
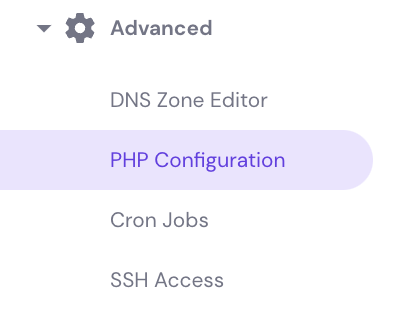
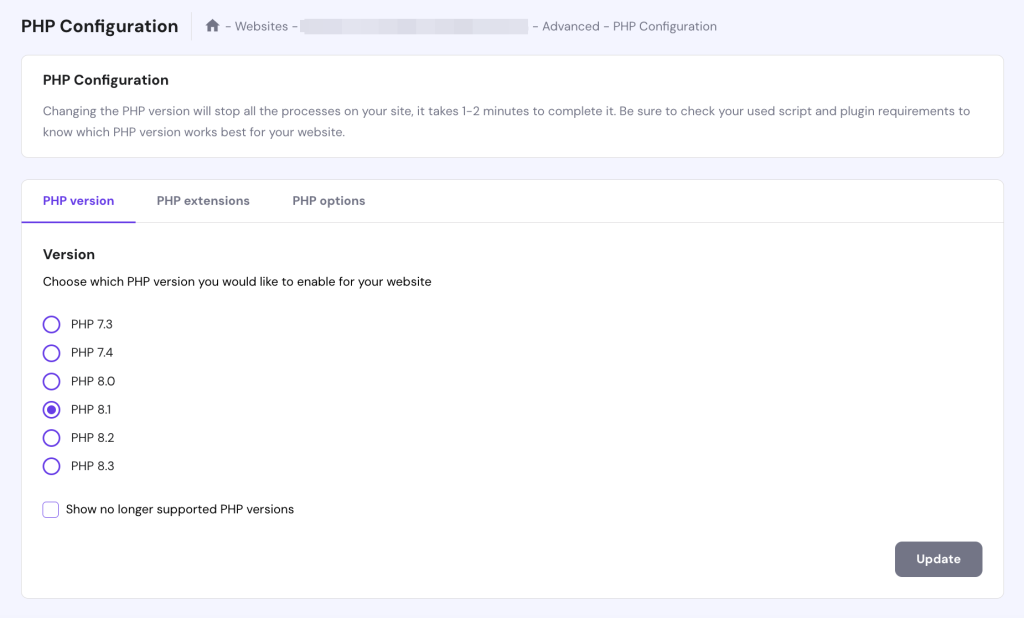
1. Log in to hPanel and navigate to Advanced → PHP Configuration.
2. Select the version you prefer and click Update on the PHP version tab.
Pro Tip
Check that your WordPress website’s code is compatible before upgrading to the latest PHP version. We recommend that you try to upgrade the PHP version using the staging environment first. This method is the best way to decrease the risk of your site crashing.
9. Update WordPress Core, Plugins, and Themes Regularly
By updating your WordPress site, you will ensure that your website always has the latest performance and security improvements. Security and performance are interconnected – if a WordPress site is vulnerable, it can be slowed down or even unusable.
WordPress attracts hackers who constantly look for security vulnerabilities as it’s an open-source platform. Therefore, keeping WordPress up-to-date is all the more critical.
Luckily, since WordPress 5.5, auto-updates for WordPress core, plugins, and themes can easily be enabled straight from the dashboard. That said, you still have the option to update them manually.
Update WordPress Core
You can enable auto-updates for minor upgrades only for WordPress core, which we recommend for most users. Major updates may add significant changes that might not suit your WordPress site.
To choose how your WordPress core software should auto-update, log in to your dashboard and navigate to Updates:
- If minor auto-updates are already enabled, you will see a message that says “This site is automatically kept up to date with maintenance and security releases of WordPress only.”
- If you want to enable major auto-updates, click Enable automatic updates for all new versions of WordPress. Once this is enabled, the message “This site is automatically kept up to date with each new version of WordPress” will appear.
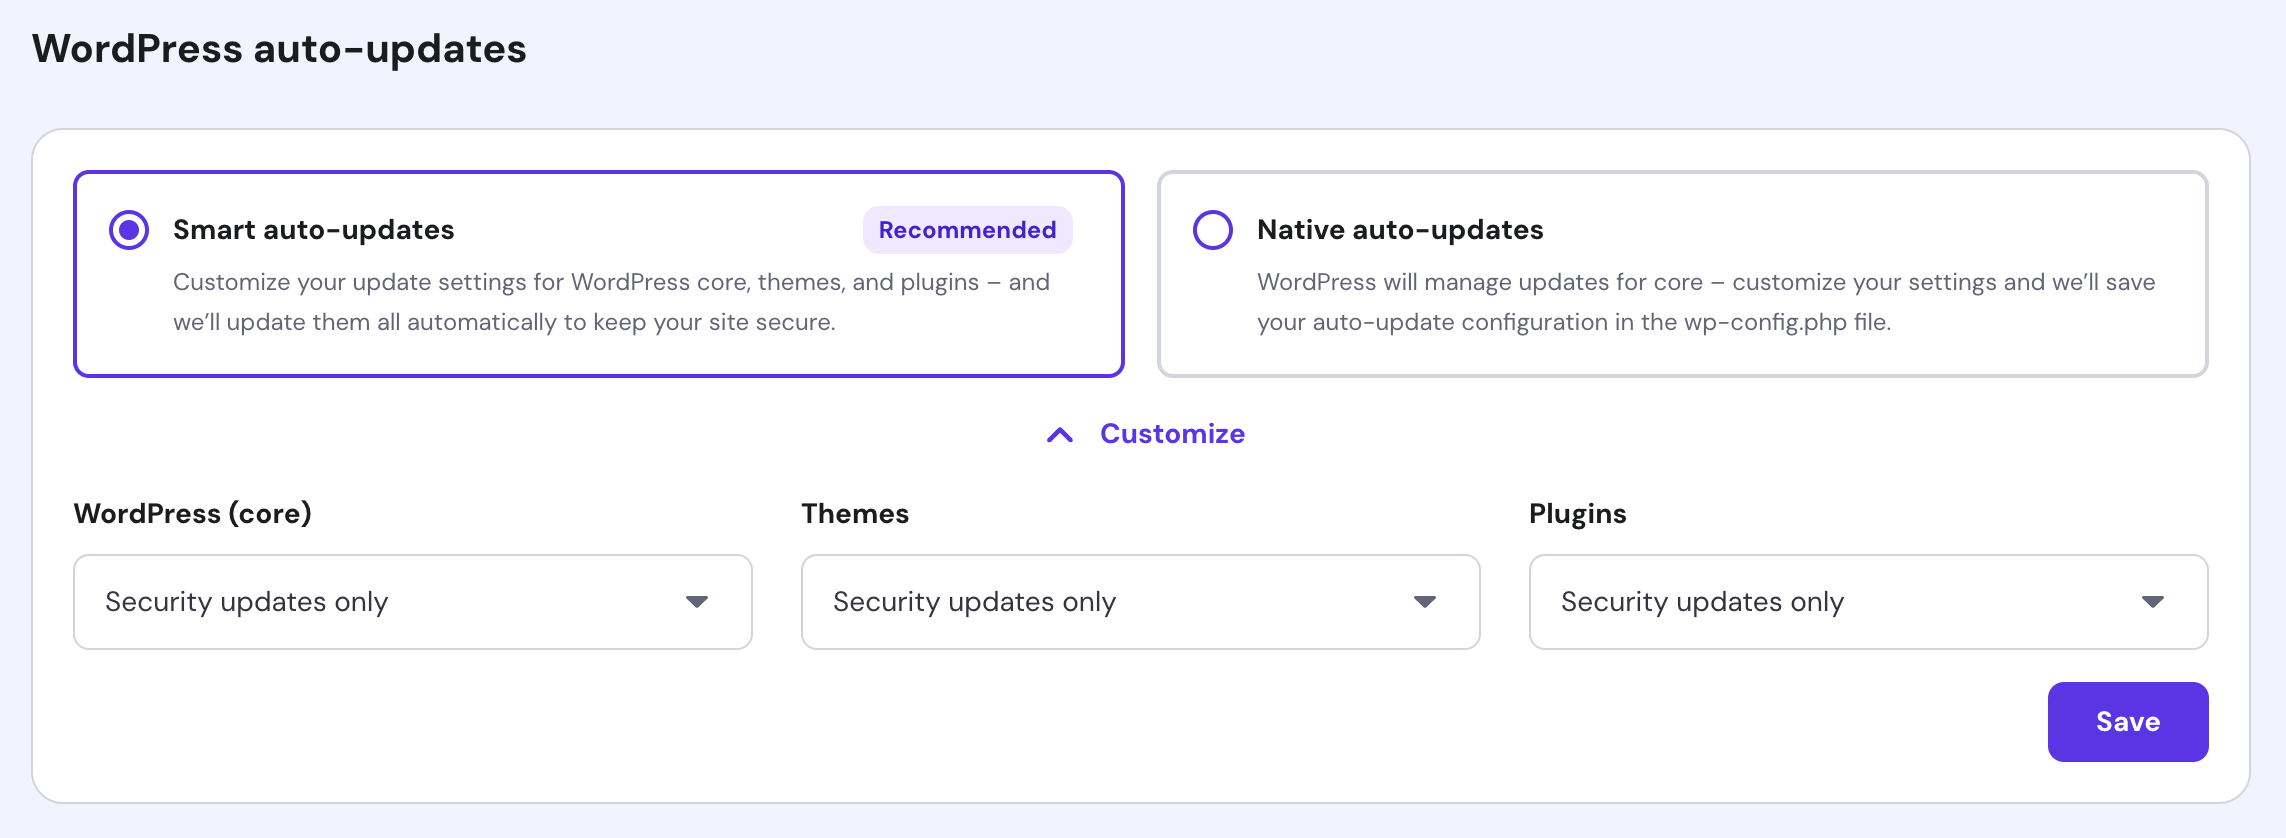
Alternatively, with Hostinger, you can enable WordPress core, theme, and plugin auto-updates from hPanel:
1. Head to the left sidebar and press WordPress → Overview. Find WordPress Updates and click Change to continue.
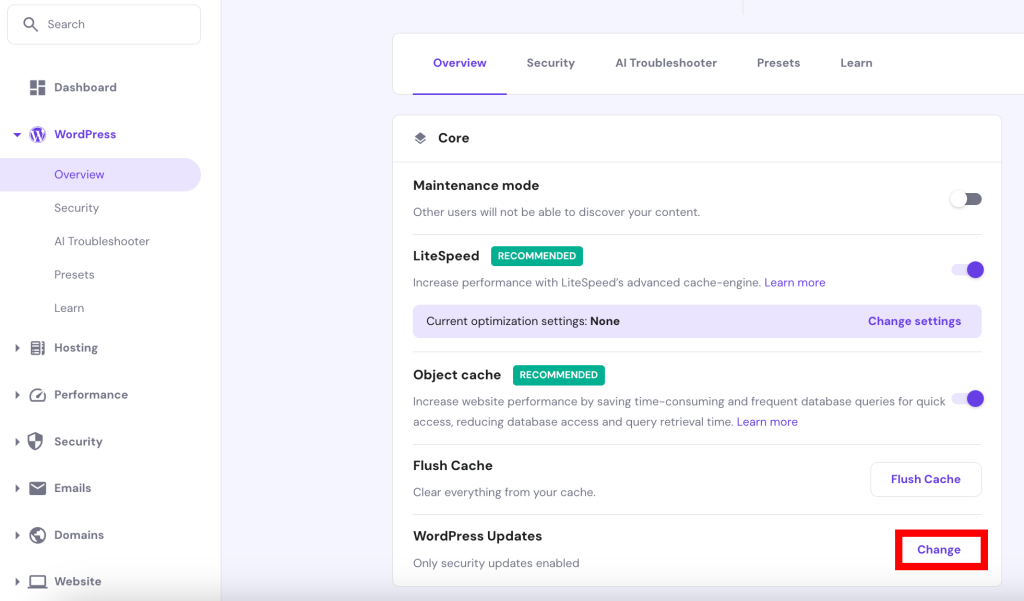
2. You will be taken to WordPress Security section of hPanel. Go to the WordPress auto-updates section.
3. Enable Smart auto-updates.
4. With the Customize panel open, choose your update preferences for WordPress core, themes, and plugins. Options for each are No updates, Security updates only, or All updates.
You can also use the WordPress dashboard to choose settings for updating plugins and themes, as described below.
Update WordPress Plugins
To update a plugin, log in to the dashboard and go to Plugins → Installed Plugins. Find the plugin you wish to update and select Update now. Alternatively, you can choose Enable auto-updates from the Automatic Updates column.
Pro Tip
It’s always recommended to read the new version’s changelog before updating any plugin. This step is especially vital if you have a large website that handles a lot of traffic. Security updates are generally safe to apply right away. However, feature updates can have bugs that affect usability and performance. A good rule of thumb is to wait a week before applying any feature update. By then, the developers should have fixed any known issues.
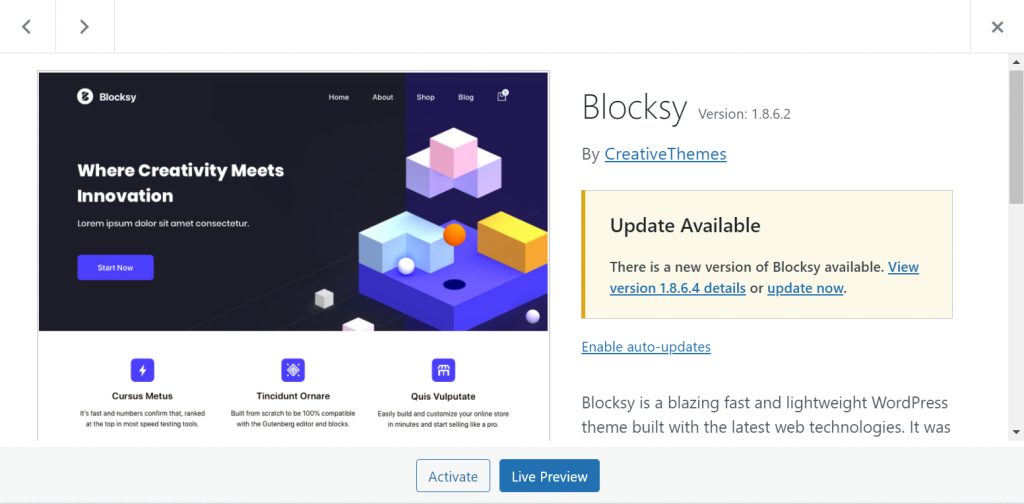
Update WordPress Themes
To update a theme, go to Appearance → Themes and click the theme you want to update. To manually update the theme, select Update now.
Alternatively, you can also select Enable auto-updates.
Similar to plugins, be careful when applying updates. Before updating themes, checking the notes on the new version is highly recommended.
Another tip is to use a child theme. A child theme inherits its parent theme’s features but lets WordPress users modify it without changing the parent theme. As a result, applying parent theme updates will retain your modifications to the child theme.
10. Optimize the WordPress Database
A database is where all your website information is stored – from posts and pages to theme and plugin settings. WordPress uses MySQL as its default database.
Over time, your WordPress database might accumulate unnecessary information that bloats your website. Unnecessary data may include post revisions, deleted comments, old plugin settings, and unused tags.
If left alone, a bloated database will make it harder for servers to retrieve specific information quickly. This condition will take a toll on the site’s performance, reducing its overall speed. In contrast, a well-optimized database can respond to queries faster.
Fortunately, there are ways to optimize your WordPress database.
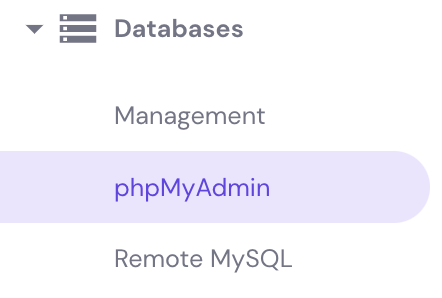
The first method is to use phpMyAdmin – an open-source database management system bundled with many hosting accounts, including those offered by Hostinger.
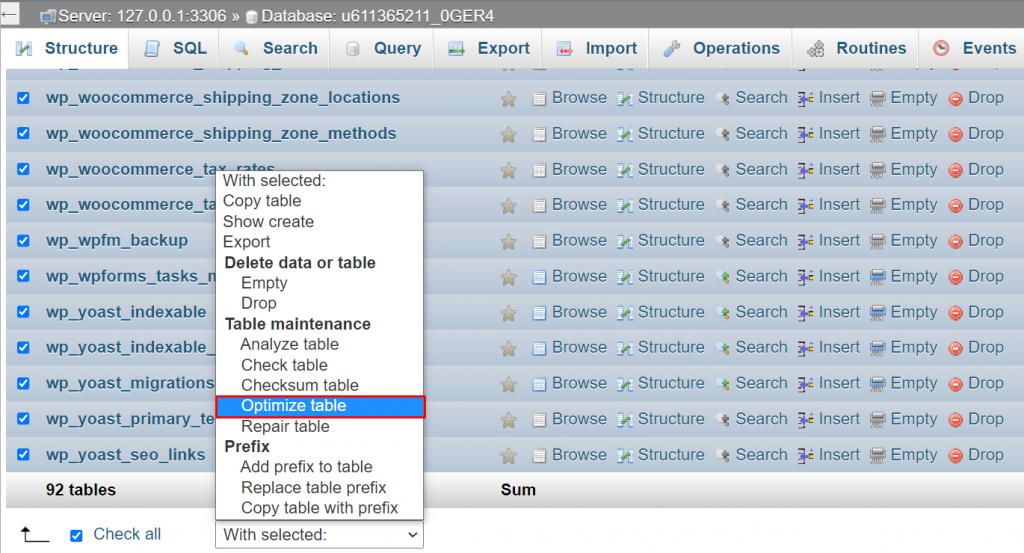
- On your hosting account, open phpMyAdmin. On hPanel, go to Databases → phpMyAdmin.
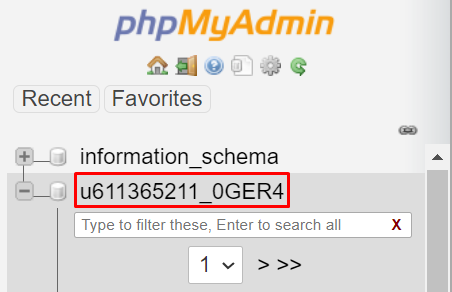
- Under the List of Current Databases, select the database name you want to optimize and click Enter phpMyAdmin.
- Once redirected to phpMyAdmin, choose the database name from the navigation sidebar.
- Click the Structure tab, then scroll down until you reach the bottom of the table and select Check all.
- In the drop-down menu, choose Optimize Table.
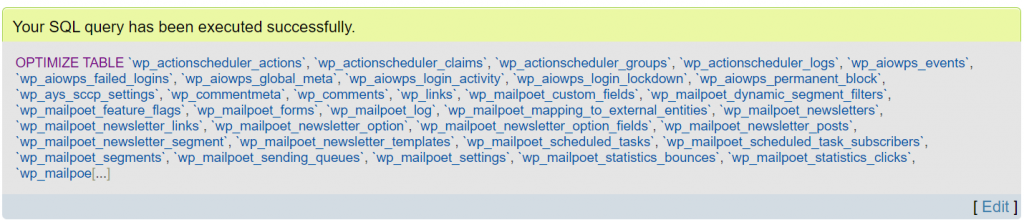
- When the process is done, you will receive a message that says, “Your SQL query has been executed successfully.”
The second method is to use a WordPress database plugin, like WP-DB Manager.
- From your WordPress admin dashboard, install and activate WP-DB Manager.
- Go to Database → Optimize DB.
- Choose Yes for all the database tables you want to optimize.
- Select Optimize.
Pro Tip
Optimizing your database is the riskiest method for WordPress speed optimization. If done improperly, you risk accidentally breaking your website. It’s essential to backup your WordPress database before optimizing it.
11. Minify HTML, CSS, and JavaScript
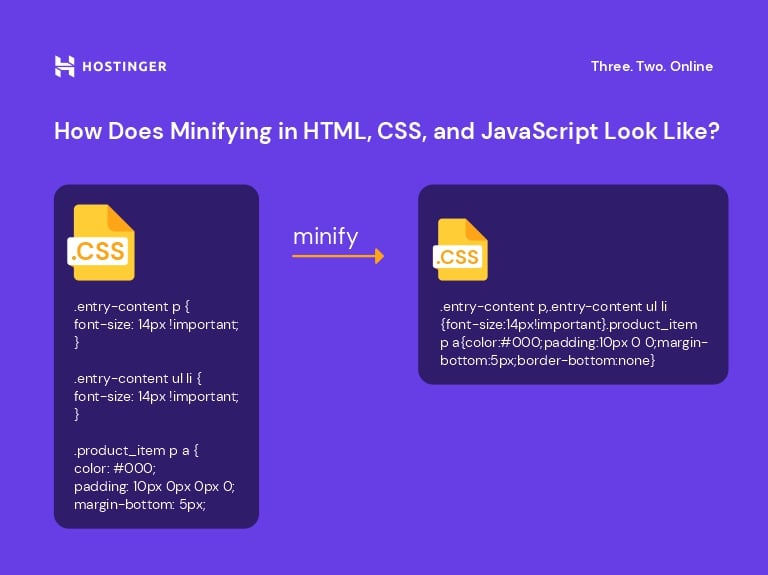
If you’ve ever opened a CSS, HTML, or JavaScript file, you will notice that some have a ton of spaces, line breaks, comments, and redundant characters. Although this makes these files more readable to other developers, it’s clutter, making the site load slower.
Minifying CSS, HTML, and JavaScript files means removing unnecessary characters to reduce the file sizes. You can speed up WordPress with smaller files because data transfers between servers and browsers will be quicker.
Take a look at the following graphic to compare a non-minified and a minified file.
There are two main ways to minify a JavaScript, HTML, or CSS file:
- Use an online tool. The website minifier.org lets you automatically minify the content of JavaScript, CSS, and HTML files. Simply replace the old files with the minified versions.
- Install a minifying plugin. Several WordPress speed optimization plugins let you minify HTML, JavaScript, and CSS files – one of them is Fast Velocity Minify. Select the file types you want to minify in the plugin’s settings.
File minification is one of the easiest and most effective ways to optimize website performance. Often, it shrinks file sizes by about 40-60%. Caching plugins like LiteSpeed, W3 Total Cache, and Autoptimize also offer minification functionality.
12. Deliver Content Over HTTP/2
Hypertext Transfer Protocol (HTTP) is the foundation of data communication on the World Wide Web. It’s how clients and servers exchange information.
For example, when someone wants to visit yourdomain.com, their browser sends an HTTP request to a remote server that will process it and load the website’s content.
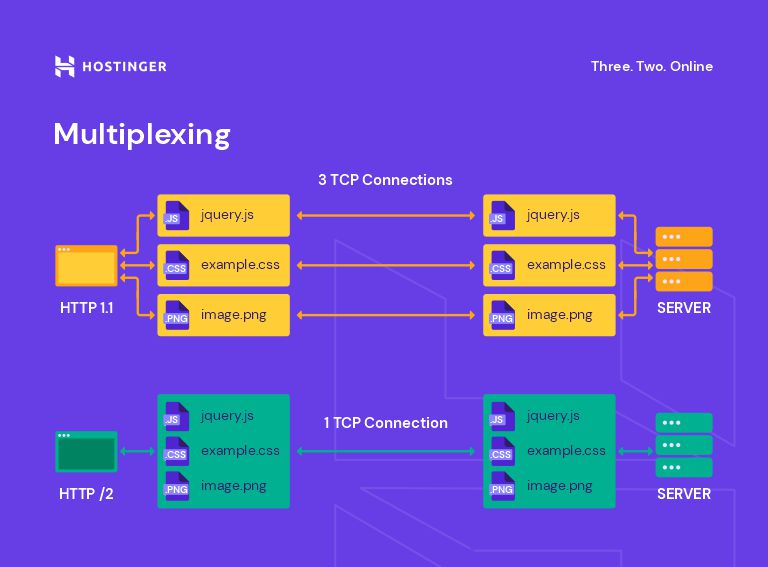
The first iteration of HTTP, HTTP/1, is quite effective. However, it’s considerably slower compared to the newer version, HTTP/2.
Here are some of the advantages HTTP/2 has over HTTP/1:
- Efficient communication. HTTP/2 uses a binary protocol designed for communication between machines. Compared to HTTP/1’s text-based protocol, binary data is simpler to process.
- Weighted prioritization. With HTTP/2, the website developer can decide which content should load first. This feature lets browsers load lighter content like text first, giving the impression that the website is loading faster.
- Multiplexing. With HTTP/1, the browser can only load elements one by one. HTTP/2 improves by letting browsers load different types of content in a single connection.
- Server push. HTTP/2 lets servers send content before the browser requests it.
- Advanced compression. Compared to HTTP/1, the compression HTTP/2 uses HPACK, which can eliminate redundancy in exchanged HTTP packets. HPACK makes HTTP messages smaller, which shortens load time.
Fortunately, most WordPress hosting providers already use HTTP/2 by default. There’s no need to manually initiate a migration because LiteSpeed, the web server software used by Hostinger, natively supports HTTP/2.
WordPress hosting providers that use Nginx servers also support HTTP/2 natively, while Apache servers added support in 2015. If your web host uses Apache, contact them to confirm whether HTTP/2 support is available.
However, if you’re unsure whether your WordPress site uses HTTP/2, use the HTTP/2 Test Tool and HTTP2.Pro to check. If it turns out that your website still uses HTTP/1, check whether your web host offers HTTP/2 and contact them to initiate the migration.
In addition, keep in mind that installing an SSL certificate is highly recommended for HTTP/2, as nearly all browsers only support HTTP/2 via an encrypted connection.
Speed up Your WordPress Site Checklist
Make sure you have done everything to speed up your WordPress site and utilize all the tools and features available.
Here is a downloadable checklist to remind you of all the methods we have shared in this article:
Test How Fast Your WordPress Website Is Right Now
Before working on your website, conduct speed tests to record your performance and see what you need to improve. GTmetrix and Pingdom are some of the most popular freemium speed test tools available – they’ll provide you with the information you need.
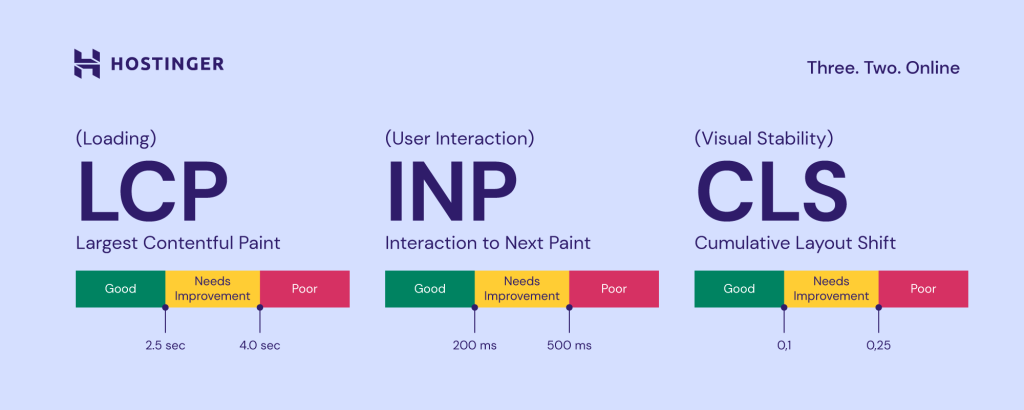
Then, Core Web Vitals are the main metrics to optimize your speed test results. The Core Web Vitals metrics include:
- Largest Contentful Paint (LCP) – checks the page loading time, especially how fast the web page renders its most significant elements. Aim to score 2.5 seconds or less to provide a good user experience.
- Interaction to Next Paint (INP) – determines how fast a page updates after user interaction, such as clicking on a link or pressing a button. Ideally, it should takes less than 200 milliseconds.
- Cumulative Layout Shift (CLS) – measures the page’s visual experience and stability by calculating the total amount of unexpected layout shifts. Aim to have a CLS score of 0.1 or less.
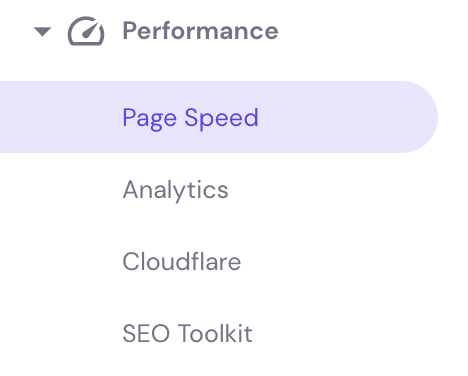
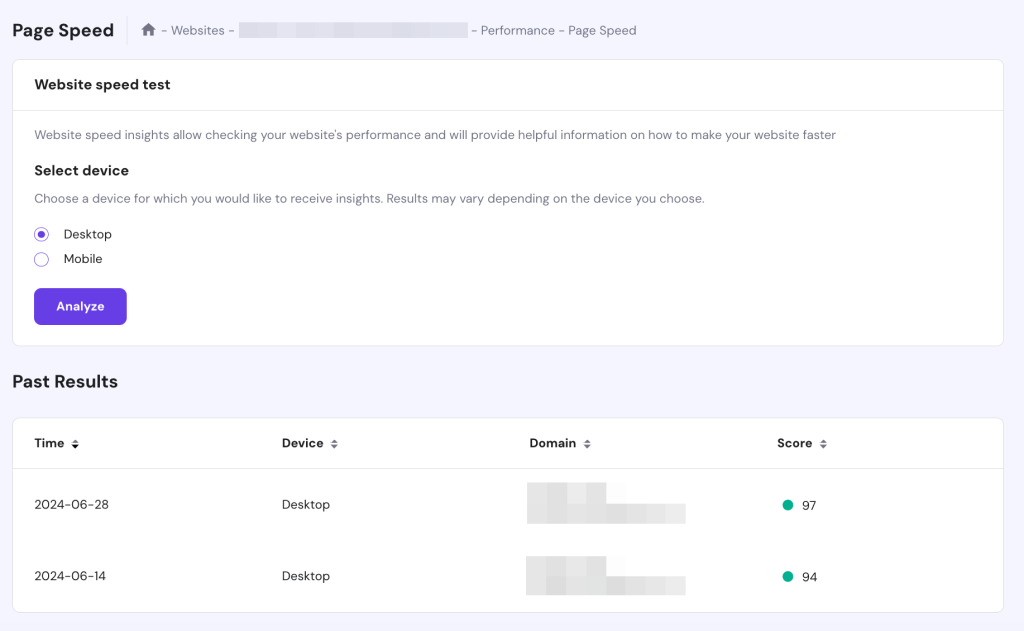
Hostinger has a PageSpeed test feature on its hPanel to simplify the process of optimizing your loading time. The feature also includes suggestions on how to improve your Core Web Vitals and, ultimately, site speed. Here are the steps to test your WordPress website using Hostinger:
- Head to the PageSpeed button under Performance section on the hPanel.
- Choose either Desktop or Mobile for the device type and click Analyze.
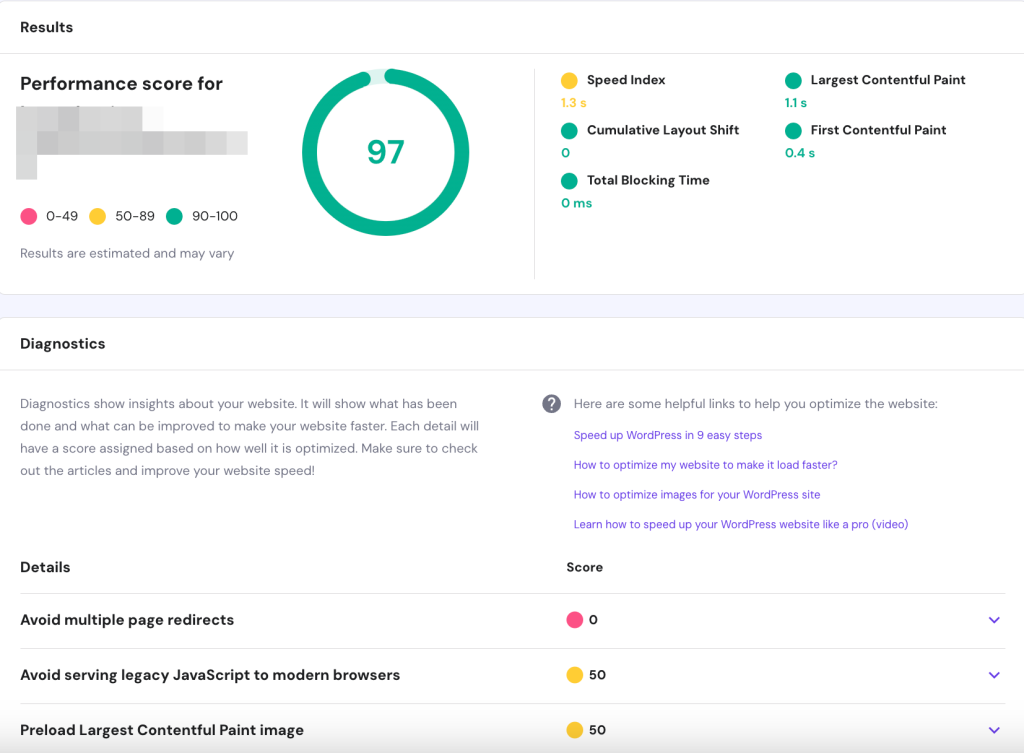
- The Results page will show the Core Web Vitals metrics and speed index, time to interactive, and total blocking time. Click on each item under the Details section to see suggestions on what to improve.
- The Page Speed section will show Past Results for all tests you have done on hPanel for the domain name. This section helps display any changes in your speed test score.
Conclusion
A slow WordPress website will frustrate visitors and negatively affect search engine rankings. Having a speedy website is essential to ensure a good user experience and search engine optimization.
In this guide, we have explored 12 methods to speed up your WordPress site. We listed the methods from the most beginner-friendly to the more advanced steps.
We hope this guide has helped you apply the best practices to speed up your site. If you have any questions or additional WordPress speed optimization tips, please leave them in the comments section.
How to Speed Up WordPress FAQ
Why Is WordPress Being So Slow?
Poor quality web hosting and no data caching in place are the most common reasons a WordPress website might take long to load. Too many plugins, unoptimized image files, and not using a content delivery network (CDN) to anticipate large traffic spikes can also harm your page load times.
How Do I Increase My Website Speed?
There are plenty of website performance optimization methods and website optimization tools to speed up your WordPress site. We recommend switching to a reputable hosting provider like Hostinger and using a CDN to start with. You can also read our tutorial on website speed optimization for more in-depth tips.
How Do I Check the Speed of My Website?
You can run a website speed test using online tools like Pingdom and GTmetrix. Some of them will let you choose a test location to check your site’s performance in different regions. Besides scoring your page load times, website speed test tools detect performance issues that hurt your website’s loading speed and suggest actionable advice to solve them.
How Do I Increase My WordPress Mobile Speed?
The best way to speed up your WordPress website for mobile users is to make it mobile-friendly. Do so by using a responsive theme, enabling mobile caching, and optimizing images for mobile as part of the site optimization process.
What Affects My Website Speed?
The main factors that affect website speed are page elements (HTML and CSS), hosting, multimedia, and internet connection. Your coding standards will also make or break your website’s load speed and overall performance.
What Is a Good Website Load Speed?
The acceptable website loading time is between two and five seconds. However, Google recommends keeping your Largest Contentful Paint – a Core Web Vital – under 2.5 seconds.

Domantas leads the content and SEO teams forward with fresh ideas and out of the box approaches. Armed with extensive SEO and marketing knowledge, he aims to spread the word of Hostinger to every corner of the world. During his free time, Domantas likes to hone his web development skills and travel to exotic places.

Comments
April 24 2020
Hello Domantas G Thank you so much for giving so valid information on Speed Up WordPress in 9 Easy Steps definitely I'm going to user this
March 27 2021
This is an excellent information. I will surely apply this in my wordpress. Thanks for help.
April 28 2021
Great advice Domantas! Lots of good information in these blog tutorials. Thank you! Nate
August 02 2021
With litespeed webserver lscache plugin works best in terms of wp caching solution, I suggest try once u will notice the difference.
October 04 2021
Can you please help me with my google account i was going into my Facebook account using google and it says hmm can't reach this page can you please help me, I'm really i need of it.
October 05 2021
Hi, you probably weren't able to connect to Facebook due to their downtime yesterday. IF you're still having problems with your Google Account, you should check with Google Support team :)
March 02 2022
Lscache plugin with LiteSpeed best for WordPress speed optimization.
March 08 2022
Hi there, I agree - LiteSpeed is a fairly little-known, but awesome tool for optimization! We actually have a full guide along with test results of before and after using LiteSpeed - feel free to check it out :)
March 06 2022
Hi Domantas & Mantas, thanks for the helpful post! It is worth mentioning to disable as much bloat as you possibly can. This doesn’t take much time and increases in site’s speed are huge. I’ve used a Disable Everything plugin for bloat removal. It is free and worth checking out: https://wordpress.org/plugins/disable-everything/