How to minify CSS
Mar 10, 2026
/
Ariffud M.
/
7 min Read
CSS minification removes unnecessary characters from stylesheets – whitespace, comments, and line breaks – without affecting how the code works. This reduces CSS file sizes, which helps pages load faster in browsers.
Minifying CSS improves page speed metrics like Largest Contentful Paint (LCP) and lowers bandwidth usage for both servers and visitors.
Since search engines consider load times when ranking pages, CSS minification is a quick and effective SEO win.
The process usually involves three simple steps: prepare your CSS files, run them through a minification tool, and check that the output renders correctly on your site.
You can minify CSS files using online tools, build systems like Webpack, or standalone applications. The best option depends on your workflow and how often you update your styles.
After minifying your CSS, test everything carefully. Use browser developer tools to debug issues and the W3C CSS Validator to catch errors early.
Also, avoid common mistakes, such as minifying files that are already minified or using overly aggressive settings that can break layouts.
1. Understand the basics of CSS and minification
Cascading Style Sheets (CSS) files contain selectors, properties, and values that browsers use to render page layouts and styles.
Developers use whitespace, line breaks, and comments to make CSS code readable. Browsers don’t need these characters to apply styles correctly, so they add size without adding value.
A typical stylesheet includes:
- Whitespace. Extra spaces between selectors, properties, and values.
- Line breaks. Breaks that separate rules and declarations.
- Comments. Notes that explain sections of code, wrapped in /* */.
- Formatting characters. Semicolons and spacing that don’t affect how styles work.
Minification removes all of these elements. For example, a 50 KB stylesheet might shrink to 35 KB after minification. That’s a 30% reduction.
Here’s what a CSS file looks like before minification:
/* Main navigation styles */
.nav-menu {
display: flex;
justify-content: space-between;
padding: 20px;
}
.nav-menu a {
color: #333;
text-decoration: none;
}
And here’s the same file after minification:
.nav-menu{display:flex;justify-content:space-between;padding:20px}.nav-menu a{color:#333;text-decoration:none}The minified version is harder for humans to read, but it works the same. Browsers parse both versions the same way.
For sites serving mobile users on slower connections, these file size reductions matter. Every kilobyte saved helps reduce time to first paint.
If you want to optimize website performance across the board, CSS minification should be one of your first steps. Understanding CSS basics also makes it easier to spot styles that increase file size without affecting functionality.
2. Choose the right CSS minification tool or method
CSS minification tools fall into three main categories: online minifiers, GUI-based applications, and build tool integrations.
- Online tools. These run in your browser. You paste your CSS or upload a file, click a button, and download the minified version. They don’t require installation and work well for quick, one-off tasks. Popular options include Toptal CSS Minifier and Clean CSS.
- GUI-based software. Apps like Prepros and CodeKit run locally on your computer. You can set folders to watch, and the app minifies CSS files automatically when you save changes. These tools often include extras like Sass compilation and live browser refresh.
- Build tool integrations. These tools integrate into automated workflows and minify assets during a larger build process. That process often includes bundling, transpiling, and deployment. Common examples include Webpack with plugins like css-minimizer-webpack-plugin, gulp.js with gulp-clean-css, and Grunt with grunt-contrib-cssmin.
The right CSS minification tool depends on your project size, automation needs, and your workflow setup. The table below shows which option works best for different project types:
| Project type | Recommended approach |
| Single static site with occasional updates | Online CSS minifier |
| Active development with multiple CSS files | GUI app or build tool integration |
| Automated production builds | Build tool integration |
| Team project with a CI/CD pipeline | Build tool integration |
| WordPress or CMS-based site | CMS plugin with built-in minification |
3. Prepare your CSS files for minification
Preparing your CSS files for minification means cleaning up and organizing your stylesheets first.
Start by removing unused styles. Selectors that don’t match any elements in your HTML add file size without changing how the page looks. You can find and remove them in a few ways:
- Browser DevTools. The Coverage tab shows which CSS rules actually run on a page.
- PurgeCSS. Scans your HTML files and automatically removes unused selectors.
- Chrome Lighthouse. Performance audits highlight unused CSS in the report.
Next, back up your original CSS files. Minification is one-way, so you can’t restore comments or formatting later. Keep unminified CSS locally or in version control, and deploy only the minified files to production.
Before minifying, validate your CSS syntax. Invalid CSS can break during minification or produce unexpected results.
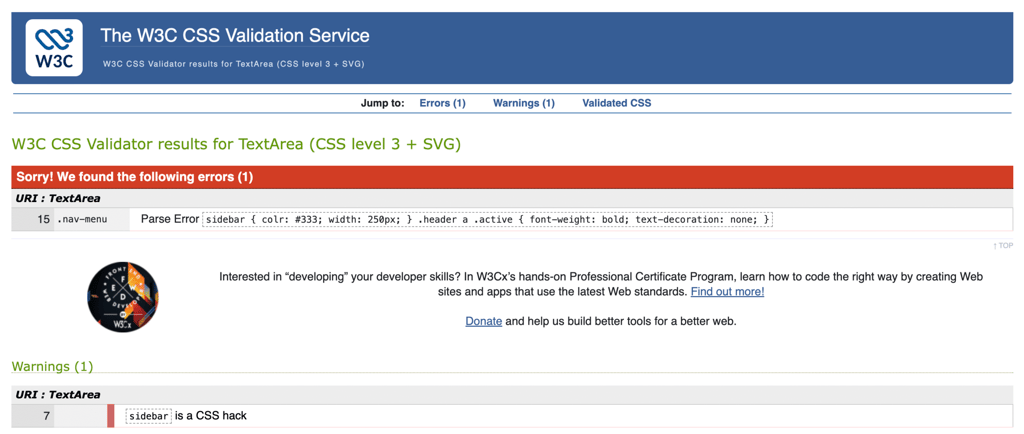
The W3C CSS Validator helps catch common issues, such as missing brackets, invalid properties, or malformed selectors.
Common problems to fix before minifying include:
- Unclosed brackets or parentheses.
- Invalid property values.
- Duplicate selectors you can merge.
- Vendor prefixes for properties that no longer need them.
You can also run a linter like Stylelint to automatically catch these issues. Clean input leads to more reliable minified output.
4. Minify your CSS files using online tools
To minify CSS online, use a browser-based tool that removes unnecessary characters from your stylesheet. Most tools let you paste code or upload a file and return a minified version within seconds.
- Open your original CSS file in a text editor and copy its contents, or locate the file on your computer if you plan to upload it.
- Open an online CSS minifier. For this example, we’ll use the Toptal CSS Minifier.
- Paste your CSS into the input field, or upload the file if the tool supports file uploads.
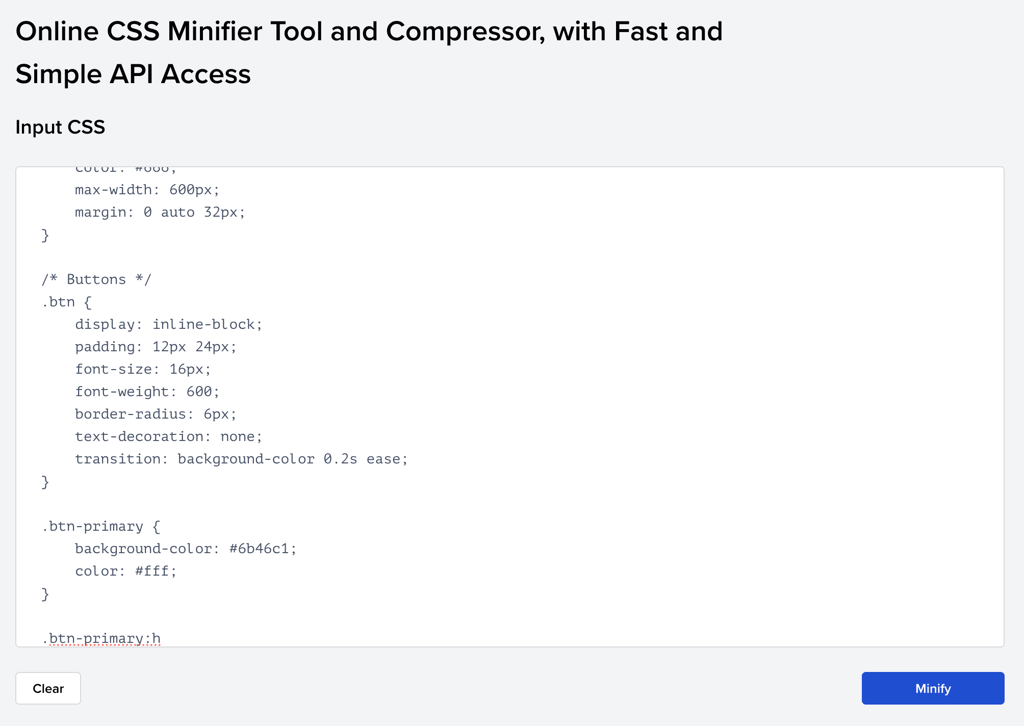
- Click the minify button, which may be labeled Minify, Compress, or a similar name.
- Copy the minified output or download the minified file once processing finishes.
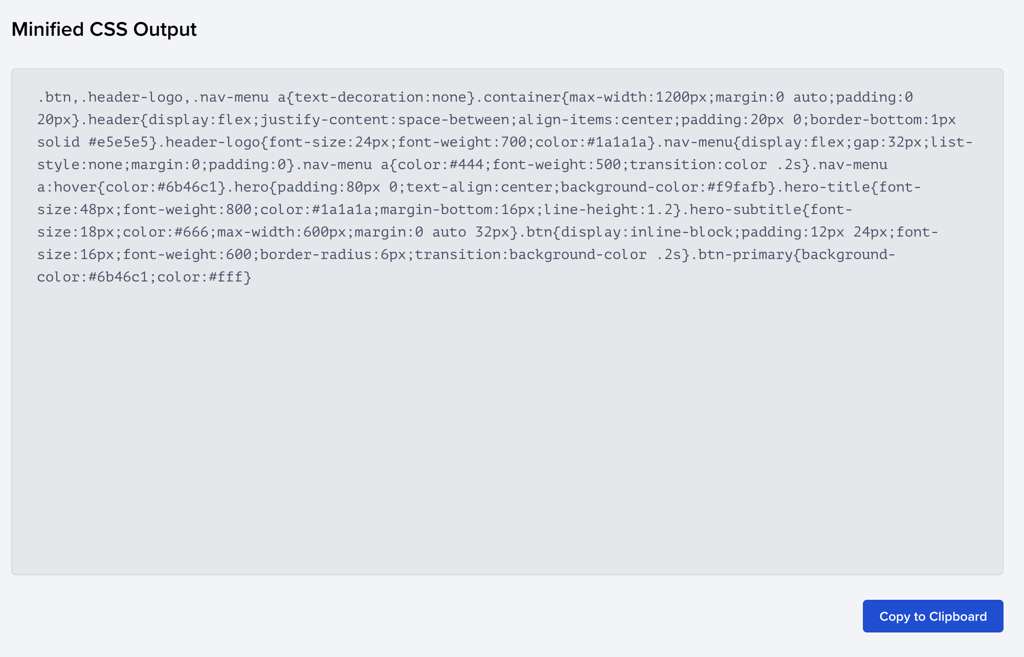
- Save the file with a .min.css extension, such as styles.min.css, so it’s easy to tell it apart from the original file.
Important! Online minification tools process your CSS on external servers. If you’re working with proprietary stylesheets, NDA-covered projects, or business-specific code, use local minification tools instead.
5. Verify and test your minified CSS
Verifying your minified CSS involves checking both file size and visual output across browsers.
Start by comparing the file size of the original and minified versions to confirm compression worked. If a CSS file doesn’t shrink, it may already be compact, or the minification tool didn’t process it correctly.
If you’re using free online minifiers, keep in mind that some tools can modify output in unexpected ways. Always test your minified CSS in a browser before pushing it to production to make sure it matches the original styling.
Here’s how to test your minified CSS:
- Test the page locally in multiple browsers, such as Chrome, Firefox, Safari, and Edge.
- Check layouts at different viewport sizes, including desktop, tablet, and mobile.
- Test interactive elements like hover states, dropdown menus, and form styles.
You can also use browser developer tools for deeper checks:
- Elements panel. Inspect computed styles for specific elements.
- Network panel. Confirm the minified file loads correctly and check its file size.
- Console. Look for CSS parsing errors or warnings.
The W3C CSS Validator can also scan minified CSS files. Invalid output usually indicates that the source CSS had hidden syntax errors or that the minification tool introduced an error.
Run a website speed test before and after enabling minified CSS. Tools like PageSpeed Insights and GTmetrix show actual load times, and help confirm that browsers render your minified styles correctly.
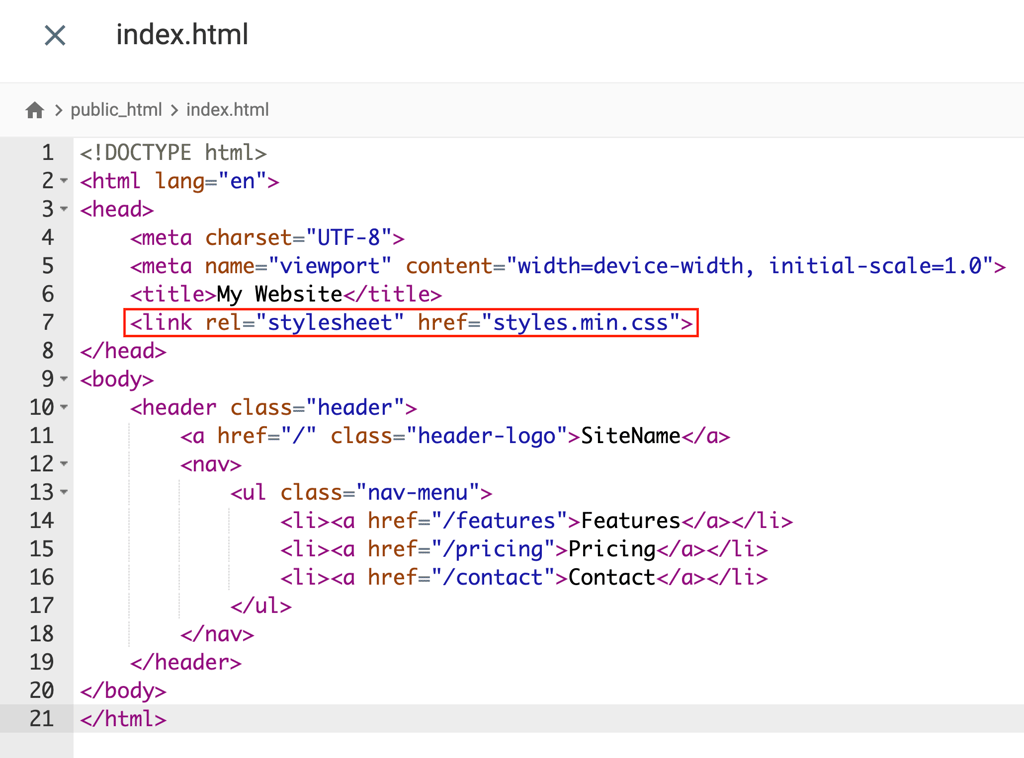
Once testing confirms the minified CSS works correctly, upload it to your server in the same directory as the original stylesheet. Then update your HTML to reference the minified file:
<!-- Before -->
<link rel="stylesheet" href="styles.css">
<!-- After -->
<link rel="stylesheet" href="styles.min.css">
After confirming everything works in production, remove the unminified file from the server to avoid confusion.
Why minifying CSS improves website performance
Minifying CSS improves website performance by reducing file size. Smaller files download faster and use less bandwidth for both servers and visitors.
Website performance directly affects Core Web Vitals:
- Largest Contentful Paint (LCP). Measures when the main content becomes visible. Faster CSS delivery lets the browser start rendering sooner.
- Interaction to Next Paint (INP). Measures how quickly a page responds to user input. Smaller CSS files reduce render-blocking time, so clicks and taps feel faster.
- Cumulative Layout Shift (CLS). Improves indirectly. Faster style loading reduces flashes of unstyled content that cause layout shifts.
Search engines use Core Web Vitals as ranking signals. When two pages offer equally relevant content, Google uses page experience metrics like LCP, INP, and CLS as tiebreakers.
Sites that meet all three “good” thresholds – LCP under 2.5 seconds, INP under 200 milliseconds, and CLS under 0.1 – have an advantage over slower competitors targeting the same keywords with similar content quality.
Here’s the real-world impact of CSS minification on performance:
| Site type | Typical CSS reduction | Load time improvement |
| WordPress site | 25–40% | 0.2–0.5 seconds |
| Custom web app | 30–50% | 0.3–0.8 seconds |
| Ecommerce site | 20–35% | 0.2–0.6 seconds |
A 0.4-second reduction in stylesheet loading may seem small, but combined with other optimizations like image compression, JavaScript minification, and caching, total load time improvements often reach 2–3 seconds.

Common mistakes to avoid when minifying CSS
The most common CSS minification mistakes include double-minifying files, using overly aggressive settings, skipping backups, and ignoring testing.
- Minifying files that are already minified. Running minification twice usually delivers minimal gains (often under 1%) while increasing the risk of errors. Files ending in .min.css have already been minified, so only process your source CSS.
- Using aggressive minification settings. Some tools offer aggressive modes that can break layouts or change how styles behave. These settings may merge similar selectors (changing specificity), shorten color values (affecting transparency), or remove “redundant” semicolons (causing parsing issues). Stick to default or “safe” settings unless you fully understand the tradeoffs. If you use aggressive optimization, test everything carefully.
- Skipping backups of source files. Debugging minified CSS is difficult, so you’ll need the original, readable files to track down issues. Keep a clear separation:
- Source files. Used for development and stored locally or in version control.
- Minified files. Used only for production and deployed to the server.
- Ignoring testing before deployment. Always apply minified CSS to a staging environment or local server first. Check responsive layouts, interactive components, and print styles. Problems caught during testing cost far less than issues discovered by users.
Other strategies for website optimization
CSS minification is only one part of a broader website optimization strategy. Other techniques can deliver equal or even greater improvements in load times.
- JavaScript minification. Works the same way as CSS minification. Removing whitespace and comments reduces file size. Tools like Terser and UglifyJS handle JavaScript compression. When combined, CSS and JavaScript minification can cut total asset size by 40–60%.
- Image optimization. Often delivers the largest file-size savings. Compressing images, serving them in WebP format, and using lazy loading can reduce page weight by megabytes. A single unoptimized hero image can outweigh all CSS and JavaScript combined.
- Caching strategies. Reduce load times for repeat visitors. Browser caching headers tell a visitor’s browser to store CSS files locally. Content delivery networks (CDNs) cache assets on servers around the world, which lowers latency for users far from your origin server.
- HTTP keep-alive. Keeps connections between browsers and servers open. Without keep-alive, each CSS file, image, and script requires a new connection, which adds round-trip latency to every request. Enabling keep-alive lets multiple files load over a single connection, reducing overhead.
- GZIP compression. Compresses text-based files, including CSS, at the server level before transmission. A minified CSS file compressed with GZIP can shrink by another 70–80% during transfer. Most web servers support GZIP, and enabling it usually takes minimal configuration.
Combining these strategies produces cumulative gains. A site that uses minification, compression, caching, and image optimization often loads 3–5 times faster than an unoptimized version.
All of the tutorial content on this website is subject to Hostinger's rigorous editorial standards and values.

Ariffud is a Technical Content Writer with an educational background in Informatics. He has extensive expertise in Linux and VPS, authoring over 200 articles on server management and web development. Follow him on LinkedIn.


Comments
0 responses