How to deploy a website with Devin: step-by-step guide
Sep 15, 2026
/
By Ariffud M.
/
11 min Read
To deploy a website with Devin, create a new project or open an existing one in Devin Desktop, then prepare and test it before starting the deployment.
You can use Devin App Deploys for a quick Netlify deployment. For a production workflow, you can push your project to a GitHub repository, connect the repository to your hosting provider, and let the provider deploy it from there.
Previously known as Windsurf, Devin Desktop is an AI-powered IDE that lets you create, edit, test, and deploy projects with AI assistance. It’s a Visual Studio (VS) Code fork, so its interface and workflow will feel familiar to VS Code users.
Follow these steps to deploy your website with Devin:
- Choose how you want to deploy your website with Devin.
- Prepare the website for deployment.
- Ask Devin to build and test your project.
- Push your project to a GitHub repository.
- Connect the GitHub repository to your hosting provider.
- Add environment variables and other deployment settings.
- Deploy the website from your hosting provider’s dashboard.
- Verify the live website and its key functionality.
If you’re a Hostinger customer, you can also install the Hostinger Connector extension in Devin Desktop. It connects Devin to your Hostinger account, so you can deploy websites and manage hosting resources directly from the IDE.
1. Choose how Devin will deploy the website
Choose how you want to host your website when using Devin by first deciding how the project gets into Devin Desktop, then choosing the deployment route that will publish it.
If you don’t have a project yet, go to the Agent tab → New Session and describe the website you want Devin to build. Continue prompting Devin until you’re happy with the result.
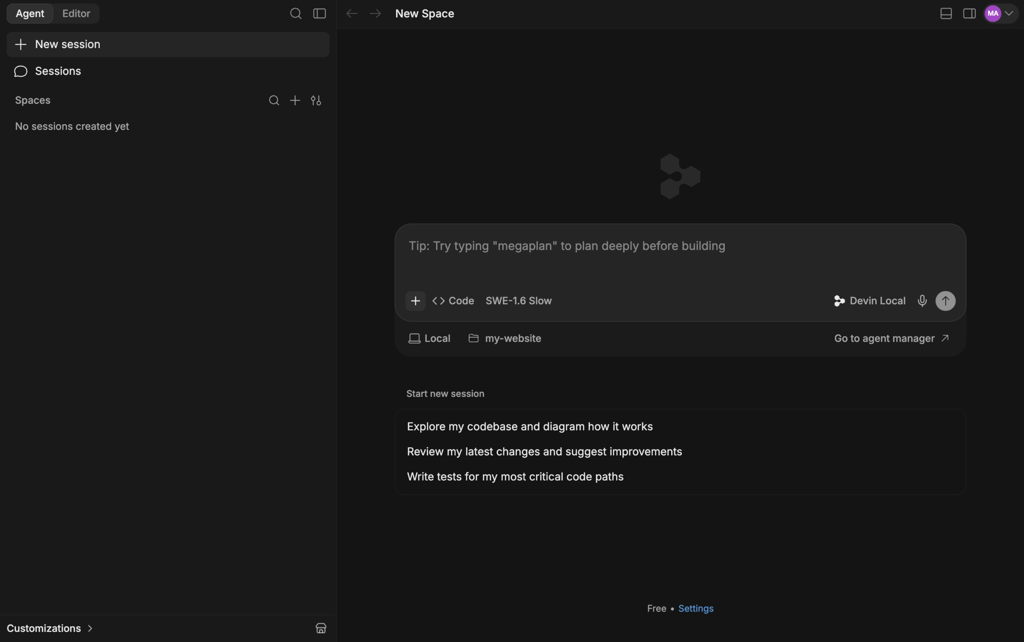
If you already have a project, open the Editor, then use Explorer to open the project folder.
Once your project is ready, choose one of these deployment methods:
- App Deploys. Ask Devin to deploy the website directly with its App Deploys feature, then let it handle the build and deployment process. Note that App Deploys is currently in beta and is intended mainly for preview deployments rather than production websites.
- GitHub and your hosting provider. Push the project to a GitHub repository, then connect that repository to your hosting provider. This approach is better suited for production websites because it gives you a version-controlled deployment workflow and makes future updates easier to manage.
If you’ve ever deployed a website using another integrated development environment (IDE), the remaining process will feel familiar because the steps below use the GitHub and hosting provider method.
2. Prepare the website for deployment
Prepare the website for deployment by checking for configuration that works only on your local computer.
This step is especially relevant for dynamic websites that use APIs, databases, environment variables, or other external services.
If you’re deploying a simpler static website built with HTML, CSS, and JavaScript, you may need little or no additional configuration before deployment.
Ask Devin to review the project and make necessary changes before you build and test it. For example:
Prepare this project for production deployment, but don't deploy it or push it to GitHub yet.
Check the project configuration, dependencies, environment variables, and any URLs or settings that only work locally. Fix any clear deployment issues and tell me what you changed.
Don't add passwords, API keys, or other secrets to the project files.
Review Devin’s changes before continuing. In particular, check for:
- Local URLs, such as localhost, that won’t work on the live website.
- Passwords, API keys, or other credentials stored directly in project files.
- Environment variables that you’ll need to configure with your hosting provider.
- Development-only settings that shouldn’t be used in production.
If the project uses environment variables, note which ones it needs, but don’t add their production values to files you’ll push to GitHub. You’ll configure those values later with your hosting provider.
3. Ask Devin to build and test the project
Ask Devin to build and test the project locally before pushing it to GitHub. The exact checks depend on how your website is built.
Framework-based projects may have a production build, automated tests, linting (automated code quality checks), or type checks. A simple HTML, CSS, and JavaScript website may only need to run locally so you can confirm that it works.
Ask Devin to run the checks that already exist in the project and fix any errors it finds. For example:
Use the project's existing package manager and scripts. Run the production build and any existing tests, linting, or type checks that apply.
If the project doesn't require a build or doesn't have automated checks, run it locally and make sure it works.
If you find an error, identify the cause, fix it, and rerun the affected checks. Don't deploy the website or push it to GitHub yet.
Tell me what you tested and whether any issues remain.
Review any changes Devin makes while fixing errors, especially changes to dependencies, build scripts, or project configuration. Check that the fixes don’t introduce unexpected behavior.
If your project has a production build, confirm that it completes successfully and generates the expected output before continuing.
For projects without a build process, confirm that the website runs locally and that its pages and functionality work as expected.
4. Push the project to GitHub
Push your tested project to a GitHub repository, which will serve as the source for deployment.
You can ask Devin to handle the Git workflow or use Devin Desktop’s built-in Source Control panel. Asking Devin is simpler because it can run the required Git commands for you.
To do this, open the Agent tab and ask Devin to push the project to GitHub. For example:
Push this project to GitHub.
If it's already connected to a GitHub repository, commit and push the latest changes to it.
Otherwise, initialize Git, create a .gitignore file for this project, commit the files, and help me publish them to a new GitHub repository named my-new-website.
Ask me for any repository details or GitHub authorization you need before continuing.
Devin will handle the required Git commands. It may ask you to approve actions or sign in to GitHub along the way.
Once Devin finishes, open the repository on GitHub and confirm that your project files are there.
You can also push the project manually through Source Control. If you’ve previously deployed a website from VS Code through GitHub, the process is nearly identical:
- Open Source Control in the sidebar, or press Ctrl+Shift+G. Select Initialize Repository if the project isn’t already using Git.
- Stage the project files by selecting the + icon next to Changes.
- Enter a commit message, such as Initial commit, then select Commit.
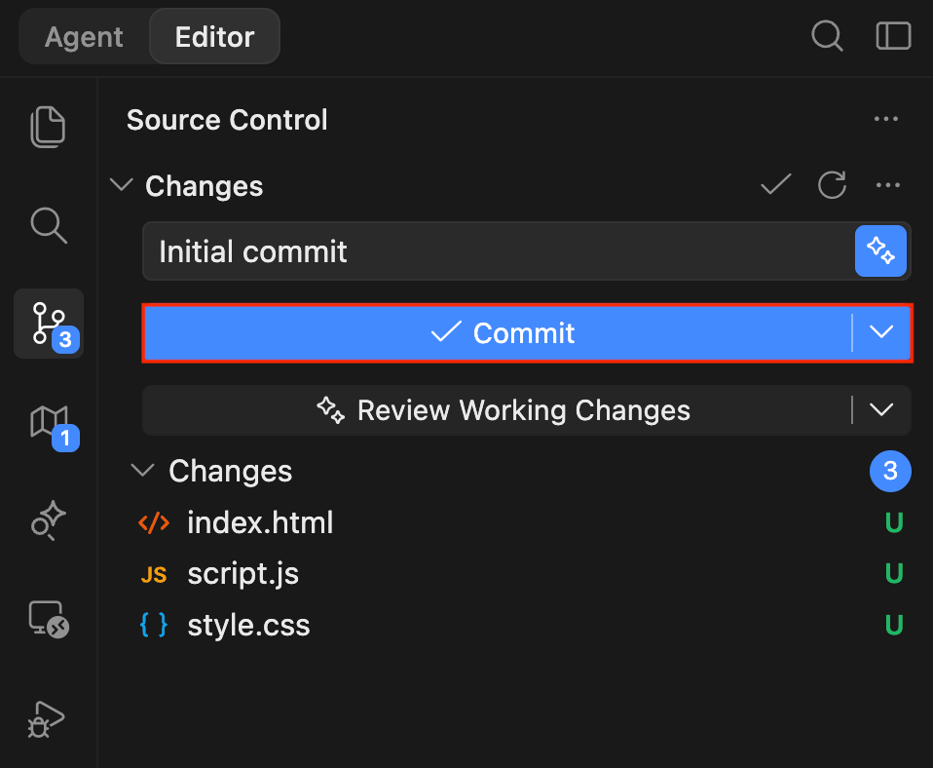
- Select Publish Branch → Publish to GitHub, then choose whether to make the repository public or private. Sign in to GitHub and authorize access if prompted.
5. Connect GitHub to your hosting provider
Connect your GitHub repository to your hosting provider so it can access and deploy your project.
On most web app hosting providers, the process is similar, although the exact menu names and deployment settings may vary. Here’s how:
- Open your hosting dashboard and find the Git or GitHub integration.
- Authorize access to your GitHub account.
- Select the repository that contains your project.
On Hostinger Unlimited web hosting plan and above, use the setup path that matches your project:
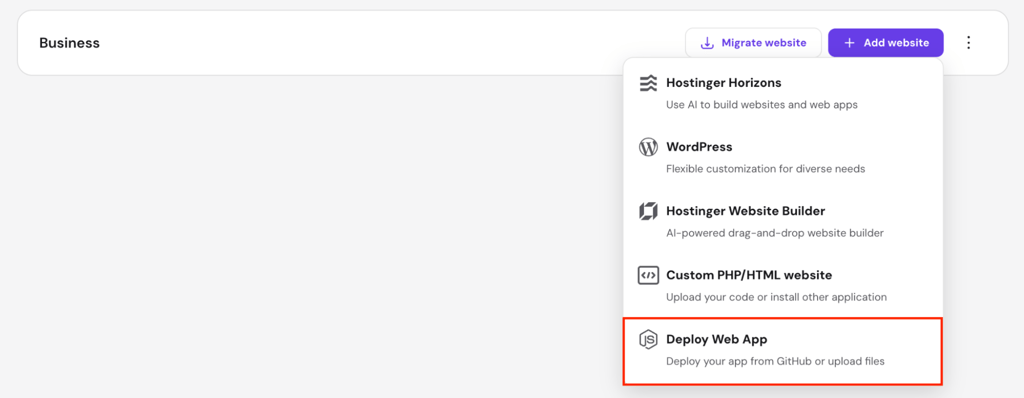
- For Node.js-based projects, including React, Next.js, and Express.js, go to Hostinger dashboard → Websites → Add Website → Deploy Web App → Import Git Repository. Authorize GitHub when prompted, then select your repository. Hostinger will analyze the project and suggest the remaining build settings before deployment.
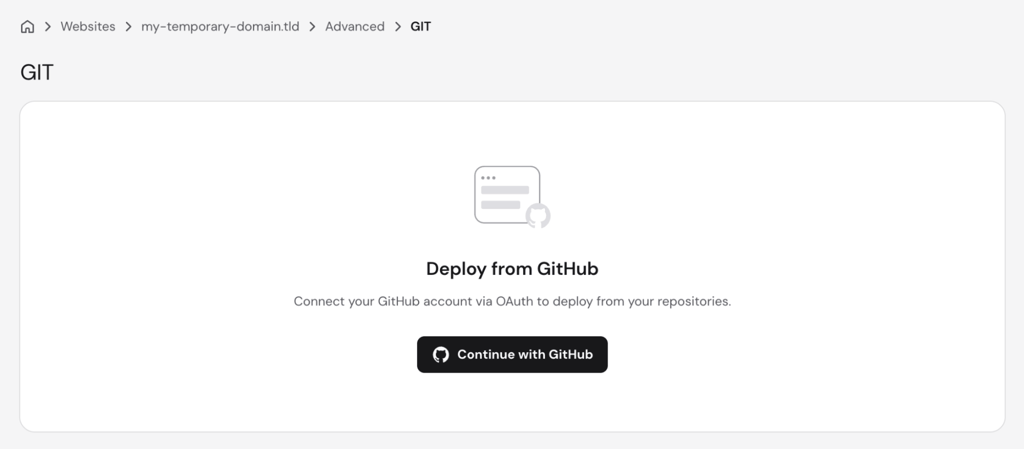
- For static HTML and custom PHP projects, navigate to Hostinger dashboard → Websites → select your website → Dashboard → Advanced → Git. Select Continue with GitHub, authorize Hostinger to access your GitHub account or repository, then choose the repository and branch you want to deploy.

6. Add environment variables and deployment settings
After connecting the repository, add any environment variables your website needs and review the settings your hosting provider will use to build and run it.
If you’re deploying a simple static HTML, CSS, and JavaScript website without environment variables or a build process, you can usually skip this step.
For framework-based and dynamic projects, configure these settings when your hosting provider asks for them:
- Build command. The command your provider runs to create the production version of the website, such as npm run build.
- Output directory. The folder that contains the files generated by the build, such as dist or build.
- Start command or entry file. Some server-side applications need a command or file that tells the host how to start the application.
- Environment variables. Add the production values you identified earlier, such as API keys, database URLs, and other configuration.
Some hosting providers can detect several of these settings automatically.
Hostinger, for example, can detect the framework, build command, and output directory. You’ll still need to add any required environment variables yourself, though.
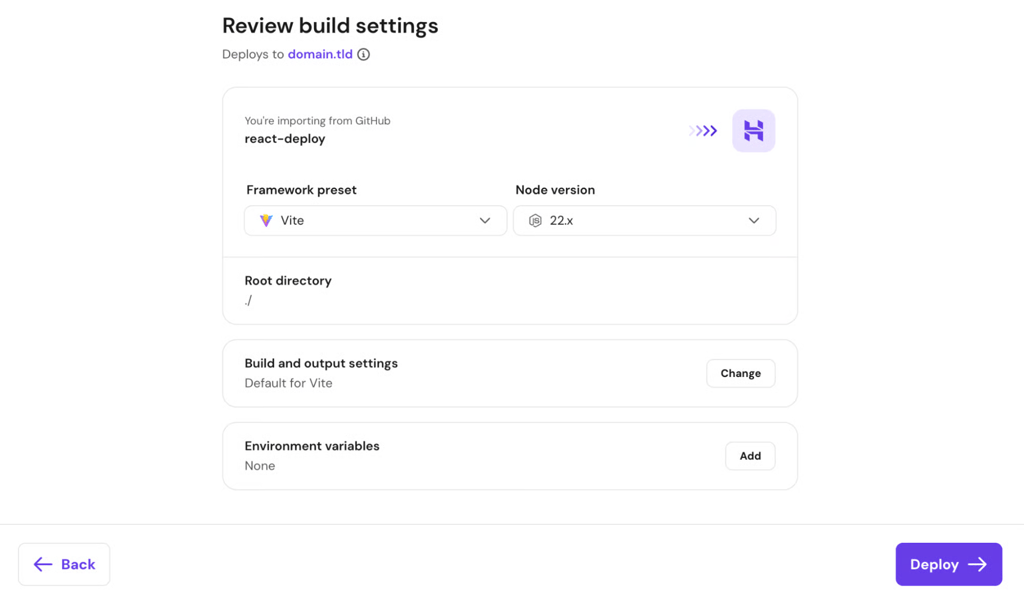
It’s still a good idea to double-check the detected settings and adjust them if needed. If you’re not sure which values to use, ask Devin to inspect the project:
Check this project and tell me which production environment variables, build command, output directory, and start command or entry file I should use with my hosting provider.
Only include settings that this project actually needs.
7. Deploy the website from your hosting provider
Once the repository, environment variables, and build settings are ready, start the deployment from your hosting dashboard.
Depending on the provider, select Deploy, Create deployment, or an equivalent option, then wait for the process to finish. The platform will pull your project from GitHub and run the build process you configured earlier.
On Hostinger, click Deploy to start the deployment. When the process finishes successfully, you’ll get a link to the live website and its deployment details.
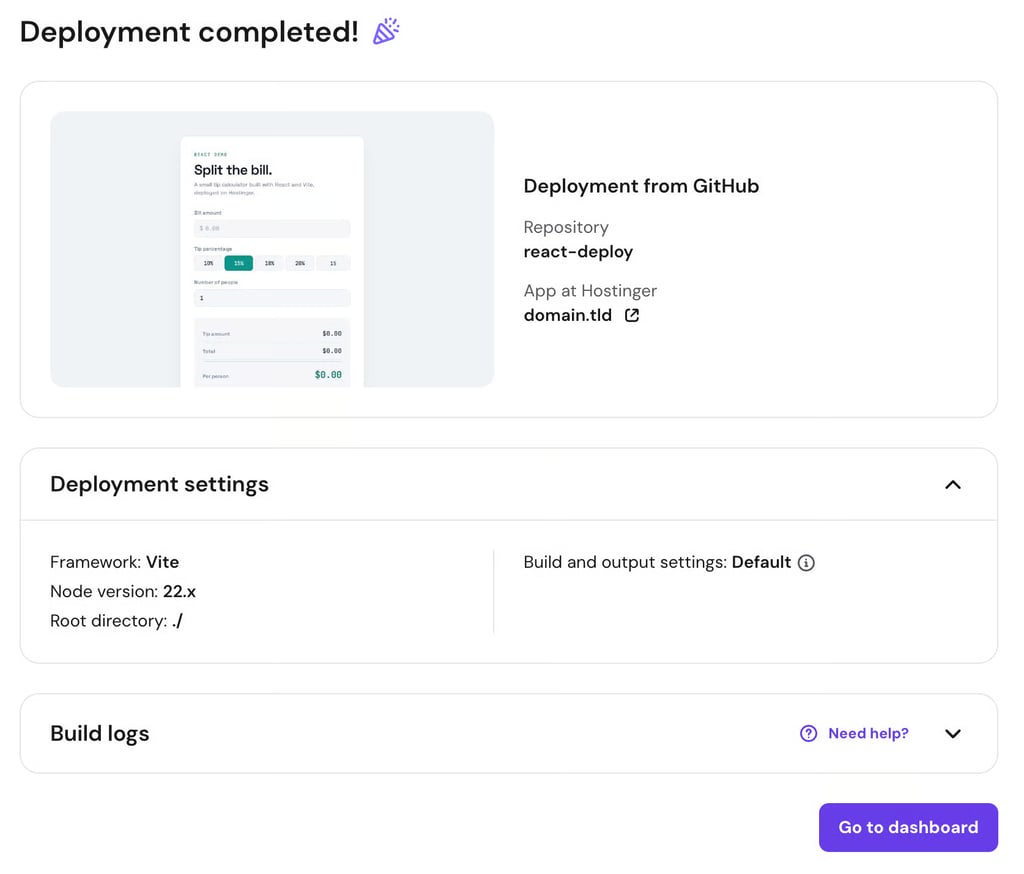
If the deployment fails, open the build log and look for the error. You can give the error to Devin and ask it to investigate:
My website failed to deploy. Here's the build error from my hosting provider:
[paste the error here]
Find the cause and fix the project. Then run the relevant build and tests again. Don't deploy or push anything until the checks pass.
After reviewing Devin’s fix, push the updated project to GitHub and redeploy it from your hosting provider.
8. Verify the live website
After deployment, test the live website to confirm that it works correctly outside your local development environment.
Open the website URL and check the parts visitors are most likely to use:
- Visit the main pages and confirm that the content, images, and styles load correctly.
- Follow the navigation and important links.
- Test interactive features such as forms, buttons, login, and search if your website has them.
- For dynamic websites, check that features connected to APIs or databases return the expected data.
- Open the site on a mobile phone and other smaller-screen devices to spot responsive layout issues.
- If you’re using a custom domain, confirm that it opens the correct website over HTTPS.
If something breaks on the live website, give Devin a clear description of the problem. You can also attach a screenshot if it helps explain the issue.
For example:
My website deployed successfully, but the contact form doesn't work on the live site.
Help me find the cause and fix it without changing unrelated parts of the project.
After Devin fixes the problem, test the project again, push the changes to GitHub, and redeploy it.
Some hosting providers, including Hostinger, support automatic deployments. After you connect a GitHub branch, future pushes to that branch can trigger a new deployment automatically.
This means you can make changes in Devin, test them, and push them to GitHub. Hostinger will then build and deploy the updated version automatically, so you won’t need to return to Hostinger dashboard and redeploy it manually.
How to deploy a Devin-built website with Hostinger Connector
You can deploy a website directly from Devin Desktop with the Hostinger Connector extension without pushing the project to GitHub or setting up the deployment manually in Hostinger dashboard.
Hostinger Connector connects Devin to your Hostinger account, so you can deploy websites and manage supported hosting resources – including domains, DNS records, and VPS instances – through prompts.
Hostinger Connector requires Node.js 18 or later on your computer and an active Hostinger account. If Node.js is missing or outdated, Hostinger Connector can install or update it for you.
To deploy a website, you’ll also need an active Hostinger hosting plan that supports your project type.
Compared with deploying a website from Cursor, the process is nearly identical. The main differences are where each editor places its extensions and AI chat controls.
- Open the Editor tab and select Extensions in Devin Desktop. Search for Hostinger Connector, then select Install.
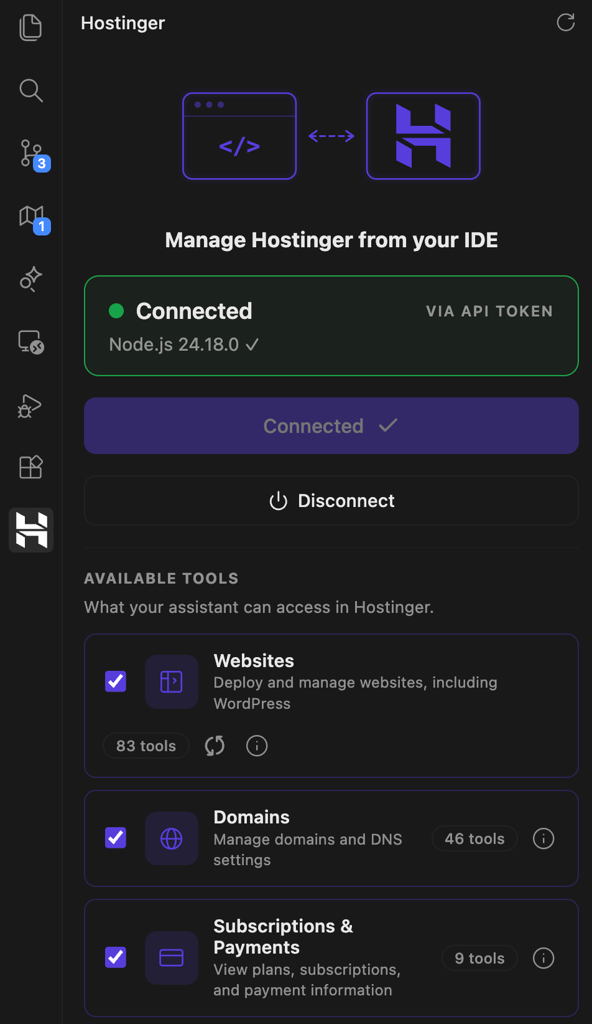
- Select the Hostinger icon in the Activity Bar → 1-Click Connect. Sign in to your Hostinger account in the browser and authorize the connection.
- Return to Devin Desktop and open the Hostinger extension again. You should see it’s connected now.
- Ask Devin to deploy the project. For example:
Deploy this project to my Hostinger Unlimited hosting plan on domain.tld. Ask me for any hosting or domain details you need.
If you don’t want to connect a custom domain yet, you can use a temporary domain:
Deploy this project to one of my active Hostinger hosting plans using a temporary domain.
Devin will use Hostinger Connector to handle the deployment and return the deployment status and live URL in the chat.
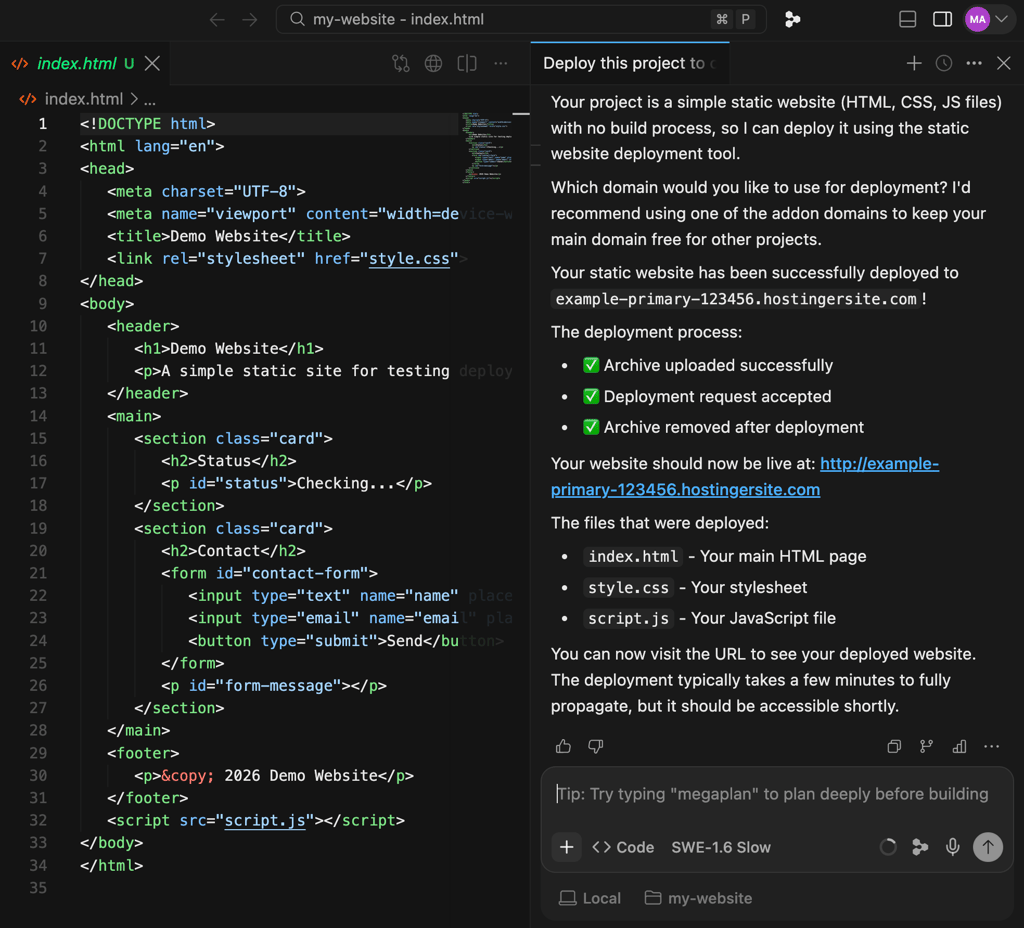
Open the live URL and verify that the website works correctly. If the deployment fails, ask Devin to inspect the deployment error or build logs, fix the issue, and deploy the project again.
Common errors when deploying a website with Devin
Common errors when deploying a website with Devin include missing production configuration, incorrect build settings, incompatible runtime versions, branch mismatches, and access issues.
Many of these problems happen because the production environment doesn’t match the project configuration you tested locally.
- Missing environment variables. Some features may stop working after deployment because the live server doesn’t have the API keys, database URLs, or other variables your project uses locally. Add the missing values to your hosting provider using the same variable names, then redeploy the website.
- Wrong build or start settings. The deployment may fail if the build command, output directory, start command, or entry file is incorrect. Check these values in package.json and your project configuration, or ask Devin to identify the correct settings before trying again.
- Wrong Node.js version. A Node.js project may fail if your hosting provider uses a different version from the one your project requires. Check the required version in your project, then select the same version in your hosting settings.
- Wrong deployment branch. Your latest changes won’t appear on the live website if your hosting provider deploys a different GitHub branch. Check which branch Devin pushed the changes to, then confirm that your hosting provider uses the same branch.
- GitHub repository doesn’t appear. Your hosting provider may not see the repository if its GitHub integration doesn’t have access to it. Update the integration permissions, then reconnect or refresh your GitHub account.
- Local URLs remain in the project. Features may fail after deployment if the website still points to localhost or another development address. Replace those URLs with the correct production URLs or environment variables, then rebuild and redeploy the project.
- “Cannot find binary path” in Hostinger Connector. This error means Devin Desktop can’t find a program that Hostinger Connector needs, usually npx. Run which npx on macOS or Linux, or where npx on Windows, to find its location. If the command returns a path but Devin still shows the error, add the full path to Hostinger Connector’s MCP configuration, then fully restart Devin Desktop.
Best practices for deploying a website with Devin
Best deployment practices with Devin focus on keeping the AI’s scope clear, reviewing what reaches production, limiting access to only what’s needed, and testing higher-risk changes before launch.
- Give Devin one clear task at a time. A prompt that combines coding, testing, Git operations, and deployment gives Devin too many actions to handle at once. Break the workflow into separate tasks and set clear boundaries, such as Don’t push to GitHub yet or Deploy only after the build passes.
- Review important changes before publishing them. Changes to dependencies, build scripts, configuration files, and deployment settings can affect how the website behaves in production. Review Devin’s changes in the editor before committing or deploying them, especially when they affect how the project builds or runs.
- Limit Hostinger Connector access to what you need. Hostinger Connector lets you choose which Hostinger product groups Devin can use, such as Websites, Domains, and VPS. Keep only the relevant groups enabled, then turn on additional ones when a task requires them.
- Be careful with branches that deploy automatically. When automatic deployment is active, pushing to the deployment branch can publish changes without another manual step. Keep unfinished work on a separate branch and update the deployment branch only after the changes pass your checks.
- Use a staging site for major changes. Authentication changes, database updates, and third-party integrations can be difficult to test completely on your local computer. Deploy higher-risk changes to a staging site or temporary domain first, then publish them to production after you’ve verified that they work.
What to do after deploying a website with Devin
After your Devin-built website is live, focus on making sure it works well for visitors and is easy to maintain as it grows.
- Connect a custom domain. A custom domain gives visitors a consistent address for your website. If you’re still using a temporary URL, buy a domain from your preferred registrar and connect it to your hosting plan by updating the DNS settings when needed. If your domain and hosting are under the same Hostinger account, you won’t need to update the DNS settings manually.
- Plan future website changes. Your website will likely need new content, design updates, bug fixes, or features after launch. Large batches of changes are harder to review and troubleshoot, so organize updates into manageable groups. Ask Devin to implement and test each batch, then publish it through the same deployment workflow.
- Set up backups. Backups give you a copy of your website that you can restore if an update, configuration change, or other issue affects the live version. Hostinger includes daily website backups with Unlimited plans and higher, while lower-tier plans can add them separately. You can also restore or download available backups through Hostinger dashboard.
- Monitor hosting resources and upgrade when needed. Your website uses CPU, memory, storage, and other hosting resources as it receives traffic and runs applications. Check your hosting dashboard for high resource usage, especially if the website becomes slow or starts returning errors. On Hostinger, you can upgrade to a higher hosting plan if your current resources no longer meet the website’s needs.
- Add website analytics. Analytics shows how visitors find and use your website, including which pages they visit and how traffic changes over time. This data helps you decide which content, pages, or features to improve instead of relying on assumptions. Set up a tool such as Google Analytics 4 and start collecting data before making major changes, so you have a baseline for comparing performance afterward.
Domain Name Checker
Instantly check domain name availability.

Ariffud is a Technical Content Writer with an educational background in Informatics. He has extensive expertise in Linux and VPS, authoring over 200 articles on server management and web development. Follow him on LinkedIn.