How to migrate from Wix to WordPress
Oct 17, 2026
/
By Bruno S.
/
8 min Read
Migrating from Wix to WordPress requires rebuilding your site because Wix doesn’t provide a full-site export that WordPress can import directly.
You can approach the rebuild in two ways: manually migrate your Wix content to WordPress or use Hostinger AI Builder to recreate the site design before moving the required content separately. URL regeneration produces a visually similar draft in minutes, but replaces your images with AI-generated stand-ins and fills in content it couldn’t read from the page.
Manual migration preserves the data Wix allows you to export, including physical products, orders, contacts, and media files, though each has its own limitations. Digital products aren’t included, images need to be matched separately, and pages, design elements, and post archives don’t have a direct export path.
For stores with product catalogs, order history, and contact lists worth preserving, the manual Wix-to-WordPress migration is the better approach. For static, design-focused sites, URL regeneration can speed up the rebuild, but you’ll still need to migrate the relevant content and data separately.
How to choose Wix migration method
Choose the AI path for a fast, visually close draft; choose the manual path for full control over your data exports.
Regenerate from URL | Manual export + rebuild | |
Pages and design | Recreated from publicly visible content | Not exportable; rebuild from scratch |
Blog posts | Visible blog page previews recreated; full post bodies require copy-paste or third-party tools | RSS feed carries the 20 most recent posts as excerpts only |
Store products | Visually recreated from listings visible on the page; prices and product details can be incorrect | Physical products are exported as a CSV; digital products are excluded |
Media | Replaced with AI-generated visuals in a similar style | Download from the Media Manager; licensed stock images cannot be exported |
Contacts and members | Not transferred | Contacts export as CSV (up to 50,000); site members must re-register on the new platform |
First draft time | Roughly five minutes (our test, simple site) | Hours to days, depending on site size |
Skills required | Writing prompts | Platform setup, CSV handling, content re-entry |
The manual export steps for products, orders, contacts, and media apply to both approaches. If you regenerate from URL, you still need to bring your real store data, including products and orders, as well as your contacts and media files, into the new platform afterward.
How to regenerate your Wix site from URL
To regenerate your Wix site, give Hostinger AI Builder your site’s URL – no export files needed. It reads the publicly visible content (layout, colors, typography, navigation, text, and products) and builds an editable version from it.
The result is a starting point, not a copy. AI Builder replaces your images with AI-generated visuals in a similar style and writes fresh content for anything it couldn’t read from a public page. It doesn’t recreate dynamic features (such as logins, bookings, membership areas, or backend integrations).
To generate your Wix site from its URL with Hostinger AI Builder, follow these steps.
1. Open Hostinger AI Builder and describe your request
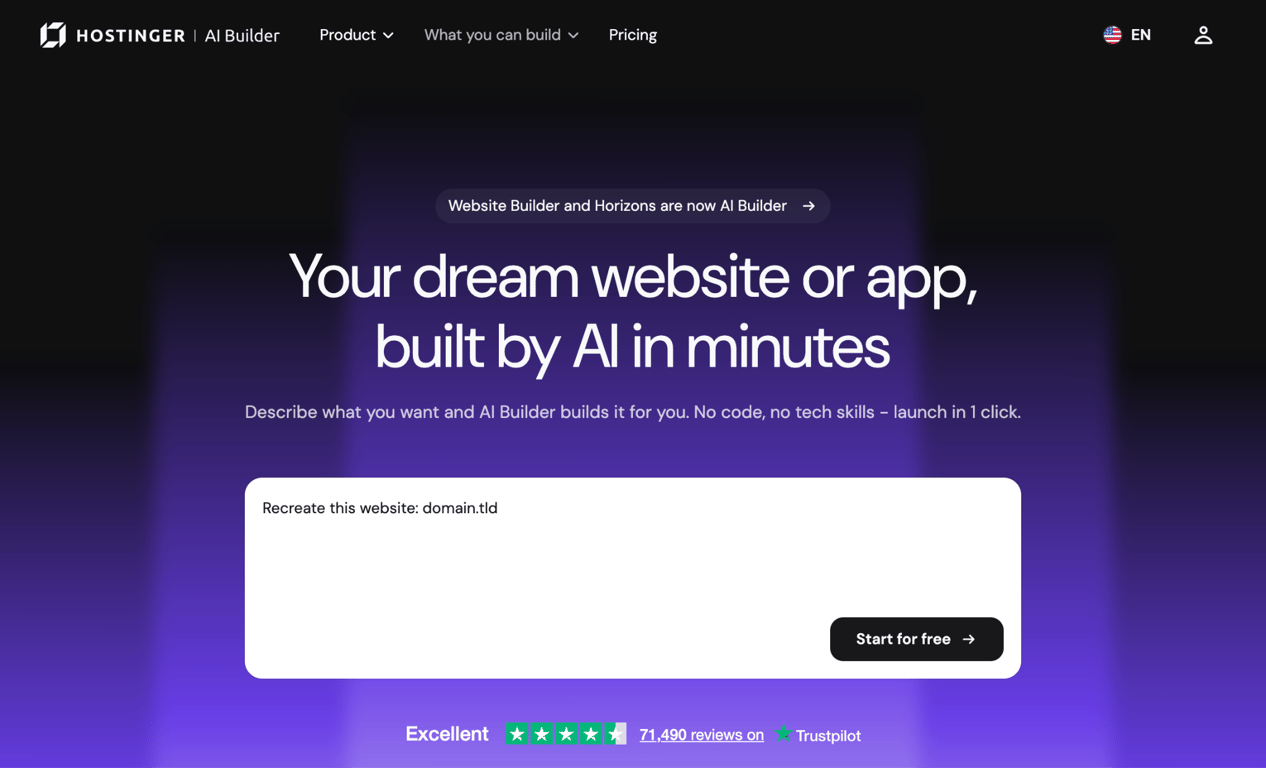
Go to Hostinger AI Builder and type your prompt in the text field. Use this format:
Recreate this website: [your Wix site URL].Click Start for free to submit.
2. Wait for the first draft
AI Builder fetches your site, then starts building. In our test on a simple site with a blog and a shop, the first draft took roughly 5 minutes and used about 2.7 credits; generation time and credit use vary by site complexity.
3. Review the homepage carefully
The first draft is your homepage. Palette, fonts, nav labels, hero text, and visible product listings tend to transfer accurately. Pay close attention to the footer: in our test, AI Builder generated an incorrect contact email address and brand name from context clues on the page.

4. Build your separate pages
The first draft links navigation items to homepage sections rather than separate pages. Prompt AI Builder to build them:
Create the About Me, Shop, Blog, and Portfolio pages and link the navigation to them.It builds each page with your design system and placeholder content, then connects the nav.
5. Populate the pages with your real content
For each separate page, give AI Builder the actual URL:
Update the Blog page using the posts from [your Wix blog page URL].AI Builder fetches what’s publicly visible on that page. In our test, it loaded the six most recently published blog posts with real titles and opening excerpts.
Two limits apply: AI Builder migrates post previews, not full bodies, and generates any metadata it can’t read from the page (categories, tags, publication dates). You need to use the chat to correct any imprecise information.

6. Review every line before you publish
Compare every page against your Wix original before publishing. AI Builder generates content for any gaps it couldn’t read from the source, styled to match the rest of your site.
In our test, AI Builder generated content wherever it couldn’t read the original source, including:
- Mismatched prices and details.
- AI-generated entries for store listings it couldn’t fully read.
- AI-written blog post bodies beyond what’s publicly visible.
- AI-generated placeholder text on pages without public content, like About.
Before publishing, go through each page and:
- Replace every AI-generated image with your original files from the Media Manager download.
- Check every price and product name against your store.
- Read the opening of each blog post against the original to find exactly where the real text ends.
7. Edit your content
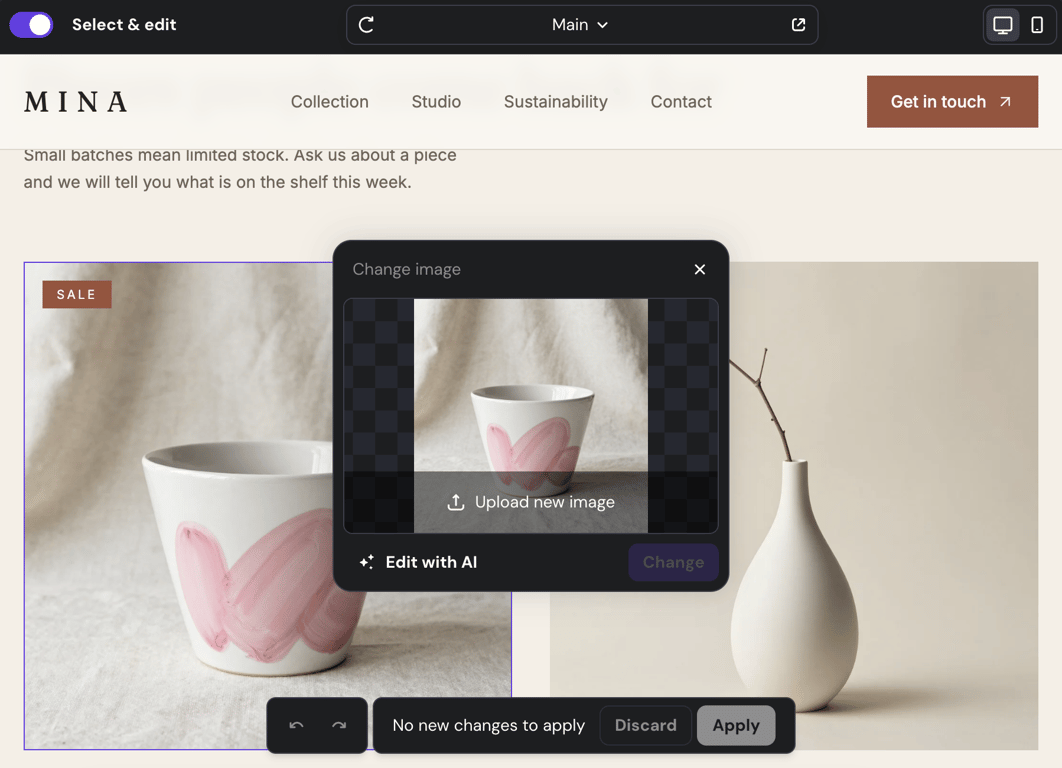
Turn on Select & edit in the top toolbar to make inline changes. Elements with dashed outlines (logo, buttons, navigation CTA) are directly editable. For body text and page content, type your change in the chat panel and AI Builder will rewrite the relevant section.
8. Publish your site
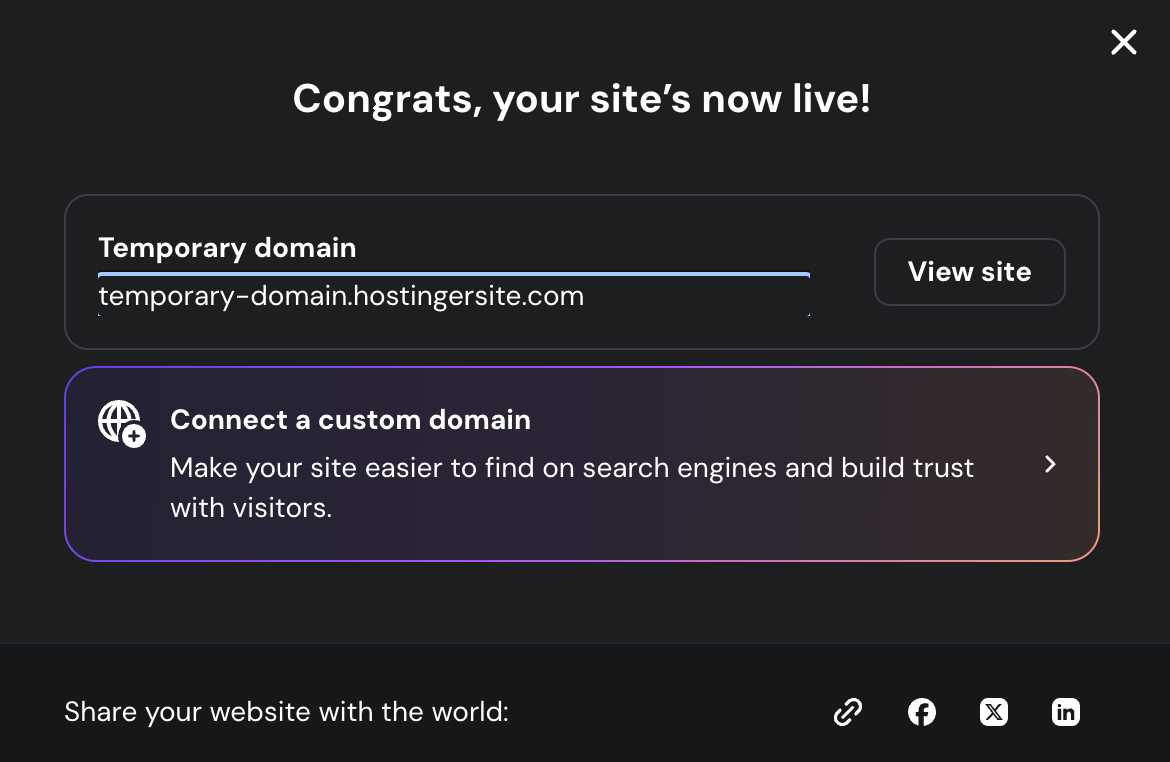
When you’re done, click Publish in the top-right corner. AI Builder deploys the site and shows a confirmation screen with a temporary […].hostingersite.com address. From that screen, you can connect a custom domain.
What are the benefits of using Hostinger AI Builder for Wix migration
The main benefit is that Wix’s export restrictions don’t apply: pages, design, and blog structure have no export format, so the only manual alternative is to rebuild manually while referencing the live site. AI Builder reads your published site directly and produces an editable draft in roughly five minutes.
The workflow is also iterative: you don’t commit to a result until you’re satisfied with it. Each prompt refines a specific page or element, so you can replace placeholder content one section at a time rather than rebuilding everything before seeing anything.
Your product and order data, contacts, and media still need to be migrated separately; the manual export steps apply regardless of which method you choose for the design rebuild.
How to migrate your Wix site to WordPress manually
The manual Wix-to-WordPress migration exports the data Wix allows, including physical products, orders, contacts, and media files, and rebuilds the remaining content directly in WordPress.
Being the leading self-hosted CMS, WordPress is the most common destination for manual Wix migrations. It gives you full ownership of your content and a plugin ecosystem that covers virtually any functionality Wix provides.
1. Set up WordPress hosting and install WordPress
Get a managed hosting for WordPress plan and, if needed, install WordPress. This gives you the WordPress admin area where everything exported from Wix will go.
2. Export your blog posts
The starting point is Wix’s RSS feed at yoursite.wixsite.com/your-site-name/blog-feed.xml. It carries the 20 most recent posts as plain-text excerpts of around 500 characters each.
There are no full post bodies in the feed. Importing it into WordPress via Tools → Import → RSS produces title stubs and short excerpts, not complete articles.
The Content Manager export isn’t accessible on standard Wix blog sites either: the dashboard has no CMS entry, and the official export link returns an error. To move full post bodies, copy them manually from your live Wix site or use a third-party migration tool that reads published pages.
Pro tip
WordPress.com has a built-in Wix importer under Tools → Import → Wix that migrates static pages, images, and menus from a Wix site URL. It doesn't migrate blog posts and only works on WordPress.com, not on a self-hosted WordPress installation like the one you'd run with Hostinger.
For larger blog archives, third-party migration tools can read your published Wix pages and move posts as full articles.
3. Export your store products
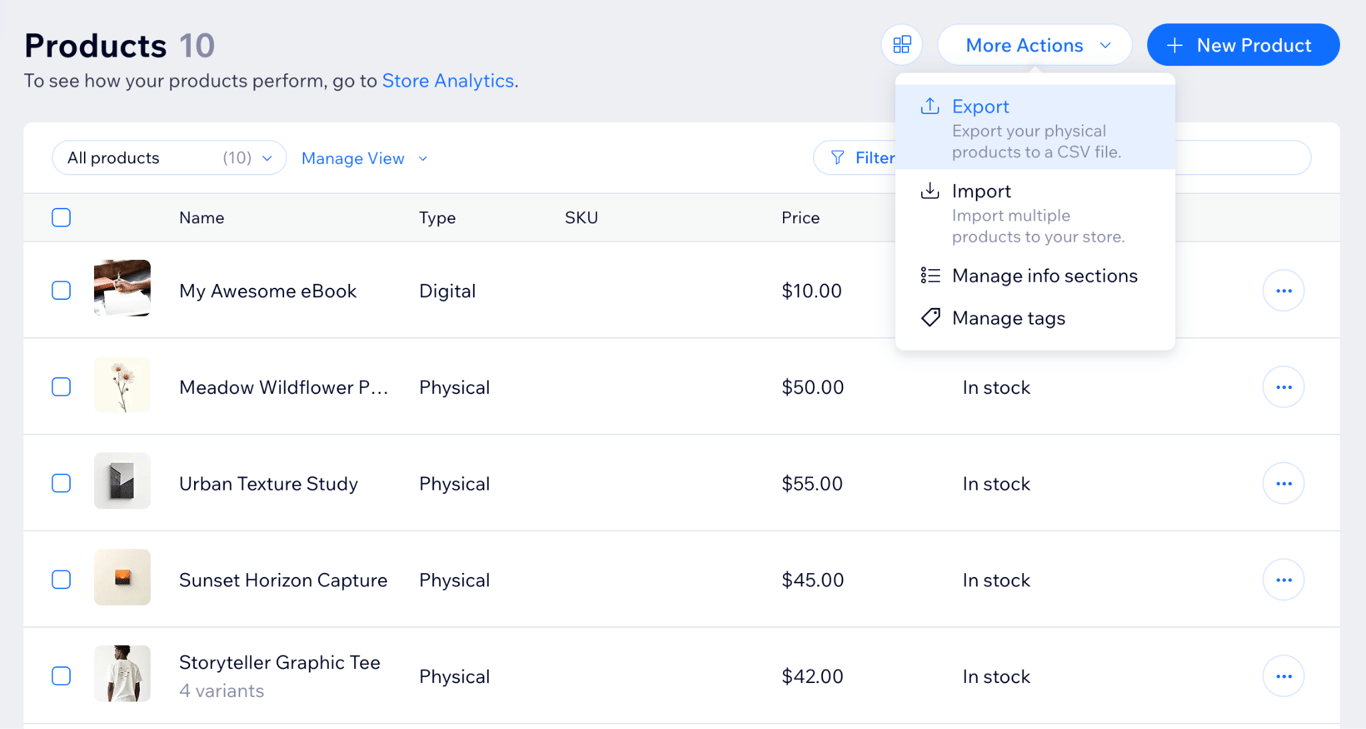
Go to Catalog → Products → More Actions → Export. Choose All and click Export to download the CSV.
Digital products are not exported. To migrate them, download the files from the Media Manager and recreate each listing manually in WooCommerce.
The file uses three row types, all linked by a shared handle:
- PRODUCT rows carry the product name, description (as HTML), and price for simple products.
- VARIANT rows carry the price for each variant of a product with options like size or color. A product with multiple variants expands into multiple VARIANT rows.
- MEDIA rows carry internal Wix filenames and alt text, not usable image URLs. Download product images separately from the Media Manager, then reattach them when importing.
The export limit is 5,000 rows per file.
4. Export your order history
If you run a Wix store, export your existing orders before moving to WordPress. Go to Orders in your Wix dashboard, select the orders you want to export, click Export, and choose whether to save each order or each purchased item as a separate CSV row.
Wix order CSV files aren’t formatted specifically for WooCommerce, so importing the order history may require additional mapping or an order-import plugin. WooCommerce supports order imports through dedicated CSV import tools.
5. Export your contacts
Only the site owner can run this export. Go to Customers & Leads → Contacts → Import / Export → Export. Choose All Contacts, select Regular CSV, and click Export. The file exports up to 50,000 contacts, including subscription status.
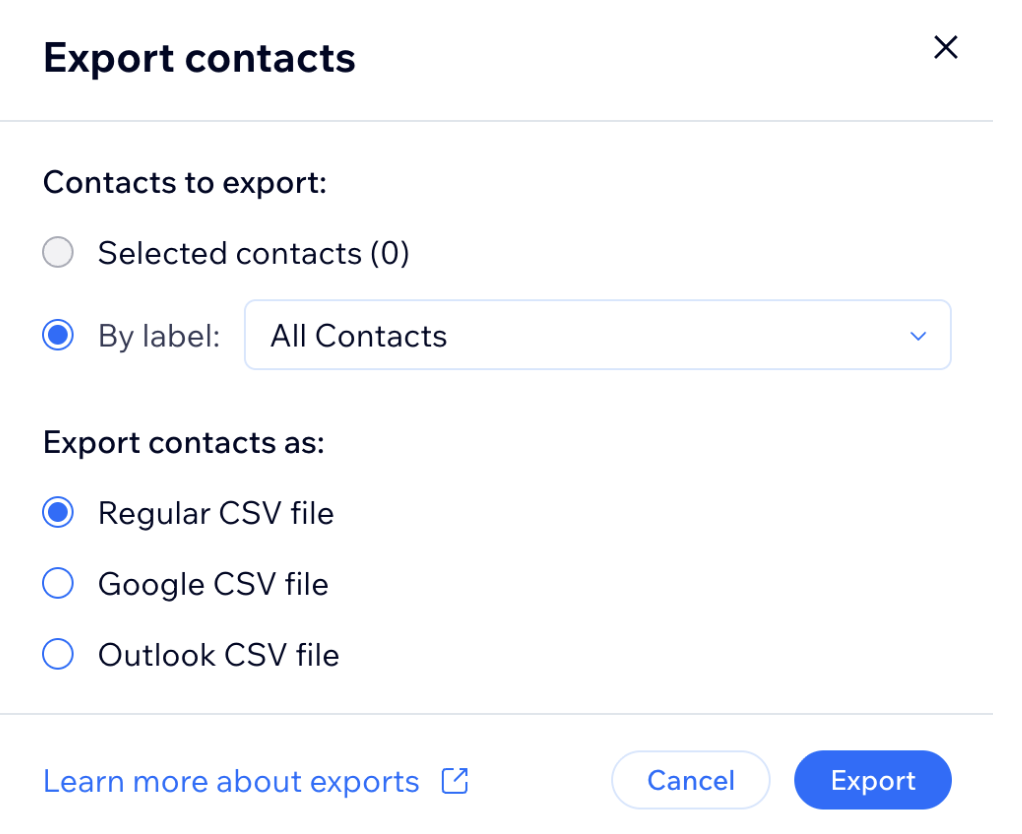
Map the email subscription status column when importing contacts into your new email marketing tool. Preserve each contact’s subscription status, and only send marketing emails to contacts you’re permitted to contact under the laws that apply to your audience.
Site members appear in the export as contacts with “Source: Site Members.” Their accounts and passwords don’t transfer; they need to re-register on the new platform.
6. Download your media files
The Media Manager isn’t in the dashboard sidebar on a standard Wix site. Search media in the dashboard’s top search bar and open it from the results.
To download individual files, hover over a file and click ⋯ → Download. To download in bulk, select multiple files and click Download in the right-hand Actions panel. Files arrive as Site Files.zip.
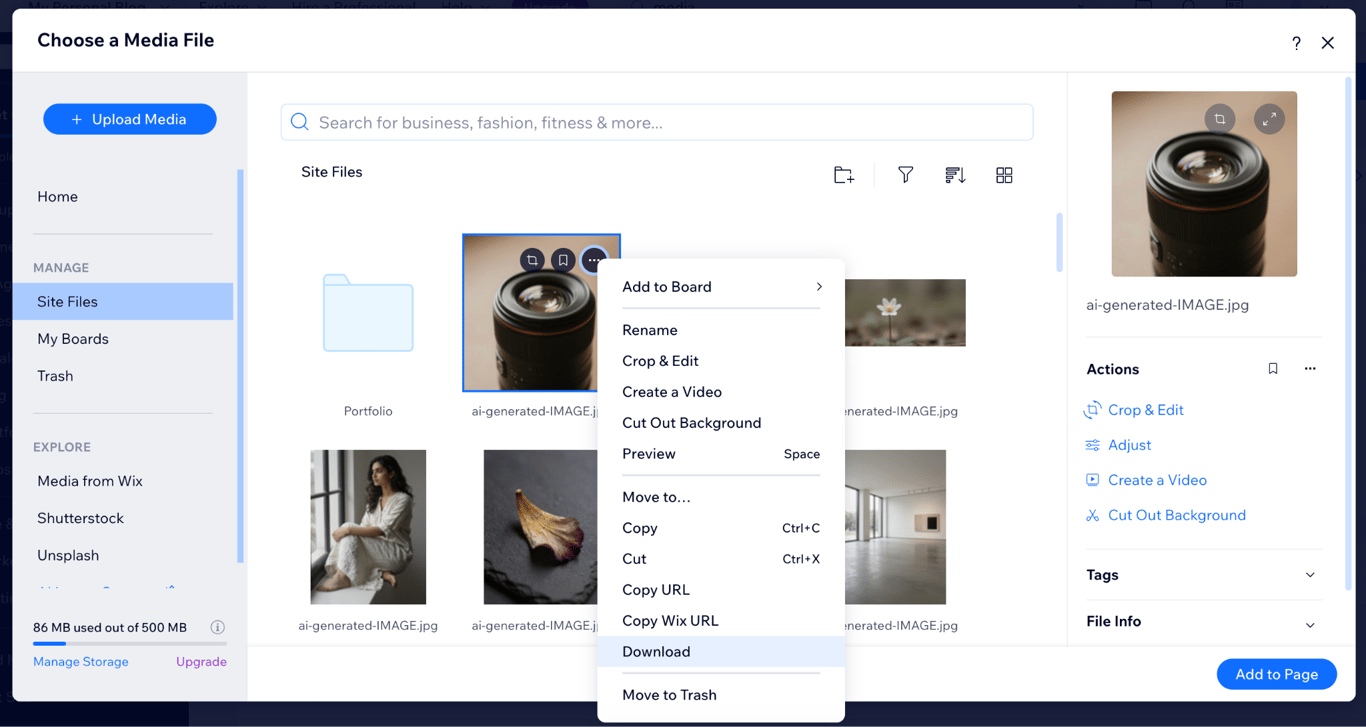
Images from the Media from Wix, Shutterstock, and Unsplash tabs cannot be downloaded. Find replacements for any licensed stock images used on the site.
Pro tip
The ⋯ menu also has a Copy URL option. If your product CSV shows internal filenames rather than accessible image links, use Copy URL in the Media Manager to get the direct CDN URL for each product image.
7. Rebuild your pages, connect your domain, and set up redirects
With your exports in hand:
- Install and set up WooCommerce, the free ecommerce plugin for WordPress, then import your product CSV and reattach the product images you downloaded.
- Upload your media files and rebuild your pages in the WordPress block editor.
- Re-create your navigation menus and any contact forms.
When you’re ready to go live, point your domain’s DNS to your WordPress host or transfer the domain. Then set up 301 redirects in WordPress from your old Wix URLs to their WordPress equivalents to preserve any search rankings built on the old site.
Pro tip
Wix domains can't be transferred within 60 days of purchase; contact information changes and completed transfers also reset the lock. Disable Private Registration before starting or you may miss the authorization email, and re-add your business email MX records manually after the transfer. To start, go to Domains in your Wix account, click the Domain Actions icon next to your domain, and select Transfer away from Wix.
What are the benefits of migrating from Wix to WordPress manually?
The main benefit is full ownership: you end up with your content and data on a platform you can export from later.
WordPress offers plugins for most common Wix functionality, including ecommerce, portfolios, memberships, and bookings. It also gives you more control over your content and hosting, with built-in tools for exporting site data if you later decide to move to another WordPress host.
The process also gives you a safety window: keep your Wix site published until the WordPress version is ready, then cancel the paid plan. After the Wix plan expires, the site remains online on the free Wix URL with Wix ads unless you unpublish it.
Should you migrate or rebuild your Wix site?
The right approach depends on what your site is and what matters most in the migration. In most cases, a hybrid is the strongest option: regenerate the design and page structure with AI Builder, then bring your product data and contacts in via CSV.
Your situation | Better fit | Why |
Design-focused site with mostly static pages | Regenerate from URL | Pages have no export format; URL regeneration reads the published design directly |
Large blog archive | Manual path + copy-paste or third-party tool | Both methods only recover previews of the most recently visible posts automatically; archives need manual work either way |
Active store with order history | Manual exports for data, optional AI for design | Products, contacts, and orders can be exported as CSV files; order data may require additional mapping or an import tool to import into WooCommerce, while digital products need to be recreated manually |
Limited technical experience, need speed | Regenerate from URL | Prompt-driven; first draft in roughly five minutes, live on a temporary domain in under a minute. |
Need specific plugins or custom functionality | WordPress manual | URL regeneration recreates visual output, not backend logic or integrations |
The hybrid approach often produces the cleanest result: use AI Builder to rebuild the design and page structure, import your product CSV into WooCommerce, move your contacts to your new email tool, and copy and paste the blog posts that matter most.
Why migrate from Wix to WordPress?
WordPress is a strong Wix alternative if you want more control over your content, hosting, and site functionality. Its plugin ecosystem supports ecommerce, portfolios, memberships, bookings, and other common website features, while its export tools make it easier to move your content between WordPress hosts later.
For full ownership and flexibility, WordPress is the standard choice. WordPress supports a broad range of functionality through plugins and gives you more flexibility to export and move your content between WordPress hosts.
For more specific use cases, the guide to Wix alternatives covers dedicated ecommerce platforms, portfolio builders, and business site tools. Exporting your products, orders, contacts, and media follows the same process regardless of where you migrate.
This article is a localized version of How to migrate from Wix to WordPress, originally published in English.

Bruno is a Content Writer at Hostinger, focused on creating and optimizing helpful, engaging articles about web development and marketing. With a background in journalism, he combines storytelling with practical insights to make complex topics easier to understand. He has also contributed to publications like MacMagazine and Jornal A Tarde. Outside of work, Bruno enjoys exploring art, cooking, and technology.