How to use AI to write blog posts
Oct 16, 2026
/
By Alma
/
14 min Read

To use AI to write blog posts that are ready to publish, treat AI as a writing assistant instead of publishing its first output unchanged.
AI-assisted blog writing means using AI to help plan, organize, draft, and improve your content while you stay responsible for the facts, examples, expertise, voice, and final editorial decisions.
Build the article in stages so you can review each part before moving on:
- Prepare the brief.
- Select an AI writing tool.
- Build and review the blog outline.
- Create the initial draft.
- Refine the AI-generated draft.
- Incorporate your expertise and brand voice.
- Verify facts and key information.
- Polish the article for clarity and flow.
- Get the post ready for publication.
Working this way makes it easier to catch weak ideas, unsupported claims, and generic writing before publication.
1. Prepare the blog post brief
Write a short brief that tells the AI who you’re writing for, what the reader needs help with, what the article should cover, and which sources it should use for factual claims. Whether you’re using a chatbot or an AI agent for writing, the brief provides the context needed to produce a focused draft.
If you simply ask, “Write a blog post about product photography,” the AI has to fill in important details on its own. It doesn’t know whether the reader is a professional photographer, an ecommerce seller, or someone taking their first product photo with a phone. Those missing details can quickly lead to broad advice that doesn’t suit the actual reader.
For your blog post brief, include:
- Topic. State the exact subject and angle.
- Audience. Describe the reader and what they already know.
- Reader goal. Explain what they should understand or be able to do after reading.
- Search intent. State what someone searching the topic wants to accomplish, such as following instructions, understanding a concept, or comparing options.
- Primary keyword. Give the AI the main search phrase so it understands the page topic. Don’t ask it to repeat the keyword a fixed number of times.
- Required coverage. List the questions, examples, or points the article needs to address.
- Sources. Provide the documentation, research, interviews, or notes that should support factual claims.
- Brand voice. Explain how the writing should sound. Examples from approved articles are more useful than instructions such as “sound professional.”
- Structure. Specify the format or heading structure when you already know how the article should be organized.
- Exclusions. State what the article should omit to prevent the draft from straying into related topics.
If the post supports a broader content marketing campaign, add its role to the brief as well. The post might answer an early research question, support a product launch, or lead interested readers to a more detailed resource.
For instance, a product photography brief could specify that the article is for first-time Etsy sellers who want to photograph products at home with a smartphone. They should finish the post knowing how to choose a background, use window light, pick useful camera angles, and make basic edits without buying professional equipment.
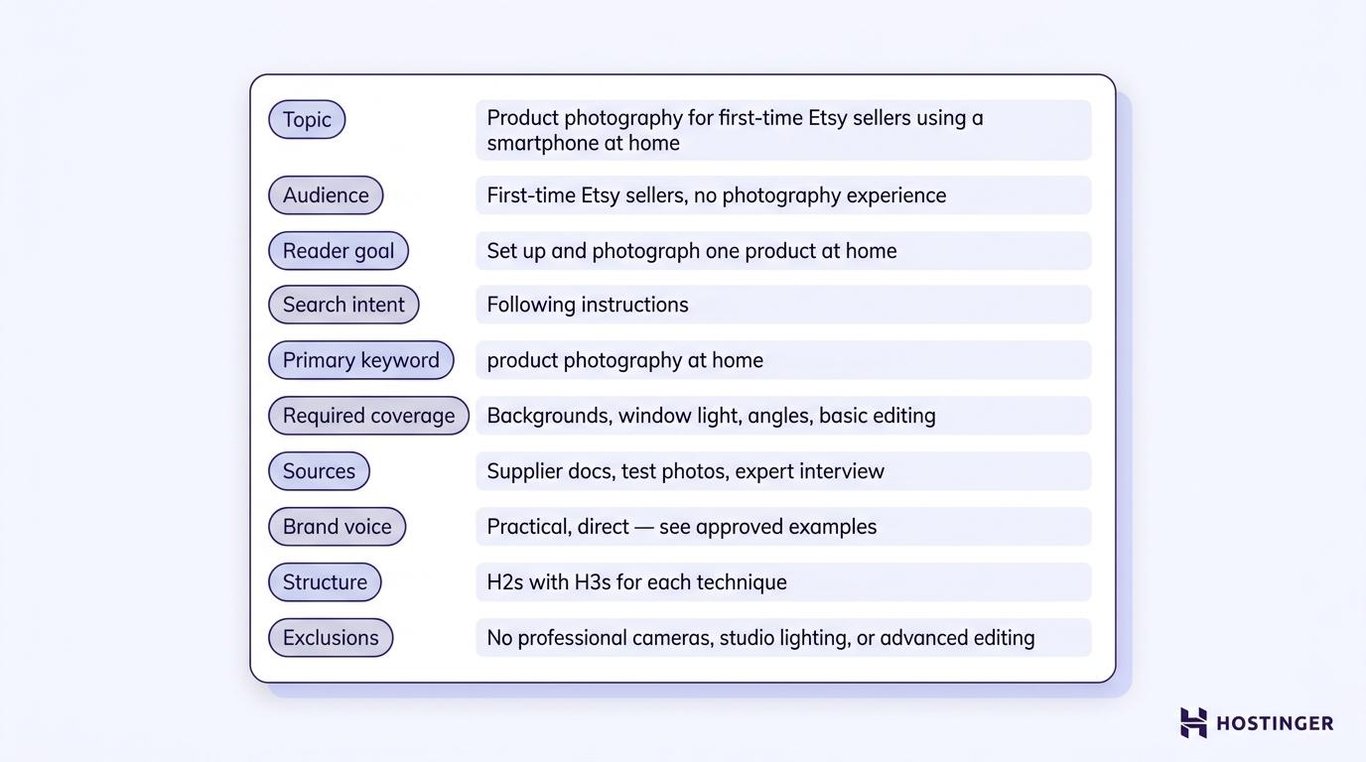
That gives the AI a defined reader, a clear outcome, and boundaries for what belongs in the article.
Before moving on, read the brief as if you were giving it to another writer. If they still need to ask who the reader is, what the article needs to achieve, or which sources they can trust, add that information.
If you haven’t chosen the topic yet, start with questions from support tickets, social media comments, or search data. Those audience questions can also lead to useful blog ideas instead of topics generated without any connection to what readers need.
2. Choose an AI writing tool
Choose an AI writing tool that lets you provide your article brief, sources, and writing instructions, then revise individual parts of the draft without starting over.
Different AI tools support different writing setups. For example:
- A general AI assistant works well for flexible drafting and revisions.
- An AI writing platform may suit a team that follows the same process for every article.
- An AI tool built into your content management system (CMS) lets you generate and edit content where you publish it.
- An AI agent is useful when you want one tool to help with several related tasks, such as research, drafting, and search engine optimization (SEO).
ChatGPT and Claude are general AI assistants, while Jasper is an AI writing platform. For writing directly in WordPress, Hostinger’s WordPress AI Assistant lets you generate and edit blog content from your dashboard. Hostinger Agent provides specialized agents for writing, SEO, and marketing.

You don’t need to compare dozens of products. Start by checking whether the tool can do the work your article requires:
- Can you give it the full brief and enough source material for the article?
- Can you paste or upload the sources you want it to use?
- Can you revise one section without regenerating the rest of the draft?
- Can you give it writing rules or examples of your brand voice?
- Can you easily copy, export, or publish the finished draft?
- If it researches online, does it show where the information came from?
If the tool can research online, check how clearly it shows its sources. Web access doesn’t make an AI answer automatically correct, so you still need to open the source and confirm that it supports the claim.
After checking the features you need, test the tool with the type of article you normally produce. If it repeatedly ignores your instructions, loses important context, or creates more editing work than it saves, try another.
Different tools are better suited to different parts of the process, such as research, long-form drafting, editing, or collaboration. Knowing which of those jobs you need the most help with makes it easier to compare the best AI content generators.
Before sharing source material with an AI tool, check whether it contains private or confidential information, or anything you don’t have permission to share. Remove customer details, confidential company information, unpublished client work, and other sensitive material first.
3. Create and review the blog outline
Create the outline by asking the AI to turn your brief into a clear sequence of headings, then review it for missing steps, repeated ideas, and sections that appear in the wrong order.
Review the structure before asking for full paragraphs. If two sections overlap or an important step is missing, you can fix the outline in a few lines instead of rewriting large parts of the draft later.
A clear outline puts the article in a logical order, with the information readers need first and later steps introduced when they become relevant. That makes it easier to write a blog post without reorganizing large parts of the draft later.
For the product photography example, you could ask:
Create an outline for a practical article about taking product photos at home with a smartphone.
The reader is a first-time Etsy seller with no photography experience. After reading, they should be able to set up and photograph one product at home.
Cover product preparation, backgrounds, natural light, smartphone camera setup, useful angles, and basic editing.
Leave out professional cameras, studio lighting, and advanced editing software.
Return the H2s and any H3s that are genuinely needed. Under each heading, explain in one sentence what that section should help the reader do.
Then review the outline from the reader’s point of view:
- Does the article start where the reader needs to start?
- Does each heading cover a different part of the question?
- Is an important step missing?
- Could you remove a section without making the article less useful?
AI-generated outlines can include sections simply because they commonly appear in similar articles. A tutorial on taking better product photos, for example, probably doesn’t need a long section explaining why product photography is important. The reader is already looking for instructions.
Check the order too. If the outline tells the reader how to position the product before explaining the lighting setup they need, move the lighting section earlier.
When you’re happy with the outline, make that version the one the AI should draft from. If you’re continuing in the same chat, tell the AI to use the outline you just approved. If you start a new chat or switch tools, paste in both the approved outline and the original brief so the AI has the same audience, scope, sources, and writing instructions.
4. Generate the first draft
Generate the first draft by asking the AI to turn the approved outline into prose while following the audience, scope, sources, and writing rules from your brief.
You can continue with the AI tool you used for the outline or use a writing-specific option. If you’re using Hostinger Agents, the Creative Writer agent can turn your topic, audience, outline, tone, and other instructions into a blog draft.
If you’re using ChatGPT for blogging and continuing in the same conversation, you can say:
Use the outline we just approved to draft the article.
Follow the headings and order exactly. Keep the audience, scope, tone, and source rules from the original brief.
Don’t add new sections unless you flag them for review first.
If you’re starting a new conversation or using a different tool, paste the approved outline and brief with the same instructions.
For a short article with few factual claims, you can ask the AI to draft the whole outline at once. For a longer tutorial, technical article, or source-heavy post, drafting one section at a time makes it easier to catch a misunderstanding before it affects the rest of the article.
Suppose the approved outline includes an H2 on using natural light for product photography, with notes to cover window placement, harsh shadows, and ways to reflect light.
A vague request such as:
Write a section about lighting.
throws away the decisions you already made in the outline. The AI has to decide on the scope again, so it may omit required points or add information that doesn’t belong.
Instead, use the outline notes in the drafting prompt:
Draft only the H2 on using natural light for product photography.
Follow the points in the approved outline. Explain where to place the product relative to a window, what to do if direct sunlight creates harsh shadows, and how a white card can reflect light onto the darker side.
Write for a first-time Etsy seller using a smartphone at home. Avoid professional studio terminology.
Use the supplied sources for factual claims. If something still needs verification, mark it as VERIFICATION NEEDED instead of guessing.
Before refining the wording, check that the draft follows the approved structure, covers the required points, and clearly marks anything that still needs research.
5. Refine the AI draft
With the first draft in place, refine it by replacing vague explanations with specific actions, adding context where the reader might be confused, and filling in gaps that prevent them from understanding or following the advice.
Read each paragraph and ask: what does this help the reader understand or do? If the answer isn’t clear, the paragraph needs more work.
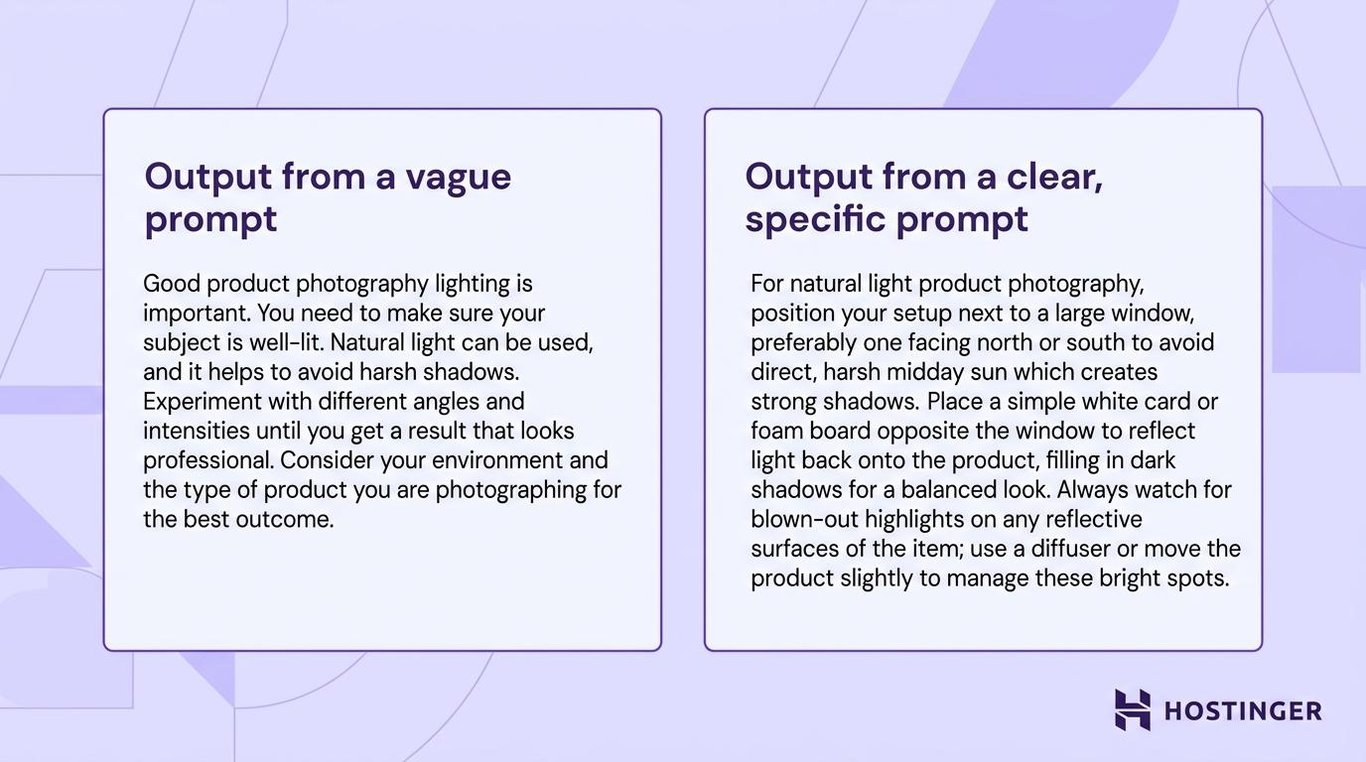
Compare these two versions:
Too vague: Good lighting helps you take professional-looking product photos and present your products in the best possible way.
The sentence says lighting is important, but it doesn’t tell the reader what to change.
More useful: Place the product beside a window rather than in direct sunlight. If the side facing away from the window looks too dark, place a piece of white card opposite the window to reflect some light back onto it.
The second version gives the reader a specific action and explains what to look for.
You can rewrite weak passages yourself or ask the AI to revise them. When using AI, tell it exactly what’s missing rather than asking it to “make this better.”
For example:
Rewrite this paragraph for a first-time Etsy seller. Replace the general advice about good lighting with specific instructions for where to place the product and what the reader should look for in the photo. Keep the existing factual claims unchanged and don’t add new information that isn’t in the supplied sources.
Then check the rest of the draft for the same weaknesses:
- Broad advice. Replace it with a specific action or explanation.
- Missing context. Give the reader the information they need before asking them to do something.
- Unfamiliar terms. Explain them in plain language when they first appear.
- Unclear instructions. Add an example when the reader could interpret the advice in more than one way.
- No way to check the result. Explain what the reader should expect to see or achieve when that helps them confirm they followed the instruction correctly.
Focus here on making the draft useful and specific. Your own experience, original examples, expert input, and brand voice come next.
6. Add expertise and your brand voice
Add expertise by bringing in real experience, original examples, expert input, or data that wasn’t available to the AI, then edit the draft so it matches your usual tone, wording, and level of detail.
For the product photography article, that could mean adding a photo from your own test, explaining a mistake you made when using direct sunlight, including advice from a photographer, or sharing results from a test your company actually ran.
These details give the reader information that a generic AI draft couldn’t provide on its own.
After adding that material, check the article against your brand voice. Look for wording that feels too formal or casual, phrases your publication wouldn’t use, and sentence patterns that make the writing sound repetitive.
AI can help with this edit if you give it examples of the voice you want:
Rewrite this passage to match the supplied examples of our brand voice. Keep the facts, examples, and meaning unchanged. Simplify any stiff wording, but don’t add new claims or experiences.
Compare the revision with your original material before accepting it. The goal is to make the writing sound consistent without changing factual claims or removing important details.
By the end of this pass, the article should contain knowledge that comes from real sources or experience and sound consistent with the rest of your publication.
Pro Tip
Don’t ask the AI to invent customer stories, tests, quotes, expert opinions, or personal experience. If you use a made-up scenario to explain something, label it clearly as an example.
7. Fact-check the article
With the content and examples in place, fact-check the article by verifying factual claims against reliable, current sources and testing instructions yourself when you have access to the tool or process being described.
Pay particular attention to information that can change or be stated incorrectly:
- Statistics and research findings.
- Names and dates.
- Quotations.
- Product features and prices.
- Technical instructions.
- Laws and regulations.
- Medical, legal, or financial claims.
- Statements about what a person or company has said or done.
Open the original source yourself rather than approving a citation because the title or URL looks believable.
For each claim, check three things:
- Does the source actually exist?
- Is it current enough for the claim you’re making?
- Does it support the exact wording in the draft?
Suppose the draft says a WordPress plugin supports a particular payment service. Check the plugin’s current documentation. If the integration has been removed or now works differently, update the article to reflect the product’s current functionality.
Test instructions yourself when possible, too. If the article tells readers to open a menu, change a setting, or follow a sequence of steps, doing so can reveal a renamed button, a missing step, or an instruction that no longer works.
For medical, legal, financial, and other high-stakes subjects, have a qualified professional review the advice before publication. A general editor and an AI tool can check wording and sources, but they can’t replace professional judgment where an incorrect instruction could cause harm.
8. Edit the article for clarity and flow
After fact-checking, read the article from start to finish and edit how the sections work together. Check that each section answers its heading, the ideas appear in the order the reader needs them, and repeated or unnecessary wording is removed.
This is a different pass from refining individual paragraphs. Here, you’re checking the article as a whole to see whether a reader can follow it without getting lost, backtracking, or hearing the same point several times.
As you read, check whether:
- The opening quickly answers the main question.
- Each heading is answered immediately.
- Each paragraph develops one idea.
- Sections appear in the order the reader needs them.
- Unfamiliar terms are explained when they first appear.
- Examples make the advice easier to understand or follow.
- The same idea isn’t repeated in different sections.
- Transitions make it clear why the next idea follows.
- The tone and level of detail stay consistent throughout the article.
If something feels confusing, look at what comes before it as well as the sentence itself. The wording may be clear on its own, but the reader could still be missing a definition, an earlier instruction, or the reason the information matters.
9. Prepare the post for publication
After the final edit, prepare the article for publication by checking its title, links, images, search information, formatting, and publishing settings.
Run through this final checklist:
- Title and H1. Make sure they accurately describe what the page answers.
- Opening. Check that the reader gets a direct answer without unnecessary background first.
- Headings. Make sure the hierarchy is correct and every heading accurately describes the section below it.
- Internal links. Add them where they help the reader understand a related topic or continue a related task.
- External sources. Open each link again and confirm it points to the source you intended.
- Images. Check that screenshots are current and add descriptive alt text when the image provides information that the surrounding text doesn’t.
- URL. Keep the slug short and descriptive.
- Title tag and meta description. Describe the page accurately and use the main topic naturally. When creating SEO-friendly content, keywords should help identify the topic rather than make the copy repetitive.
- Author information. Add the correct byline and any disclosures your publication requires.
- Page layout. Preview tables, lists, images, and text on both desktop and mobile.
Some content management systems also include AI tools for parts of this workflow. You can, for example, use AI directly in WordPress while preparing the post, but review any AI-generated changes before publishing.
Once you’ve completed the checklist, publish the post in your content management system. Open the live page and confirm that links work, images load, tables display correctly, and spacing matches what you saw in the editor.
Best practices for using AI to write blog posts
Use a consistent set of instructions throughout the article, make it clear when the AI should stop rather than guess, and revise specific weaknesses instead of repeatedly generating new versions from scratch.
- Keep one approved brief. Use the same audience, scope, sources, and writing rules from outlining through drafting and revision. Update the brief itself if something changes rather than giving conflicting instructions later.
- Tell the AI not to guess. Ask it to mark missing information as
VERIFICATION NEEDEDor leave a placeholder instead of inventing a statistic, feature, source, quote, or example. - Say exactly what needs fixing. “Explain where the reader should place the light and what result to look for” gives the AI a clear revision task. “Make this section better” leaves it to decide what should change.
- Separate source material from instructions. Label them clearly, such as
SOURCE MATERIALandINSTRUCTIONS, so the AI doesn’t mistake quoted text for something it should follow. - Save prompts that work. Reuse the structure of a useful brief or revision prompt, but replace the audience, topic, sources, and other article-specific details before using it again.
- Keep earlier versions. Use your editor’s version history or save a copy before a major rewrite so you can restore wording if the AI removes an important detail or changes the meaning.
If you also use AI for content marketing beyond the blog post itself, carry the approved facts and voice instructions into related content, such as emails or social posts, instead of asking the AI to recreate them from memory.
Common mistakes when using AI to write blog posts
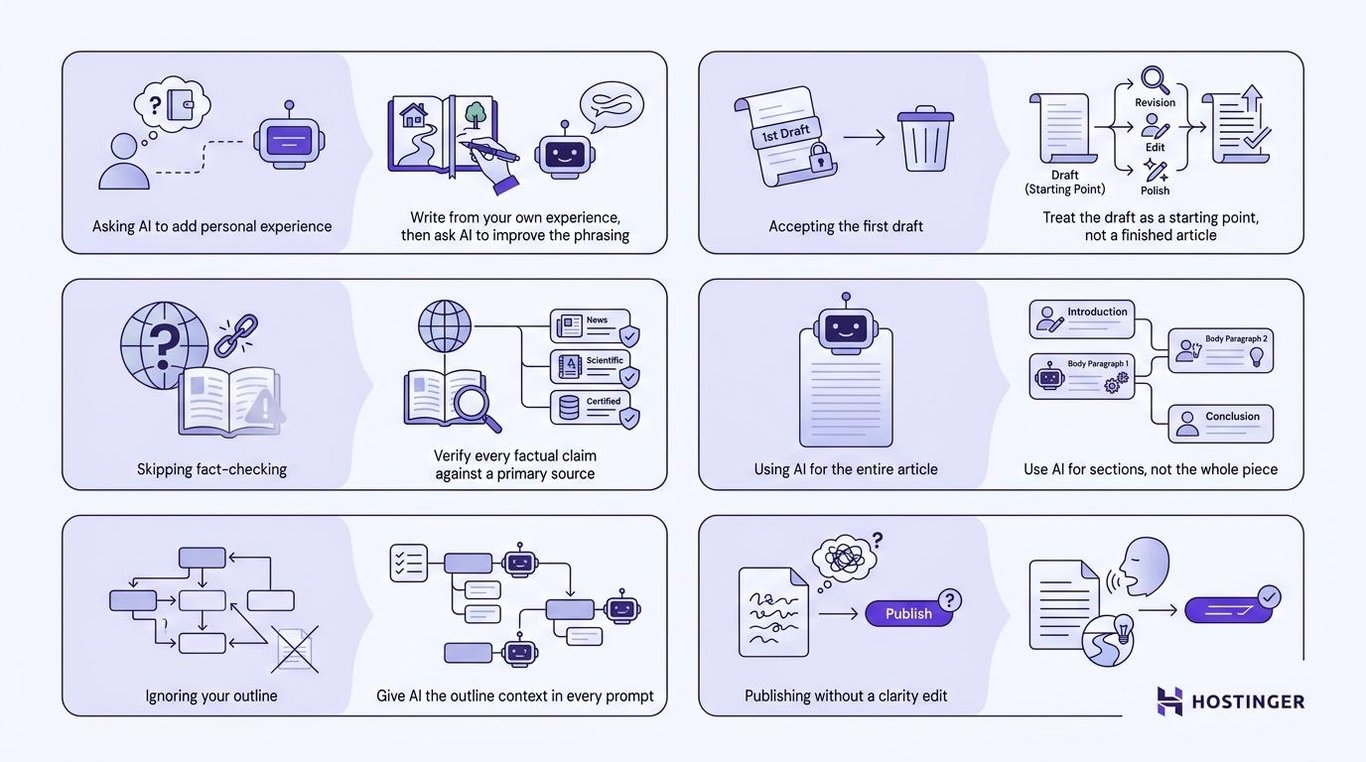
Common mistakes when using AI to write blog posts include giving the AI too much freedom, trusting its output without checking it, and repeatedly regenerating content instead of making clear editorial decisions.
Mistake | What happens | What to do instead |
Asking for an entire article from one broad prompt | The AI has to decide the audience, scope, structure, and examples itself | Supply a brief, review the outline, and draft from the approved version |
Treating confident wording as a verified fact | An incorrect or outdated claim can sound convincing enough to publish | Check factual claims against reliable, current sources |
Asking AI to add “experience” | The AI can invent tests, stories, quotes, or observations that never happened | Add only real experience and clearly label hypothetical examples |
Regenerating weak sections repeatedly | A new version can fix one weakness while changing facts, examples, or useful details elsewhere | Tell the AI exactly what to change and what must stay unchanged |
Giving the AI too much material without priorities | Important requirements can get buried among background information and sources | Label required instructions, supporting material, and optional context separately |
Publishing many similar AI-generated pages | Readers get multiple pages that repeat the same advice without answering a distinct need | Give each page a specific reader question or task and include information that belongs uniquely on that page |
Limitations of AI blog writing
The main limitations of AI blog writing are that it can’t reliably verify every fact, know information you haven’t provided, or replace expert judgment.
Even with a clear brief, reliable sources, and detailed instructions, an AI tool can still misunderstand what a source says or miss an important condition. A product page might say a feature is available only on a certain plan, for example, but the AI could summarize it as if every customer gets that feature.
AI also can’t supply experience it never had access to. It doesn’t know what happened in your own tests, what your customers told you, or why your team recommends one approach over another unless you provide that information.
That leaves some decisions with the human editor: whether a source was interpreted correctly, whether important context is missing, and whether the advice is sound enough to publish.
What is the role of human editing in AI blog writing?
Human editors decide what stays, what changes, and what gets removed from an AI-assisted draft while checking that the article is accurate, useful, and right for its intended reader.

AI can organize information, suggest explanations, and draft copy, but it can’t make every editorial judgment for you. It doesn’t know whether an example reflects your real experience, whether a recommendation is appropriate for your audience, or whether a technically correct explanation is still confusing.
A human editor also sees problems that appear across the article rather than within a single paragraph. Two sections might repeat the same point, an example might suit the wrong audience, or an important step might appear too late to help the reader.
That’s why human editing happens throughout the process, from approving the brief and outline to reviewing the draft, checking facts, adding expertise, and making the final publication decisions.
SEO considerations for AI-generated blog posts
For SEO, AI-generated blog posts need to be useful, accurate, and written around what the reader is trying to find. Using AI itself doesn’t make a page unsuitable for Google Search.
Google’s guidance on generative AI content says AI-assisted pages still need to meet its Search Essentials and spam policies, and generating many pages without adding value can violate its scaled content abuse policy.
AI-assisted articles deserve extra attention in a few areas. Don’t let keyword variations turn into repetitive sections, create multiple near-duplicate pages for slightly different searches, or keep AI-generated passages that sound relevant but don’t add useful information.
You also don’t need a separate version of the article for Google’s AI Overviews or AI Mode. Google says there are no additional requirements or special markup needed specifically for these features.
You can use AI SEO tools to spot possible gaps and optimization opportunities, but don’t follow every recommendation automatically. If a tool suggests an unnecessary section or asks you to repeat a keyword until the writing sounds unnatural, leave the suggestion out.
AI search still differs from traditional search in some areas. Our AI SEO playbook for content explains where the two overlap, where they differ, and how to optimize a single article for both rather than creating separate versions.
What to do after publishing an AI-assisted blog post
After publishing an AI-assisted blog post, monitor its performance in search and AI answer engines, then update it based on search data, reader feedback, and changes to the information it covers.
Search queries, rankings, traffic, and reader questions can show where the article is missing information, where an explanation isn’t clear enough, or where readers expected a different answer. Use those signals to decide what needs changing instead of rewriting the post without a specific reason.
Keep the factual parts current, too. Product features, prices, screenshots, software instructions, statistics, and linked sources can all change after publication.
Use what you learn from that performance data for ongoing AI content optimization, with a focus on improving visibility in traditional search results and AI answer engines.
This article is a localized version of How to use AI to write blog posts, originally published in English.

Alma is an AI Content Editor with 9+ years of experience helping ideas take shape across SEO, marketing, and content. She loves working with words, structure, and strategy to make content both useful and enjoyable to read. Off the clock, she can be found gaming, drawing, or diving into her latest D&D adventure.