How to Install Docker on Ubuntu Using VPS Template and Manually
Mar 05, 2025
/
Ariffud M.
/
7 min Read
Docker is a powerful platform to automate application deployments using lightweight, portable containers. Setting up Docker on a Linux server can significantly enhance your development workflow.
In this guide, you’ll learn how to install Docker on Ubuntu using Hostinger’s VPS template and manually. By the end of this article, you’ll have a fully functional Docker setup ready for your projects.
Download free docker cheat sheet
Prerequisites for Docker Installation on Ubuntu
Before following our Docker installation guide, make sure your Ubuntu system meets the following prerequisites:
- Supported Ubuntu version. Use a long-term support (LTS) version of Ubuntu, such as Ubuntu 20.04, 22.04, or 24.04.
- Server requirements. Verify that your VPS meets the minimum requirements for Docker. Your system should have a 64-bit architecture and at least 2 GB of RAM.
- Basic Linux knowledge. Familiarity with basic Linux commands is beneficial for installing and managing Docker applications.
Suggested Reading
Need a refresher on what Docker is? Check out our article to understand how Docker works and what its components are.
How to Install Docker on Ubuntu Using Hostinger’s VPS Template
Using Hostinger’s preconfigured template is the easiest way to set up Docker on your Ubuntu VPS. Available for both VPS and Docker hosting plans, this method saves time and ensures Docker is installed correctly with all necessary components.
Follow these steps to install Docker with Hostinger’s VPS template:
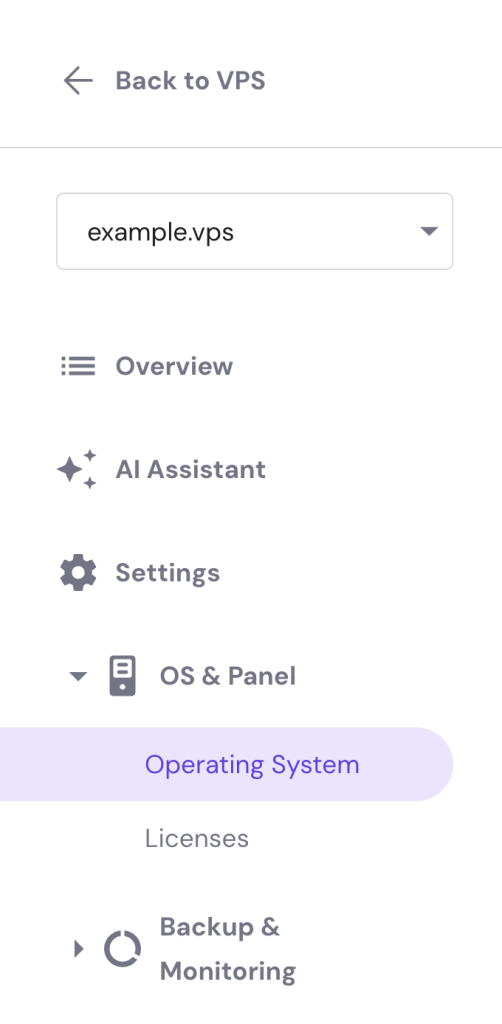
- Log in to hPanel and navigate to VPS → Manage next to your server.
- From the VPS dashboard, go to Settings → OS & Panel → Operating System in the left sidebar.
- On the Operating System page, select Application → Ubuntu 22.04 with Docker.
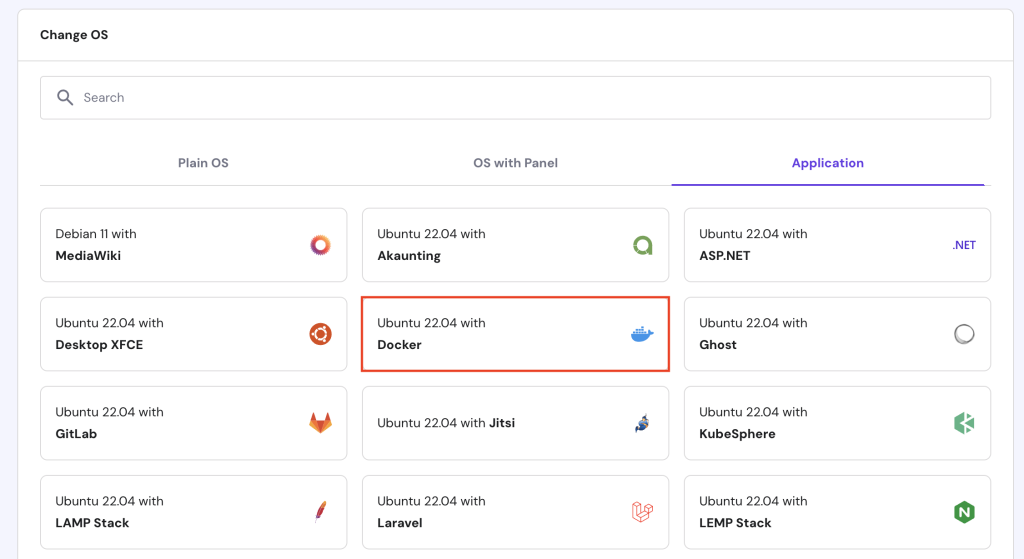
- Click the Change OS button and wait for the installation process to finish, which typically takes about 10 minutes.
That’s it! You have installed Docker on your VPS and are ready to deploy applications.

How to Manually Install Docker
For those who prefer a hands-on approach, this section will guide you through manually installing Docker on an Ubuntu 24.04 distribution.
1. Install Necessary Packages
To begin installing Docker, verify that your system is up to date and has all the required packages installed. Follow these steps:
- Open your terminal and connect to your VPS using SSH. Replace username and your_server_ip with your actual credentials:
ssh username@your_server_ip
- Update your package list to ensure your server uses the newest versions of packages and their dependencies:
sudo apt update

sudo apt upgrade
- Install the necessary packages to allow apt to use repositories over HTTPS:
sudo apt install apt-transport-https ca-certificates curl software-properties-common
2. Add Docker’s Official GPG Key
To ensure the authenticity and security of the Docker packages, you need to add Docker’s official GPG key and set up the Docker repository. Here’s the guide:
- Run the following curl command to add Docker’s GPG key:
curl -fsSL https://download.docker.com/linux/ubuntu/gpg | sudo gpg --dearmor -o /usr/share/keyrings/docker-archive-keyring.gpg
- Add the official Docker repository to your APT sources:
echo "deb [arch=amd64 signed-by=/usr/share/keyrings/docker-archive-keyring.gpg] https://download.docker.com/linux/ubuntu $(lsb_release -cs) stable" | sudo tee /etc/apt/sources.list.d/docker.list > /dev/null
- Update your package list to include packages from the new repository:
sudo apt update
3. Install Docker
With the necessary repositories set up, you can now proceed to install Docker. Here are the steps to do so:
- Make sure you’re about to install Docker from its official repository instead of the default Ubuntu repository:
apt-cache policy docker-ce
- You’ll see the following output, indicating that Docker will be installed from the correct repository:
docker-ce:

 Installed: (none)

 Candidate: 5:26.1.3-1~ubuntu.24.04~noble

 Version table:

 5:26.1.3-1~ubuntu.24.04~noble 500

 500 https://download.docker.com/linux/ubuntu noble/stable amd64 Packages

 5:26.1.2-1~ubuntu.24.04~noble 500

 500 https://download.docker.com/linux/ubuntu noble/stable amd64 Packages

 5:26.1.1-1~ubuntu.24.04~noble 500

 500 https://download.docker.com/linux/ubuntu noble/stable amd64 Packages

…
- Execute this command to install Docker Engine, Docker Community Edition, and containerd runtime, all necessary for running Docker containers:
sudo apt install docker-ce docker-ce-cli containerd.io
- Ensure Docker starts automatically when your system boots:
sudo systemctl enable docker
4. Verify Docker Installation
After installing Docker, it’s important to verify that the installation was successful and that Docker is running correctly. Here are the instructions:
- Confirm the Docker version installed on your system:
docker --version
- Here’s the expected output:
Docker version 26.1.3, build b72abbb
- Use the following command to check the Docker service’s status:
sudo systemctl status docker
- You should see an output indicating that Docker is active and running:
● docker.service - Docker Application Container Engine

 Loaded: loaded (/usr/lib/systemd/system/docker.service; enabled; preset: enabled)

 Active: active (running) since Wed 2024-05-22 06:12:32 UTC; 39s ago

TriggeredBy: ● docker.socket

 Docs: https://docs.docker.com

 Main PID: 3717 (dockerd)

 Tasks: 9

 Memory: 29.4M (peak: 29.8M)

 CPU: 334ms

 CGroup: /system.slice/docker.service

 └─3717 /usr/bin/dockerd -H fd:// --containerd=/run/containerd/containerd.sock
- To exit from this status screen, press Ctrl + C on your keyboard.
5. Run Docker Without Sudo (Optional)
By default, Docker only allows you to run its commands as a root user with sudo privileges, which can be inconvenient and potentially less secure. If you attempt to run Docker commands as a non-root user, you might see an error like this:
docker: Cannot connect to the Docker daemon at unix:///var/run/docker.sock. Is the docker daemon running?.
However, running Docker without sudo is more advisable because it’s quicker and simpler. Follow this guide:
- Run the following command to create the docker group:
sudo groupadd docker
- Add a new user if you don’t have one. Here, we name it new_user:
sudo usermod -aG docker new_user
- You’ll be prompted to set up a new password for this user.
- Add new_user to the docker group:
sudo usermod -aG docker new_user
- Switch to the recently created user:
su - new_user
- Verify that this user is part of the docker group:
groups
- Here’s the output:
new_user users docker
- Run a simple Docker command to verify that you can run commands without sudo:
docker run hello-world
- You should see an output showing that Docker is running correctly as a non-root user:
Unable to find image 'hello-world:latest' locally

latest: Pulling from library/hello-world

c1ec31eb5944: Pull complete

Digest: sha256:266b191e926f65542fa8daaec01a192c4d292bff79426f47300a046e1bc576fd

Status: Downloaded newer image for hello-world:latest

Hello from Docker!

This message shows that your installation appears to be working correctly.
Congratulations! You’ve successfully set up Docker manually on an Ubuntu VPS using commands.
Troubleshooting Common Docker Installation Issues
Installing Docker can sometimes come with challenges. Here are some common issues and actionable tips to resolve them.
Docker Daemon Not Running
If you receive an error message indicating that the Docker daemon is not running, it likely means the service is not active. To resolve this, start the Docker service using the command:
sudo systemctl start docker
You can verify the Docker daemon’s status by running:
sudo systemctl status docker
Cannot Connect to the Docker Daemon
If you encounter the “Cannot connect to the Docker daemon at unix:///var/run/docker.sock” error, it usually means the Docker service is not running or there are permission issues.
First, make sure the Docker service is running with:
sudo systemctl start docker
Then, verify that your user is part of the Docker group by running the following:
groups
Installation Issues from Repositories
Problems when adding the Docker APT repository or during package installation can arise from incorrect repository setup. Make sure you have added the official repository and updated your package list by running:
sudo add-apt-repository "deb [arch=amd64] https://download.docker.com/linux/ubuntu $(lsb_release -cs) stable"

sudo apt update
Running Containers Not Responding
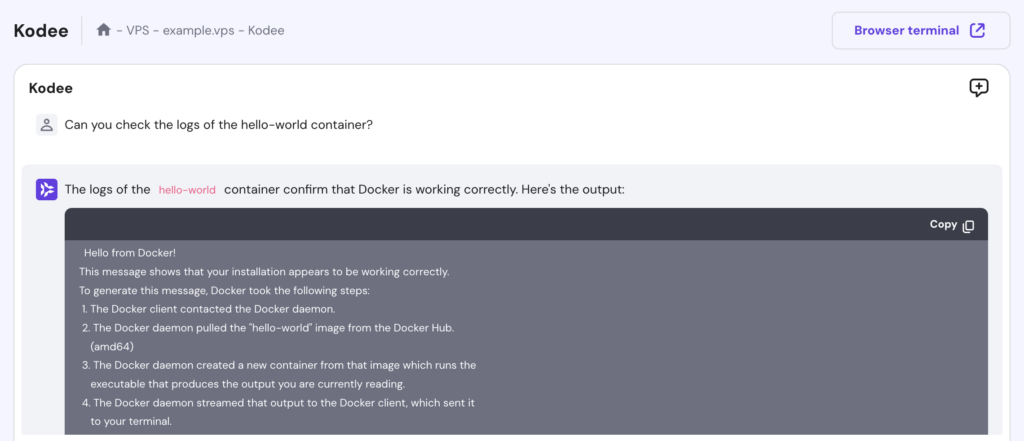
If running containers are not responding or behaving unexpectedly, check the container logs to diagnose the issue. Use the command:
docker logs container_id
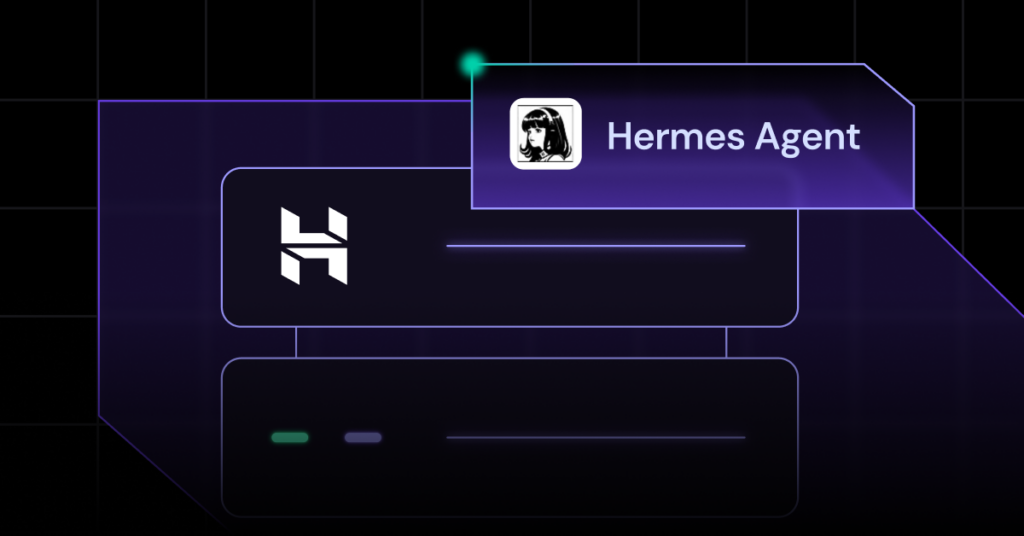
Alternatively, Hostinger VPS users can use the Kodee AI Assistant to check their container logs. Simply ask, “Can you check the logs of the [container_name] container?” like the following example:
If necessary, restart the container by executing:
docker restart container_id
Firewall and Network Configuration
Sometimes, Docker might face issues due to firewall settings or network configurations blocking necessary ports. Ensure that your firewall allows traffic on Docker’s default ports. You can check your firewall rules and add necessary exceptions if required.
For example, if you’re using Uncomplicated Firewall (UFW), you can allow Docker traffic with:
sudo ufw allow 2375/tcp

sudo ufw allow 2376/tcp

sudo ufw allow 2377/tcp

sudo ufw allow 7946/tcp

sudo ufw allow 7946/udp

sudo ufw allow 4789/udp
Additionally, verify your network settings to ensure Docker can communicate with external servers to download images and perform other tasks.
Post-Installation Configuration and Tips
After installing Docker, new users should become familiar with several necessary commands and tasks. This section will cover some Docker post-installation configurations and tips.
Basic Docker Commands
Getting started with Docker involves learning a few essential commands. Here are some commands that every new user should know:
- List Docker images:
docker images
- Search for images on Docker Hub:
docker search image_name
- Download a Docker image from Docker Hub:
docker pull image_name
Furthermore, check our Docker cheat sheet guide to learn all the most essential commands and their purposes.
Running and Managing Docker Containers
Running and managing containers is a core part of working with Docker. Here’s a guide to perform these tasks:
- Run a Docker container using the specified image:
docker run -d --name container_name image_name
docker start container_id_or_name
- Stop a running container:
docker stop container_id_or_name
- List all running containers:
docker ps
Working with Docker Images
Docker images are the basis for containers. Here’s how you can work with images:
- Build a Docker image from a Dockerfile in the current directory:
docker build -t image_name .
- Tag an image with a specific name and tag:
docker tag source_image_name target_image_name:tag
- Log in to Docker Hub, tag your image, and push it to your repository:
docker login

docker tag image_name dockerhub_username/image_name:tag

docker push dockerhub_username/image_name:tag
Deleting Unused Docker Components
To keep your environment clean and efficient, you need to remove unused Docker components regularly. Here’s how to do so:
docker image prune
- Delete all stopped containers:
docker container prune
- Clean unused Docker volumes:
docker volume prune
- Erase all unused networks:
docker network prune
Using Docker Compose
Docker Compose is a powerful tool for managing multi-container applications. Here’s a basic command to get it started:
docker-compose up -d
This starts services defined in the docker-compose.yml file in detached mode.
Suggested Reading
Did you know that you can run WordPress as a Docker container? Learn how in our article.
Conclusion
In this Docker tutorial, you’ve learned how to install Docker on an Ubuntu system, both using Hostinger’s VPS template and a manual approach. You’ve also understood the importance of verifying the installation and troubleshooting common issues.
Furthermore, it’s advisable to practice essential Docker commands, manage containers and images, and clean up unused components. By following these instructions, you can effectively set up and manage Docker for deploying your applications.
How to Install Docker on Ubuntu FAQ
This section answers the most common questions about installing Docker on Ubuntu.
Are There Any Specific Configurations Needed After Installing Docker on Ubuntu?
After installing Docker on Ubuntu, it’s recommended to configure Docker to run without sudo for convenience. Additionally, make sure your firewall settings allow Docker traffic and adjust any necessary network configurations for smooth access to external resources.
Can I Install Docker on Any Version of Ubuntu?
Currently, Docker supports installation on Ubuntu 20.04, 22.04, and 24.04. It’s advisable to use a long-term support version for stability. Additionally, always check Docker’s official documentation for the latest compatibility information.
How Do I Verify if Docker Is Successfully Installed on Ubuntu?
To verify if Docker is successfully installed on Ubuntu, run docker –version to check the installed version and sudo systemctl status docker to confirm the Docker service is active and running.
Can I Run Docker Without Root Privileges on Ubuntu?
Yes, you can run Docker without root privileges by adding your user to the docker group. Run the command sudo usermod -aG docker your_username as root and then switch to the user with su – your_username.
All of the tutorial content on this website is subject to Hostinger's rigorous editorial standards and values.

Ariffud is a Technical Content Writer with an educational background in Informatics. He has extensive expertise in Linux and VPS, authoring over 200 articles on server management and web development. Follow him on LinkedIn.