Host your own email server: how to set up a self-hosted email service
Mar 10, 2026
/
Aris S. & Valentinas C.
/
8 min Read
Business owners typically use pre-configured mail servers from third-party providers to host their mailing services. While they are sufficient for some users, others might need higher flexibility and control.
For such users, self-hosting email servers can be a better option. In addition to providing complete control over the service, they are more secure since each account has a dedicated, isolated environment.
In this article, we will explain how to host your own email server with Hostinger’s virtual private server (VPS) using the CyberPanel control panel. Before getting into the steps, we will also explain the benefits of creating a private mail server.

Why Host Your Own Email Server?
A self-hosted email server requires some technical expertise to set up and manage. However, it has many benefits compared to a third-party service:
- Control. Users can choose a mail transfer agent (MTA), set up any email server software, and customize the features. This is different from third-party providers, commonly offering pre-configured plans with limited customization.
- Data privacy. A VPS provides each account with an isolated environment. It prevents other users from accessing your data, improving your email server privacy.
- Reputation. A free email provider usually lacks a dedicated IP address. This might impact deliverability since other mailing services within the same server can affect it.
- Cost efficiency. Mailing hosting services might be cheaper in the short term. However, a self-hosted server can host more email accounts and provide more storage.
- Scalability. Users can scale up their private email server hardware and set up a load balancer. In comparison, email hosting providers usually offer limited plans with fixed resources.
- Security. A self-hosted server is safer when properly configured since users can implement any security measures and firewall rules based on their needs.
How to Host Your Own Mail Server
In this section, we will explain the steps on how to host your own private email server, from purchasing a VPS hosting plan to sending a test email.
1. Select the Right VPS Plan
While you can host an email service on a personal computer, managing it requires more time and effort. Moreover, you would need server-grade hardware to run the machine 24/7, increasing the total cost.
Email hosting on a VPS is simpler since the provider will set up and manage the hardware. As such, it is more cost-efficient and offers various features that help simplify the email server configuration process.
To pick the best VPS hosting provider and plan for your needs, consider the following factors:
- Resources. The VPS plan must offer sufficient bandwidth, storage, and computing power to host your email service.
- Reliability and uptime. The ideal VPS hosting plan should guarantee high uptime to maintain your mailing service availability.
- Dedicated IP. A dedicated IP address isolates your mailing service from other users, improving email reputation and deliverability.
- Management tool. Management tools like a graphical control panel and one-click installer help simplify email server maintenance and configuration.
Hostinger offers four VPS KVM plans starting at CA$ 9.09/month with a 30-day money-back guarantee. We use reliable hardware and network infrastructure to ensure 99.9% uptime, ideal for self-hosted email for businesses.
All Hostinger VPS hosting plans include a dedicated IP address to improve email deliverability and reputation. Moreover, users can configure various operating systems and control panels in one click via hPanel without any Linux commands.
We also provide the Kodee AI Assistant to help troubleshoot server problems using simple prompts. For example, ask, “I have pointed my domain using custom nameservers, but it won’t propagate. Explain the issues and their solutions,” and the tool will give the guide to fix it. You can also ask Kodee to do basic server management tasks, like checking your VPS resource usage or adjusting firewall rules.

2. Set Up Your Virtual Private Server
After purchasing a plan, navigate to the VPS section on the top menu of hPanel and select your new server. Complete the setup process by entering a hostname, selecting a server location, and choosing an operating system.
For this tutorial, we will use AlmaLinux 9 with CyberPanel. You can change the operating system anytime by following these steps:
- Log in to hPanel and head to VPS on the sidebar. Click Manage on your server.
- On the sidebar, go to OS & Panel → Operating System.
- Select OS with Control Panel.
- From the list, select CyberPanel.
- Click Change OS.
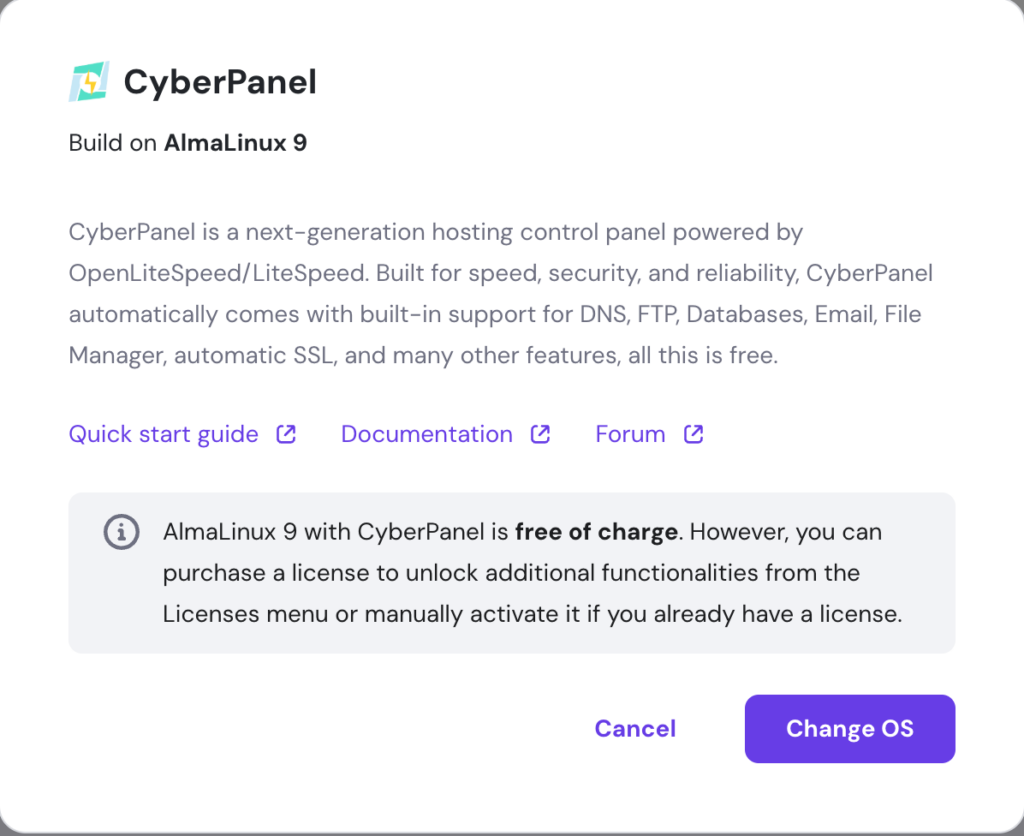
Warning! Changing your VPS operating system and control panel will wipe all your existing data. We strongly suggest creating a backup before doing so.
If you prefer to use another Linux distribution, install CyberPanel using commands. To do so, connect to your remote server using an SSH client like PuTTY.
Enter the SSH login credentials, which you can obtain in your VPS overview’s SSH Access tab. Run the following command to start the installation wizard and follow the instructions:
sh <(curl https://cyberpanel.net/install.sh || wget -O - https://cyberpanel.net/install.sh)
3. Point the Domain to Your Mail Server
After setting up your VPS, purchase a domain from Hostinger. Log in to hPanel and follow these steps to point it to your outgoing mail server:
- Go to Domains on the top menu.
- Select the domain you want to configure.
- Navigate to DNS/Nameservers on the sidebar → Child Nameservers.
- Name your child nameservers. For simplicity, we’ll name them ns1.domain.tld and ns2.domain.tld.
- Enter your VPS IP address. You can find this information in the VPS overview menu. Then, press both of the Save buttons.

- Navigate to the DNS Record tab.
- Under the Nameservers section, click Change nameservers.
- Select Change nameservers and enter the two child nameservers. Leave the rest of the fields empty.
- Press Save to apply the changes.

Wait until the propagation process is complete, which can take up to 24 hours.
Note that once finished, your domain might still not point to several DNS records. We will configure them later in CyberPanel.
4. Create a Website Container
Self-hosting an email server in a CyberPanel VPS requires creating an empty website as a container. It is essential for domain binding and DNS configuration.
To do so, enter https://your_vps_ip:8090 in your web browser to open CyberPanel. Alternatively, click the panel access link in hPanel’s Operating System menu.
Enter the admin username and password to log in. If you forget the credentials, reset them via the Operating System menu. On the CyberPanel dashboard, follow these steps:
- Go to Websites → Create Website.
- Select Default from the Select Package drop-down menu.
- Choose admin as the Owner.
- Turn off the Test Domain toggle and enter your domain name without www.
- Enter an email address – this account will be used for email server administration.
- Select the PHP version, ideally the newest one.
- Check the DKIM Support box. It will improve your mail security, prevent spoofing, and ensure deliverability.
- Click Create Website to complete the process.
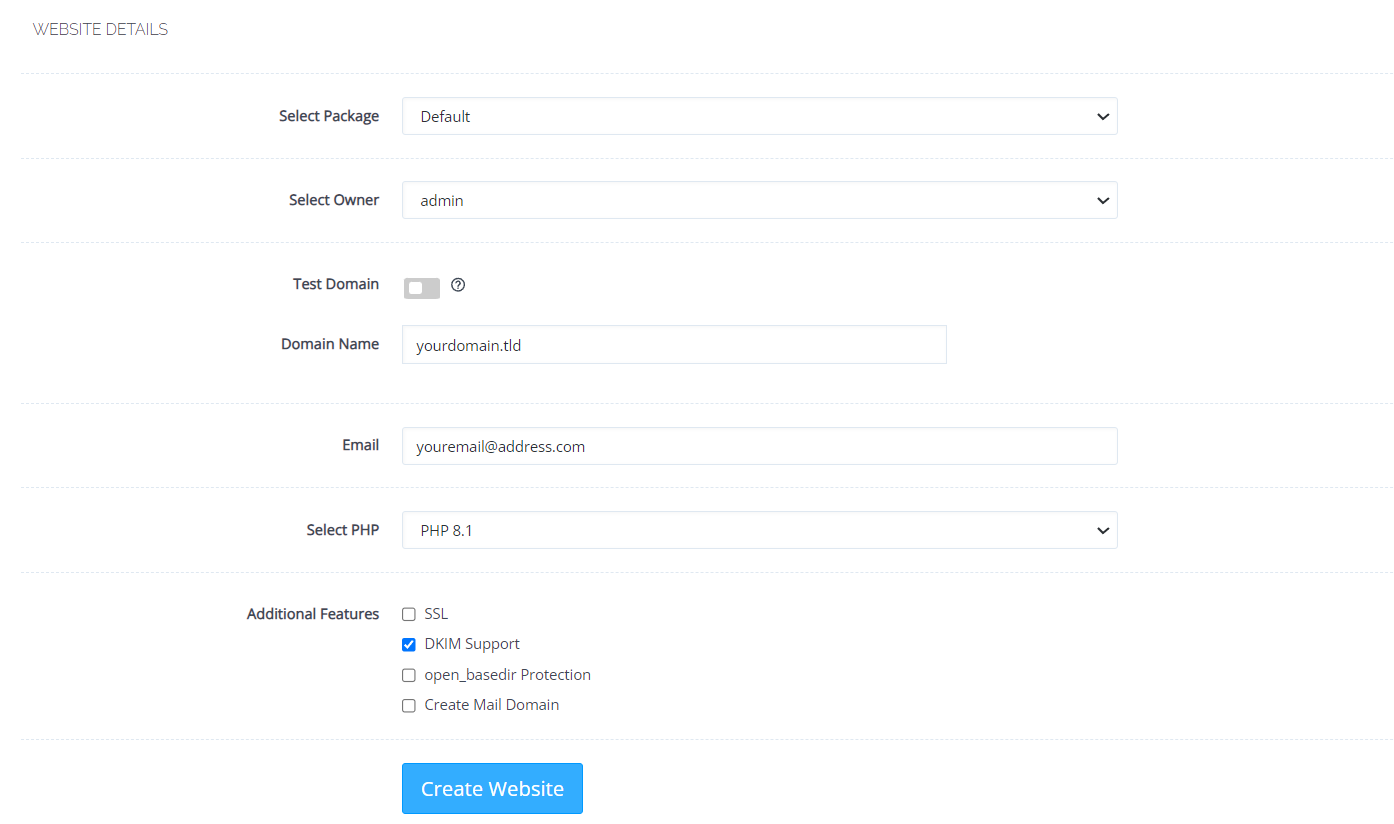
Important! When accessing CyberPanel for the first time, your web browser might warn you about an unsafe website. You can ignore the warning and proceed to the login page.
5. Create Nameservers in CyberPanel
Create nameservers in CyberPanel to connect your mailing service with the domain. Here are the steps:
- On your CyberPanel dashboard, navigate to DNS → Create Nameserver.
- Enter your child nameservers and your VPS IP address in the respective fields.
- Select Create Nameserver.
CyberPanel will generate all the DNS records, including MX, which allows your server to receive and send emails. Check them by navigating to DNS → Add/Delete record.
In addition, head to Email → DKIM Manager and select your website from the list. Ensure your domain has the public and private key pairs. Otherwise, email providers like Gmail might flag your messages as spam.
Before creating an email account, wait until the propagation completes. Use an online DNS checker tool to see if all the records appear, then proceed to the next step.
6. Issue an SSL Certificate for the Domain
Secure sockets layer (SSL) certificates enable encryption to improve your email server security. CyberPanel provides free, unlimited Let’s Encrypt SSL, which you can issue via the control panel dashboard.
To do so, go to SSL → MailServer SSL. Select your domain from the drop-down list, then click Issue SSL. The process might take a few minutes.
7. Set Up Reverse DNS for Your VPS
Setting up a reverse DNS helps improve message deliverability. It enables other mail servers like Gmail and Yahoo to track back your server IP address using the domain, bypassing the spam filters.
Hostinger users can set up a reverse DNS using PTR records via hPanel. Here are the steps:
- In hPanel, click VPS on the top bar.
- Select the relevant VPS and click Settings on the sidebar.
- Hit the IP address tab → Set PTR record.
- Enter your domain name and click Save.
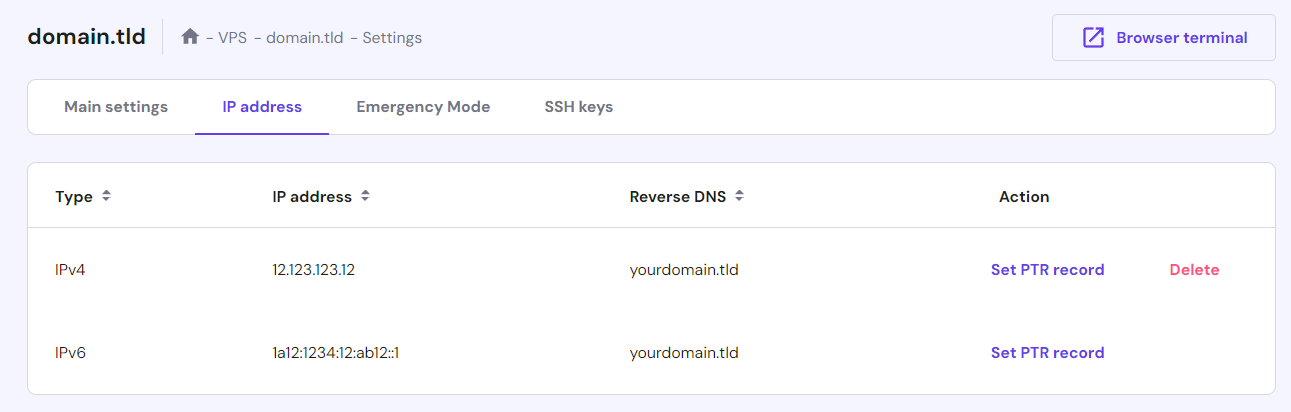
Wait until the propagation process finishes. To check if your VPS IP address resolves to the correct domain, run this command on Terminal:
dig -x ip_address
Ask Kodee
Hostinger VPS users can set a reverse DNS for their server by asking Kodee AI assistant, "Set a reverse DNS for my VPS. The domain is mydomain.com and the server IP address is 123.0.0.1." Remember to replace mydomain.com and 123.0.0.1 with their actual values.
8. Create Your Email Account
After the server and domain are set, create your mail address. Open your CyberPanel dashboard and navigate to Email → Create Email.
Select the domain from the drop-down list. Enter your email address and password, then press Create Email.
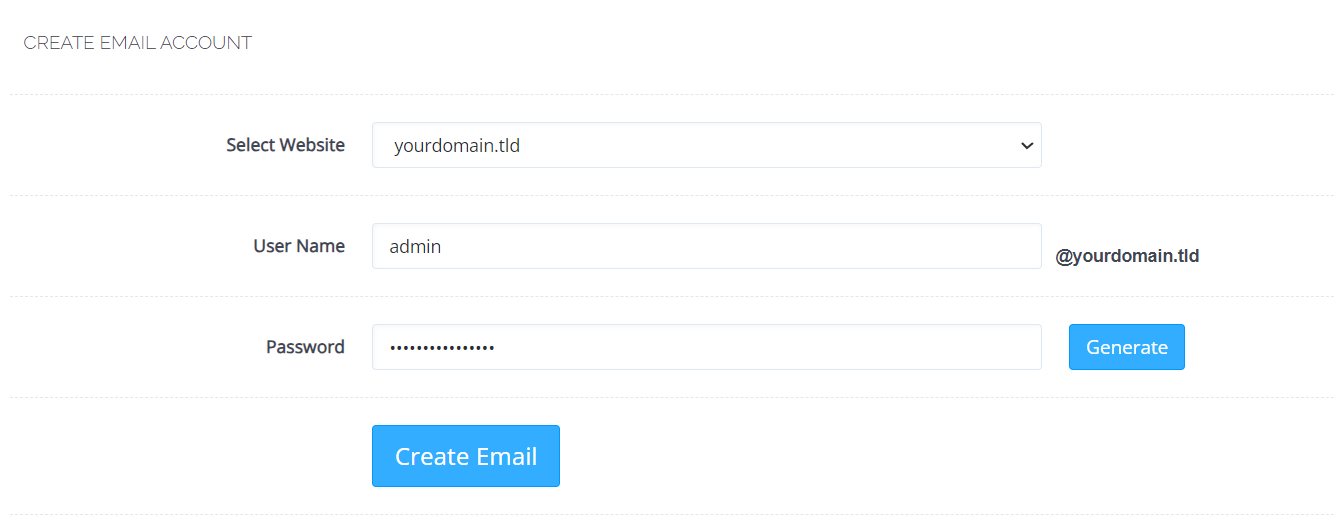
To see all the email accounts, navigate to Email → List Emails on the sidebar. This menu also displays the SMTP and POP3/IMAP server configuration for setting up email clients like Thunderbird.
Integrating your SMTP mail server into your service helps improve deliverability and security.
Suggested Reading
Read our article to learn more about WordPress SMTP server setup and the best email provider for it.
9. Test Your Email Server
Check whether your server works properly by sending emails. Here’s how to do so using CyberPanel’s built-in Webmail mail client:
- On your CyberPanel dashboard, go to Email → Access Webmail.
- It will redirect you to the email client dashboard. Input your login credentials and press Enter.
- Press the New button on the top left corner to create a new email.
- Write a test email and send it to another account.
- Open the destination email inbox to check if the server successfully sends the message.
- In return, send email messages to the server’s inbox to see if it receives them.
Pro Tip
For mobile devices, switch the Webmail user interface by enabling the Mobile version in your account settings.
In addition, test your email server’s spam score. To do so, use an online tool like Mail Tester, which will rate your email deliverability from the recipient server side.
When using this tool, ensure your test emails are long enough and don’t contain words like test. Otherwise, the anti-spam filter might falsely flag them, negatively impacting the score. Then, expand the report to see suggested areas of improvement, like configuring spam protection software.
Moreover, use Kodee, our AI assistant, to help identify deliverability problems and their solutions.
Conclusion
Hosting email on a Linux server provides users with control and flexibility. It also offers higher performance, storage, and scalability than third-party services, making it suitable for businesses wanting to host many accounts.
In this tutorial, we have explained the steps of email server setup with your own domain. Here’s a recap:
- Purchase a VPS hosting plan. Buy a VPS hosting plan with a dedicated IP address, control panel support, and a high uptime guarantee like one from Hostinger.
- Set up the VPS. Choose a data center location, set a root password, and install the AlmaLinux 8 with CyberPanel template via hPanel.
- Point your domain. Create child nameservers pointing to your VPS IP address and configure your domain.
- Create a website container. Open the CyberPanel dashboard and navigate to the Website menu to create a new empty website.
- Create nameservers in CyberPanel. Create ns1.domain.tld and ns2.domain.tld nameservers via CyberPanel’s DNS menu.
- Issue an SSL certificate. Open CyberPanel’s SSL section and install the free Let’s Encrypt SSL certificate to enable secure email hosting.
- Set up reverse DNS. Navigate to hPanel and add the domain as the reverse PTR record for your VPS IP addresses.
- Create your email account. Go to the Email section on the CyberPanel dashboard and create a new email account.
- Test your email server. Open the Access Webmail menu and log in to your new account. Send a test email to another address inbox and check deliverability using a tool like Mail Tester.
Keep in mind that the process might differ depending on your hosting provider and server requirements. If you have a question, leave us a comment below. Good luck!
Discover Other Types of Servers You Can Set Up With VPS Hosting
How to Make a TeamSpeak Server
How to Make a Minecraft Server
How to Set Up a Linux VPN Server
Host Your Own Email Server FAQ
In this section, we will answer several questions about hosting a private email server.
Is It Worth Hosting Your Own Email Server?
It depends on your needs. Self-hosting your personal email server is worth the effort if you prioritize control, flexibility, and scalability. However, email hosting services are more suitable if you want a preconfigured and simple solution.
How Much Does It Cost to Host Your Own Email Server?
The cost of VPS email hosting depends on the provider. For example, Hostinger VPS plans start at CA$ 9.09/month. Also, consider other fees like domain subscriptions and software licenses.
We don’t recommend using a personal machine since setting up and maintaining it requires a lot of effort.
Is Hosting My Own Email Server Secure?
A self-hosted mail server is secure if you configure it properly, like installing an SSL certificate and enabling a firewall. Conversely, DIY email hosting is more prone to cyber attacks when misconfigured since the user is responsible for managing all the security aspects.

Aris is a Content Writer specializing in Linux and WordPress development. He has a passion for networking, front-end web development, and server administration. By combining his IT and writing experience, Aris creates content that helps people easily understand complex technical topics to start their online journey. Follow him on LinkedIn.

Valentinas Čirba, Hostinger's Head of VPS, is a seasoned product leader specializing in VPS products with over ten years of experience. He's an expert at setting product strategy, leading cross-functional teams, and making smart decisions to deliver innovative solutions. Valentinas is committed to creating products that not only meet business objectives but also truly serve the customer. Follow him on LinkedIn.


Comments
August 28 2024
what will be the limit of mails per hour / day for the self-hosted mail server on hostinger vps with almalinux with cyber panel? do cyberpanel will charge me for smtp mails?
September 05 2024
Hello! For a self-hosted mail server on Hostinger VPS with AlmaLinux and CyberPanel, there aren't any specific restrictions from Hostinger on the number of emails you can send per hour or day. However, it's crucial to manage your server resources properly to avoid being flagged as spam. While CyberPanel doesn't charge for sending SMTP emails, it's essential to configure your server according to best practices to prevent potential issues ;)