How to Set up a Valheim Dedicated Server (Manually and Using Hostinger Game Panel)
Mar 10, 2026
/
Ariffud M. & Valentinas C.
/
8 min Read
Valheim is a popular survival game where players explore, build, and survive in a Viking-inspired world. Creating your dedicated server for Valheim offers smoother gameplay, control over who joins your world, and freedom to play as you wish.
In this article, you’ll learn how to set up a Valheim dedicated server on a Linux virtual private server (VPS). Ready to rule your own Valheim server and embark on an epic saga with your friends? If so, let’s dive in!

Prerequisites
Valheim server’s requirements are relatively modest compared to other games on dedicated servers, such as Satisfactory or Enshrouded. Here’s what you’ll need:
- Operating system. Major Linux distributions, Windows 7 or newer, Windows Server 2016 or 2019.
- CPU. At least a quad-core processor.
- RAM. A minimum of 2 GB, though 4 GB is recommended if you plan on hosting more players.
- Storage. At least 2 GB to get started, but consider 4 GB or more for expanded game data storage.
For a smooth Valheim server installation, make sure you use a broadband internet connection.
If you opt to install the Valheim dedicated server on a Linux VPS, it’s advisable to have a basic understanding of SSH and Linux commands. These skills are helpful for installing, navigating, and managing Linux server systems.
How to Set up a Dedicated Valheim Server Using Hostinger Game Panel
Using Hostinger’s Game Panel is the simplest way to launch your own Valheim dedicated server. Our Valheim server hosting plans offer this intuitive graphical interface tool, allowing you to install, manage, and invite players to join your server with ease.
For hosting Valheim, we recommend choosing the Game Panel 4 plan, which comes with a quad-core processor and 16 GB of RAM.
After selecting your desired plan, finish the setup wizard to pick a server location near you and create a secure password for your server. Then, follow these steps to get your Valheim server running with Game Panel:
- Head to the VPS Overview page within hPanel.
- Go to the top section and click the Manage panel button to open Game Panel.

- Enter your username and password on the login page.
- Choose Create Instance, then select Valheim from the drop-down menu.
- Give your Valheim server a name and click Create Instance.
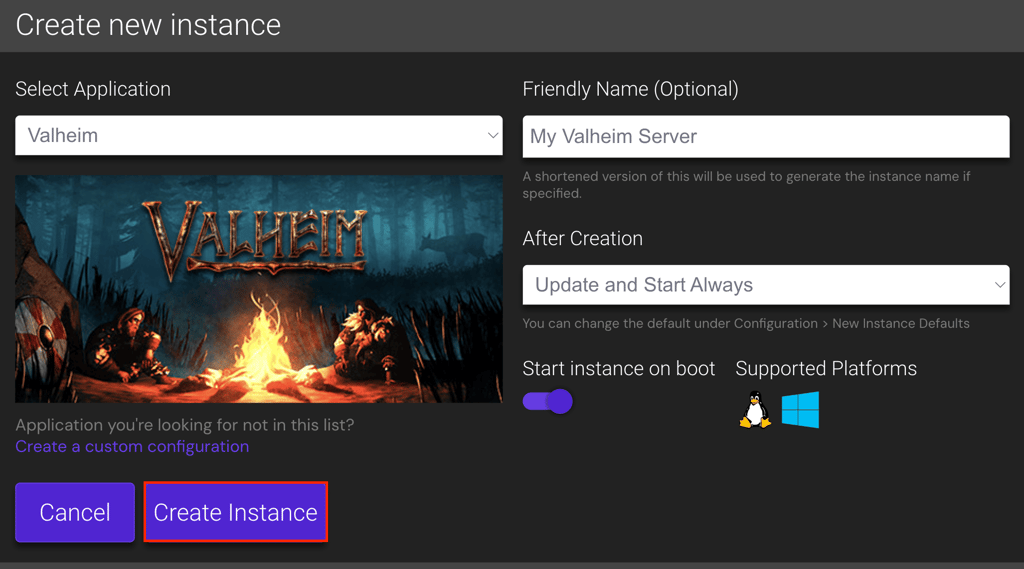
Once the installation process wraps up, you’ll see your new server active and ready for action.
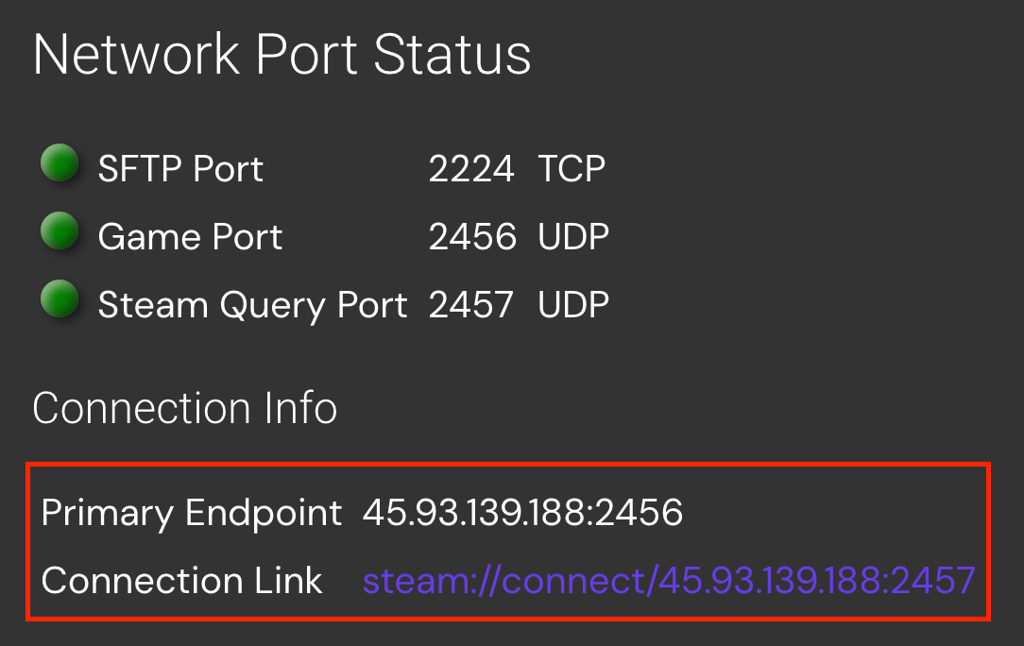
To invite players, double-click the new instance and look under the Connection info section for the server’s public IP address and default port.
For additional server setup options, head to Configuration → Valheim – General Settings. Here, you can tweak such settings as player permissions and game world presets.
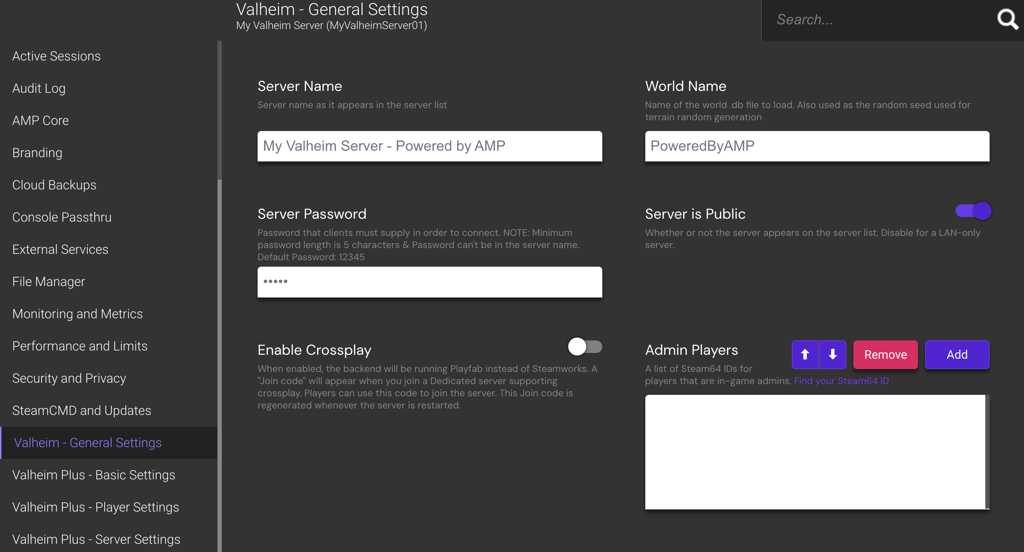
Valheim Plus users have even more customization options accessible in the Basic, Player, and Server Settings sections.

Pro Tip
Hostinger's Game Panel allows you to install multiple dedicated servers within a single account. For optimal performance when running several servers, consider upgrading your plan.
How to Set up a Valheim Dedicated Server Manually
For players who prefer more control and a hands-on approach, you can manually install the Valheim dedicated server. In this tutorial, we’ll use Debian 12 as our operating system.
1. Get a Game VPS Hosting;
Choosing a suitable game hosting provider is crucial for setting up a dedicated Valheim server. Hostinger stands out as a top game server provider, offering tailored solutions for various gaming needs.
Using the latest VPS-based tricks and solutions, our game hosting service grants full root access, allowing you to install, manage, and fine-tune your Valheim server according to your needs. You can also add custom mods to yourValheim server to enhance your overall gaming experience.
Furthermore, Hostinger’s game hosting plans come with dedicated resources and data centers across Asia, Europe, South America, and North America. These ensure low latency and smooth gameplay for players worldwide.
With Hostinger, you’re getting more than just VPS for gaming; you’re investing in a robust gaming server supported by solid hardware and a dependable network for minimal downtime.
2. Set up Your VPS
After purchasing a VPS plan, the next step is to prepare it for your Valheim server. For Hostinger customers, firstly, find your VPS login details by heading to the VPS details section at the bottom of your VPS Overview page.
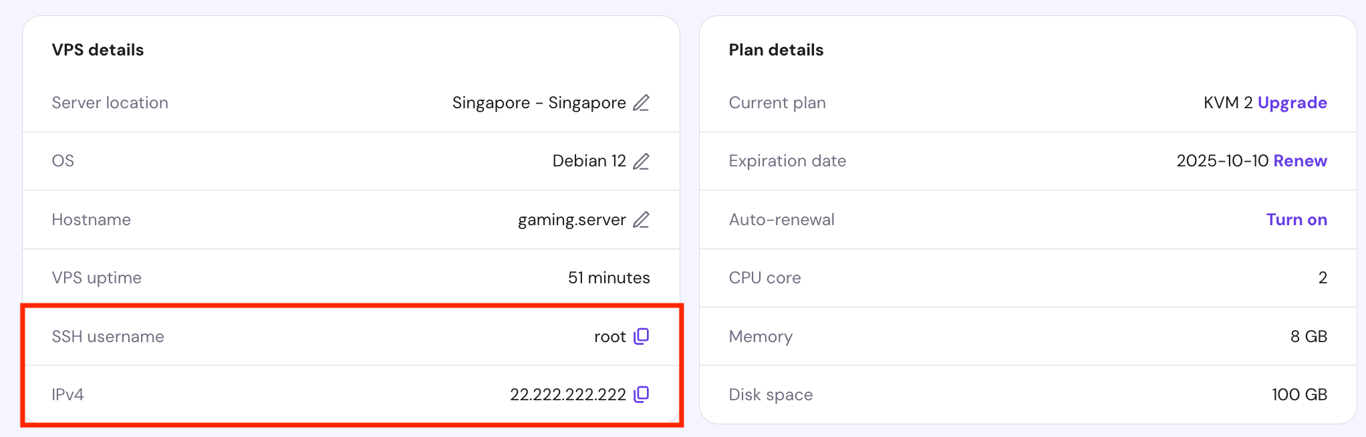
Then, use an SSH client app like PuTTY, macOS Terminal, or Hostinger’s Browser terminal feature to log into your server. Once logged in, follow these steps to complete the VPS initial setup:
- Update and upgrade your server’s package index to get the latest features and security patches:
sudo apt update && sudo apt upgrade
- Install the software-properties-common package to manage software from sources beyond the official Debian repositories:
sudo apt install software-properties-common
- If you have the Uncomplicated Firewall (UFW) installed on your server, make sure to open Valheim’s default ports with these commands:
sudo ufw allow 2456/udp
sudo ufw allow 2457/udp
sudo ufw allow 2458/udp
- Activate the latest firewall configuration with:
sudo ufw enable
- Verify the server’s firewall status by running:
sudo ufw status
Ask Kodee
Hostinger game server users can ask Kodee AI assistant to set up a new firewall rule for Valheim by simply asking, "Create and activate a new firewall rule that allows traffic from any IP address to port 2456, 2457, and 2458 TCP/UDP."
3. Install SteamCMD
SteamCMD is the command-line version of the Steam client, allowing you to install game servers directly from Valve’s repositories, including those for Valheim. It’s a must-have tool for managing game servers in a Linux environment.
Before installing SteamCMD, you must configure your system to access all necessary repositories, including 32-bit libraries. Debian users should execute the following commands in sequence:
sudo add-apt-repository non-free
sudo dpkg --add-architecture i386
sudo apt update
For players using an Ubuntu server, execute these commands instead:
sudo add-apt-repository multiverse
sudo dpkg --add-architecture i386
sudo apt update
Once your repositories are set up, proceed with these steps:
- Install SteamCMD with:
sudo apt install steamcmd
- To enhance security, avoid running game servers as the root user. Instead, create a dedicated user for managing the Valheim server:
sudo adduser -m valheim
Replace valheim with your preferred username.
- Switch to the new user account:
sudo -u valheim -s
- Move to the new user’s home directory:
cd ~
- Optionally, you can create a symbolic link or shortcut to run SteamCMD directly from the user’s directory:
ln -s /usr/games/steamcmd steamcmd
4. Install and Configure the Valheim Dedicated Server
After installing SteamCMD on your Debian VPS, you’re ready to download the Valheim server files. Follow these steps:
- Use this command to log in with the anonymous Steam account, install the server files, and store them in the valheimserver directory:
./steamcmd +force_install_dir /home/valheim/valheimserver +login anonymous +app_update 896660 +quit
- Navigate to the Valheim server folder:
cd ~/valheimserver
- To start the Valheim server, execute:
./valheim_server.x86_64
- To launch the server with customized settings, use:
./valheim_server.x86_64 -name "YourServerName" -port 2456 -world "YourWorldName" -password "YourPassword" -public 1
Replace YourServerName, YourWorldName, and YourPassword with your server details. The -public 1 option makes your server visible in the Valheim server list. Use -public 0 for a private server.
- To stop the server, press Ctrl + C.
- Switch back to the root user by running:
exit
Please note that the commands above run the Valheim dedicated server as a foreground service, meaning the server will stop if you close the terminal software. To keep your server running in the background, proceed to the next step.
5. Run Your Valheim Server in the Background
There are two common methods to maintain your Valheim server running without keeping the terminal open – using the Linux screen and setting up a systemd service.
Starting a screen Session
Using screen is a simple way to run your server in the background for temporary or casual use. Follow the instructions below:
- Install screen if it’s not already installed by running:
sudo apt install screen
- To start a new screen session for your Valheim server, use:
screen -S ValheimServer
- Within the session, switch to the valheim user, navigate to your server directory, and start the Valheim server:
sudo -u valheim -s
cd ~/valheimserver
./valheim_server.x86_64
- To detach from the Screen session and leave the server running in the background, press Ctrl + A → D.
Creating a Service
Setting up a systemd service is more suitable for long-term and automatic Valheim server management. Here are the steps:
- Create a new service file for your Valheim server:
sudo nano /etc/systemd/system/valheimserver.service
- Insert the following configuration, adjusting paths and parameters as necessary:
[Unit]
Description=Valheim Dedicated Server
Wants=network-online.target
After=network-online.target
[Service]
Environment=SteamAppId=892970
Environment=LD_LIBRARY_PATH=/home/valheim/valheimserver/linux64:$LD_LIBRARY_PATH
Type=simple
Restart=on-failure
RestartSec=10
KillSignal=SIGINT
User=valheim
Group=valheim
WorkingDirectory=/home/valheim/valheimserver
ExecStartPre=/usr/games/steamcmd +login anonymous +force_install_dir /home/valheim/valheimserver +app_update 896660 validate +exit
ExecStart=/home/valheim/valheimserver/valheim_server.x86_64 -nographics -batchmode -port 2456 -public <ISPBULIC> -name "<SERVERNAME>" -world "<WORLDNAME>" -password "<PASSWORD>" -savedir "/home/valheim/valheim_save_data"
[Install]
WantedBy=multi-user.target
- Press Ctrl + X → Y → Enter to save changes and exit the text editor.
- Enable the service to start on boot with the following:
sudo systemctl enable valheimserver.service
- Start the service using:
sudo systemctl start valheimserver.service
- To check the status of your Valheim server service, run the following:
sudo systemctl status valheimserver.service
Here’s an output example indicating your dedicated Valheim server is up and running:
● valheimserver.service - Valheim Dedicated Server
  Loaded: loaded (/etc/systemd/system/valheimserver.service; enabled; vendor preset: enabled)
  Active: active (running) since Thu 2021-03-04 12:34:56 UTC; 1min 17s ago
Main PID: 12345 (valheim_server)
  Status: "Game server connected"
  Tasks: 23 (limit: 4915)
  Memory: 300M
  CGroup: /system.slice/valheimserver.service
          └─12345 /home/valheim/valheimserver/valheim_server.x86_64 -nographics -batchmode -port 2456 -public 1 -name "YourServerName" -world "YourWorldName" -password "YourPassword"
6. Connect to the Server
After completing the Valheim server setup, it’s time to invite your friends to join your newly established server. Here’s how players can connect:
- Launch Valheim, select a character and click Start.
- Navigate to Join Game → Join IP.
- Enter the server’s IP address and port, then click Connect.
If everything is configured correctly, they should be able to join the server and play Valheim without issues.
Valheim Server Troubleshooting
If players can’t access your server, consider these troubleshooting tips:
- The server does not appear in the community server list. Make sure your server is set to public (-public 1) and verify that your firewall settings allow the necessary ports (2456-2458 UDP). The server might also take a while to appear on the list, so please be patient.
- Connection timeouts or failures. Ensure the server’s external IP address is accurate, and that port forwarding is correctly set up on your router. Additionally, confirm that your firewall isn’t blocking incoming connections.
- Game server connection issues. If players can see the server but can’t connect, recheck the server’s IP and port forwarding configurations. Confirm that the server is running and not stuck during startup. Restarting the server might also help fix these issues.
7. Maintain and Update Your Server
To ensure a stable and enjoyable experience on your Valheim server, you need to maintain and update it regularly. Follow these steps to keep your server in optimal condition:
Safely Stopping the Server
If you’re in a screen session or have the server running in a terminal, press Ctrl + C to carefully stop the server. If it’s running as a service, use:
sudo systemctl stop valheimserver.service
To confirm that the server has shut down, run the status command:
sudo systemctl status valheimserver.service
The output should indicate that the service is inactive (dead). For example:
…
Active: inactive (dead) since Thu 2021-03-04 12:34:56 UTC; 1min 17s ago
…
Backing Up Server Data
To back up your Valheim world, execute the following commands, replacing ~/ValheimBackups/worlds with your preferred backup location:
cd ~/.config/unity3d/IronGate/Valheim/worlds
mkdir -p ~/ValheimBackups/worlds
cp ~/.config/unity3d/IronGate/Valheim/worlds/*.{db,fwl} ~/ValheimBackups/worlds
For character data backups, run these commands instead:
cd ~/.config/unity3d/IronGate/Valheim/characters
mkdir -p ~/ValheimBackups/characters
cp ~/.config/unity3d/IronGate/Valheim/characters/* ~/ValheimBackups/characters
Updating the Valheim Server Software
If your server receives an update from Valve, follow these steps to apply it:
- Before updating, stop the server and back up your server files as described above.
- Launch SteamCMD and update the server with this command:
./steamcmd +login anonymous +force_install_dir /home/valheim/valheimserver +app_update 896660 validate +quit
- Restart the server once the update is finished:
sudo systemctl restart valheimserver.service
Monitoring Server Performance
Adopt these best practices to monitor the server’s performance:
- Use tools like top, htop, or glances to observe server resource usage in real time.
- Check server logs for any errors or warnings that might indicate performance issues. Logs are usually located within the server directory or a specified log file path.
Conclusion
In this guide, you’ve learned how to set up, configure, and maintain dedicated Valheim servers, ensuring a seamless multiplayer experience.
As you become more familiar with server management, we encourage you to customize your own server further and explore the various mods that are available. These can enrich your Valheim gameplay, offering a unique experience for you and your fellow Vikings.
Should you have any questions, don’t hesitate to drop them in the comment box below!
How to Set up a Valheim Dedicated Server FAQ
This section will answer the most common questions about creating Valheim dedicated servers.
Do I Need Server Management Experience to Set up a Valheim Server?
Setting up a Valheim server doesn’t require extensive server management experience. A basic understanding of operating systems and following step-by-step guides can get your server running. However, advanced skills could enhance complex customizations and troubleshooting.
Can I Customize My Valheim Dedicated Server Settings?
Yes, you can customize Valheim dedicated server settings, including server name, new world generation, and player limits, through startup commands or configuration files for a tailored gameplay experience.
How Can I Add Mods to My Valheim Dedicated Server?
To add mods to your Valheim dedicated server, first install a mod manager such as BepInEx. Once installed, place the mod files into the designated plugins folder to enrich your server with new features and gameplay elements.

Ariffud is a Technical Content Writer with an educational background in Informatics. He has extensive expertise in Linux and VPS, authoring over 200 articles on server management and web development. Follow him on LinkedIn.

Valentinas Čirba, Hostinger's Head of VPS, is a seasoned product leader specializing in VPS products with over ten years of experience. He's an expert at setting product strategy, leading cross-functional teams, and making smart decisions to deliver innovative solutions. Valentinas is committed to creating products that not only meet business objectives but also truly serve the customer. Follow him on LinkedIn.


Comments
0 responses