How to Set Up an Enshrouded Dedicated Server
Mar 10, 2026
/
Ariffud M. & Valentinas C.
/
8 min Read

Enshrouded is a role-playing game where players can explore, build, and engage in quests within the open world of Embervale. Creating your own Enshrouded server enhances the gaming experience by providing stable performance and extensive customization options.
In this article, you’ll learn how to set up an Enshrouded dedicated server on a virtual private server (VPS) with two different options: using Hostinger’s Game Panel for an easy setup and a manual method for those who prefer hands-on control.

Prerequisites for Hosting an Enshrouded Server
If you’re on the lookout for the best game hosting provider for Enshrouded dedicated servers, make sure your choice adheres to the following system requirements:
- Operating system – Linux or Windows.
- Processor – quad-core or better.
- RAM – at least 16GB.
- Storage – minimum of 60GB available space.
Also, ensure a broadband internet connection for a smooth Enshrouded server installation. When hosting Enshrouded on Linux, consider distributions like Ubuntu, Debian, or CentOS. Do note, however – CentOS commands might differ from Ubuntu or Debian.
Hostinger’s Enshrouded server hosting is an excellent choice for Enshrouded servers. Our AMP-based Game Panel enables you to install, manage, and invite players to join your dedicated server with ease.
Based on the above requirements, we recommend choosing the Game Panel 4 plan, which includes 16 GB RAM and a quad-core processor.

How to Set Up a Dedicated Server for Enshrouded with Hostinger’s Game Panel
Setting up an Enshrouded dedicated server using Hostinger’s Game Panel simplifies the complex and error-prone manual approaches. With its graphical interface, this method is suitable for beginners or those not familiar with Linux commands.
Start by choosing your desired plan for Enshrouded game hosting and complete the initial VPS setup wizard. This includes selecting the server location closest to your player base and creating a secure password for your server.
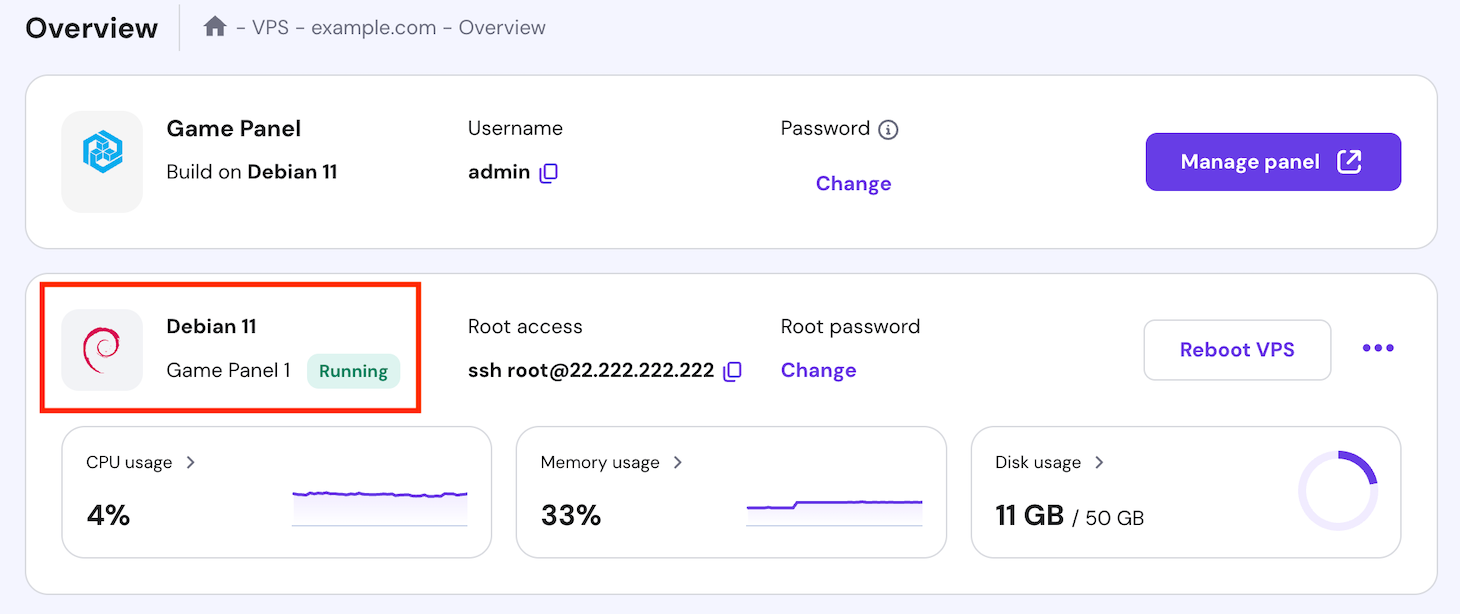
Once finished, you’ll be directed to the VPS dashboard. In the VPS Overview menu, check if your server status is Running. If not, manually start it by clicking the Start VPS button.
Then, proceed with the following steps:
- Navigate to the top menu and click the Manage panel to enter the Game Panel.
- On the login page, input your username and password.

- Select Create Instance, then choose Enshrouded from the drop-down menu.
- Name your Enshrouded server and click Create Instance.

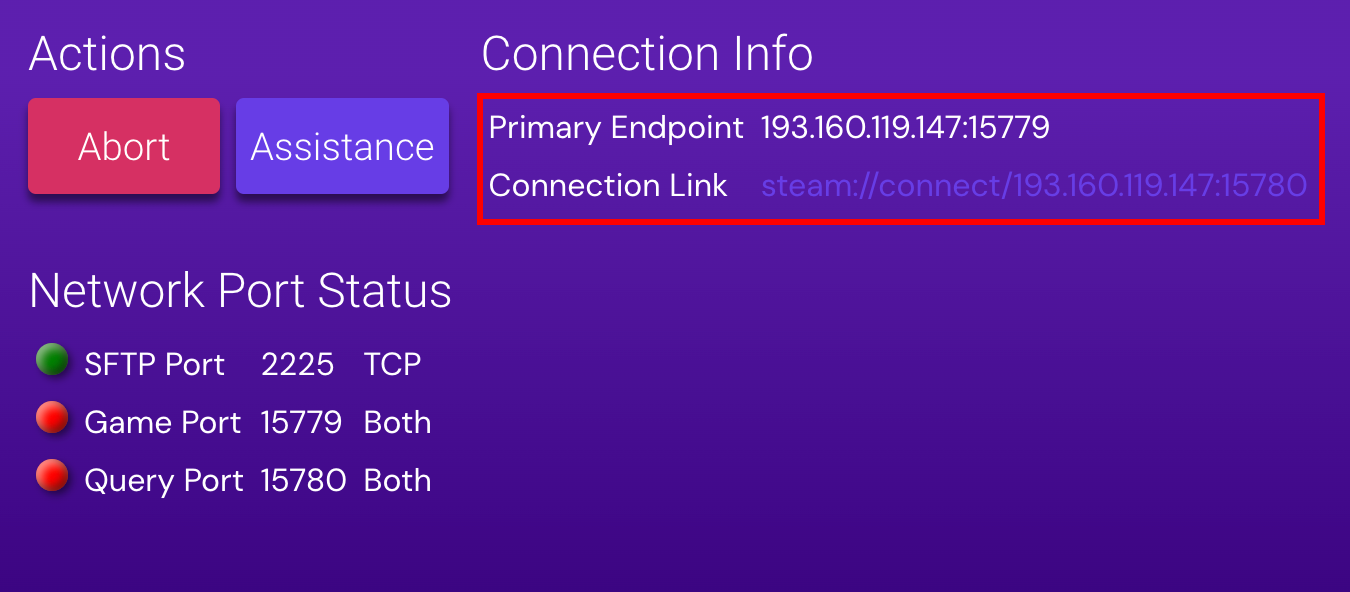
Wait until the server creation process is complete. Afterward, you can invite players to join your dedicated server using your server’s IP address and default port. Double-click your newly created server instance and see Connection Info section to find it.
Additionally, you can configure your Enshrouded server setup further, such as setting a player limit, by accessing Configuration → Enshrouded Server Settings.
How to Make an Enshrouded Dedicated Server Manually
Creating an Enshrouded dedicated server manually offers greater control and customization options for those comfortable with hands-on configuration. For this tutorial, we’ll use Debian 12.
1. Choose a Game Hosting VPS Provider
When selecting the right provider with Linux VPS for Enshrouded, consider your server’s specific needs. These include anticipated player traffic, server uptime requirements, and your player base’s geographical location.
Hostinger’s game hosting plans accommodate various gaming needs, from casual, small-scale servers to large, high-traffic multiplayer server environments.
As previously mentioned, we suggest starting with our Game Panel 4 plan. It offers sufficient resources for smooth gameplay, full-root access for comprehensive server management, and a malware scanner and firewall for server protection.
Our gaming plans are also scalable, allowing your server to grow with your gaming needs. This is beneficial when your player base expands, or you want to host additional game servers for other games.
2. Set Up Your VPS Server
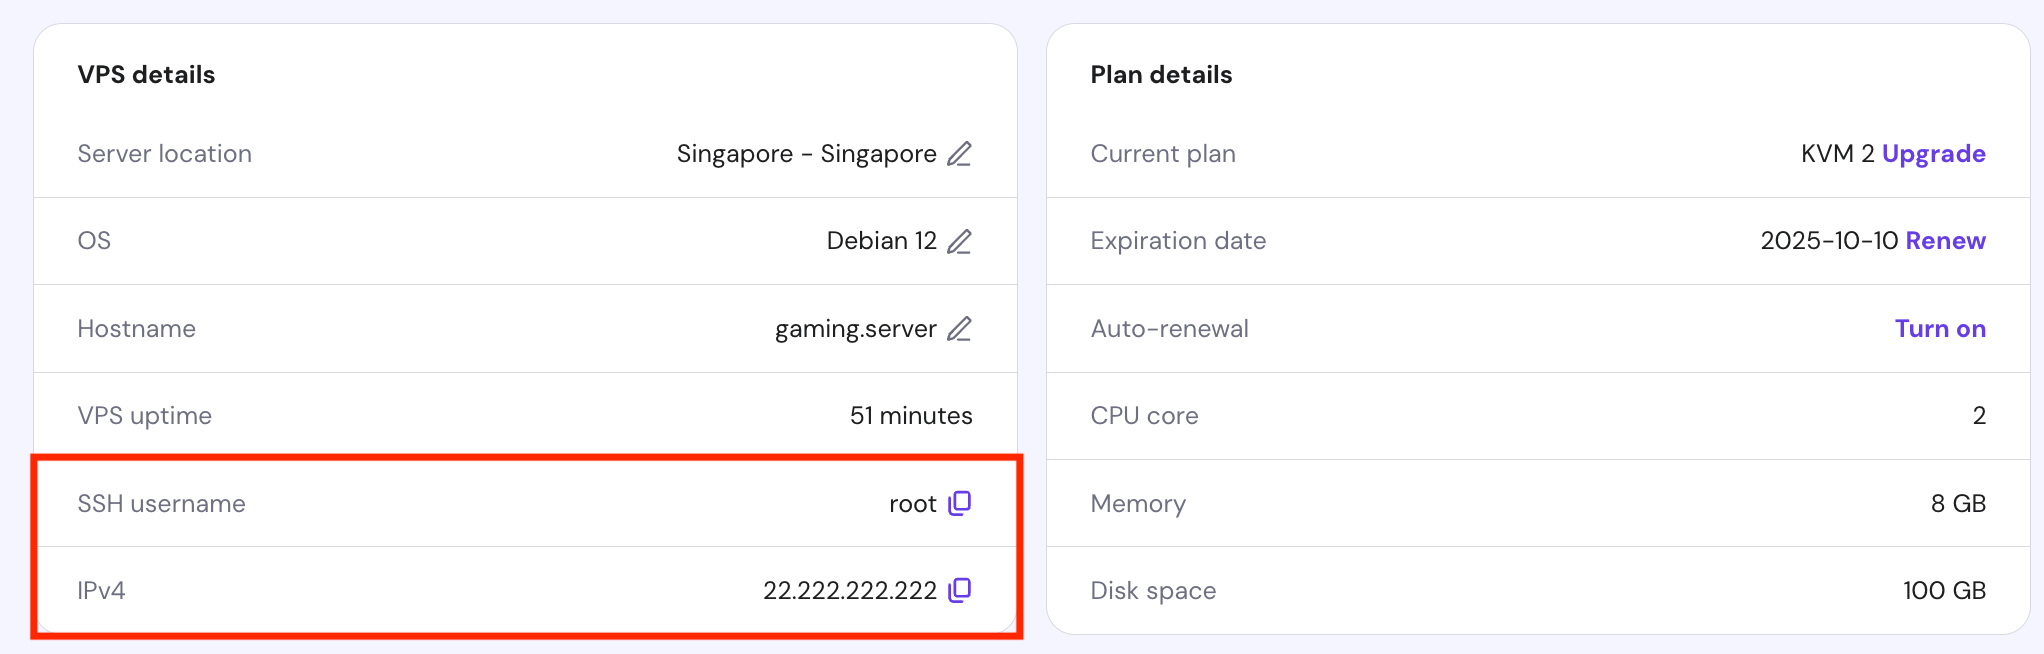
Before installing your Enshrouded server, it’s crucial to complete the steps for the Linux server setup. For Hostinger’s customers, firstly, access your VPS details by navigating to the VPS details section within your VPS overview menu.
Then, connect to your VPS via an SSH client, such as PuTTY, Terminal, or our Browser terminal feature.
Once logged into your server, follow this simple guide to get started:
- Ensure all your Linux packages are up to date with the latest features and security patches:
sudo apt-get update && sudo apt-get upgrade
- Set up your Enshrouded dedicated server by installing the necessary packages:
sudo apt install software-properties-common lsb-release wget
- Adjust your firewall configuration settings to allow the correct ports (15636 and 15637) for your Enshrouded game server:
sudo ufw allow 15636/tcp
sudo ufw allow 15637/tcp
If you encounter a “command not found” error, the firewall utility might be disabled or uninstalled. In such cases, refer to our tutorial on configuring the Uncomplicated Firewall (UFW).
You can also adjust your firewall settings through the VPS dashboard. Go to sidebar → Security → Firewall and click Add firewall.

Name your configuration, then select the three dots icon and choose Edit to forward ports 15636 and 15637, allowing external access to your server.
Ask Kodee
You can also ask Kodee to set up a new firewall rule on your VPS. To do this, ask it "Create a new firewall rule in my VPS that allows connection from any IP address to port 15636 and 15637 TCP/UDP."
3. Install Wine
Wine is a tool for running Windows applications in a Linux environment, such as your VPS. Since configuring the Enshrouded dedicated server may require Windows-specific software, you need to install Wine on your server.
Here are the steps:
- Ensure the repository keyrings directory for Wine is set up:
sudo mkdir -pm755 /etc/apt/keyrings
- Authenticate Wine packages by downloading the Wine GPG key into the directory you just created:
sudo wget -O /etc/apt/keyrings/winehq-archive.key https://dl.winehq.org/wine-builds/winehq.key
- Tailor the WineHQ sources list to your system:
sudo wget -NP /etc/apt/sources.list.d/ https://dl.winehq.org/wine-builds/$(lsb_release -is | tr '[:upper:]' '[:lower:]')/dists/$(lsb_release -cs)/winehq-$(lsb_release -cs).sources
- As some Wine and SteamCMD components are 32-bit, add compatibility for the i386 architecture:
sudo dpkg --add-architecture i386
- Install the most recent version of Wine:
sudo apt install --install-recommends winehq-staging
- Install additional packages for Wine to manage the Enshrouded server efficiently:
sudo apt install cabextract winbind screen xvfb
Important! Every time you modify the repository configurations, always update your package list to reflect the changes by running the sudo apt update command.
4. Configure SteamCMD
SteamCMD acts as a command-line version of the Steam client. It enables administrators to download, configure, and update game servers efficiently. Follow the instructions below to install SteamCMD on your VPS:
- For Debian systems, add the non-free repository to gain access to SteamCMD:
sudo apt-add-repository non-free
- For Ubuntu distributions, use this command instead to add the multiverse repository:
sudo add-apt-repository multiverse
- After adding the appropriate repository, install SteamCMD with:
sudo apt install steamcmd
5. Install the Enshrouded Server
Utilize SteamCMD to download and install the Enshrouded dedicated server files to your VPS. Proper directory management is crucial to ensure smooth operation and ease of access to the files.
Follow these steps to complete the Enshrouded server installation:
- Since it’s not recommended to run SteamCMD as the root user, create a dedicated user named enshrouded or your choice and include a home directory for the user:
sudo useradd -m enshrouded
- Change to the newly created enshrouded user using:
sudo -u enshrouded -s
- Move to the enshrouded user’s home directory by executing:
cd ~
- Download the Enshrouded server using SteamCMD. This game currently doesn’t have a Linux build, so it’s necessary to force SteamCMD to use the Windows version:
/usr/games/steamcmd +@sSteamCmdForcePlatformType windows +force_install_dir /home/enshrouded/enshroudedserver +login anonymous +app_update 2278520 +quit
By following these steps, all the essential Enshrouded server files, including save files, will be downloaded and organized in the /home/enshrouded/enshroudedserver.
Suggested Reading
Did you know you can use SteamCMD to install other game servers, including Unturned? Check out our tutorial on how to create an Unturned server.
6. Launch Your Enshrouded Server
Launching your Enshrouded server involves simple steps to ensure it starts correctly and becomes accessible to players. Here’s how to initiate your dedicated server and confirm it’s running successfully:
- Use Wine to launch the server:
wine64 ~/enshroudedserver/enshrouded_server.exe
- Keep an eye on the terminal for specific messages that confirm the server is operational:
[Session] 'HostOnline' (up)!
[Session] finished transition from 'Lobby' to 'Host_Online' (current='Host_Online')!
- Once the server is active, it should appear in the Steam client’s server list or server browser. Players can now join it through the game’s main menu.
- To stop the server, press CTRL + C in the terminal.
7. Adjust Enshrouded Server Settings
Initially, your dedicated server will run with default settings. However, you can customize your Enshrouded server settings to enhance the players’ experience. This guide will assist you in accessing and modifying key settings.
After launching the server, it automatically generates a default configuration file. To modify the Enshrouded server configuration, open this file with the nano text editor using the following command:
nano ~/enshroudedserver/enshrouded_server.json
Within the file, consider adjusting the following settings:
Server Name
Assign a distinctive name to your server for easy identification in the game’s server browser.
"name": "YourCustomServerName"
Password Protection
Set a server password to control access and maintain security.
"password": "YourServerPassword"
Player Slot Limit
Specify the maximum number of players your dedicated server can accommodate. For instance, to limit it to 8 slots:
"slotCount": 8
Please note that the Enshrouded server consumes approximately 4GB of RAM with no players and up to 6GB with all 16 slots occupied, averaging about 100MB per player.
After implementing the desired changes, save your custom Enshrouded server settings and exit nano by pressing CTRL + X → Y → Enter.
8. Set up a Service File for the Enshrouded Server
To streamline your Enshrouded server management, you can set up a service file. This file ensures the server automatically restarts after any crashes and boots with the system. Start by creating and opening the Enshrouded service by executing:
sudo nano /etc/systemd/system/enshrouded.service
Within the file, insert the configuration below. These settings dictate the service’s behavior, including the user, the working directory, and the commands to initiate the server:
[Unit]
Description=Enshrouded Server
Wants=network-online.target
After=network-online.target
[Service]
User=enshrouded
Group=enshrouded
WorkingDirectory=/home/enshrouded/
ExecStartPre=/usr/games/steamcmd +@sSteamCmdForcePlatformType windows +force_install_dir /home/enshrouded/enshroudedserver +login anonymous +app_update 2278520 +quit
ExecStart=/usr/bin/wine64 /home/enshrouded/enshroudedserver/enshrouded_server.exe
Restart=always
[Install]
WantedBy=multi-user.target
After finalizing your changes, activate the service with:
sudo systemctl enable enshrouded
To start the Enshrouded server immediately without rebooting, execute:
sudo systemctl start enshrouded
Service Management Commands
Here are additional commands for managing the Enshrouded service:
- To stop the server, use sudo systemctl stop enshrouded.
- Prevent the server from starting automatically with sudo systemctl disable enshrouded.
- After applying changes or troubleshooting, restart the service with sudo systemctl restart enshrouded.
9. Connect to Your Enshrouded Server
Connecting to your Enshrouded server is simple once it’s correctly set up and running. Below are instructions for players to join your server, along with troubleshooting tips to ensure a smooth connection.
Adding Your Server to Favorites in Steam
Players can easily find and join your dedicated server by adding it as a favorite in Steam:
- Open the Steam client on your computer and select View → Servers to open the Game Servers Panel.
- In the Game Servers dialog, click the Favorites tab. Use the select box in the top-right corner to find and select Enshrouded.
- Click the plus (+) symbol at the bottom of the dialog box to add a new favorite server.
- Type in your server’s IP address and port, then click OK.
Connecting to Your Server
To join the server and start playing:
- Open Enshrouded and select PLAY from the main menu.
- In the PLAY SELECTION window, choose the JOIN option.
- Your dedicated server should be listed among the available servers. Click Join on your server name to connect.
Troubleshooting Connectivity
Here are some best practices to address connectivity issues:
- Local network – ensure your local network settings permit connections. Check your firewall and antivirus configuration settings to confirm they are not blocking the access.
- Port forwarding – for players connecting via the internet, verify that the correct port (15637 in this case) is forwarded in your router settings to the server’s local IP address.
- Check log files – review the server’s log files for any errors or warnings related to connection issues. These logs can often provide detailed insights into potential problems.
- Command prompt checks – use command prompt tools like ping to confirm that your server is reachable from client machines. You can also employ tracert (on Windows) or traceroute (on Linux/Mac) to see if connections might be failing within the network path.
Conclusion
In this guide, we’ve gone over setting up Enshrouded dedicated servers through two methods. Whether you opt for Hostinger’s Game Panel or prefer a manual installation, you now have the knowledge to tailor your server settings, guarantee seamless connectivity, and address any potential issues effectively.
With your Enshrouded server operational, you’re fully prepared to host an engaging and reliable gaming experience for your community. Enjoy your adventures in Embervale!
How to Set up an Enshrouded Dedicated Server FAQ
This section will answer the most common questions about creating Enshrouded servers.
What Is a Dedicated Enshrouded Server?
A dedicated Enshrouded game server is a specialized server hosting the Enshrouded game. It offers a stable, ongoing multiplayer experience, allowing administrators to customize server settings and manage their gaming community.
Why Should I Set Up a Dedicated Server for Enshrouded?
The benefits include much more control over your game server optimization, resulting in smoother, more reliable multiplayer sessions that can be tailored to players’ liking.
Can I Customize My Enshrouded Server?
Yes, you can customize your Enshrouded server. The server’s configuration file enables administrators to modify settings such as the server name, password, and player slots, elevating gameplay that fits your community’s preferences.

Ariffud is a Technical Content Writer with an educational background in Informatics. He has extensive expertise in Linux and VPS, authoring over 200 articles on server management and web development. Follow him on LinkedIn.

Valentinas Čirba, Hostinger's Head of VPS, is a seasoned product leader specializing in VPS products with over ten years of experience. He's an expert at setting product strategy, leading cross-functional teams, and making smart decisions to deliver innovative solutions. Valentinas is committed to creating products that not only meet business objectives but also truly serve the customer. Follow him on LinkedIn.