How to automate VPS management using n8n and Hostinger API
Mar 10, 2026
/
Aris S.
/
15 min Read
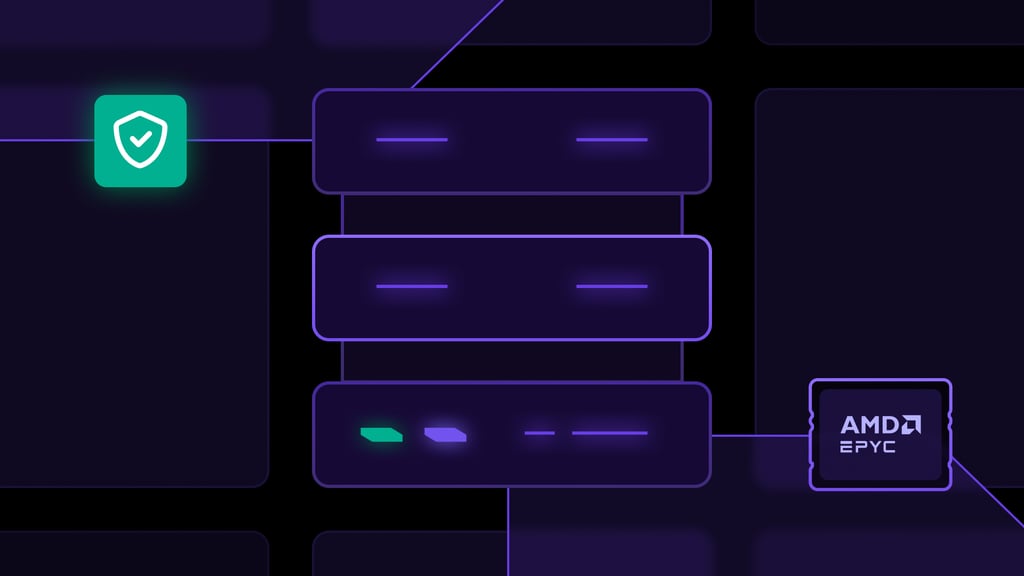
Automating Hostinger virtual private server (VPS) management using n8n and our public API helps streamline repetitive tasks, such as monitoring uptime and sending alerts on Slack. In addition to making the task more efficient, it reduces human errors and enables you to focus on crucial tasks that require more complex configurations, like fine-tuning firewall rules.
You can accomplish this using two key tools: n8n, a powerful open-source low-code automation platform, and the Hostinger API, which provides the programmatic interface to manage your servers, in this case through n8n. The process of automating your VPS tasks with these tools is straightforward:
- Get your Hostinger API token from hPanel.
- Set up or self-host an n8n instance and connect your Hostinger API by adding the API token as the HTTP request node’s authentication credential.
- Configure your n8n workflow using specific API endpoints and nodes based on the VPS management tasks you want to automate.
Examples of simple tasks that can be automated using n8n and the Hostinger API include alerting you to downtime, logging the latest backup for historical data, notifying you of potentially compromised VPS, and creating Jira tickets for traffic spikes.
Before diving into building these workflows, let’s explore the basics by understanding the tools that make this automation possible.
What is VPS management and why automate it?
VPS management involves overseeing and maintaining the performance, security, software, and system updates of a virtual server. It includes tasks such as configuring server settings, monitoring uptime, managing storage and backups, and applying security patches.
Proper VPS management is essential to ensure smooth, reliable, and secure operations. However, it can be time-consuming, repetitive, and prone to human error – especially as you add more servers.
Automating VPS management can streamline routine tasks, reduce risk, and free up time for more strategic work, among other benefits.
Benefits of automating VPS management
Automating your VPS management tasks with n8n and the Hostinger API delivers various benefits that extend beyond simple efficiency, impacting reliability, consistency, and resource allocation.
- Significant time and effort savings. By automating operations like fetching daily resource metrics and logging malware scan results, you can focus on complex tasks that require more human judgment or intervention.
- Drastically reduced downtime. Creating an automated monitoring and alerting system enables you to identify issues on your VPS and respond to them promptly. The automation’s ability to run 24/7 without supervision ensures immediate detection of interruptions or anomalies.
- Minimized human errors and improved data consistency. Performing manual, repetitive administrative tasks is inherently prone to human error. Automated and tested workflows consistently perform the same steps, ensuring data consistency.
- Streamlined multi-VPS management. Administrators can monitor and receive alerts about multiple VPS instances on a centralized hub. The n8n-Hostinger API integration is also scalable, meaning you can easily expand your workflow to automate tasks across multiple server instances.
What are the tools for automating VPS management?
Automating Hostinger VPS management requires two tools: n8n and our public API.
n8n runs the workflow for automating the task, while the API facilitates the communication between the automation platform and your VPS.
What is n8n?
n8n is an open-source platform that lets you automate various tasks by connecting different applications and setting custom logic to manipulate data as it moves.
In automated VPS management, n8n fetches data from your VPS via API, filters it according to specific rules, and executes a predefined sequence of actions if certain conditions are met.
What makes n8n suitable for this task is its low-code nature. This means you don’t need to be a professional developer to build sophisticated server management workflows.
You can build workflows in n8n by dragging and dropping nodes. Each node performs a specific function, whether it’s sending an API call, setting a filter rule, sending a notification on third-party apps, or scheduling task execution.
Important! n8n isn’t a drop-in replacement for tools like Grafana and Prometheus due to the lack of features specifically designed for server monitoring. However, it’s a more beginner-friendly option for basic tasks like alerting and is much easier to use, especially for non-developers.
What is Hostinger’s API?
Hostinger’s public API is a tool that enables you to interact with your Hostinger account and products programmatically. It allows your third-party applications, such as n8n, to connect and exchange data with your Hostinger account, including the associated VPS.
The Hostinger API is crucial for automating VPS management because it enables n8n to fetch data from your server, which is necessary for determining whether the tasks should be performed.
APIs typically have multiple endpoints – addresses that allow you to request particular data or take a specific action. For example, Hostinger API has endpoints that let you fetch data about backup, VPS information, and malware scanner summary, among others.
Hostinger API endpoints are also helpful for administering various aspects of your server. For instance, you can create a new Docker project or set a new firewall rule without directly interacting with your VPS. To learn more about all available endpoints and their usage, refer to our API documentation.
How to set up your VPS management workflow
By integrating n8n and the API from Hostinger, you can set up a VPS management automation workflow in only three simple steps.
1. Generate your Hostinger API token
The API token is a unique authentication key that allows the Hostinger system to verify requests coming from third-party sources, like n8n.
Generating an API key at Hostinger takes these simple steps:
- Log in to hPanel.
- Click your account icon on the top right corner of your screen and select Account information.
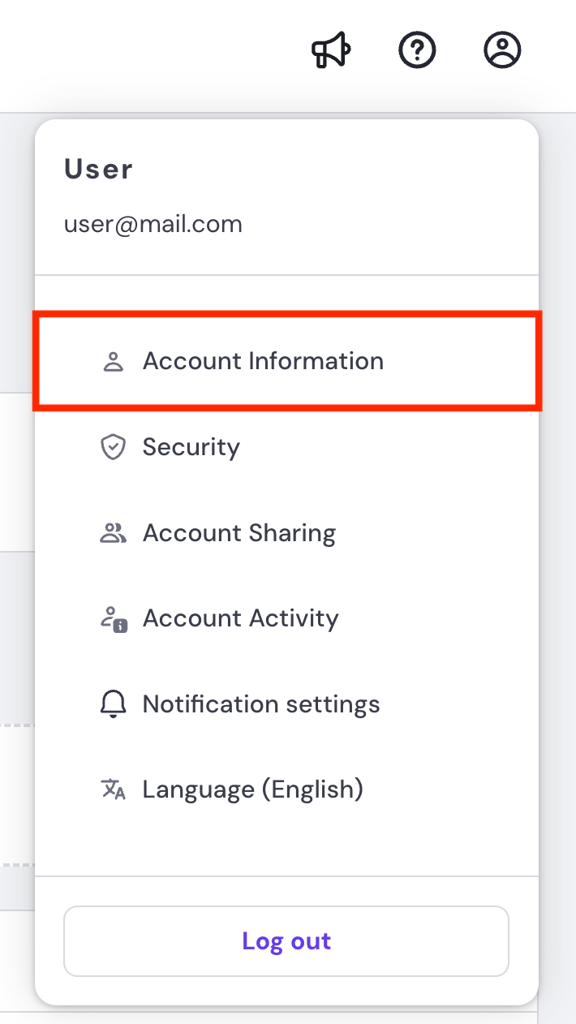
- Select API from the left sidebar.
- Click New token.
- Add a name for your token and select an expiration date. Hit Generate.
Copy the generated token and store it in a safe location, like an encrypted password manager. This is important because you won’t be able to see it again after closing the API token generation page.
Keeping the token safe prevents this credential from being compromised, which is crucial since cybercriminals can use it to obtain sensitive data or modify critical server settings.
Important! In addition to storing your token in a safe location, choosing a shorter expiration date safeguards your API token. The more frequently you update your token, the more difficult it becomes for cybercriminals to obtain a valid one.
At the same time, however, updating your token frequently can be tedious. In that case, choose an expiration period that best balances security and maintenance according to your needs.
After obtaining your API token, let’s check whether it works properly. You can easily do this by copying commands at the bottom of the token generation page and running them on your computer’s command-line application.

If you don’t receive any error message, it means the API token is valid, and we can proceed with setting up n8n.
After verifying the API token, obtain your VPS ID, which the API will use to identify the server and fetch the data. Here’s how to do so:
- Go to hPanel → sidebar → VPS.
- Click Manage on the VPS you want to monitor.
- Check the page URL. Your VPS ID is the number next to /vps. In this URL example, the ID is 123456:
https://hpanel.hostinger.com/vps/123456/overview
2. Set up n8n on your VPS
You can set up n8n using two methods: manually on a self-hosted environment or using the official cloud plan.
We recommend self-hosting n8n in a VPS. Not only is this method more cost-effective than the cloud plan, but it also gives you complete control over the hosting environment and your data, resulting in a higher level of flexibility.
Important! Avoid hosting your n8n instance on the same VPS you want to monitor because your workflow will also fail if the server experiences downtime.
In addition, VPS providers offer various features that help you configure and manage your n8n instance more easily. For example, Hostinger’s self-hosted n8n plan provides OS templates that enable you to deploy n8n with just a few clicks, all without any commands.
If you want to see this template in action or learn how to manually deploy this automation platform, check out our tutorial on installing n8n.

Once n8n is deployed, use the API to connect this tool to your VPS.
3. Connect n8n to Hostinger
Connecting n8n to Hostinger via API involves setting up the token as the HTTP node’s authentication method. Here’s how to do it:
- Open and log in to your n8n instance.
- On the main page, click Create Workflow in the top right corner.
- Click the plus icon to bring up the node selector. From this menu, choose HTTP request.

- In the URL field, enter your API endpoint. For testing, use the following endpoint, with 123456 being your actual server ID:
https://developers.hostinger.com/api/vps/v1/virtual-machines/123456
- Open the Authentication menu, click Generic Credential Type.
- Select Bearer auth.
- Expand the Bearer Auth dropdown menu and click Create new credential.
- On the credential creation menu, enter your API token into the Bearer Token field and hit Save.
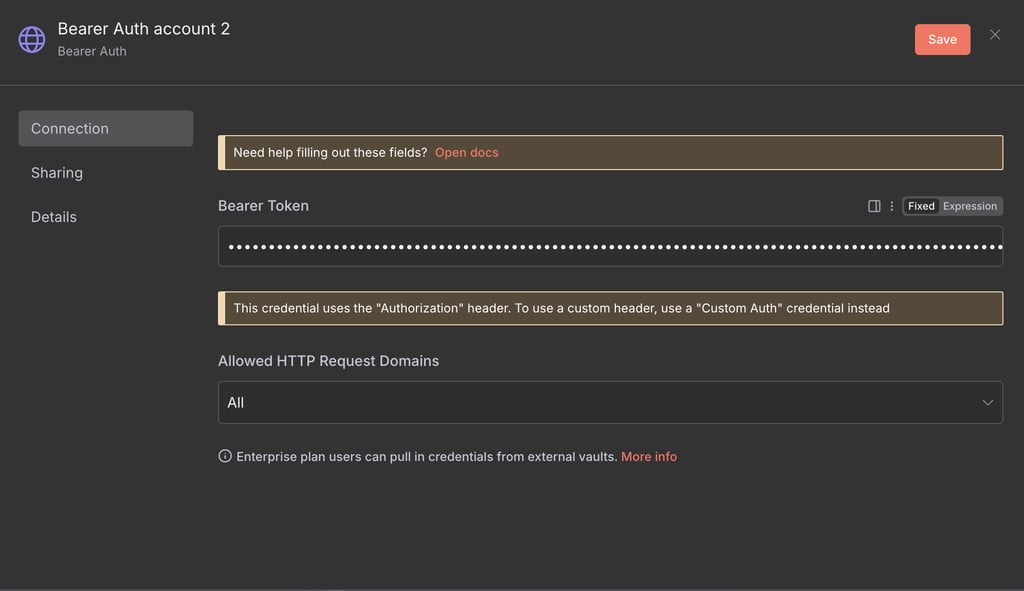
This HTTP node is now connected to your VPS via the Hostinger API. Check if the integration works properly by clicking the Execute step button.
If the node’s right pane shows details about your VPS, the integration is successful. Otherwise, there might be issues like:
- Incorrect VPS ID. Check your VPS ID against the data on hPanel. If it’s incorrect, the API can’t find the destination to send the HTTP request.
- Misconfigured credential. Make sure you enter the correct API key. Also, use Bearer Auth as the node’s authentication method.
- Expired API token. Use a fresh API token because the older one might already be expired and invalid. If you lost the previous key, simply regenerate a new one.
- Wrong or mistyped endpoint. Verify if you use the correct endpoint. A type can cause the endpoint to be invalid, while using a different endpoint can cause errors because it may require specific parameters.
Once you have a working integration, create an actual workflow by adding and connecting more nodes. There are various tasks you can automate with n8n and the Hostinger API, but we’ll explore the simplest ones in the following section.
Practical VPS automation examples
Here are several examples of simple VPS management tasks you can automate with n8n and the Hostinger API.
1. Monitoring server status
You can create a workflow that constantly monitors your server status and alerts you of potential downtime on a third-party app. This enables you to take the necessary actions immediately as soon as an issue arises.
To achieve this, you need to retrieve the server status using the API and set a rule that triggers alerts if the status indicates downtime. Here’s how to create it:
- Add the On schedule trigger to determine when the workflow will fetch the server status. In the configuration window, set the frequency according to your needs.
- Connect and configure an HTTP request node. Use the following endpoint, but remember to replace the server ID with the actual value:
https://developers.hostinger.com/api/vps/v1/virtual-machines/123456
- Set Bearer auth as the authentication method.
- Add the If node to filter the server status. Set a rule with this condition:
- {{ $json.state }} is not equal to running
- Connect the False condition to the Do nothing node to end the workflow.
- For the True condition, connect another If node and set the VPS status that will trigger the alert. You can set multiple rules with an OR condition, such as:
- {{ $json.state }} is equal to stopped
- {{ $json.state }} is equal to destroyed
- {{ $json.state }} is equal to suspended
- Connect the True condition with the platform where you want to receive the alert. For example, use the Slack: Send a message node.
- Integrate your Slack account and select the channel or user to whom you want to send the alert. To learn more about the steps, check out n8n’s official guide on configuring Slack credentials.
- Enter the notification message. For example, you can pass the current server status dynamically using the following:
⚠️**Critical!** Potential downtime detected. Server status: {{ $json.state }} 
Important! When choosing the condition for your If node, pay attention to the type of data you are working with, whether it is a string, array, object, or another type.
The completed workflow looks like this:

Note that this workflow will still alert you during planned downtime, like a scheduled maintenance or deliberate restart, because it shows the stopped status.
To get around this, connect the if and wait node to set a logic that alerts you if the downtime lasts longer than the typical maintenance duration. Alternatively, you can pause the workflow by comparing the execution time and your restart schedule listed on a platform like Jira.
2. Backup logging
Automating backup logging enables you to track the available restoration points of your server, ensuring data integrity. You can also set up an alert to notify you whenever the latest automatic backup is logged.
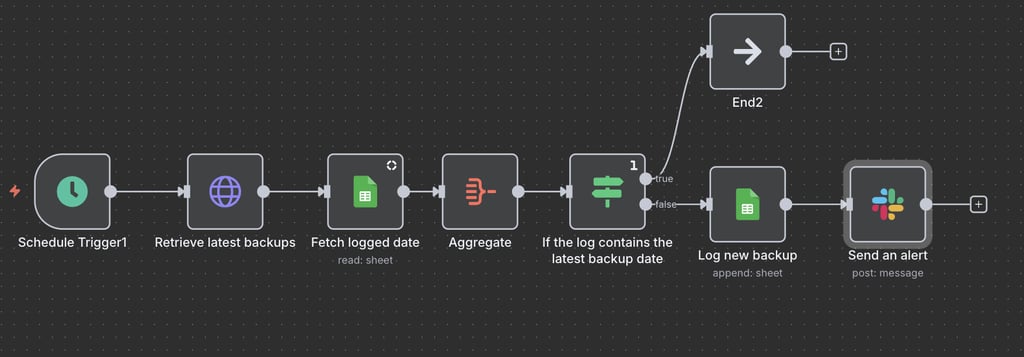
You can accomplish this by retrieving the latest backup date from the Hostinger system and comparing it to the dates in the logs in a Google sheet. Here’s how to do it:
- Add the On schedule trigger to set the time when your workflow will start.
- Connect and configure the HTTP request node with the following endpoint:
https://developers.hostinger.com/api/vps/v1/virtual-machines/123456/backups
- According to the endpoint specification, add a query parameter named page and set its value to 1.
- Add the Google Sheets get row node and connect n8n to your spreadsheet where you log the backup date.
- Click Add option and select Data Location on Sheet.
- Select Specify Range (A1 Notation) as the Range Definition.
- Enter the column where you log the backup date as the Range. For example, enter C:C if the dates are in the C column.
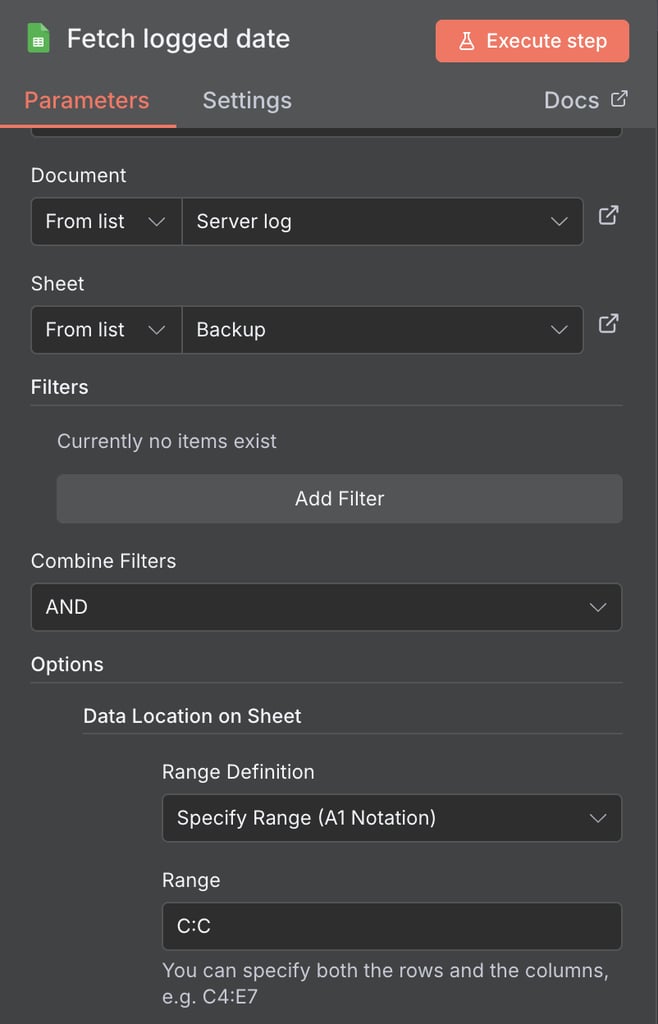
- Connect the Aggregate node to consolidate the logged dates into an array.
- Add an If node with the following configuration. This means the condition equals True if the sheet already has the latest backup date:
- {{ $json[‘Creation date’] }} contains {{ $(‘API GET’).item.json.data[1].created_at.toDateTime().format(‘yyyy-MM-dd HH mm ss’) }}
- Connect the True condition to the Do nothing node and False to a Google Sheets append row node.
- Open the Google Sheets append row node and connect it to the same spreadsheet.
- Under the Value to send section, specify the columns you want to populate with data from the API. For example, if you wish to log the backup ID, size, and date, the fields are:
- ID – {{ $(‘API GET’).item.json.data[1].id }}
- Size – {{ $(‘API GET’).item.json.data[1].size }}
- Date – {{ $(‘API GET’).item.json.data[1].created_at.toDateTime().format(‘yyyy-MM-dd HH mm ss’)}}
- Connect the Google Sheets append row node to the Slack send a message node to configure the alerting system. For example, use the following message:
✅**Backup logged!** Latest backup is added to the log.
Important! If you can’t see the columns in the Google Sheets node, make sure you selected the correct sheet and created the columns beforehand.
The completed workflow looks like this:
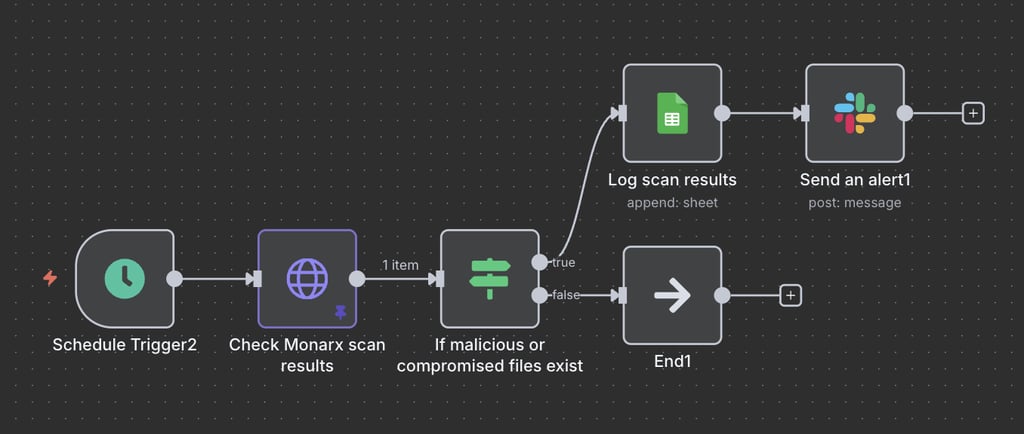
3. Reporting malware scan results
Hostinger VPS features built-in Monarx anti-malware, allowing for automatic scans. You can use the API to fetch scan results, create logs for security audits, and send notifications when malicious files are found.
Here’s how to create the workflow:
- Add the On schedule trigger.
- Connect and configure the HTTP request node. Use the following endpoints:
https://developers.hostinger.com/api/vps/v1/virtual-machines/123456/monarx
- Add the If node and set the filtering rules. For example, enter the following to set the condition as True if the scan result detects any malicious file:
- {{ $json.malicious }} is greater than 0
- If you want to get an alert about any compromised file, include this additional rule in the same node with OR condition:
- {{ $json.compromised }} is greater than 0
- Connect the False point to the Do nothing node.
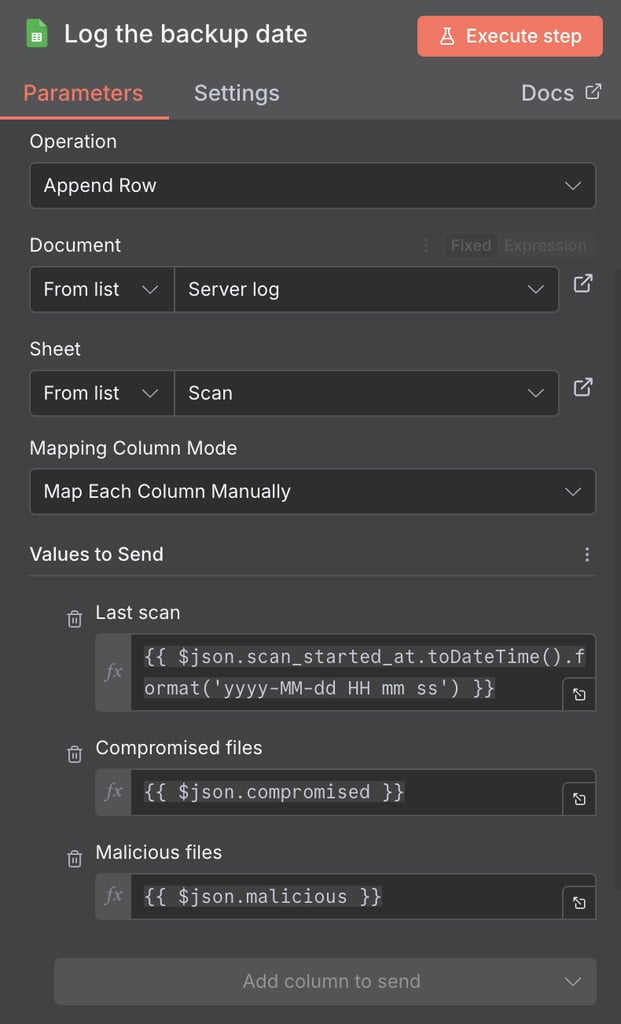
- Add the Google Sheets append row node to the True condition.
- Go to your Google Workspace and create a Google sheet with these three columns for your data:
- Last scan – the date of the latest scan.
- Compromised files – the number of detected compromised files.
- Malicious files – the number of scanned malicious files.
- Return to your n8n canvas. Then, connect your scan log spreadsheet and enter the data you want to write into each column. For example, we have three columns with these values:
- Last scan – {{ $json.scan_started_at.toDateTime().format(‘yyyy-MM-dd HH mm ss’) }}
- Compromised files – {{ $json.compromised }}
- Malicious files – {{ $json.malicious }}
- Add and configure the Slack send a message node to send the notification, such as:
⚠️**Critical!** Last Monarx scan detected {{ $json.malicious }} malicious files and {{ $json.compromised }} compromised files. Your finished workflow looks something like this:
4. Detecting usage spikes
Automating resource usage monitoring enables you to receive automated alerts if your server load exceeds specific thresholds and automatically creates issues on Jira for further investigation.
To achieve this, use the API to fetch usage data, set a rule to determine whether it exceeds the normal threshold, and notify you of overly high loads.
Note that this workflow is significantly more complex than the previous ones, as it involves modifying the JSON in transit and requires interaction with additional external systems. For example, our specific setup requires the OpenAI and Jira APIs, as well as permission to your Jira workspace.
We’ll use the OpenAI API to connect an LLM into our workflow to analyze the usage spike. Then, we use the Jira API to create an issue in our workspace using the AI analysis results.
Here’s how to create the workflow:
- Add the On schedule trigger node.
- Connect and set up the HTTP request node with the following endpoint:
https://developers.hostinger.com/api/vps/v1/virtual-machines/1268054/metrics
- Add two query parameters to choose the time range for getting the server resource usage. For example, use these to fetch the usage of the past 24 hours:
- date_from – {{ $now.minus(24 ‘hours’) }}
- date_to – {{ $now }}
- Connect the Edit field node to calculate the average resource usage. Add the following fields:
- cpu_usage.avg – {{ $json.cpu_usage.usage.values().average() }}
- ram_usage.avg – {{ $json.ram_usage.usage.values().average() }}
- out_traffic.avg – {{ $json.outgoing_traffic.usage.values().average() }}
- inc_traffic.avg – {{ $json.incoming_traffic.usage.values().average() }}
- Add the If node to determine whether the average resource usage exceeds a specific value. The rules look as follows, but you can change the threshold based on your needs:
- {{ $json.cpu_usage.avg }} is greater than 1
- {{ $json.ram_usage.avg }} is greater than 20000000
- {{ $json.out_traffic.avg() }} is greater than 5000
- {{ $json.inc_traffic.avg }} is greater than 5000
- Connect the False condition to the Do nothing node and True to the Google Sheets append row node.
- Go to your Google Workspace and create a Google sheet with five columns to log your server usage data:
- Date – the date the server usage data is fetched.
- CPU avg – the average CPU usage.
- RAM avg – the average RAM consumption.
- Out avg – the average number of outgoing traffic.
- Inc avg – the average number of incoming traffic.
- Configure the Google Sheets append rows node and connect the spreadsheet where you want to log the historical server usage. Set these values to send:
- Date – {{ $now.format(‘yyyy-MM-dd HH mm ss’) }}
- CPU avg – {{ $json.cpu_usage.avg }}
- RAM avg – {{ $json.ram_usage.avg }}
- Out avg – {{ $json.out_traffic.avg }}
- Inc avg – {{ $json.inc_traffic.avg }}
- Connect the OpenAI send a message node and connect your account by configuring the OpenAI credentials.
- Select your preferred AI model and add a prompt with User as the Role to classify the server resource usage. For example:
Analyze the following 24-hour resource usage metric of my VPS:

CPU average: {{ $json['CPU avg'] }}

RAM average: {{ $json['RAM avg'] }}

Outgoing traffic average: {{ $json['Out avg'] }}

Incoming traffic average: {{ $json['Inc avg'] }}

Classify whether the usage is mildly concerning, concerning, or critical
Based on your classification, identify potential causes and actionable steps for minimizing the usage.
- Add another prompt, but this time select System as the Role to set how you want the AI to respond. For instance:
Format your analysis as follows:

The usage is: high/medium/normal

I identify the problem lies in your (areas where the issue that causes the spike)

I suggest you do the following:

1. Solution 1

2. Solution 2
- Scroll down and enable Output Content as JSON and Simplify Output settings to process the AI output more easily later.
- Connect the Jira create an issue node and configure the Jira credentials to connect your workspace with n8n. This node will automatically create a Jira ticket for further resolution of this problem.
- Select the Project where you want to create the issue and set the Summary for the ticket. You can include the date when the issue is created, like so:
Resource spike at {{ $now.format('yyyy-MM-dd HH mm ss') }}- Click Add fields to include more information in your ticket. For example, add Description to put details about the AI analysis to your Jira issue:
VPS resource usage exceeded the threshold.

Severity: {{ $json.message.content["The usage is"] }}

Potential causes: {{ $json.message.content["I identify the problem lies in your"] }}

Suggested solutions: {{ $json.message.content["I suggest you to do the following"] }}
- Set up the Slack send a message node to configure where and how you want to receive the alert. Then add the notification message, like:
⚠️**Critical!** VPS resource usage exceeded threshold. Automatically created Jira issue on: {{ $json.self }} A finished workflow looks like this:
Important! Since AI is unpredictable, sometimes each output is formatted differently. If this happens, your JSON might not pass the data correctly because the placeholder, such as The usage is in {{ $json.message.content[“The usage is”] }}, changes.
In the workflow, we already minimized this issue by providing the output format that the AI will follow as a System prompt. However, it’s crucial to test the workflow thoroughly to ensure the output remains consistent.
How to scale your n8n VPS automation
The Hostinger API offers additional endpoints that enable you to scale your n8n workflow to automate a broader range of tasks beyond simple status monitoring. You can check the complete list of endpoints in the API documentation page, among them:
- Snapshot. Lets you create, get, and delete a snapshot of your VPS. This enables you to create a workflow that automatically creates a restoration point of your server before a scheduled major system maintenance.
- Firewall. Enables you to manage various aspects of your VPS firewall and its rules. For example, you can create a workflow that temporarily disables stale or unused rules to reduce performance overhead during traffic spikes.
- Docker. Allows you to interact with our built-in Docker Manager tool to manage your containerized services. Using this endpoint, you can automatically stop a container during a scheduled update or security audit.
- Actions. Retrieves detailed information about actions in your VPS. This is helpful for creating a workflow that automatically alerts you about suspicious activity.
n8n also provides various other nodes that enable you to process data more flexibly and integrate different applications into your workflow.
For example, you can add the PagerDuty node to set up a more robust disaster and incident management process. You can also connect multiple workflows for different tasks together to create a unified, scalable automation system.
Combining various n8n nodes and Hostinger API endpoints enables you to create a customized automation system tailored to your specific needs, which brings numerous benefits.
n8n-Hostinger integration limitation
While combining n8n and the Hostinger API provides powerful automation capabilities, it’s essential to understand that this system has inherent limitations.
For one, tasks you can automate are limited to what the Hostinger API endpoints offer. While we continuously add more functionality to the API, some critical tasks must be done directly on the system for security reasons.
This limitation also means that you cannot create a fully self-healing automation workflow that takes corrective actions independently upon encountering errors. Even if the API allows it, developing a self-healing automation can be tricky because it may perform actions that can break the system, like shutting down a critical service to free up resources during a traffic spike, if not tested carefully.
While Hostinger API is currently not suitable for complex self-healing automation, it offers endpoints for basic management tasks like restoring a backup, changing a nameserver, or uploading SSH keys.
Best practices for automating VPS management
Following best practices when using n8n and the Hostinger API to automate VPS management is crucial to maintaining optimal security and workflow functionality.
Here are several best practices when using n8n to automate tasks:
- Secure your workflow. Safeguard all credentials, such as API tokens and application passwords, to prevent unauthorized parties from accessing them. While n8n masks all sensitive information and restricts access to the credential owners by default, make sure to use an encrypted platform like NordPass if you store them locally.
- Follow VPS security practices. In addition to your workflow, your n8n hosting environment must remain secure. A compromised server can expose your automation platform to security risks and interruptions.
- Use n8n queue mode. If you have a complex automation system involving multiple workflows, consider using the n8n queue mode. It distributes processes to multiple workers for more efficient execution, especially useful for less powerful VPSes.
- Handle errors properly. Create an automated notification to catch errors in your VPS monitoring workflow. To do this, use n8n’s built-in Stop and Error node and the Error Trigger.
- Update n8n regularly. Install the newest version of n8n as soon as it is released to maintain optimal security and functionality. Refer to our tutorial on installing n8n for more information on the steps.
- Test and document your workflow. Thoroughly test your workflow, ideally in a dedicated staging environment, to ensure it works properly before the deployment. Also, document all aspects of your workflow so you can identify errors and add more functionality more easily.
- Consider the API rate limit. APIs commonly limit how frequently you can use them to prevent misuse and exploitation. Avoid running your workflow too often, such as every hour, as it may cause issues.
What’s next after automating your VPS management?
Combining n8n and the Hostinger API enables you to streamline repetitive tasks and minimize human error, resulting in more efficient VPS management.
After understanding what n8n and the Hostinger API can achieve, it’s time to explore various endpoints and nodes to determine the most effective way to automate your VPS management.
In addition to an API, Hostinger provides an MCP-powered Kodee AI assistant to simplify VPS management further. Since it offers more extensive capabilities than the API, it makes an excellent complement to your automation system.
For example, you can restart services by simply chatting with the AI assistant. Like our API, you can use Kodee for free, which is also pre-configured on your VPS.

Aris is a Content Writer specializing in Linux and WordPress development. He has a passion for networking, front-end web development, and server administration. By combining his IT and writing experience, Aris creates content that helps people easily understand complex technical topics to start their online journey. Follow him on LinkedIn.
Comments
0 responses