How to migrate a WordPress site
Oct 06, 2026
/
By Bruno S. & Marco C.
/
14 min Read
To migrate a WordPress site, follow one of three main options: use a hosting provider’s migration service, a migration plugin, or the manual method, which involves transferring your files and database directly.
A hosting migration service is the easiest path. The provider’s team handles the transfer while your original site stays live, and most moves are completed within 48 hours.
A migration plugin handles the file and database transfer through a step-by-step wizard. The free plugin versions work for most standard sites, with the import size limited by your hosting plan’s file upload settings.
The manual method has the most steps but gives you full control over every part of the transfer.
Regardless of method, every WordPress migration follows the same six steps:
- Choose a migration method based on site size, technical comfort, and whether the domain changes.
- Back up your site and check the new host’s storage and software requirements.
- Transfer the files and database using your chosen method.
- Test the site on its temporary address and refresh permalink settings.
- Point the domain to the new host.
- Check for security certificate issues, broken redirects, and missing pages.
Which WordPress migration method should you use?
The right migration method depends on your site size, technical experience, and whether your domain name changes in the process.
| Hosting migration service | Migration plugin | Manual migration | |
| Best for | Anyone switching to a host that offers free migrations | Sites under the host’s upload limit | Large sites, domain changes, or full control |
| Difficulty | Easiest; no technical work needed | Moderate; guided by plugin wizard | Complex; requires database and file access |
| Site size | Any | Up to the hosting plan’s file upload limit | Any |
| Cost | Free when offered by the host | Free for most sites | Free |
| Main limitation | Not all hosts offer it; doesn’t cover WordPress Multisite | Import size capped by the hosting plan’s file upload limit | Requires basic database and file management skills |
A hosting migration service is the fastest option when your new provider offers one. Use a plugin for a self-service move on a standard-sized site; use the manual method when the site exceeds the plugin’s free import limit, or when you’re also changing domains.
How to prepare for a WordPress migration
Before migrating, create a full website backup that includes both files and the database, and store it outside your hosting account. Your computer or cloud storage service both work.
The backup is your restore point if anything goes wrong during the transfer. Then confirm the new host can take your site:
- Disk space. The destination host needs enough free storage for the full site. Check the current usage in both your source and destination dashboards.
- Software compatibility. Confirm the new host supports the same PHP version your site runs on. PHP is the software layer that powers WordPress, and some plugins require a specific minimum version to work. Your current PHP version is usually listed in your hosting dashboard under a site health or server information section.
Once the migration starts, avoid publishing content or changing settings on the original site. Anything added after the backup won’t appear on the migrated copy.
How to migrate a WordPress site using a hosting migration service
To migrate with a hosting migration service, submit a migration request in your new host’s dashboard and give the provider access to your current site. Their team moves the files and database for you, and your original site stays live until the transfer finishes. It’s the easiest method when your new host offers one.
To submit a migration request, you typically need one of the following:
- WordPress admin credentials. The login URL, admin username, and password for your current site’s admin panel.
- A backup archive and database export. A compressed file of your site’s root directory (.zip, .tar.gz, or similar) plus a database export in SQL format, the standard file type for transferring databases between hosts.
Disable two-factor authentication and any anti-bot verification (such as a CAPTCHA on the login page) on your WordPress admin panel before submitting, where possible. Use the backup upload route if automated access is still blocked.
The service moves only files and databases. Email accounts, FTP accounts (for file access), SSH keys (for command-line server access), cron jobs (automated, scheduled tasks), and custom Domain Name System (DNS) records must be recreated separately on the new host.
WordPress Multisite networks are not supported by most hosting migration services, including Hostinger’s, and require a manual migration instead.
Point the domain to the new server only after the migration is complete. Until then, visitors still reach your original site, which stays live throughout the transfer. Switching too early sends them to a copy that isn’t finished yet.
How to migrate a WordPress site with a plugin
To migrate a WordPress site with a plugin, install the plugin on both your current site and the new one, export a backup file from the old site, then upload and restore it on the new site. The plugin handles the files and the database together, so you don’t need to touch either one directly.
The three most widely used free options are:
- All-in-One WP Migration and Backup. Exports the site as a single .wpress file. The free version imports up to your hosting plan’s file upload limit.
- Migrate Guru. Runs the migration on external servers rather than your own, removing upload size limits and keeping load off the source site. Handles sites up to 200 GB at no cost.
- Duplicator. Packages files and database into two files: an archive and an installer script. The free version has no plugin-imposed size limit, though tight storage or short server processing time limits on shared hosting can stall the process.
In the steps below, we used All-in-One WP Migration and Backup, the most widely installed free option.
- Install and activate All-in-One WP Migration and Backup on the source WordPress site – the site you’re moving from.
- In the WordPress sidebar, go to All-in-One WP Migration → Export.
- Click Export Site To and select File from the dropdown.
- Wait for the plugin to build the .wpress archive, then click the download button. The file name includes the domain name and a timestamp.
Pro tip
For sites where the domain is changing, use the Search for field at the top of the Export page to find and replace the old URL with the new one before exporting. The plugin automatically updates all stored URL references in the database, saving a separate search-and-replace step later.
- Install WordPress on the destination domain at your new host, then install and activate All-in-One WP Migration and Backup there.
- Go to All-in-One WP Migration → Import.
- Drag the .wpress file onto the Import page, or click Import From → File to browse for it.
Pro tip
Check the maximum file size shown on the Import page before uploading, since it varies by hosting plan. If your file exceeds the limit, upload the .wpress directly to wp-content/ai1wm-backups/ in File Manager, then restore it from All-in-One WP Migration → Backups instead. Adjusting the PHP upload limit to a higher value is another option for hosts with a lower ceiling.
- Confirm the restore when prompted. The import overwrites the destination site’s database and files.
- Open the destination site in a browser. Check that everything loads correctly, then log in to WordPress admin to confirm user accounts and settings carried over.
A successful import means all posts, pages, images, plugins, and user accounts are present and working on the destination site.
The plugin saves a copy of the .wpress backup under All-in-One WP Migration → Backups. You can restore from there without re-uploading the file if the site has issues after the import.
How to migrate a WordPress site manually
To migrate WordPress manually, export the database, download the site files, create a new database on the destination host, upload the files, import the database, and update the configuration file with the new database details.
This method works for any site, including those that exceed a plugin’s free import limit, and gives full control over each step.
1. Export the WordPress database
Export the database from your current host using phpMyAdmin before moving any files. The database holds everything your site displays: posts, pages, settings, comments, and user accounts.
In your hosting provider’s management panel, open phpMyAdmin and select your WordPress database in the left column, then click the Export tab.
Leave the method set to Quick and the format set to SQL (the standard database file format), then click Export to download your database through phpMyAdmin. The .sql file downloads automatically.
Pro tip
For large databases, switch to Custom and enable Compression under Output. The resulting compressed file is significantly smaller and uploads faster. phpMyAdmin on the destination host accepts compressed database files directly.
2. Download the WordPress files
Download all files from public_html on your current host. That folder contains the WordPress core software, themes, plugins, uploaded media, and the .htaccess file (a hidden configuration file WordPress uses to control how URLs and page requests are handled).
To do that, go to your hosting provider’s file manager and navigate to public_html. Select all files with Cmd+A (Mac) or Ctrl+A (Windows), then click the download icon in the toolbar. Select zip when the format prompt appears. Keep the .zip archive until you’ve confirmed the migration succeeded.
Pro tip
For large sites, transferring files over FTP (File Transfer Protocol) is a more reliable alternative. An FTP client can resume a broken transfer, which matters on slower connections.
3. Create a database on the new host
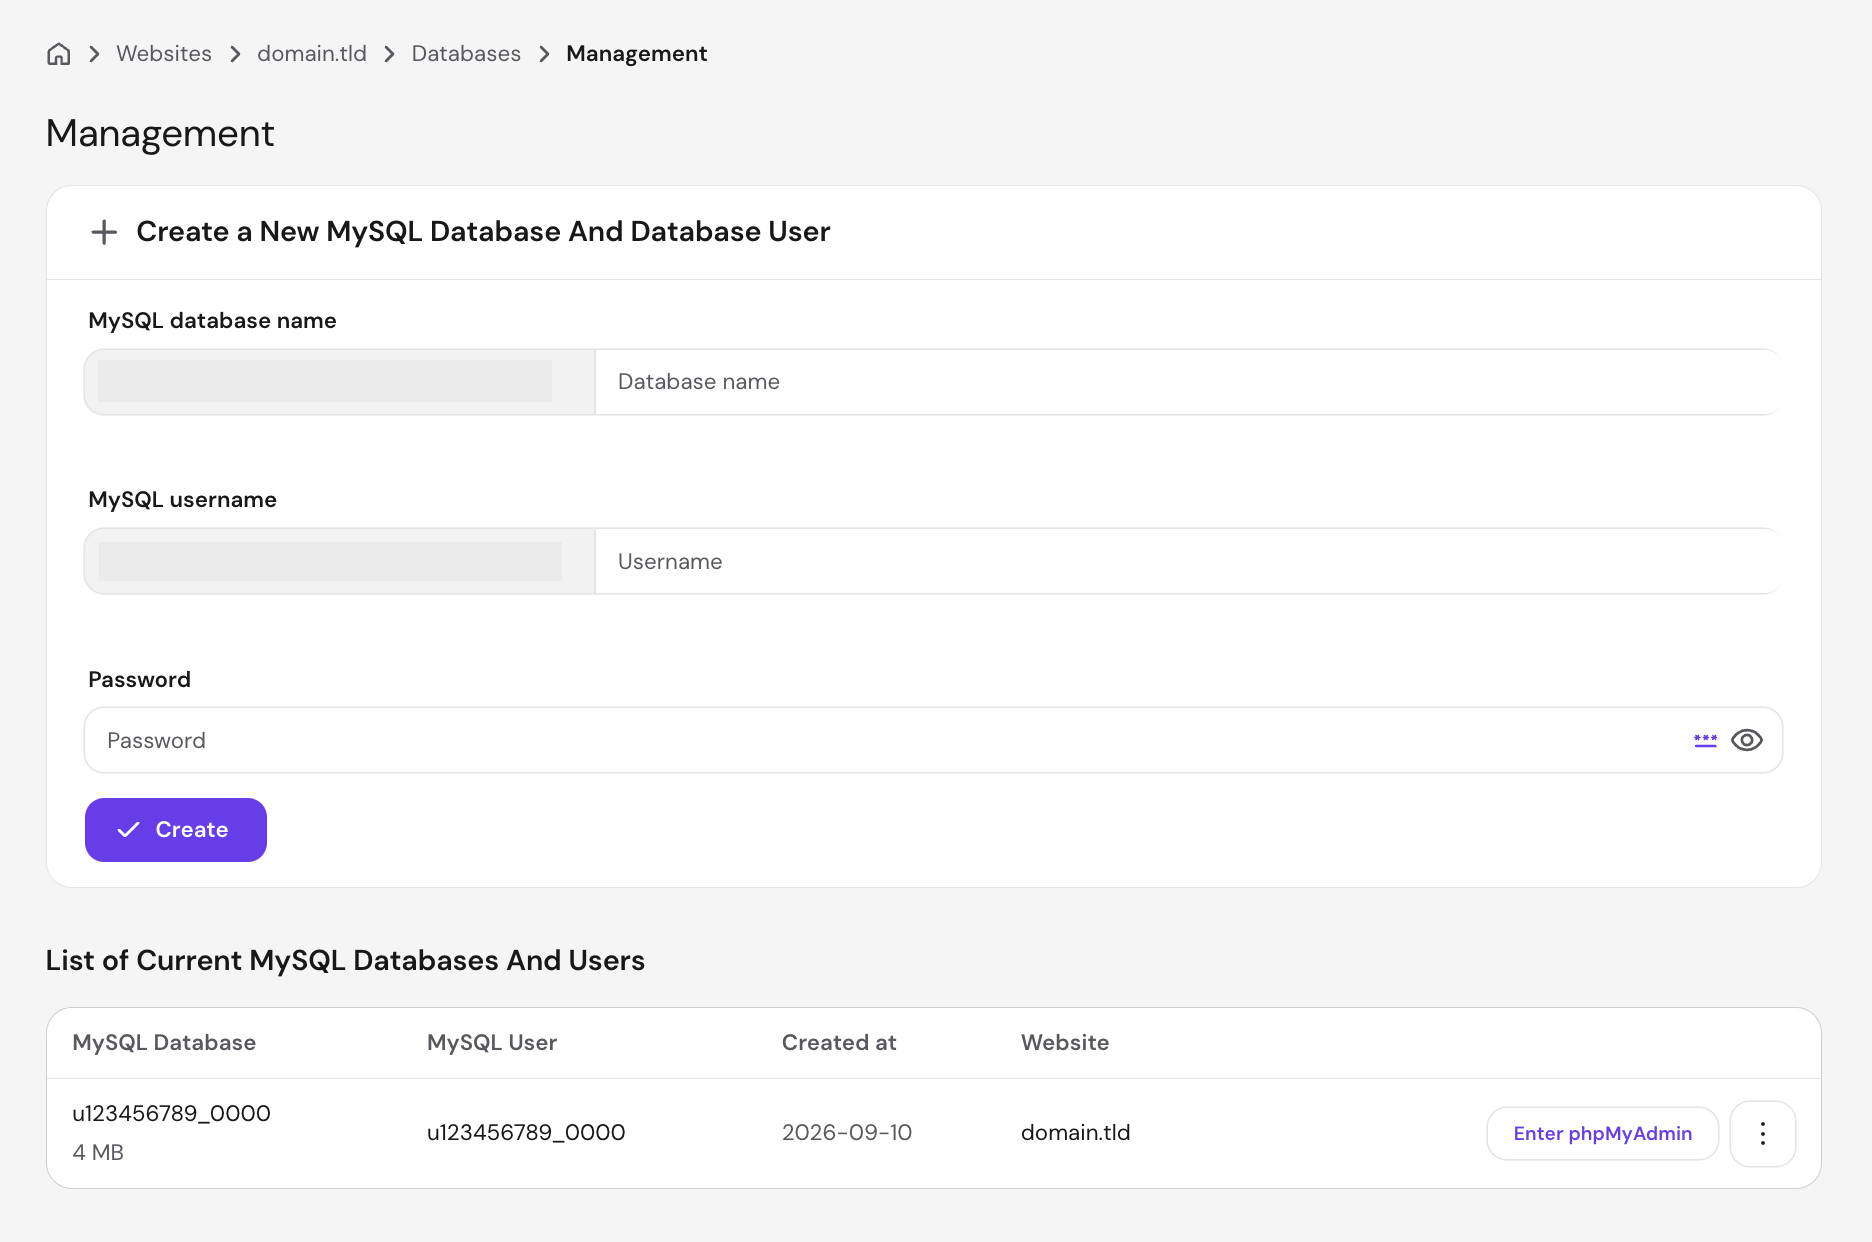
Create a new database and database user in your new host’s control panel, in the Databases or MySQL Databases section. Do this before you upload or import anything.
Grant the user all privileges when the panel asks you to link it to the database. WordPress needs full read and write access to work. Some panels, including the Hostinger dashboard, link the user and grant privileges automatically when you create them together.
Save the database name, username, and password immediately. You’ll need all three, plus the database host address, when you update wp-config.php later.
4. Upload the WordPress files to the new server
Upload the WordPress files into the root directory of the new domain (public_html on most hosts, including Hostinger).
To do that, go to the new domain’s file manager, navigate to public_html, click the upload icon, and select File. Upload the zip archive you downloaded, then right-click it and select Extract.
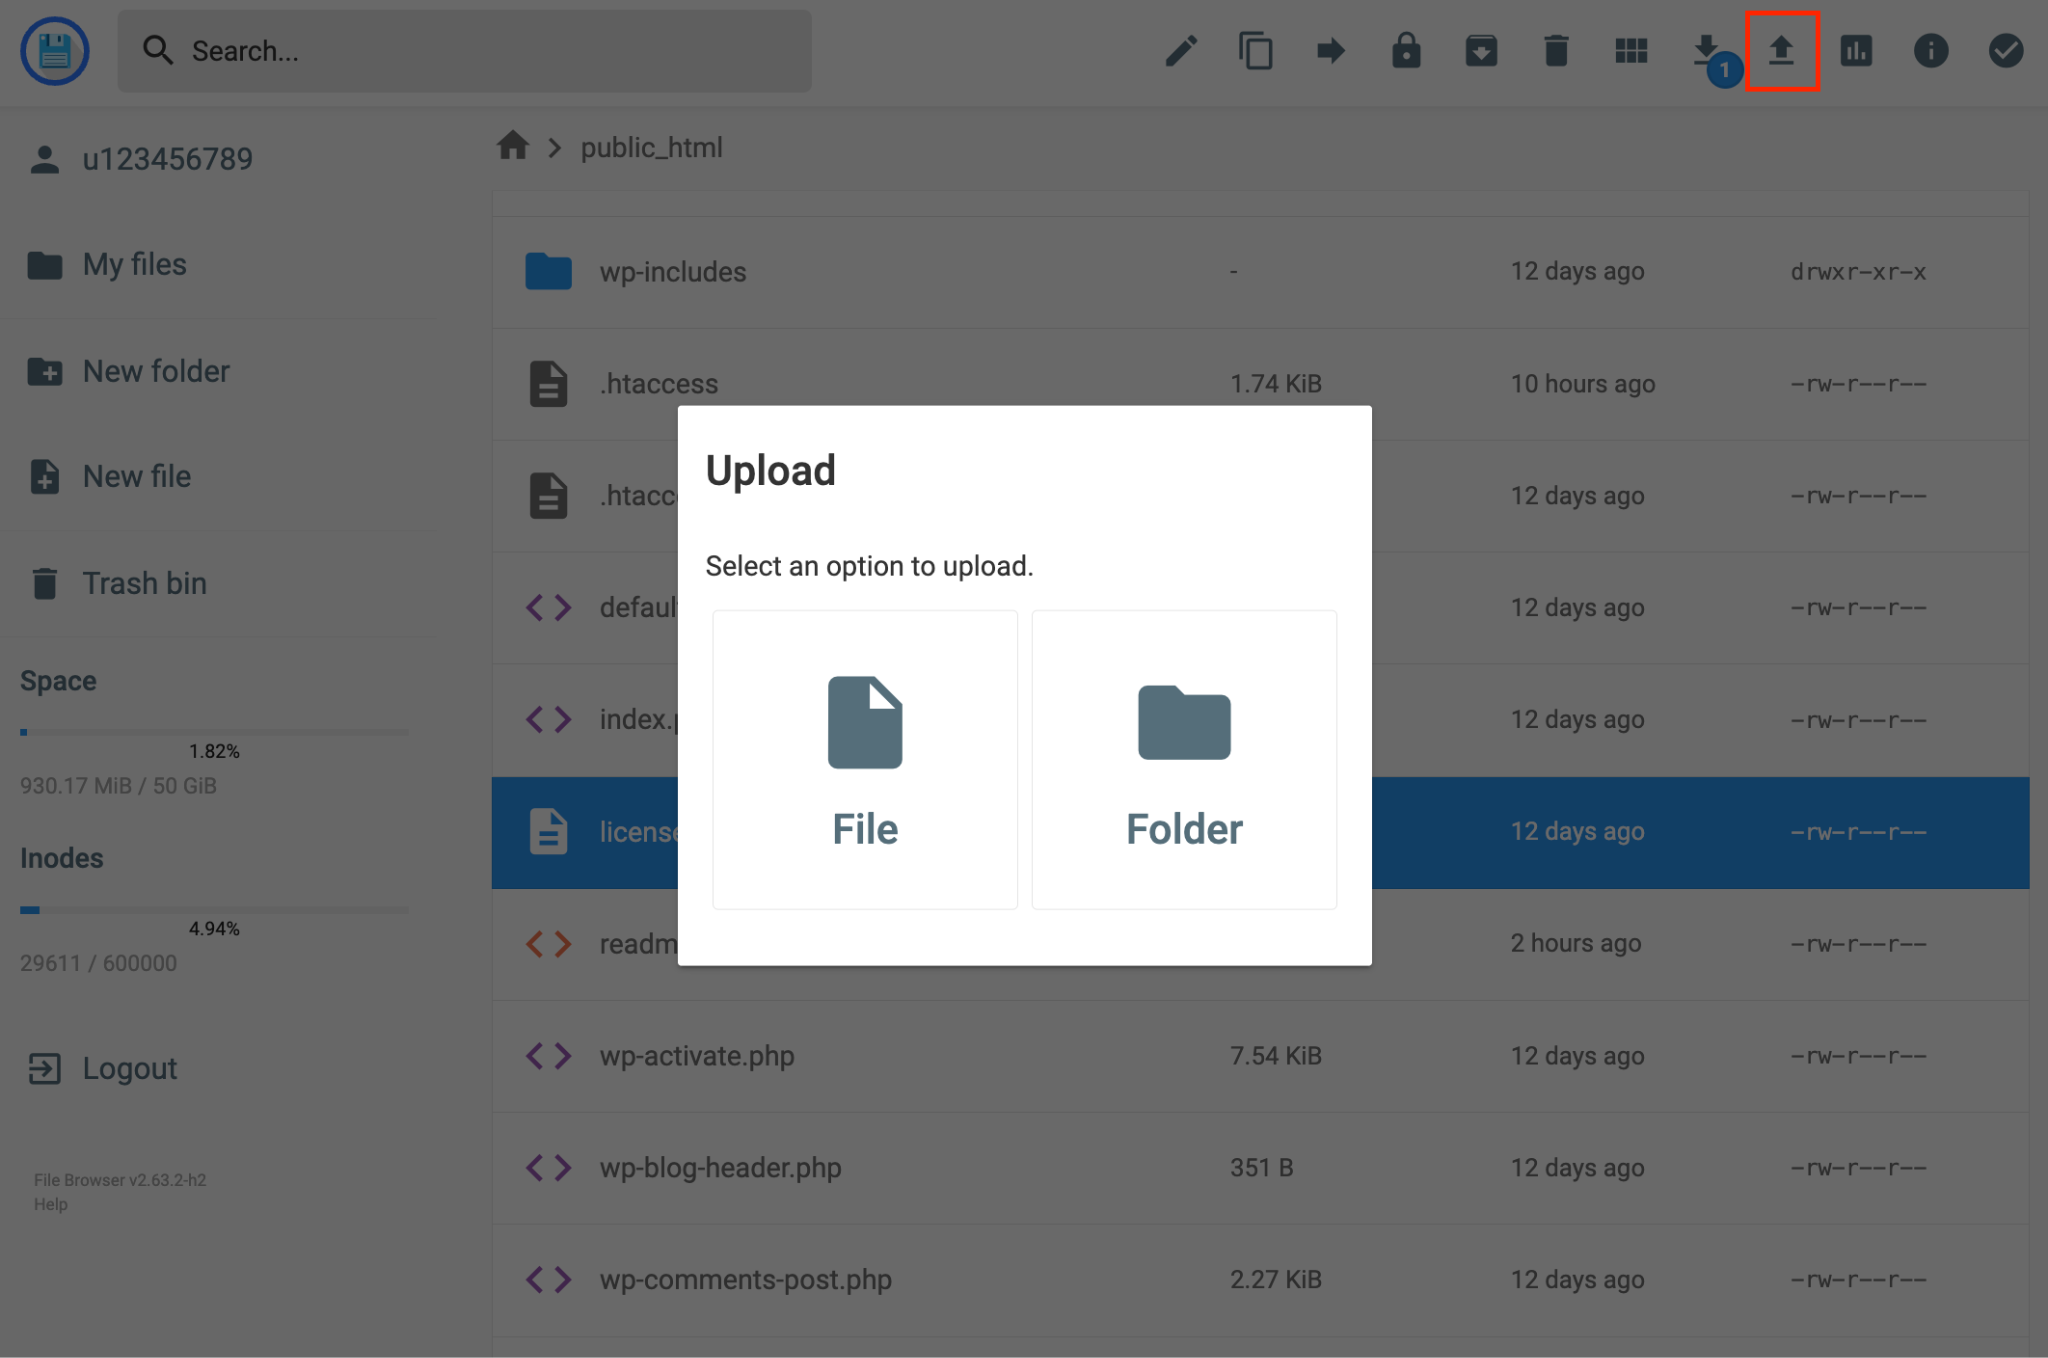
For large archives, setting up a FileZilla connection is a reliable alternative. You’ll need the FTP host, port, username, and password from the new host’s dashboard; both methods – file manager and FTP – place files in the same location on the server.
5. Import the WordPress database
Import the database export file into the new database using phpMyAdmin on the destination host: open phpMyAdmin, select the database you created, then click the Import tab. Click Choose File, select the .sql (or compressed .sql.gz) file, and click Import.
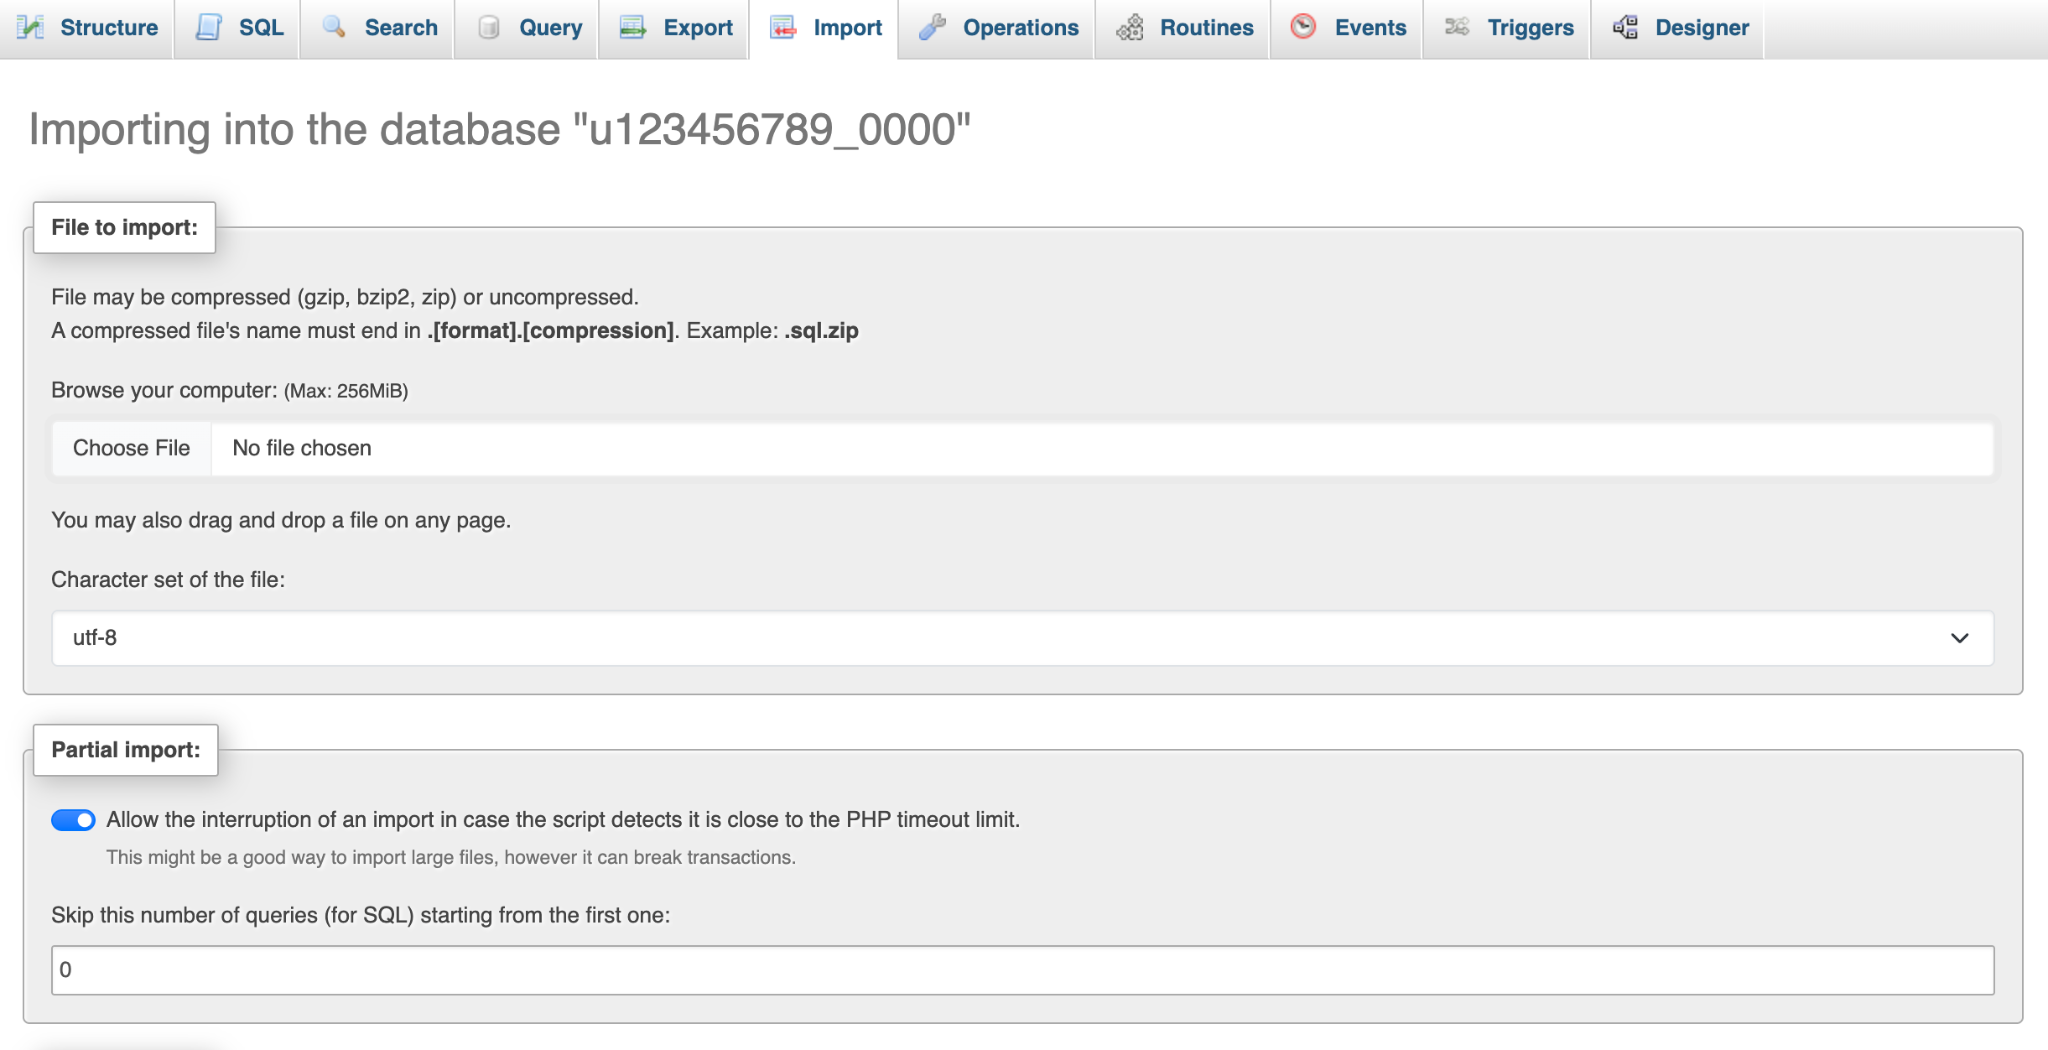
The Import tab shows the maximum file size the host accepts. For larger exports, compress the file before importing – phpMyAdmin accepts compressed database files (.sql.gz, .zip) directly.
6. Update the wp-config.php file
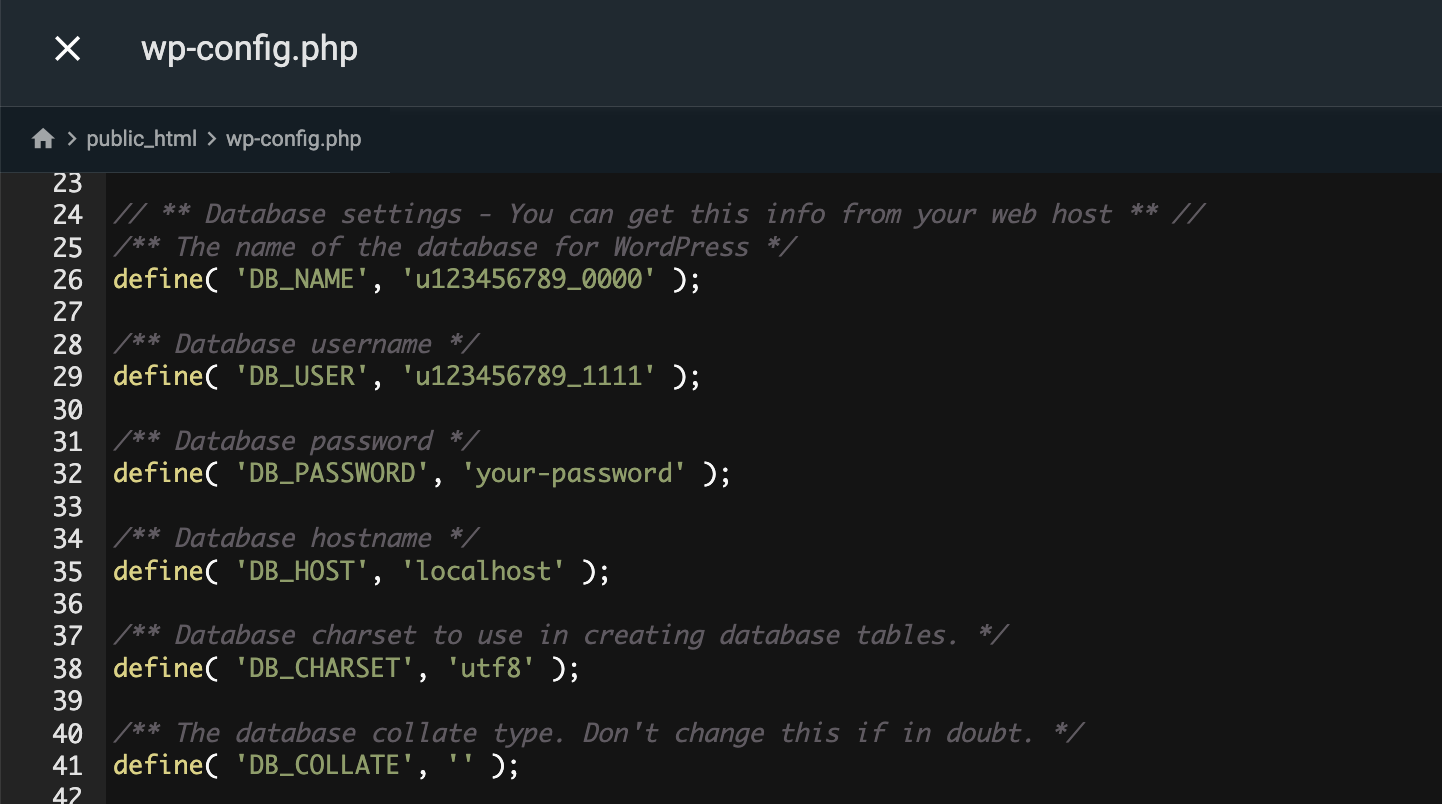
Open wp-config.php in file manager and update the four database credentials so WordPress connects to the new database. This file links WordPress to its database; without the correct credentials, the site won’t load.
To do that, open the file manager on the new host, navigate to public_html, right-click wp-config.php, and select Edit. Update these four lines to match the database you just created:
- DB_NAME. The database name.
- DB_USER. The database username.
- DB_PASSWORD. The database password.
- DB_HOST. The database server address.
Save the file once all four values match your new database.
7. Update WordPress URLs if the domain changes
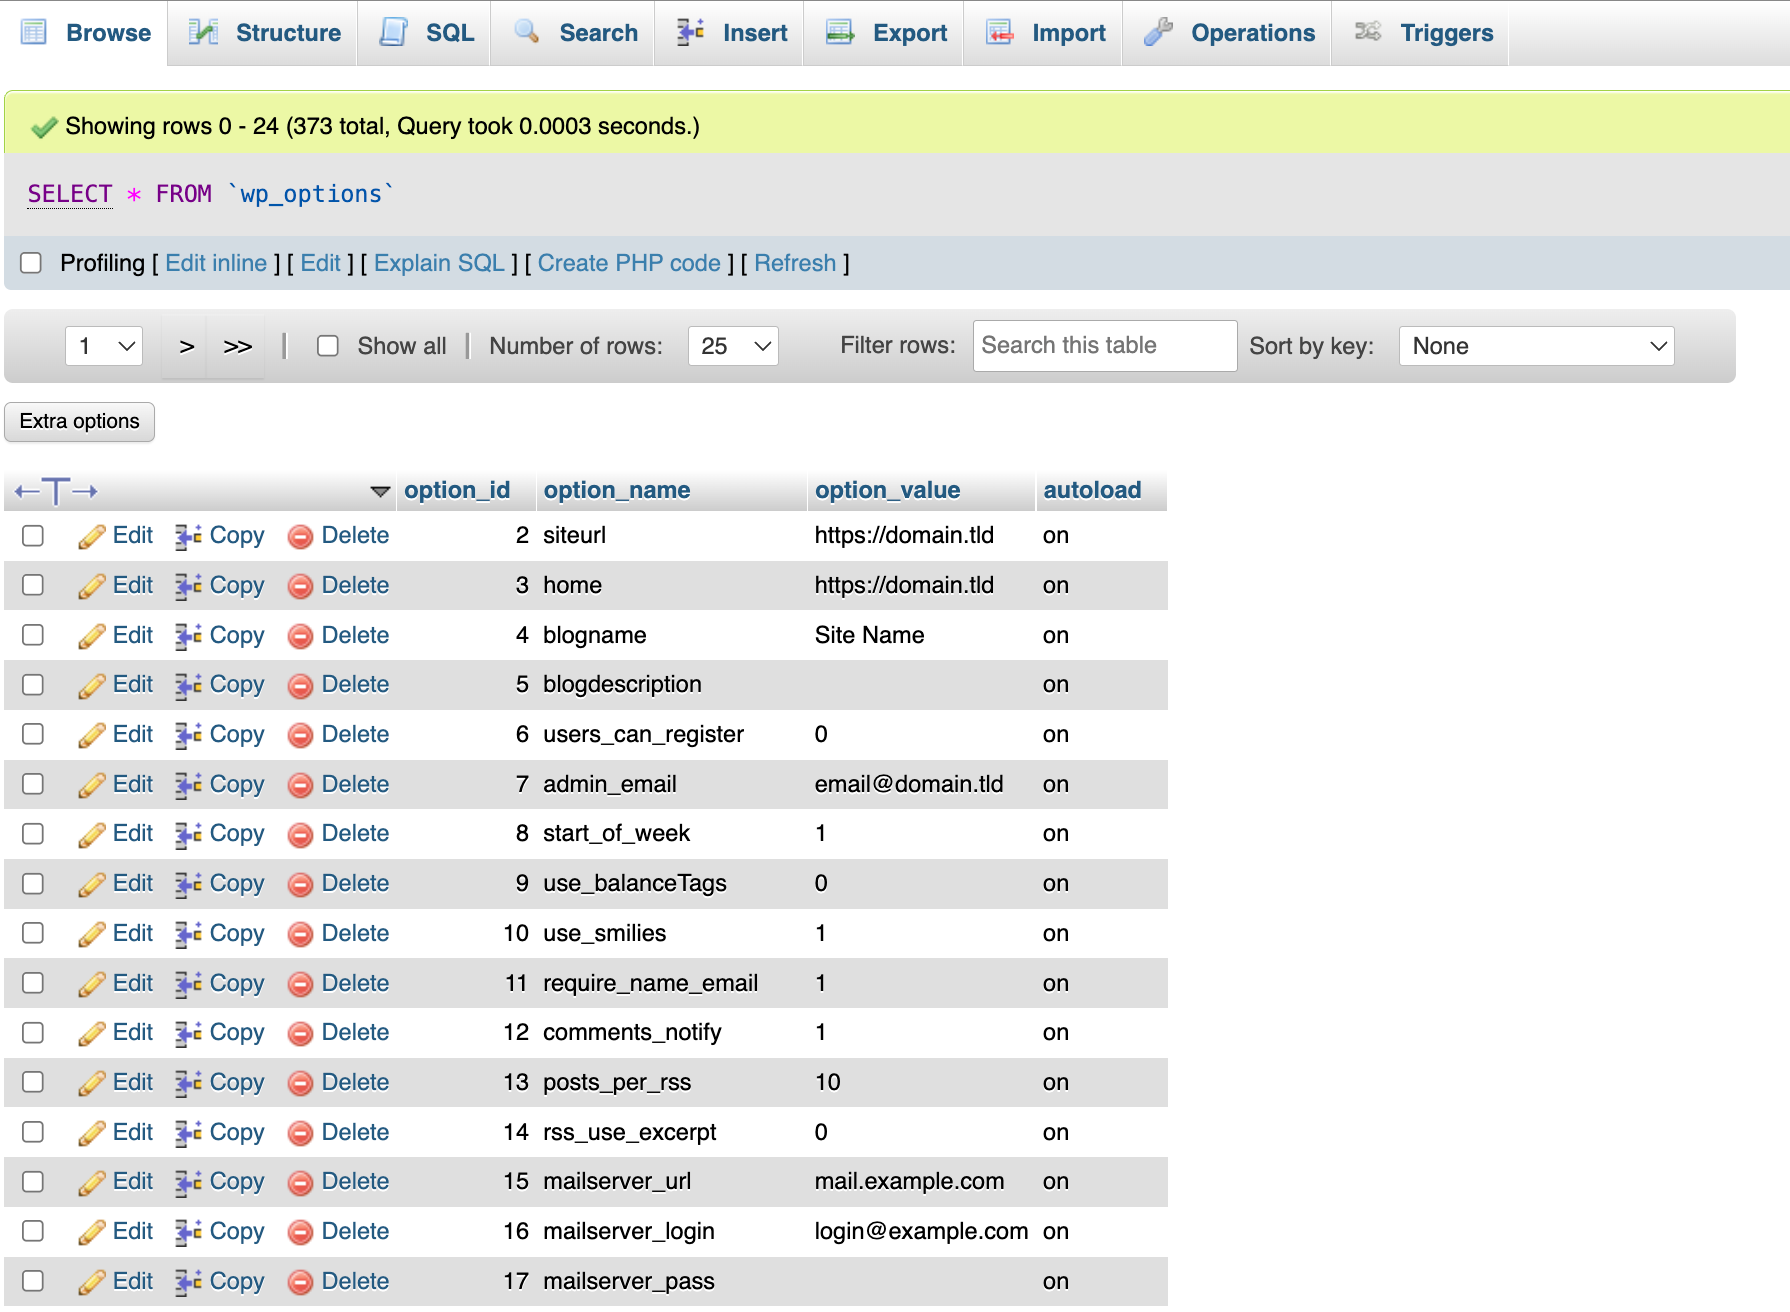
Update the two address values stored in the database (siteurl and home), so WordPress loads content from the new domain. After a domain change, these still point to the old address until you change them.
Skip this step if the domain is staying the same.
For a new domain, open phpMyAdmin on the new host, select the database, and click wp_options in the left column. Find the rows where option_name is siteurl and home, usually near the top of the table, and edit both values to the new domain. Use the Filter rows search box above the table if they aren’t immediately visible.
For sites where the old URL is stored in multiple places, editing wp_options only updates the two main address fields. Old URLs embedded in post content, widgets, and plugin settings will still point to the old domain.
WP-CLI (WordPress Command Line Interface) is a tool that lets you run WordPress commands from a terminal instead of the dashboard. Its search-replace command goes deeper and replaces every occurrence throughout the database.
WP-CLI is available on most managed WordPress and higher-tier shared hosting plans. To use it, enable Secure Shell (SSH) in the site dashboard, then run a test command to preview what will be changed before applying it:
wp search-replace ‘https://old-domain.tld’ ‘https://new-domain.tld’ –dry-run
Remove –dry-run and run again once you’ve confirmed the replacement count looks right.
Moving the site to a different domain also involves setting up permanent redirects and notifying Google Search Console. Both steps preserve the search rankings built on the old address, so handle them before announcing the new URL publicly.
How to migrate a WordPress site to Hostinger
To migrate a WordPress site to Hostinger, use the free managed migration service, move the files and database manually through Hostinger dashboard, or use Copy Website to duplicate a site within the same plan.
The migration service is the simplest option when your site is hosted elsewhere; Copy Website only applies to sites already on your Hostinger plan.
Migrate WordPress using Hostinger’s migration service
To migrate WordPress using Hostinger’s migration service, submit a request from the dashboard with your site’s URL and admin login details. Hostinger transfers the site at no additional cost, and your original site stays live throughout the process.
To use the migration service, you’ll need:
- An active Web, Cloud, or Agency hosting plan (VPS plans are not eligible).
- A self-hosted, single-site WordPress installation at your current provider.
- Your WordPress admin credentials, or a full site backup archive plus SQL database export.
Disable two-factor authentication and any anti-bot verification on your WordPress admin panel before submitting. If automated login is still blocked, use the backup upload route instead.
To submit a request:
- In the Hostinger dashboard, go to Websites and click Import website next to the plan you want to use.
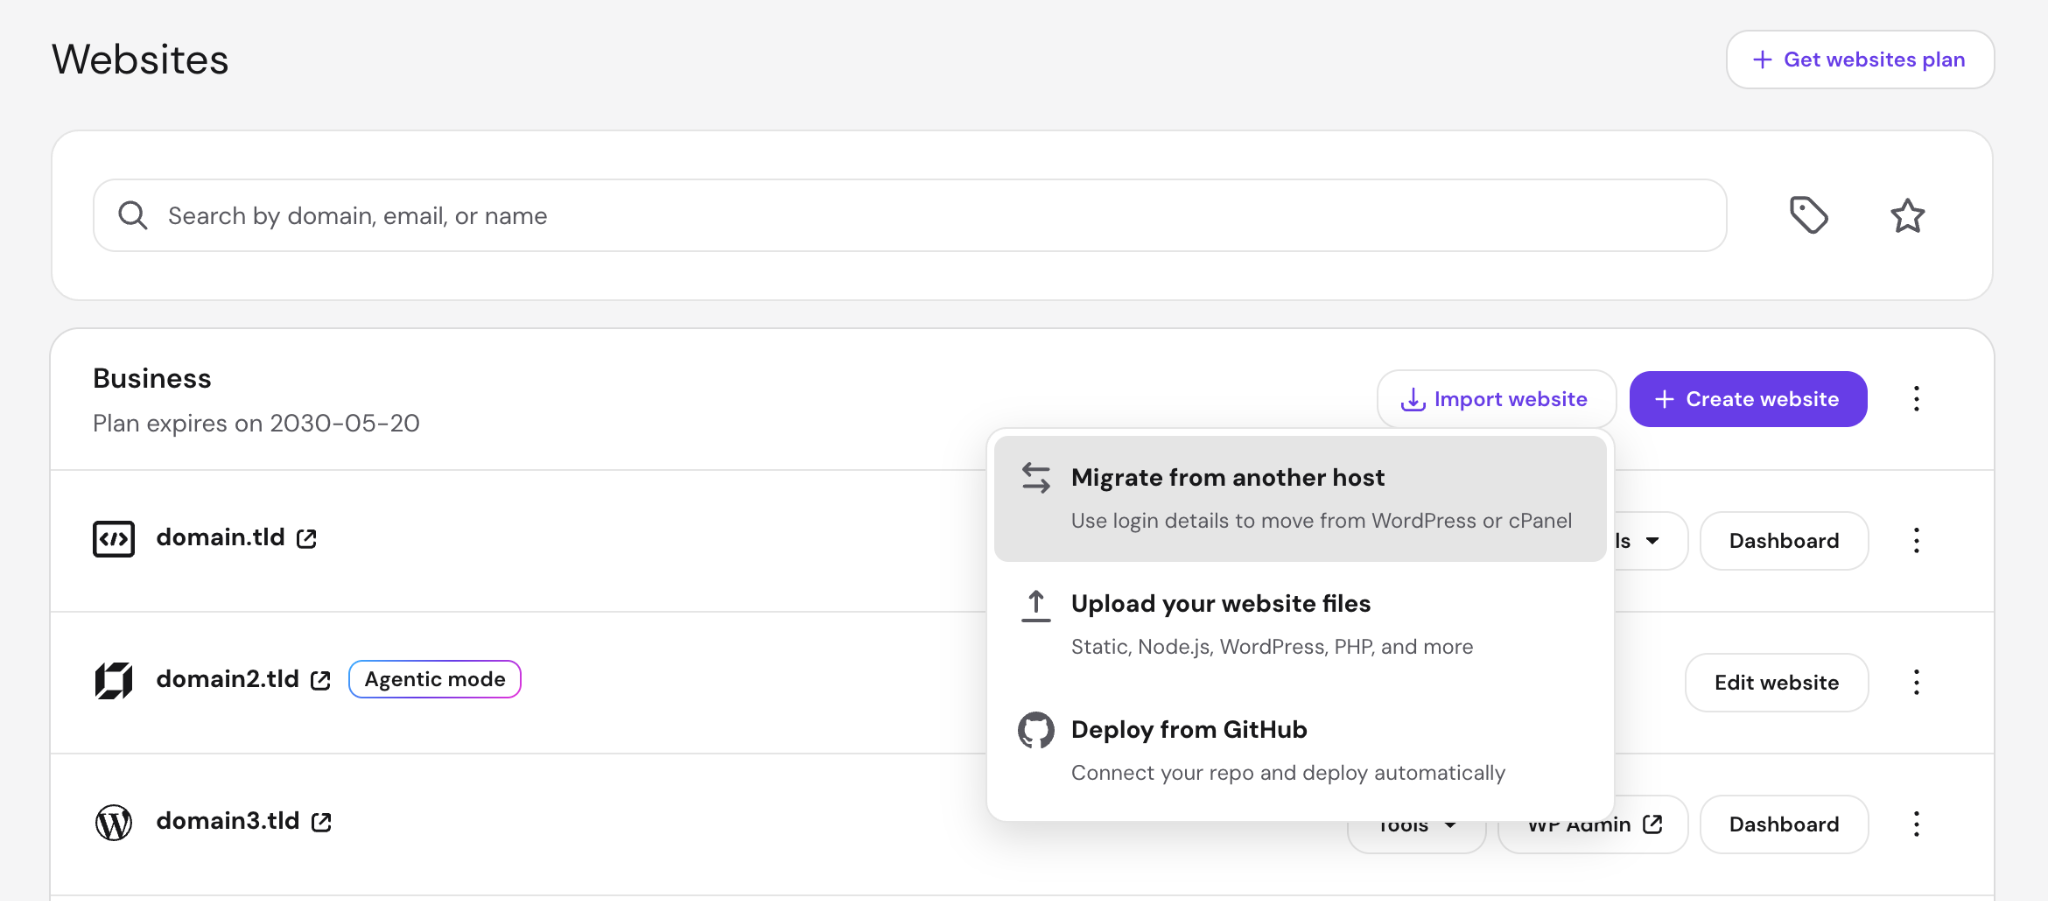
- Select Migrate from another host.
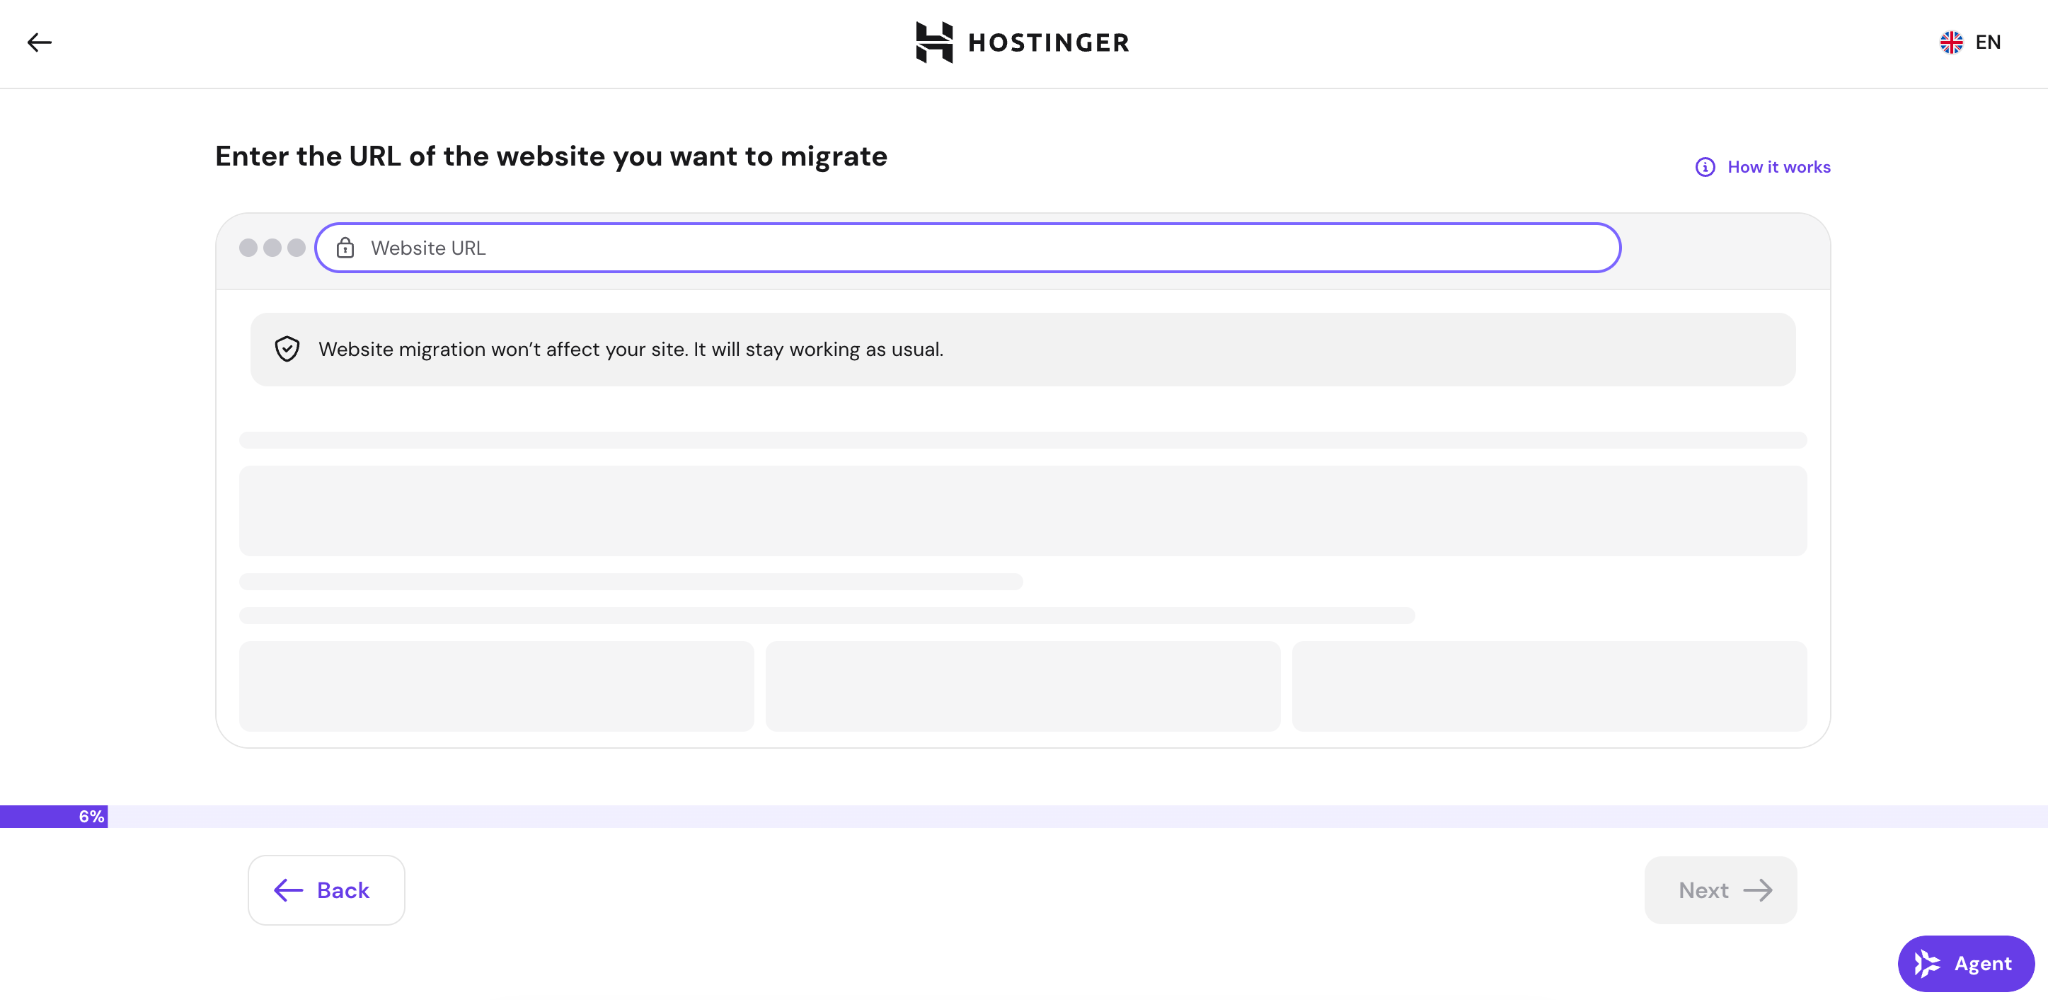
- Enter the URL of the website you want to migrate and click Next.
- Fill in your WordPress admin username or email address and password. The login path defaults to /wp-admin; update it in the address bar above the form if your login page is at a custom URL.
- Review the migration summary and click Submit request.
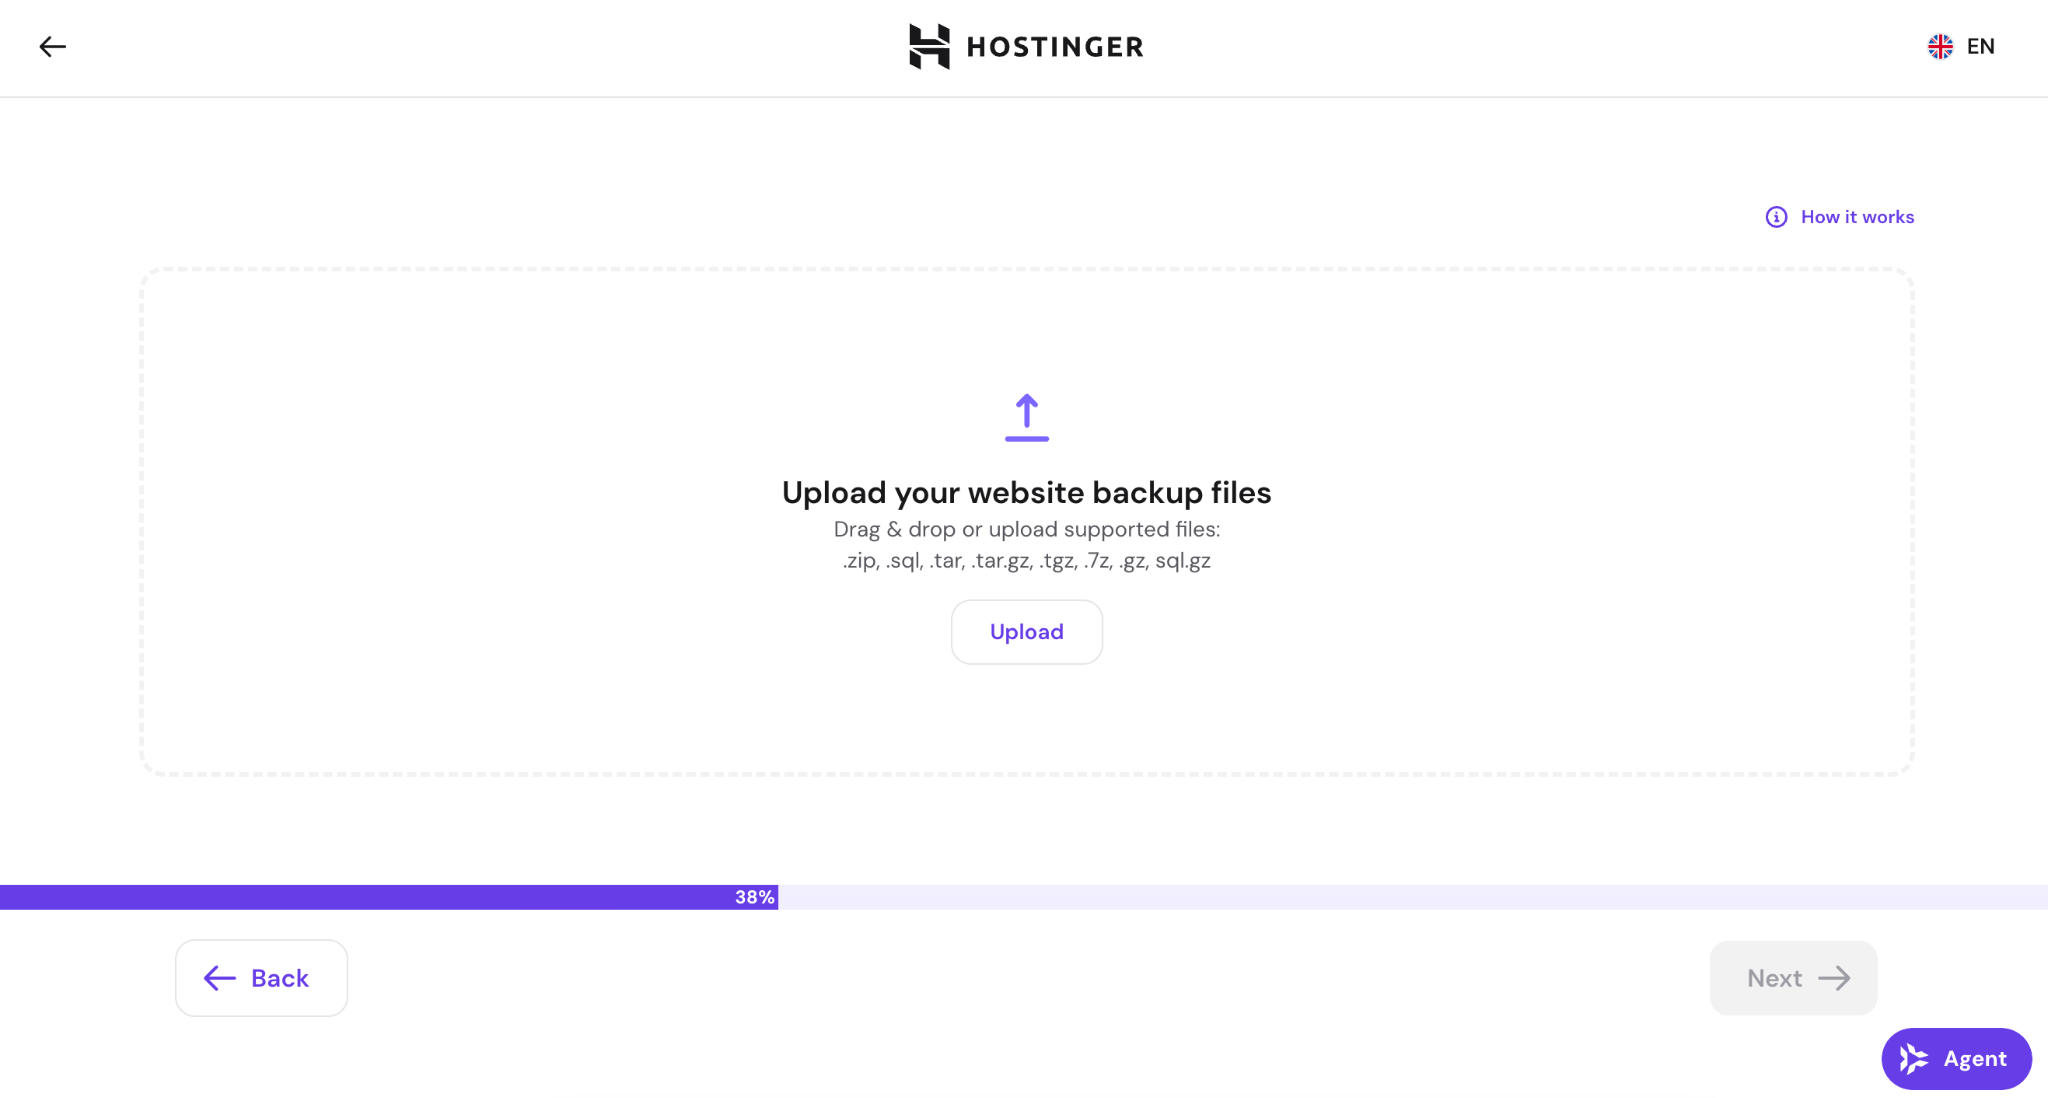
For a backup-based migration, select Upload your website files from the Import website dropdown instead. The wizard asks for a destination domain first, then shows a drop zone for the site archive and SQL database file.
- Track progress under Websites → Migrations in Hostinger dashboard. Migration typically takes up to 48 hours depending on site size and queue. You’ll receive an email when it’s done.
Point the domain to Hostinger only after the migration email arrives. Since the original site stays live during the transfer, switching DNS early may send visitors to an incomplete copy.

Complete a manual WordPress migration with Hostinger dashboard
Hostinger dashboard gives you all the tools for a manual migration from the site’s sidebar: databases and phpMyAdmin under Databases, site files under Files → File Manager, and SSH access under Advanced.
Four things to know about the layout before starting:
- Creating a database. Go to Databases → Management. The Create a New MySQL Database And Database User form is at the top of the page.
- Opening phpMyAdmin. Click Enter phpMyAdmin next to the database in the Management table under Databases → Management.
- Editing wp-config.php. The file is typically in public_html. Open it in File Manager, right-click, and select Edit. On Hostinger, DB_HOST is localhost.
- Using WP-CLI. SSH access is available on Premium plans and above. Enable it under Advanced → SSH Access in the site dashboard.
Copy a WordPress site within Hostinger
To copy a WordPress site within Hostinger, use the Copy Website tool in the dashboard to duplicate it to another domain or subdomain on the same plan. The tool moves both files and the database and automatically rewrites all internal links and database URL references to the new address.
Use it to create a separate test copy on another domain or subdomain, clone a site to a new address within the same plan, or set up a template for a new client site.
To use the Copy Website tool, you’ll need:
- A Premium web hosting plan or higher.
- A destination domain or subdomain already added to the same plan.
- Enough free disk space in your plan for a complete second copy of the site.
To start, go to the source site’s Dashboard → WordPress → Copy Website. Set the source under Copy from and the destination under To.
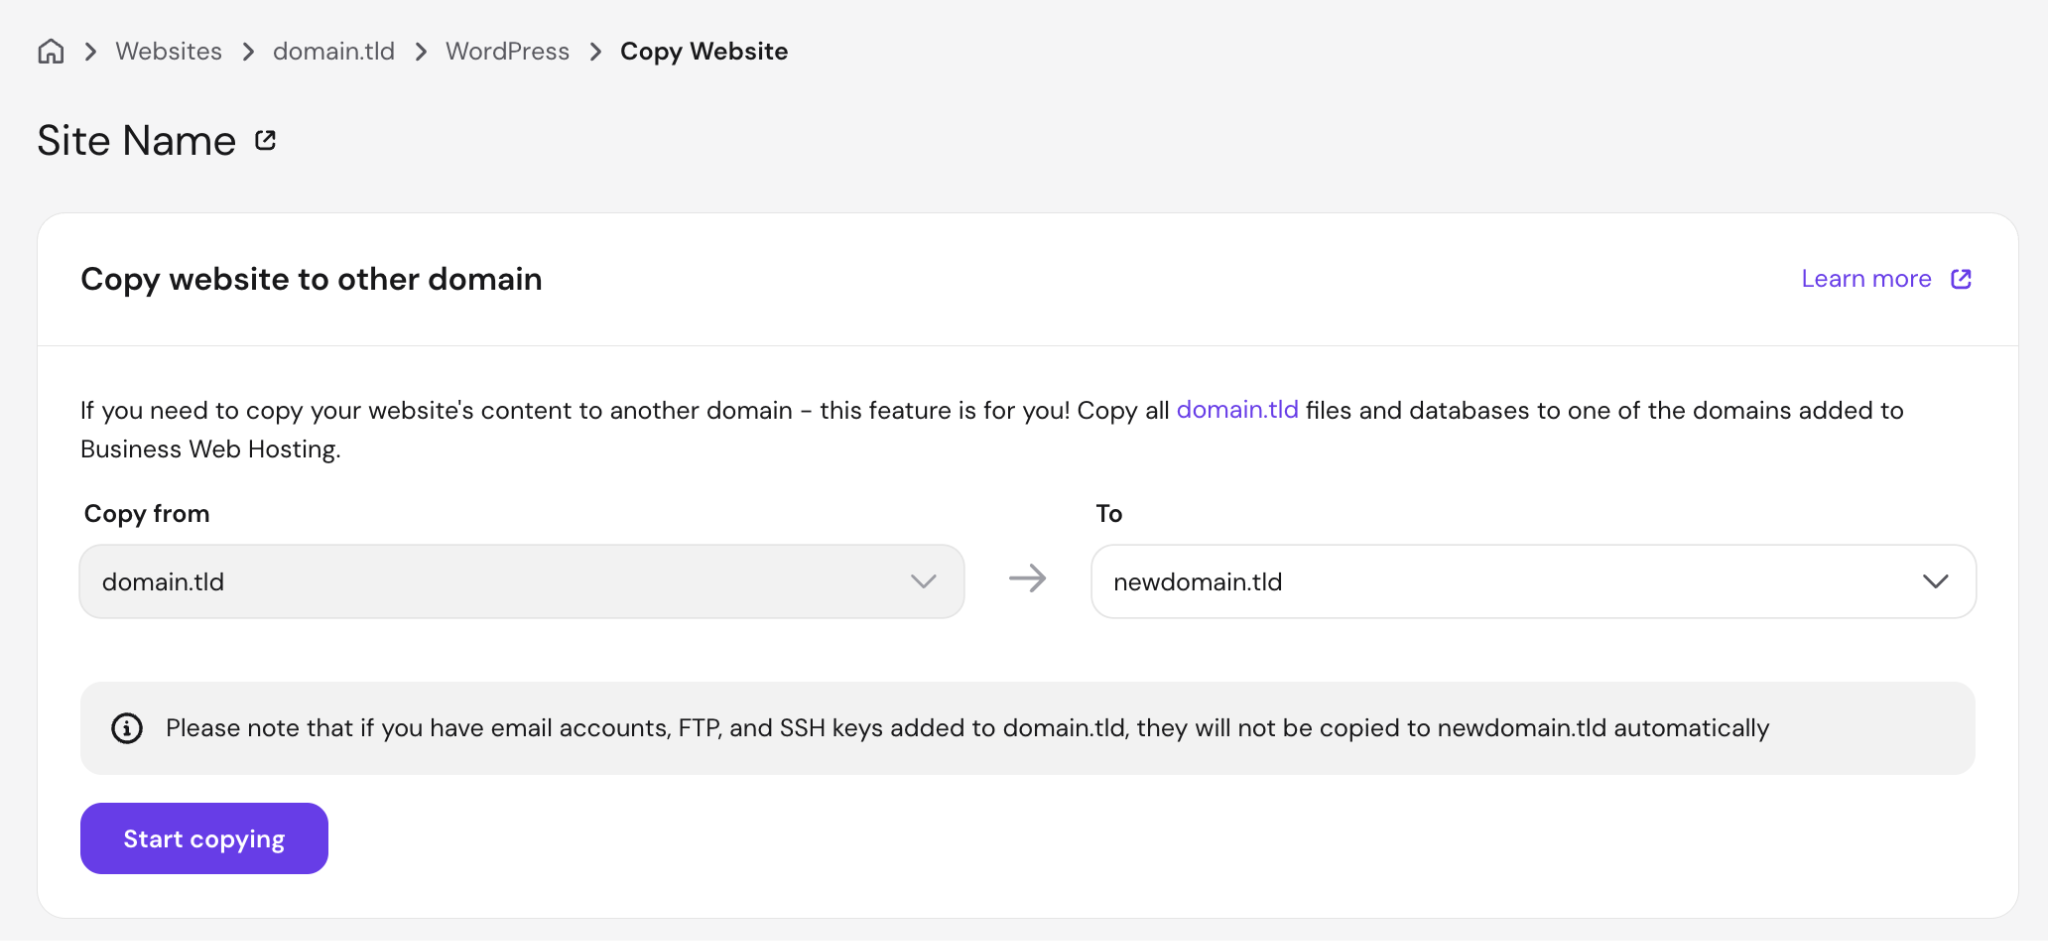
Copy Website overwrites everything on the destination domain. Download a backup of the destination site before starting if it contains any content you want to keep.
Click Start copying to begin. It typically takes up to 15 minutes depending on site size. You can close the page while it runs.
Email accounts, FTP accounts, and SSH keys are not transferred – set these up manually for the destination domain once the copy completes.

What to do after migrating a WordPress site
After migrating, test the site on its temporary address, refresh your permalink settings, point the domain to the new host, then confirm HTTPS works, and no pages return 404 errors.
Test the migrated website before changing DNS
Open the site on its temporary address and work through the pages, menus, logins, and forms a visitor would use. Anything broken here remains invisible to the public, which is why it’s worth fixing before the domain switch. Check these areas:
- Pages and posts. Open several posts, pages, and category archives to confirm content, images, and formatting are intact.
- Navigation. Click through menus and internal links to confirm none return 404 errors.
- Login. Log in with a standard user account (not just the admin) to verify user permissions carried over correctly.
- Forms. Submit a test entry through any contact or sign-up forms on the site.
- Ecommerce. For sites with a store, check product pages, the cart, and the checkout flow.
Refresh WordPress permalinks
Go to Settings → Permalinks in WordPress admin and click Save Changes. This rebuilds the URL rules WordPress uses to load pages correctly and fixes 404 errors on individual posts and pages after a migration.
Do this on the temporary address, before pointing the domain, so any issues are caught before the site goes live.
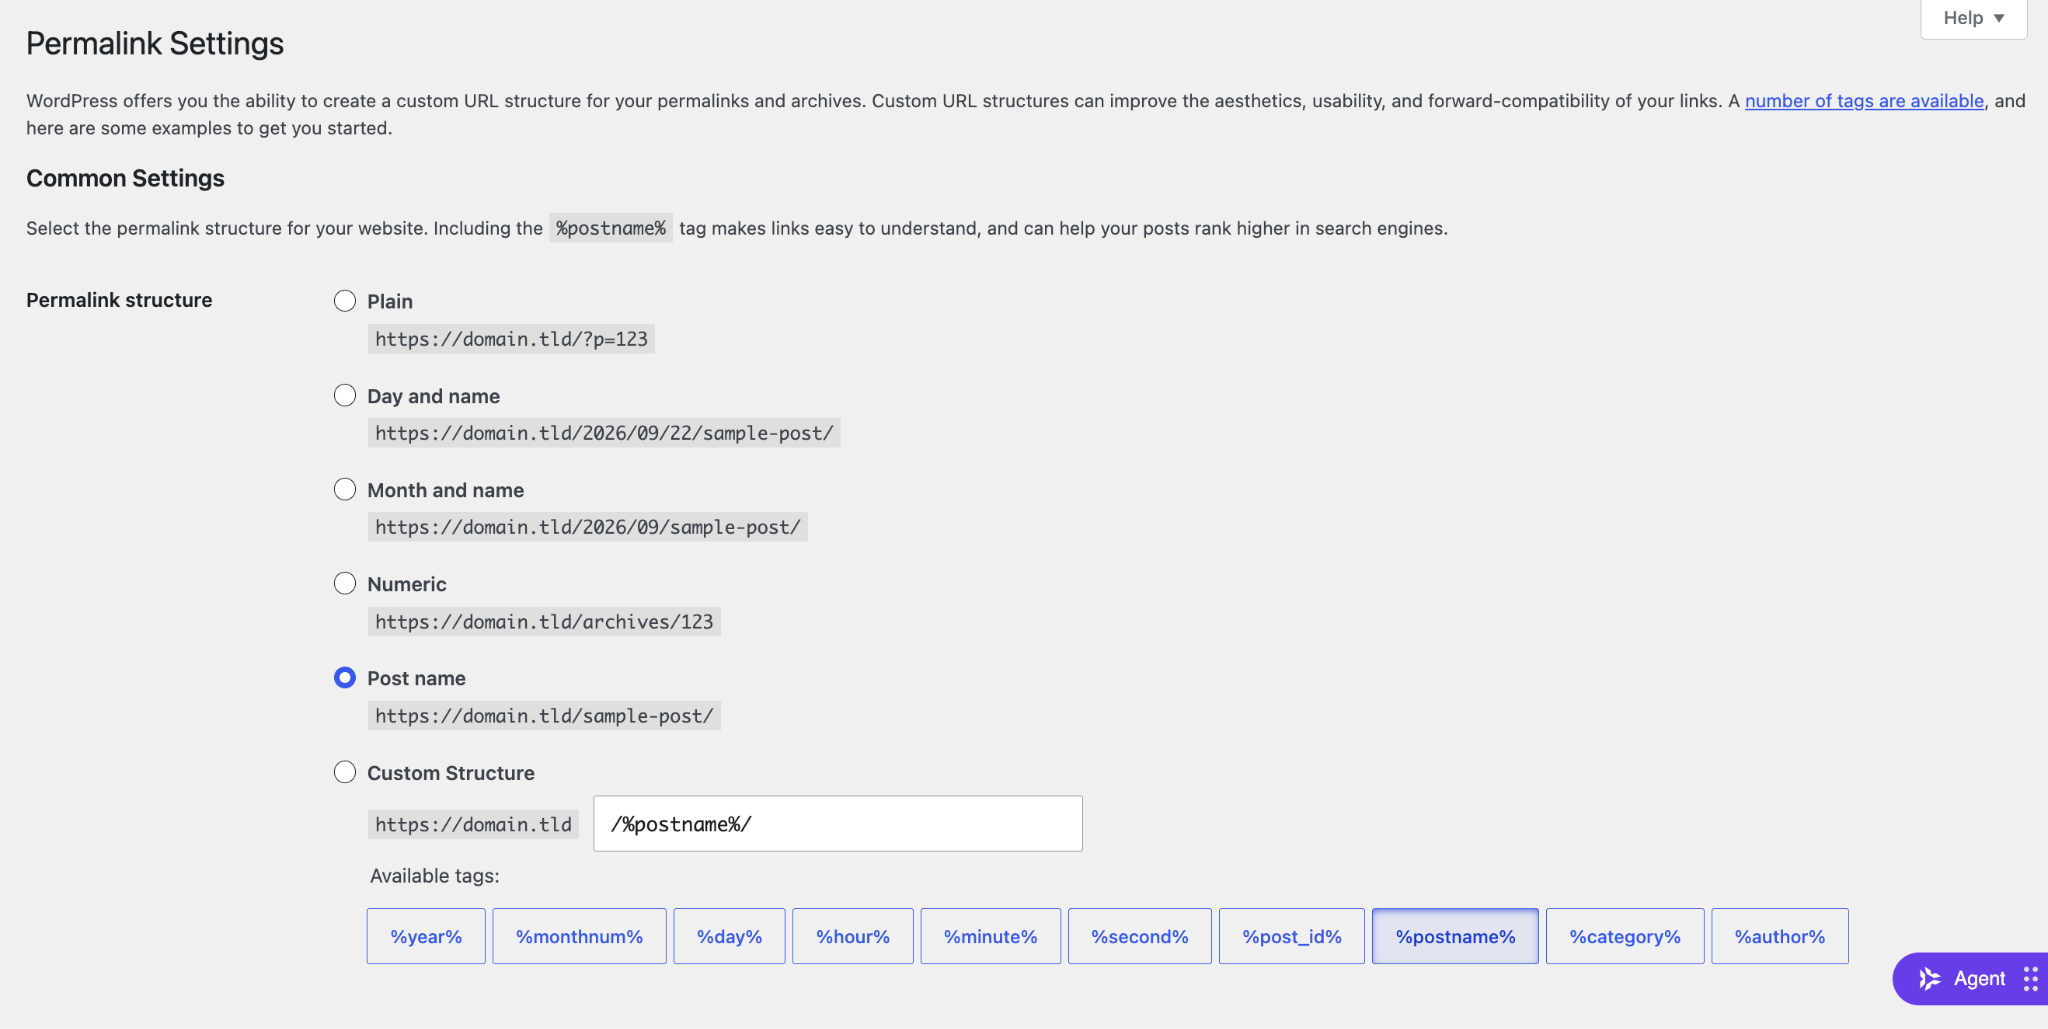
A single save is enough. This screen also controls how WordPress permalink settings work for all posts and pages on the site, so it’s worth reviewing if you want to change the URL format later.
Point the domain to the new host
Update your domain’s nameservers to point it to the new host. Since DNS works by pointing domain names to servers, changing the nameservers is what switches which server your visitors reach.
For domains registered with Hostinger, go to Domains → Manage, open the domain, select DNS / Nameservers, click Change Nameservers, and select Hostinger’s nameservers.
For domains registered elsewhere, log in to your domain registrar (the company where you bought the domain) and update your domain’s nameservers to the values your new host provides.
The update can take up to 24 hours to reach all visitors worldwide, though most see the change within a few hours. Until it’s complete, some visitors may still reach the old server briefly, so keep the original site live until you’ve confirmed the new one is working.
Check SSL, redirects, and 404 errors
Open the site in a browser once the DNS update has gone through and confirm it loads over HTTPS (the secure version of the protocol; you’ll see a padlock in the address bar). A “Not secure” warning means the SSL certificate (the file that activates HTTPS) hasn’t been installed on the new host.
On Hostinger, SSL installs automatically once the domain points to the server.
A certificate that stays inactive after the DNS update usually means the domain hasn’t fully resolved yet; to set up HTTPS for the new site, you can install it manually.
After that, check important URLs for 404 errors: key pages, posts, product pages, and any URLs with backlinks or high traffic.
Persistent 404s, especially on custom content types (such as portfolios or events) or plugin-generated pages, usually point to a server configuration issue. Troubleshooting broken pages walks through the most common fixes.
After a domain change, old URLs that weren’t redirected return 404 errors for both visitors and search engines. Installing a WordPress redirect plugin is the quickest way to map old paths to their new addresses and monitor for any 404s that keep coming in.
Confirm search engines can discover your site. In WordPress admin, go to Settings → Reading and confirm that Discourage search engines from indexing this site is not checked. This setting is sometimes left on from a staging or test install.
When should you migrate your WordPress site?
Migrate when your site loads slowly, your host goes down often, renewal prices jump, or support stops solving your problems.
Performance and reliability are the most immediate triggers: recurring slow load times or server errors that your current provider can’t fix mean it’s time to move. Slow support makes both worse, since an unresolved outage costs you visitors for as long as it lasts.
Pricing often tips the decision at renewal, when the introductory rate expires and the regular price takes over. Compare what you’re paying against what the same budget buys elsewhere; the checklist for evaluating a new hosting provider works just as well for judging whether your current host still earns its renewal price.
Security and scalability concerns are also valid reasons to move your hosting to another provider. A setup with daily backups, malware scanning, and the capacity to handle traffic spikes reduces exposure to downtime and data loss.
Alternative to WordPress migration: clone your website with AI
Hostinger AI Builder’s website cloner rebuilds your site’s design from a URL instead of migrating its files and database to the new host.
The tool reads your site’s publicly visible content (layout, colors, navigation, text, and products) and builds an editable draft in AI Builder’s Agentic mode. Other approaches to recreating an existing website, such as FTP-based copying or CMS migration plugins, transfer files directly instead of rebuilding the design from the published page.
The result looks similar to your original site but won’t be identical: layouts, animations, and highly custom elements may not carry over exactly, and AI Builder fills in anything it couldn’t read from the published page with placeholder content. Dynamic features (logins, memberships, bookings, and backend plugin settings) also don’t transfer.
To use the cloner, go to Hostinger AI Builder and type:
Recreate this website: [your site URL]
AI Builder fetches the page, builds the first draft, and lets you refine sections through the chat panel. When you publish, hosting and a domain connection are already included.
The cloner works best for static or design-focused sites. Sites with order history, active memberships, complex plugin functionality, or dynamic features still need a standard migration to preserve that data.
All of the tutorial content on this website is subject to Hostinger's rigorous editorial standards and values.

Bruno is a Content Writer at Hostinger, focused on creating and optimizing helpful, engaging articles about web development and marketing. With a background in journalism, he combines storytelling with practical insights to make complex topics easier to understand. He has also contributed to publications like MacMagazine and Jornal A Tarde. Outside of work, Bruno enjoys exploring art, cooking, and technology.

Marco Chiesi is the Head of WordPress at Hostinger, with over 20 years of experience as a software engineer in the web industry. He specializes in open-source technologies and the WordPress ecosystem, where he has contributed in different areas: Plugin Developer (with over 10 million downloads), WordCamp speaker and organizer, Meetup organizer, Translator, and Core Contributor. He is passionate about leading his team to create innovative solutions for Hostinger's web hosting product, which hosts over 5 million WordPress installations. Follow him on LinkedIn.