How to update WordPress: four quick and simple ways
Mar 10, 2026
/
Domantas G.
/
8 min Read
Once your WordPress website is up and running, you need to maintain it regularly to keep it afloat.
This is where updating your WordPress site becomes crucial. Ignoring the update message on your WordPress dashboard can lead to compatibility issues, malfunctions, or even a total site breakdown.
Fixing those problems is difficult, so it’s better to take preventive actions beforehand.
Thankfully, there are four ways to safely update WordPress, which we’ll guide you through this article. We’ll walk you through the steps of updating it manually and also show how it can be done automatically with a secure WordPress host.
Aside from the core WordPress update, we’ll cover how to update your themes, plugins, and database. This way, your website will be free from any malware or other cyber attacks.
Reasons to update a site to the latest WordPress version
Like any other software, an update will ensure that WordPress users can improve their sites with the new features, upgrades, and bug fixes.
If you don’t update your WordPress, the site will perform less efficiently as it is outdated, and visitors will be less likely to explore it. As a result, the website will have lower traffic, which isn’t ideal in the long run.
In addition, there are other perks of updating WordPress:
- Better security. Previous versions of WordPress are more prone to security vulnerabilities. Implement security updates to prevent hackers from stealing confidential data.
- Speed. Installing a new version of WordPress can speed up the site. As a result, it will be more responsive on different browsers and devices, encouraging visitors to stay longer and potentially return in the near future.
- Compatibility. The new WordPress release will make your site compatible with plugins and themes. As such, you’ll have no problems installing other features to extend your site’s functionality.
- Functionality. WordPress updates come with implementations of new or improved quality-of-life features. There’ll be more options and tools for scaling up your site.
Before updating WordPress
Before updating to the latest version of WordPress, it’s essential to prepare for any possible missteps.
Warning! Remember that these updates will impact your site files and their database.
Here’s a quick checklist before updating a WordPress site:
- Read and understand the update notice. Find out what the latest update carries through the WordPress changelog. It can either be new features or security patches.
- Check the support forums. See what others say about the latest version of WordPress and whether it contains errors or bugs. Decide if it’s necessary to update now or wait longer. As a rule of thumb, prioritize security updates.
- Create a full WordPress backup. Backups prevent permanent data loss and act as a fallback plan if an error occurs while you’re modifying or updating your website. Make sure you can restore your site.
- Turn off caching. Caching plugins may not recognize if a WordPress installation is taking place, which can impede the process. Clear your WordPress cache and turn off caching plugins first.
- Deactivate other plugins. Some WordPress updates aren’t compatible with certain plugins. This can result in an inaccessible website. Deactivate any add-ons and extensions to install the update.
- Upgrade PHP version. If you find that your current PHP version is not compatible with the update, make sure to update PHP version of your website.
How to update WordPress
Updating WordPress is critical for maintaining your website’s security and functionality. To update WordPress, go to the admin dashboard, click the “Updates” tab, and then follow the prompts to install the most recent version of WordPress, which will protect your site from vulnerabilities.
If this is your first time upgrading WordPress core, don’t worry. We’ll show you how to update a WordPress site safely using four different methods, both automatically and manually.
1. Update WordPress via the WP admin dashboard
This is one of the easiest ways to update your site to the latest WordPress version. This manual update process is only a click away, and the installation process will only take a few minutes.
All you have to do is log in to your WordPress admin dashboard. Then, check if there is a new WordPress release at the top page of the WordPress admin dashboard.
Click Please update now to initiate the website update. The Updates page will open, where you’ll have to press the Update Now button again. For minor updates, the success message along with the plugin and theme update options will appear.
However, you will see a welcome screen with a detailed summary of what has been upgraded for major releases.

Now you can update all of your themes and plugins to make sure they are compatible with the latest version of WordPress.
Pro Tip
You can also download the latest WordPress version from Hostinger hPanel, in WordPress section.
2. Update WordPress manually via FTP
Another way to update WordPress safely is via the FTP if you’re unable to do it via the WordPress admin dashboard.
To manually upgrade your WordPress site, use an FTP client, such as FileZilla or the File Manager in your hosting control panel. For this method, you need to access your WordPress root directory.
You’ll have to overwrite the old WordPress core files – wp-includes and wp-admin – with new ones.
Warning! Don’t rush to replace everything inside the WordPress root directory. You can easily break your site if you do something incorrectly, so follow the tutorial carefully.
To update your WordPress website using FileZilla, follow the steps below:
- Download the latest version of WordPress and unzip the ZIP file.
- Access the extracted folder and delete the wp-config-sample.php file and the wp-content folder to avoid losing any important data.
- Log in to your WordPress site via FileZilla or your preferred FTP client.
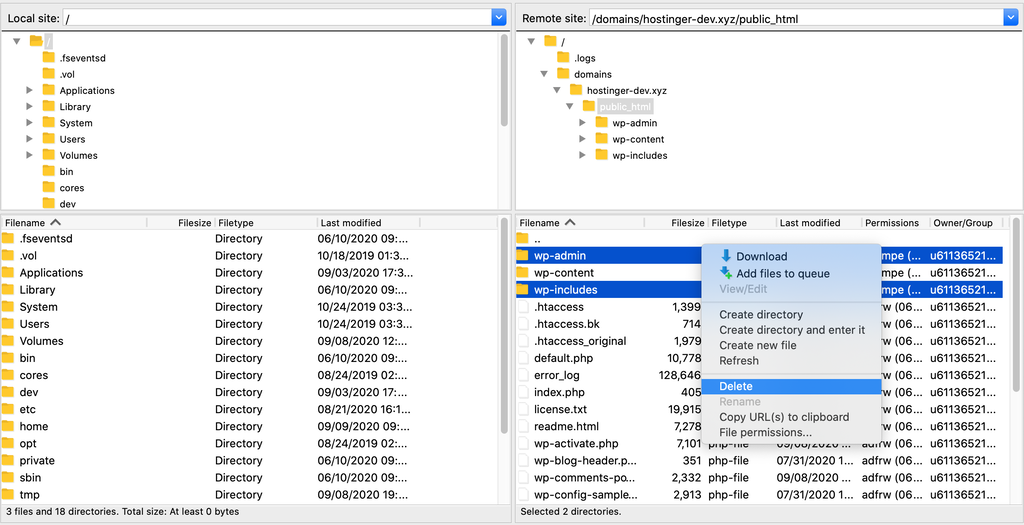
- Find the existing web host wp-includes and wp-admin directories on the right side of the panel (remote site), then right-click to Delete them.
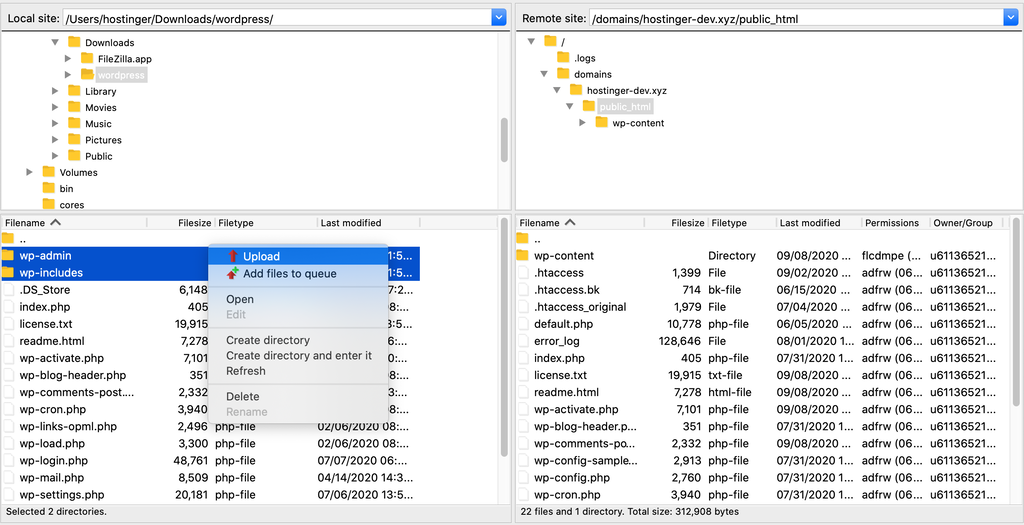
- On the local site – the left side of the panel – select the new wp-includes and wp-admin folders, then choose Upload.
- Upload the rest of the unzipped WordPress files from your computer to the web host directory. Overwrite the old WordPress files by uploading new ones to the server. When the Target file already exists confirmation message appears, select the Always use this action and Apply to current queue only options.
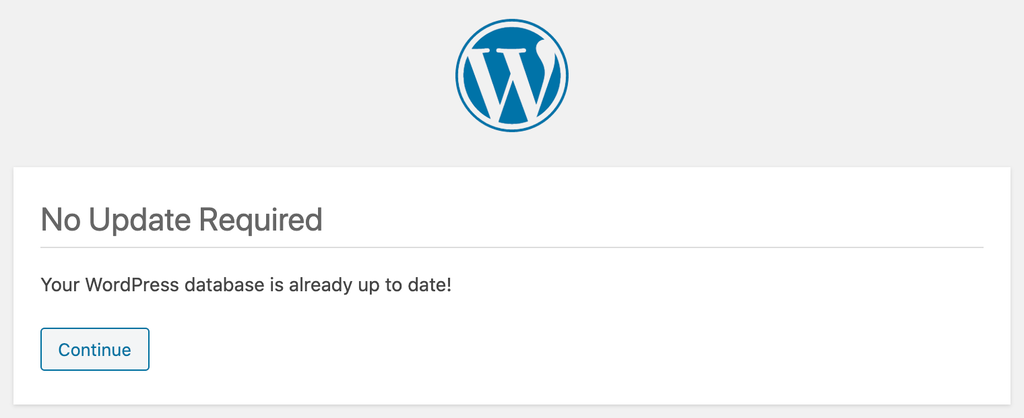
- When all files are uploaded, go to yoursite.com/wp-admin/upgrade.php/ to check if you’ve successfully finished the WordPress updates via FTP for your website.

3. Update WordPress via WP-CLI
If you’re reading this part of the tutorial, you probably already have SSH access to your WordPress root directory in the public_html folder.
When everything is configured, take the following actions to update the WordPress site safely to the latest version:
- Once you have access to your SSH account, use the cd command to switch to your WordPress root directory by using the following line:
cd public_html
To list your directory contents, type in the ls command or type cd ~ to change your directory to home.
- Enter the following command to check if the latest version of WordPress is ready to update:
wp core check-update
- If there’s a new version of WordPress available, you will see a similar message:
+---------+-------------+---------------------------------------------------------------+
| version | update_type | package_url                                                   |
+---------+-------------+---------------------------------------------------------------+
| #.#.#   | minor       | https://downloads.wordpress.org/release/wordpress-#.#.#.zip   |
| #.#.#   | major       | https://downloads.wordpress.org/release/wordpress-#.#.#.zip   |
+---------+-------------+---------------------------------------------------------------+
- If there are no updates available, you will see this message instead:
Success: WordPress is at the latest version.
- To start the update, run the following line:
wp core update
- Wait for the process to complete, and your WordPress website will be updated automatically.
Now that you know how to update the core files via WP-CLI, it’s time to upgrade your database. Run these following commands to update WordPress plugins and themes:
wp core update-db
wp theme update --all
wp plugin update --all
When the program finishes the update process, rerun the previous commands to confirm whether everything is updated correctly. Here’s what it should look like:

4. Update WordPress automatically
WordPress automatically updates your site for minor core releases by default, focusing on maintenance and stability improvements. There are also several options to automate updates for major releases, as well as plugins and themes.
Hostinger users can use WordPress auto-updates in hPanel to choose how to automate updates – whether you want to just manage updates for the core software, or themes and plugins as well. It also lets you specify whether you want just security updates, or all updates, in each category.
Here’s how to set up and configure WordPress auto-updates.
- Navigate to WordPress → Security from hPanel.
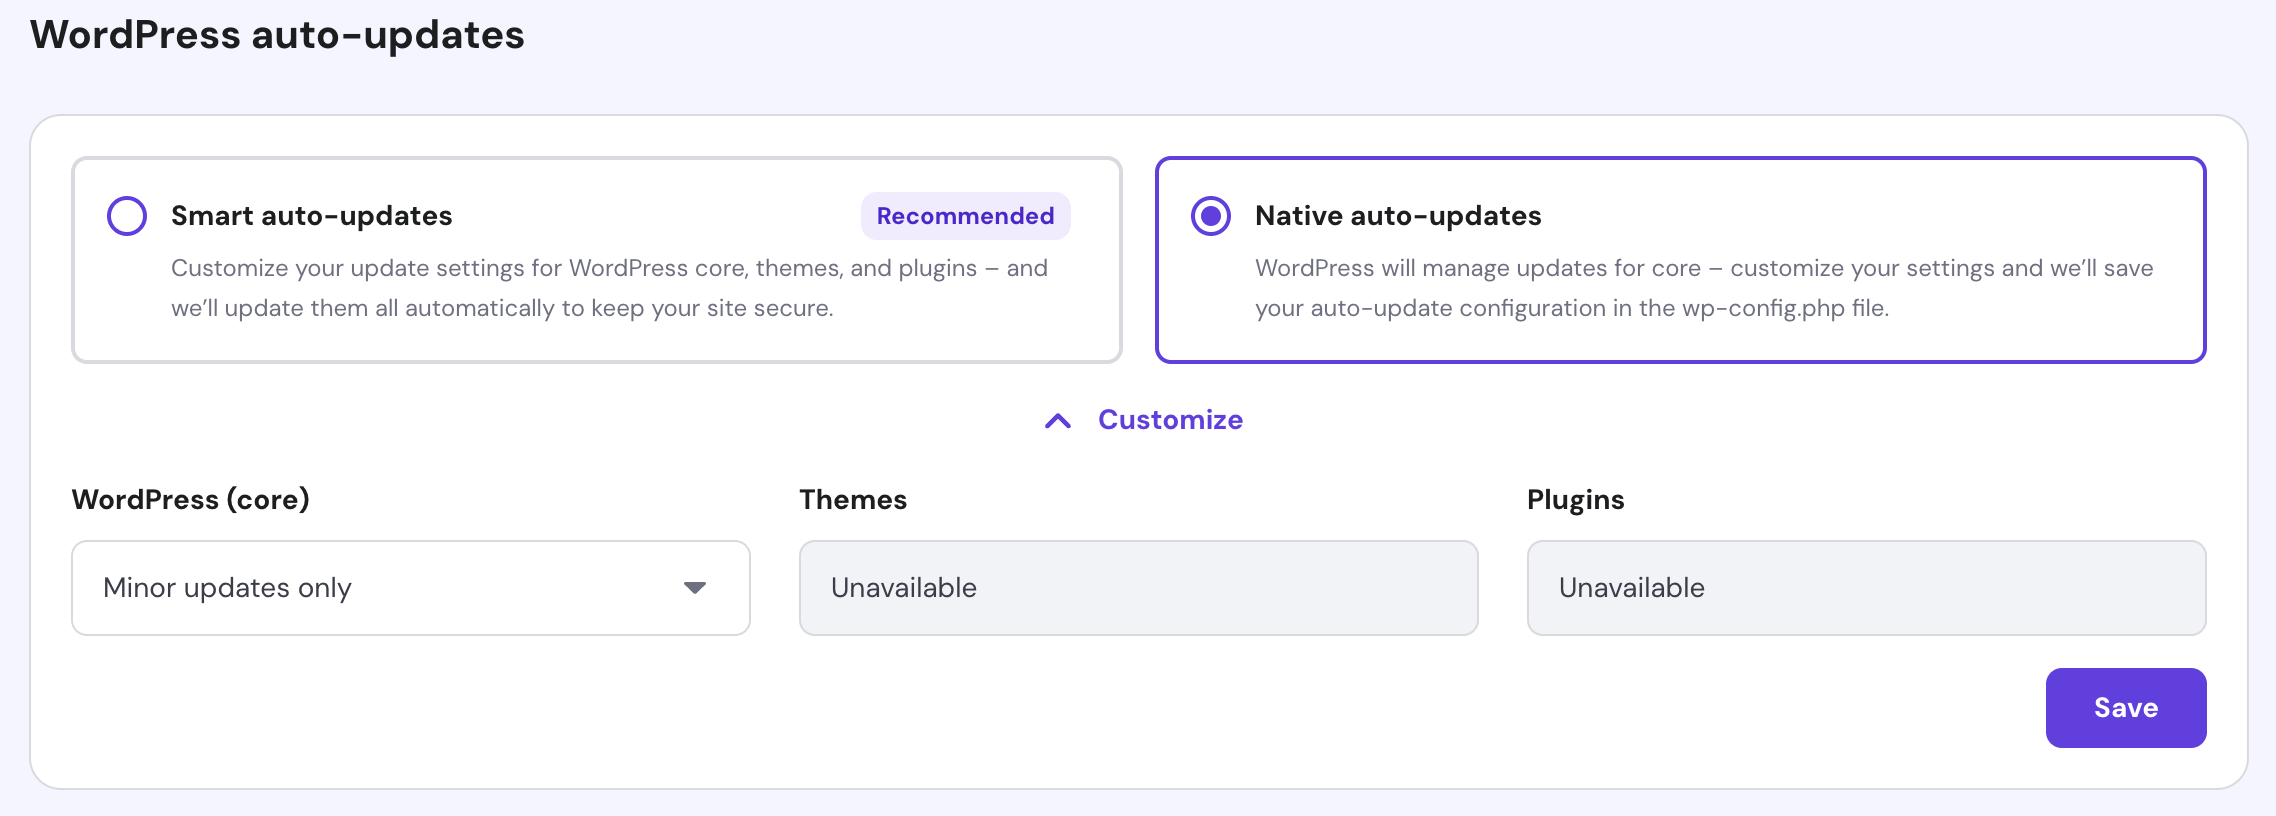
- Scroll down to the WordPress auto-updates section. If you want WordPress to manage updates, make sure Native auto-updates is checked. You can then click the Customize tab to choose whether you want No updates, Minor updates only, or All updates from the WordPress (core) dropdown menu. This will respect the update preferences you’ve set for Themes and Plugins in the WordPress dashboard.
- If you want to enable Smart auto-updates, select this option on the left.
- With the Customize panel open, choose your update preferences for WordPress core, themes, and plugins. Options for each are No updates, Security updates only, or All updates.
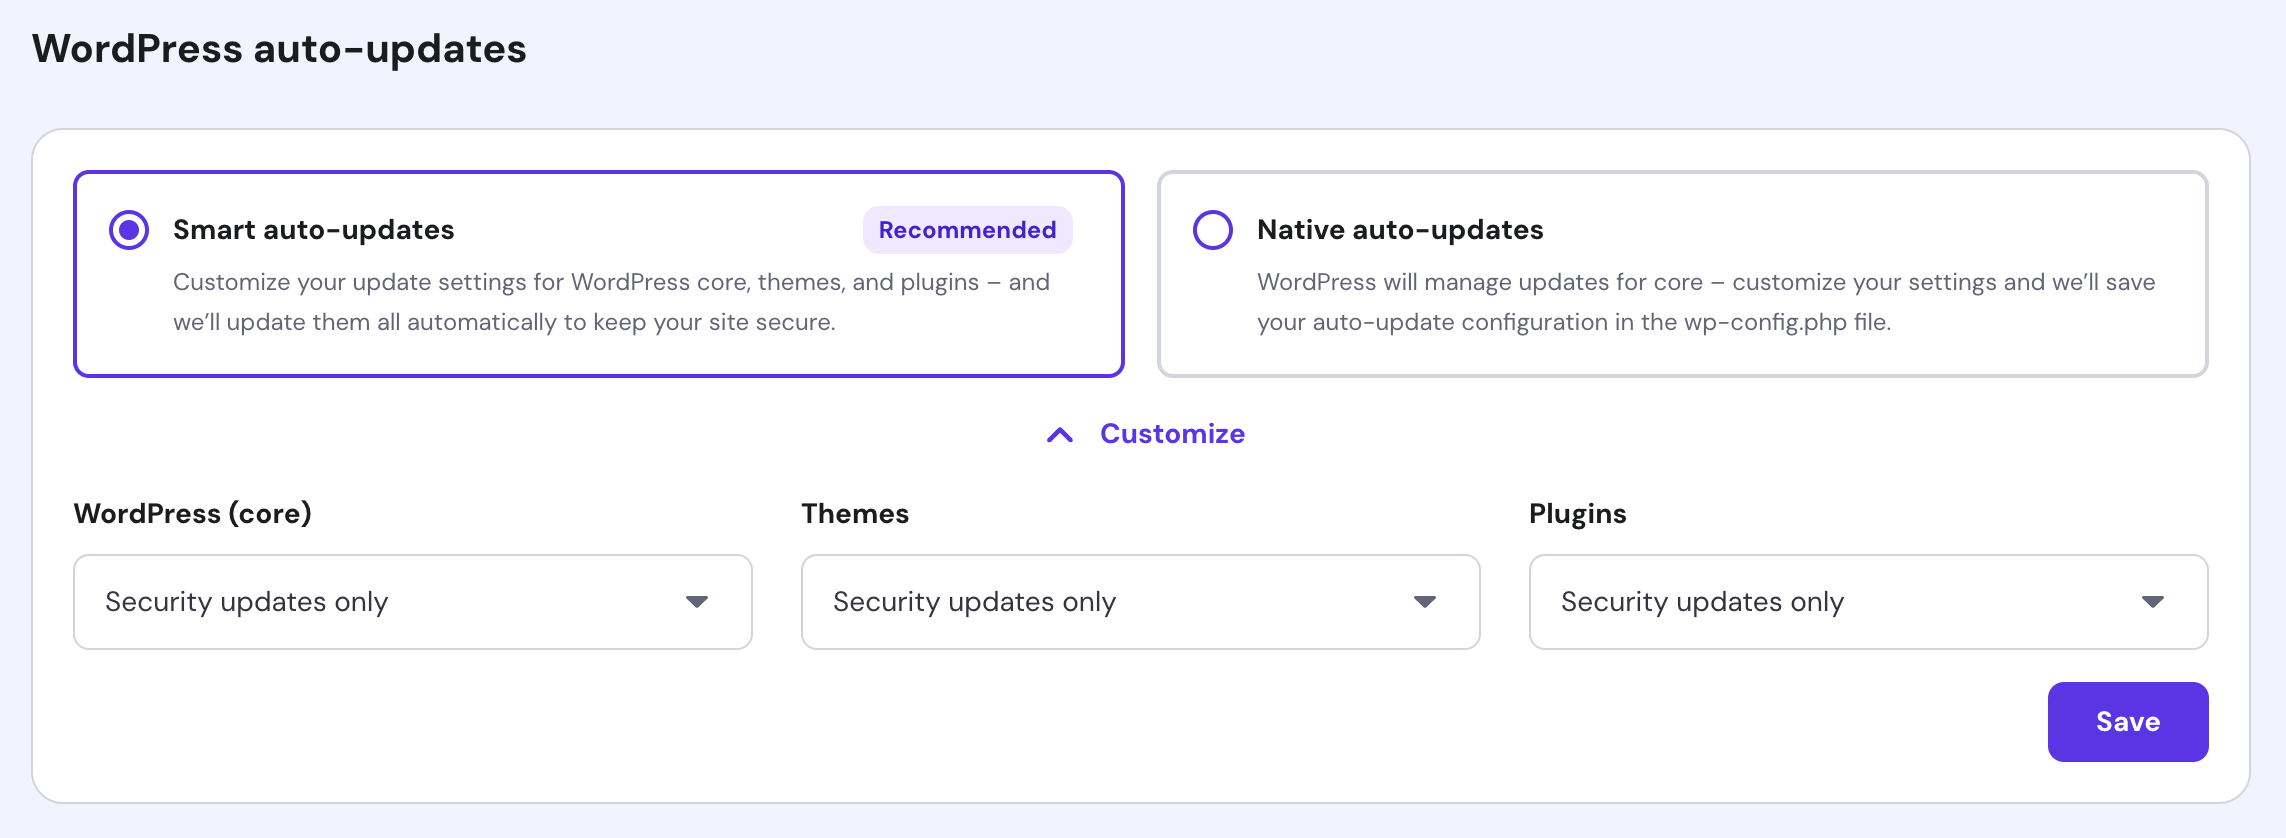
- When you’ve made your choice, click the Save button.
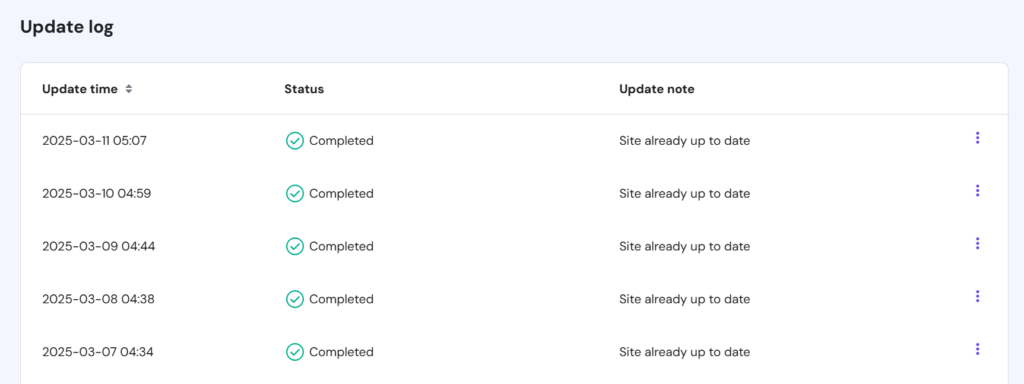
Scroll down to the Update log section to see all recent automatic updates. Click on the three-dot icon and select Details to see more information about the update or Restore to roll back to that specific version.
Alternatively, use a WordPress plugin to automate the process. Easy Updates Manager, for example, lets you activate and deactivate updates with one click and hide theme and plugin updates if custom-developed.
You can also turn on automatic WordPress updates by adding a line of code in the wp-config.php file. Follow the steps below to do it:
- Login to hPanel and go to the File Manager under the Files section.
- Once you’re in the public_html folder, scroll down and select the wp-config.php.
- Press the Edit button located in the top menu.
- Add or change the following line:
define('WP_AUTO_UPDATE_CORE', true);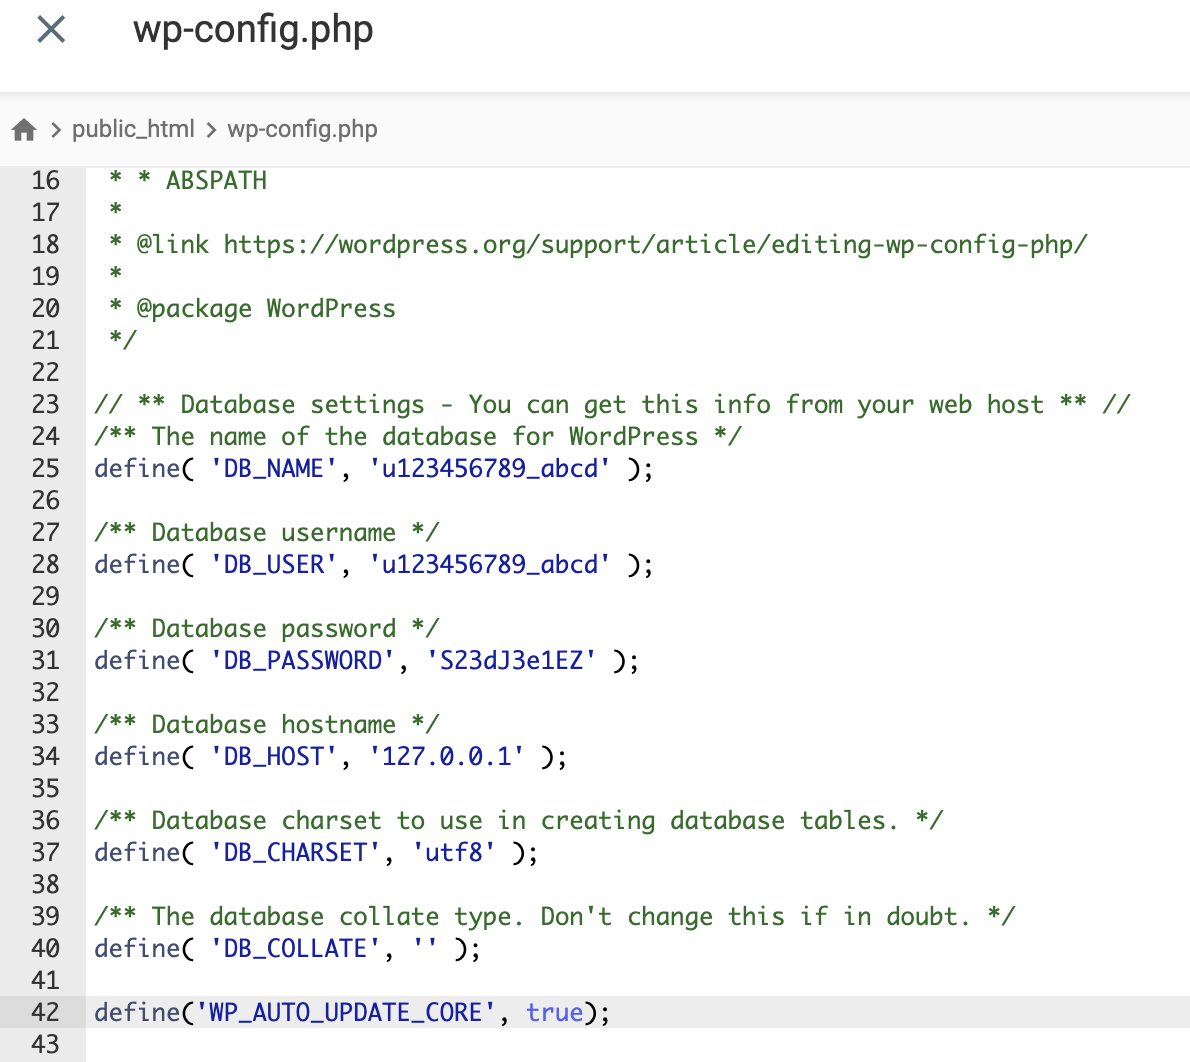
- Finally, click Save. That’s how you update WordPress safely to the latest version.
How to update WordPress themes and plugins
After updating the core WordPress files, don’t forget to do theme and plugin updates as well. If you don’t update your WordPress database, technical and operational errors can mess up the functionality of your website.
It’s important to check all the plugins and themes regularly, so you’ll know which of them require immediate updates. Updating them late will make it more difficult to synchronize the features on your website, heightening the risk of potential crashes.
Before updating, run a test and check if the updated version won’t cause any issues to your website.
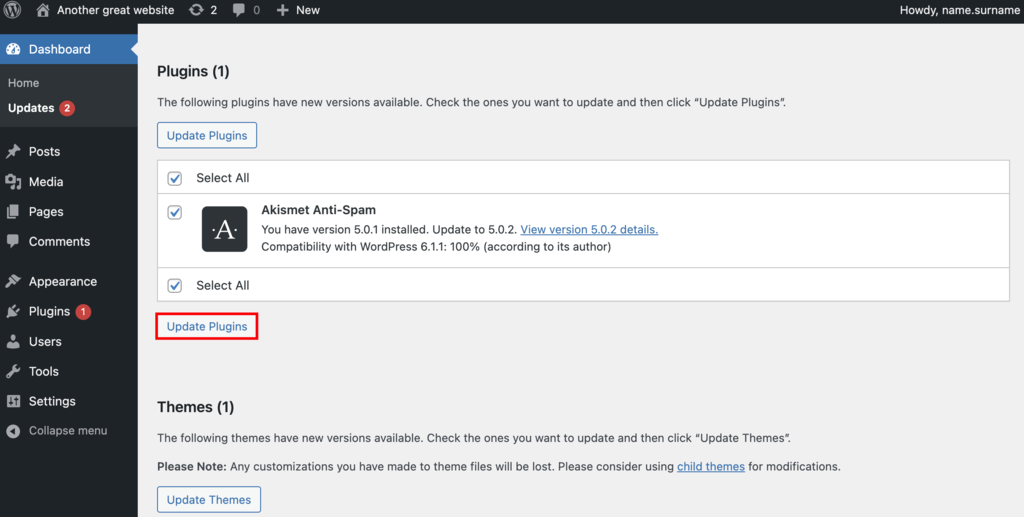
To perform plugin and theme updates, navigate to the Updates page by hovering over the Dashboard menu.
This will lead you to the updates screen. Here, you will find all the plugins and themes that have come out with the newest releases.
Tick Select all to update them all at once, or do it one by one by selecting the specific plugins and themes you want to update. However, be mindful when choosing to update all plugins at a time, as it would use a lot of your plan’s resources and might slow down your website.
Although the process involves the same steps, you’ll have to update your plugins separately from your themes. Make sure to update your caching plugin first to avoid complications.
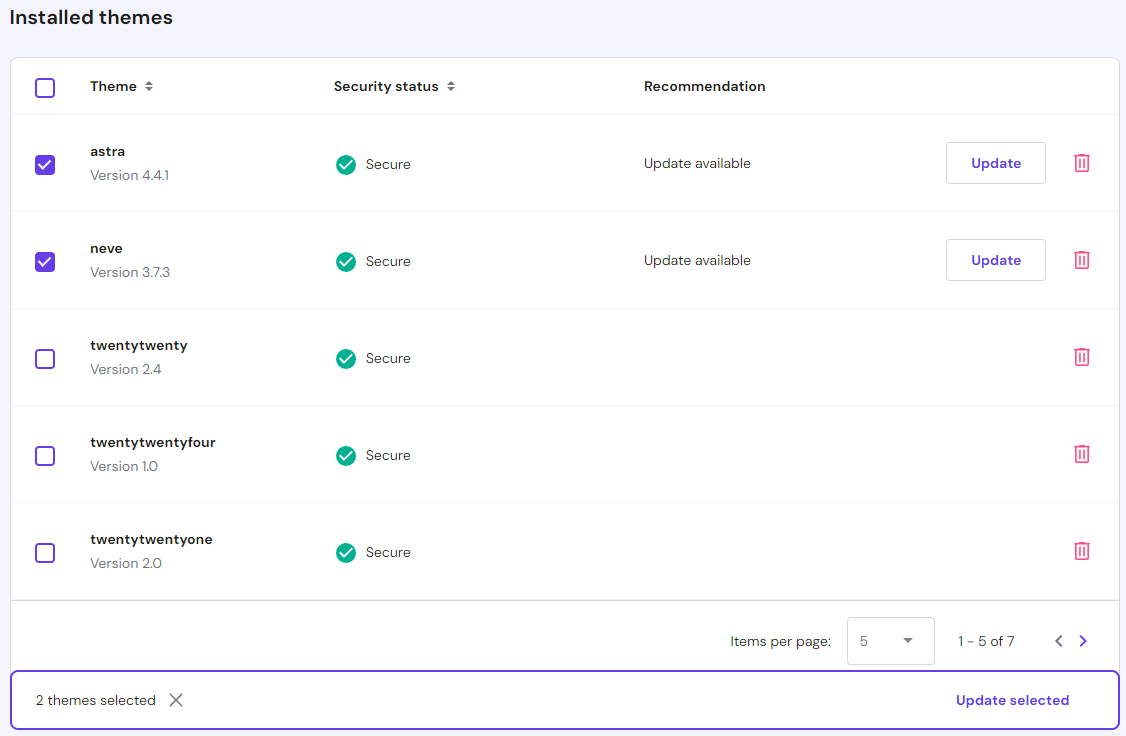
Hostinger users can update their themes and plugins via hPanel. Navigate to WordPress → Security from the hPanel dashboard, then scroll down to the Installed themes and Installed plugins section.
An “Update available” alert will appear next to outdated plugins and themes. Click on the Update button to install the latest version.
Alternatively, select any outdated plugins and themes, and the Update selected button will appear at the bottom to perform a bulk update.
Once you’re done, open a live preview of your site to see whether the updates are successful.
In some cases, you may not receive notifications regarding updates on the dashboard. Usually, plugin developers will send you information about the updates via email, so check your inbox once you finish updating WordPress.
If you’re not satisfied with the current WordPress update, consider eliminating or replacing the themes and plugins that break your site. However, don’t revert a plugin to its older version as it can pose more harm to your website, such as the SEO and traffic downgrade.
Pro Tip
Updating your WordPress theme will get rid of all the customizations you’ve made to the theme. Avoid losing them by using a child theme, instead of editing the parent theme directly.
Conclusion
In this tutorial, you’ve learned how to safely update WordPress through manual and automatic methods without breaking your site – it’s a must-have skill for a website owner.
Updating your site helps improve security and fix bugs. A well-functioning site will attract more visitors and increase your conversion rates.
For updating, you’ll need to check if there are any upcoming WordPress releases, perform a backup, clear the website cache, and perform PHP upgrade. Make sure to also deactivate plugins before updating to the new WordPress version to prevent file errors.
Before you sign off, here’s a quick recap of four ways to update your site to the latest WordPress version:
- Updating through WordPress Admin Dashboard. Click on an automatic update message on the WP admin panel to proceed with WordPress installation.
- Updating manually via an FTP client. Overwrite the old core files with new ones downloaded from the official WordPress repository.
- Updating via SSH and WP-CLI. Run commands on WordPress core files, database, themes, and plugins via an SSH terminal.
- Enabling WordPress automatic updates. Edit wp-config.php via the File Manager of your hosting control panel.
In addition, do not skip upgrading WordPress themes and plugins so that your website can perform its functions. Go to the Updates page in your WordPress admin area and choose whether you want to update each database separately or all at once.
Now that you’ve successfully updated WordPress to the latest version, don’t hesitate to leave a comment below.
Learn What Else You Can Do With WordPress
How to Login to WordPress
How to Install WordPress
How to Undo Changes in WordPress
How to Schedule Posts in WordPress
How to Manage User Roles and Permissions in WordPress
How to Reinstall WordPress
How to Add Facebook Like Button to WordPress
How to Install WordPress on a Subdomain
Guide to WordPress Favicons
All of the tutorial content on this website is subject to Hostinger's rigorous editorial standards and values.

Domantas leads the content and SEO teams forward with fresh ideas and out of the box approaches. Armed with extensive SEO and marketing knowledge, he aims to spread the word of Hostinger to every corner of the world. During his free time, Domantas likes to hone his web development skills and travel to exotic places.