How to use n8n with MCP
Mar 10, 2026
/
Aris S. & Valentinas C.
/
6 min Read
Model Context Protocol (MCP) enables seamless integration between large language models (LLMs) and external tools. Paired with automation tools like n8n, it allows you to easily create a custom AI-powered workflow to streamline complex tasks.
In this article, we’ll explain how to use n8n with MCP as a client or server. We’ll also explore some popular use cases of MCP and n8n.
What is n8n?
n8n is a tool that lets you create custom workflows to automate various tasks. Using its visual interface and pre-configured nodes, you can integrate various external tools seamlessly with zero to minimal coding.
For example, you can connect n8n with Google Sheets to create an automated data processing workflow. You can also integrate it with different LLMs and AI tools to generate content.
What is MCP?
Model context protocol (MCP) provides a standardized communication method between AI agents and external tools. It lets you easily integrate into LLMs and switch between models without manually rewriting functions.
MCP architecture comprises the following components:
- Hosts – LLM applications that provide an environment for MCP connections, like Claude Desktop or Cursor IDE.
- Clients – a component serving as an endpoint to your MCP server for other platforms.
- Servers – a separate entity that provides tools, prompts, or data resources for the host.
What can you do with MCP and n8n?
Integrating MCP into n8n enables you to expose workflows to AI agents for context-based and flexible data processing. Traditionally, you’d be limited to predetermined prompts and standard API capabilities.
You can set up n8n as an MCP server that processes data using the specified prompts, tools, and resources, or an MCP client that connects the server’s capabilities to your workflow.
Using MCP and n8n, you can streamline various tasks involving different tools and applications. For example, you can integrate Zapier to manage to-dos or Google Workspace to automate email processing using AI.
Prerequisites for n8n MCP integration
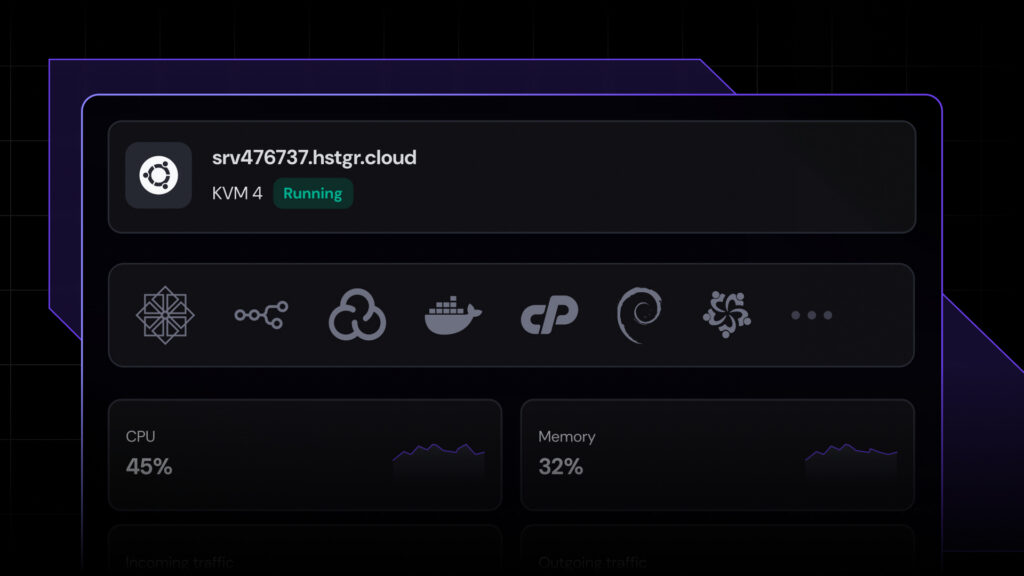
Before using MCP, you must set up n8n. You can purchase the official hosting plan, but self-hosting it on a virtual private server (VPS) is more affordable in the long term. That’s what we’ll do in this tutorial.
Since n8n is lightweight, a system with 4 GB of SSD storage and 2 GB of RAM should be enough. However, make sure your n8n hosting provider offers a clear upgrade path – you’ll need more resources as you add workflows.
Based on the above requirements, Hostinger’s MCP hosting is an excellent choice. You can start with the KVM 1 plan and upgrade anytime without downtime.

Expose an n8n workflow as an MCP server
Build an MCP server in n8n to allow hosts like Claude Desktop to access data from various services in your workflow. Here’s how to do it.
1. Insert the MCP server and tool node
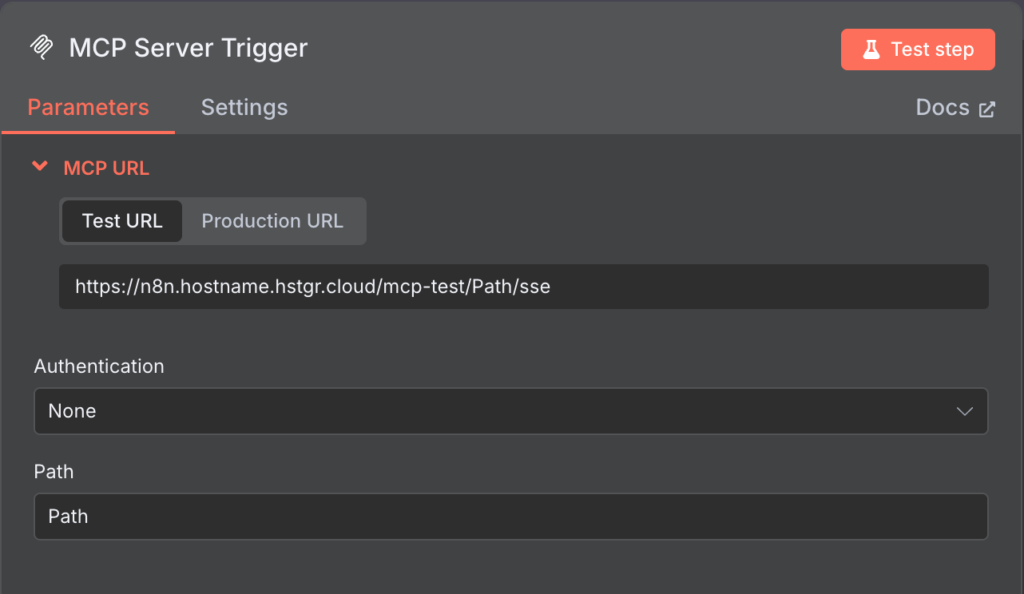
Create a new workflow in n8n and add the MCP Server Trigger node. It exposes tools, services, or applications in your workflow as MCP endpoints for the hosts.
In the node setup page, select the Production URL and copy it to a safe location. We’ll use this endpoint later on to connect your n8n workflow to a host.
Return to the n8n canvas and add a tool to your MCP Server Trigger node. This tool acts as the data source or processing unit for your workflow.
Currently, n8n’s MCP Server Trigger supports around a hundred tools for different purposes. In this tutorial, we’ll use Airtable to integrate our task planner app into our workflow.

Note that the integration steps will vary depending on the tool you choose. You can learn more about the procedure by clicking the Docs button on the tool’s node setup menu.
Pro Tip
The MCP Server Trigger node can integrate with multiple tools.
2. Secure the endpoint
By default, your MCP Server Trigger node uses no authentication method. This means if your URL endpoint is exposed, unauthorized parties can access your MCP server.
To improve security, enable Bearer authentication to allow only a specific endpoint to communicate with your MCP server. In n8n, you must create the authentication token manually according to a specific format.
To demonstrate, let’s create a Basic Auth token and encode it using the Base64 format. Here are the steps:
- Open an online encoder tool. In this tutorial, we will use Base64Encode.
- Enter a username and password pair in the following format, which will be the authentication credentials:
username:password
- Click Encode.
- Copy the encoded token and store it in a safe location.
Once we have the token, configure Bearer authentication in n8n by following these steps:
- Double-click your MCP Server Trigger node to open its setup page.
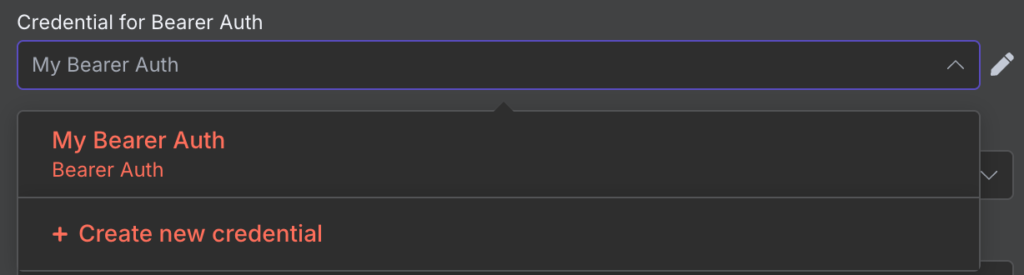
- From the Authentication drop-down menu, select Bearer Auth.
- Expand the Credential for Bearer Auth menu and select Create new credential.
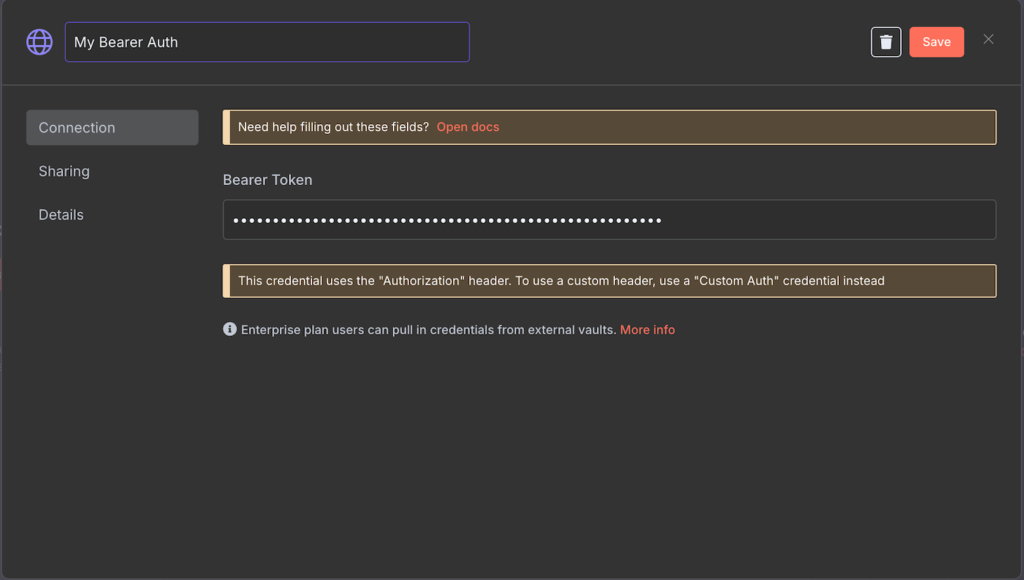
- Enter the token you created previously. Ensure it is correct because you won’t be able to see or modify it later.
- Click Save to confirm.
3. Call the workflow from an LLM agent
Once the workflow is set up, you’ll need to configure the host to trigger the action. In this tutorial, we’ll set up Claude Desktop as the host. Here are the steps:
- Download the Claude Desktop application if you haven’t already.
- Open Claude and log in to your account.
- Go to your menu bar → Claude → Settings. If you’re on Windows, go to the burger icon in the top left → File → Settings.
- Select the Developer tab and click Edit Config.
- You’ll see claude_desktop_config.json in your file explorer. Open it using a text editor.
- Add the following configuration, replace YOUR-ENDPOINT and BEARER-TOKEN with their actual values:
{

  "mcpServers": {

    "n8n": {

      "command": "npx",

      "args": [

        "-y",

        "supergateway",

        "--sse",

        "<YOUR-ENDPOINT>",

        "--header",

        "Authorization: Bearer <BEARER-TOKEN>"

      ]

    }

  }

}- Hit Ctrl + S to save the configuration.
- Restart Claude, and you’ll see that it detects the new Airtable MCP tool.
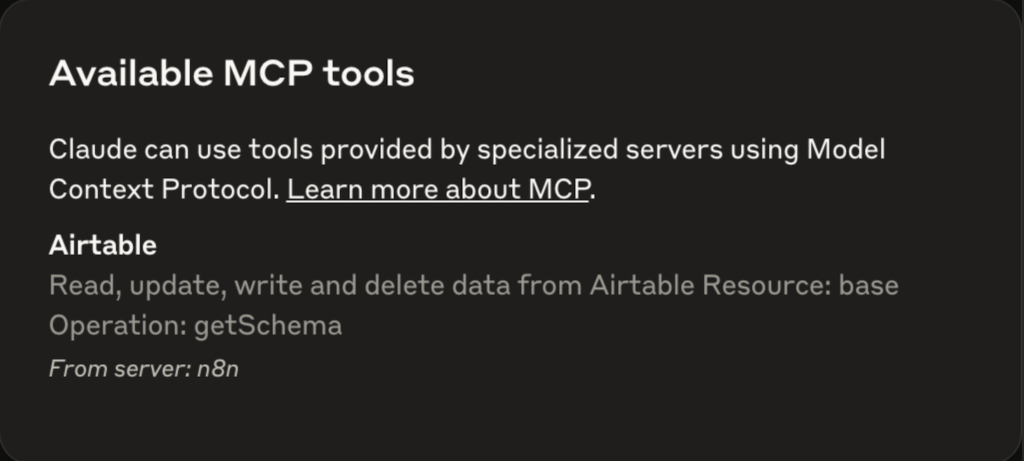
Important! If you encounter a command error when connecting the MCP server, ensure you have installed Node.js on the system on which Claude Desktop is running.
Use n8n as an MCP client
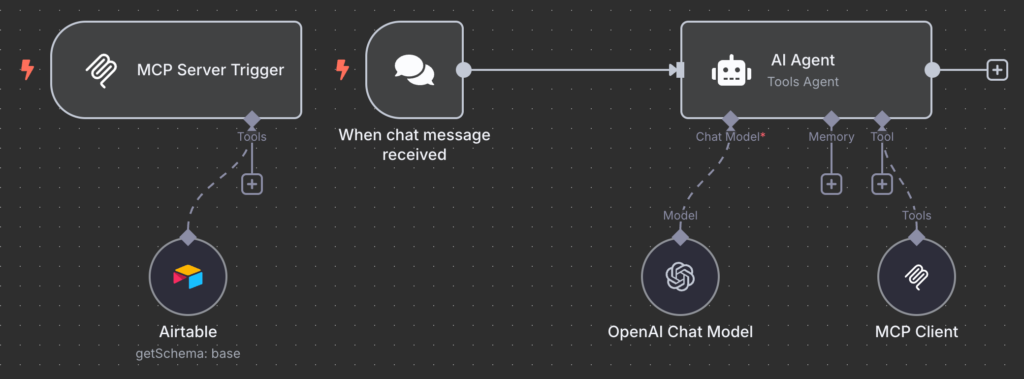
n8n also lets you set up an MCP client, which connects the MCP server as an AI agent in your workflow. Here’s how to do it.
1. Add the n8n MCP Client node
Unlike the MCP server, the MCP Client node requires a trigger. You can add various nodes for this purpose, but in this example, we’ll use Chat to execute the workflow when n8n receives a message.
Insert the AI Agent node and connect it with the trigger. Optionally, add a chat model with your preferred LLM for additional processing and a memory node for storing query preferences.

Choose MCP Client as the tool node. This is important, as it will connect your MCP server with the current workflow.
2. Configure the SSE endpoint and auth
When you add the MCP Client node, the setup menu will open. Add your MCP Production URL as the SSE Endpoint and configure the authentication token.
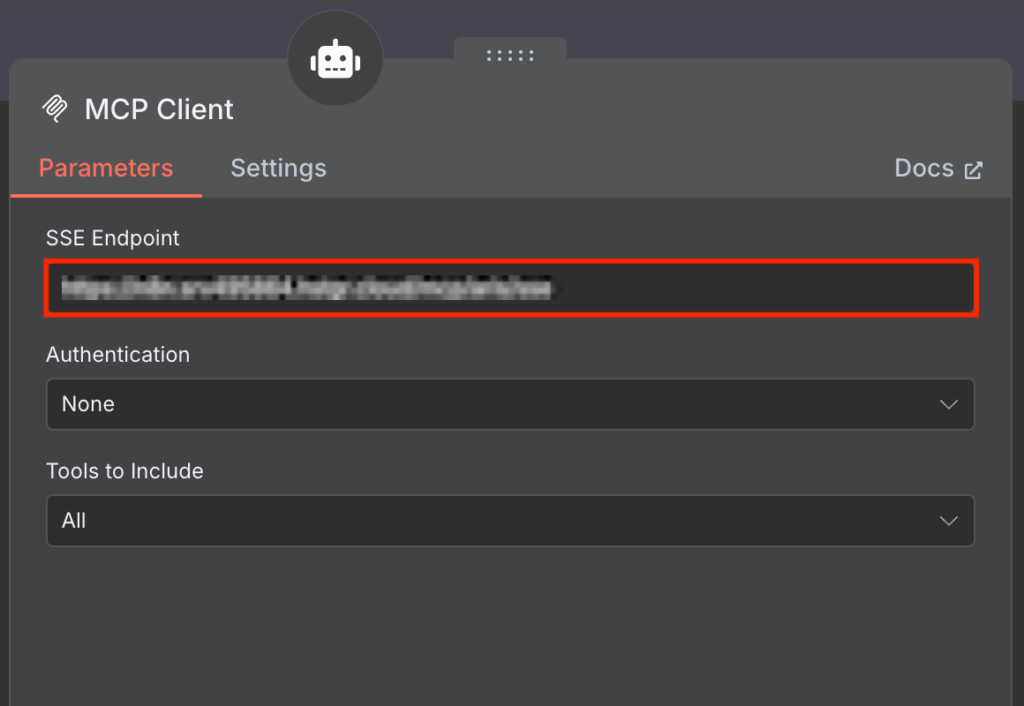
In the following menu, select the tools from the MCP server you want to include in the workflow. By default, n8n will use All available tools.
3. Test the client workflow in n8n
At this point, your workflow will look like the following, and should be ready for testing.
If you use a different trigger, the testing process will differ. In this case, we simply open the chat window by clicking Show Chat. Then, we send a message asking our AI agent to check the tasks inside Airtable’s to-do planner.
Wait until your workflow finishes processing your request. If the process succeeds, each node will show a green checkmark.
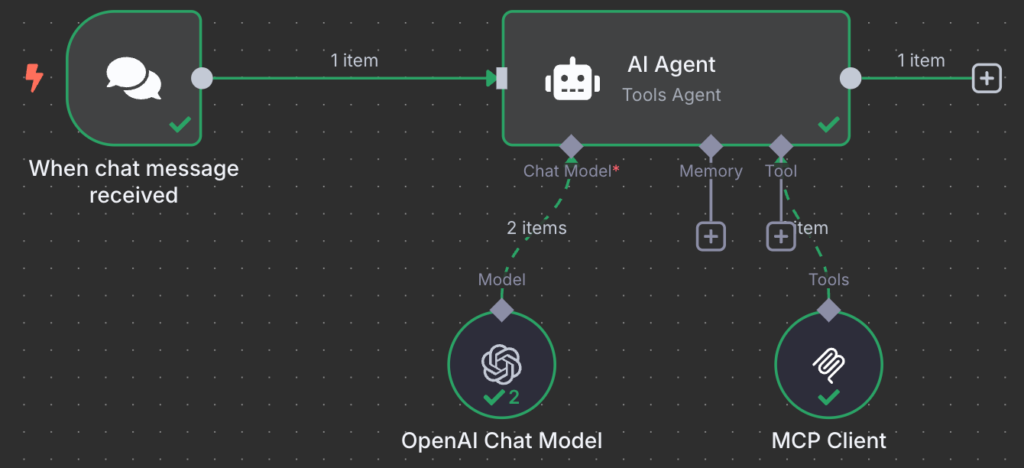
Any node that encounters an error will turn red. To troubleshoot it, expand the node, and you’ll see an explanation of the issue.
Use cases for n8n and MCP integration
The flexibility of MCP in integrating different external services with AI tools enables you to create powerful workflows for various tasks. Here are some examples of what you can automate with n8n and MCP:
- AI-powered ticket triage – automatically manage support tickets on platforms like Slack and Linear using AI. For instance, Slack messages tagged with a specific emoji can trigger an AI model to analyze and convert them into structured support tickets in Linear.
- Automated research summarization – conduct research by automating search queries, web scraping, content analysis, and structured reporting using AI tools.
- Self-healing DevOps scripts – use AI to monitor system alerts, analyze them, and create appropriate issues in DevOps platforms. For example, when an alert is raised for a missing host or domain, a workflow can read it and generate a corresponding work item in Azure DevOps.
- Personal to-do bot – set up workflows that automate task creation, reminders, and updates. For example, you can ask AI to create and update tasks in platforms like Notion or Airtable.
See more suggestions for automation using n8n and MCP in the video below.
Conclusion
MCP lets you connect AI tools with various external services, allowing you to access different data and tools. Integrating this protocol into n8n lets you easily create a powerful workflow leveraging different AI agents and applications.
To do this, add the MCP server node to your n8n workflow and configure the tool you want to integrate. Then, copy the endpoint and enable the Bearer authentication method.
Open the AI agent you want to integrate, such as Claude Desktop. Open its configuration file, then enter your MCP server endpoint and the Bearer token.
You can also set up an n8n workflow as an MCP client. Simply insert the MCP Client node into your canvas and configure it using information from your MCP server.
There are over a hundred MCP-compatible tools in n8n. Try experimenting with them to create your own custom workflow. Good luck!
How to use n8n with MCP FAQ
What are the benefits of using n8n with MCP?
The main benefit of using n8n with MCP is that it enables AI agents like Claude to access data from external tools, allowing you to create more powerful workflows.
Without MCP, you must write functions manually to connect AI agents with external tools. This process is very technical and time-consuming, especially if you wish to use multiple models.
Can I create automated workflows with n8n and MCP?
Yes, you can create an automated workflow in n8n that starts when a specific event occurs, such as sending a message or receiving an error. To set one up, add your chosen AI agent node with the trigger. Then, add the MCP Client node and connect it to your MCP server.
What triggers can I use in n8n with MCP?
If you use n8n as an MCP server, you can only use input in the connected AI agent as the trigger. For example, when you send a message in Claude Desktop, it’ll start your workflow. Meanwhile, you can use any trigger node with an MCP client in n8n, like a chat message or an HTTP request.

Aris is a Content Writer specializing in Linux and WordPress development. He has a passion for networking, front-end web development, and server administration. By combining his IT and writing experience, Aris creates content that helps people easily understand complex technical topics to start their online journey. Follow him on LinkedIn.

Valentinas Čirba, Hostinger's Head of VPS, is a seasoned product leader specializing in VPS products with over ten years of experience. He's an expert at setting product strategy, leading cross-functional teams, and making smart decisions to deliver innovative solutions. Valentinas is committed to creating products that not only meet business objectives but also truly serve the customer. Follow him on LinkedIn.