How to set up SSH keys for secure server authentication
May 22, 2026
/
Bruno S.
/
6 min Read
SSH keys let you authenticate to a remote server using a public-private key pair instead of a password, making remote access more secure and, with an SSH agent, faster than typing a password each time.
The private key stays on your local machine and never leaves it, while the public key goes on the server and is used to verify the connection.
Setting up SSH keys involves five steps:
- Generating an SSH key pair.
- Saving the key and adding a passphrase.
- Adding the public key to the server or hPanel.
- Testing SSH key authentication.
- Disabling password authentication after SSH key login works.
1. Get prerequesities
There are three things you need before generating SSH keys:
- A local machine with a terminal. macOS and Linux users can use the built-in Terminal. Windows users can use PowerShell, Windows Subsystem for Linux (WSL), Git Bash, or PuTTY for SSH.
- Your remote server’s username and IP address. You’ll need both to copy the public key to the server and test the connection.
- Initial access to your server. This means password login, console access, or hPanel – you need a way to add the public key before switching to key-based authentication.
If you plan to disable password authentication after setting up SSH keys, you also need permission to edit the server’s SSH configuration.
Warning! Keep your current SSH session open while changing authentication settings. If the new key doesn't work and you've already closed your only session, you could lock yourself out of the server.
2. Generate an SSH key pair
SSH key generation creates two files: a private key and a public key. Ed25519 is the recommended algorithm: it uses strong cryptography with a compact 256-bit key and works on all modern systems.
If your server or client is older and doesn’t support Ed25519, use RSA with a 4096-bit key size instead.
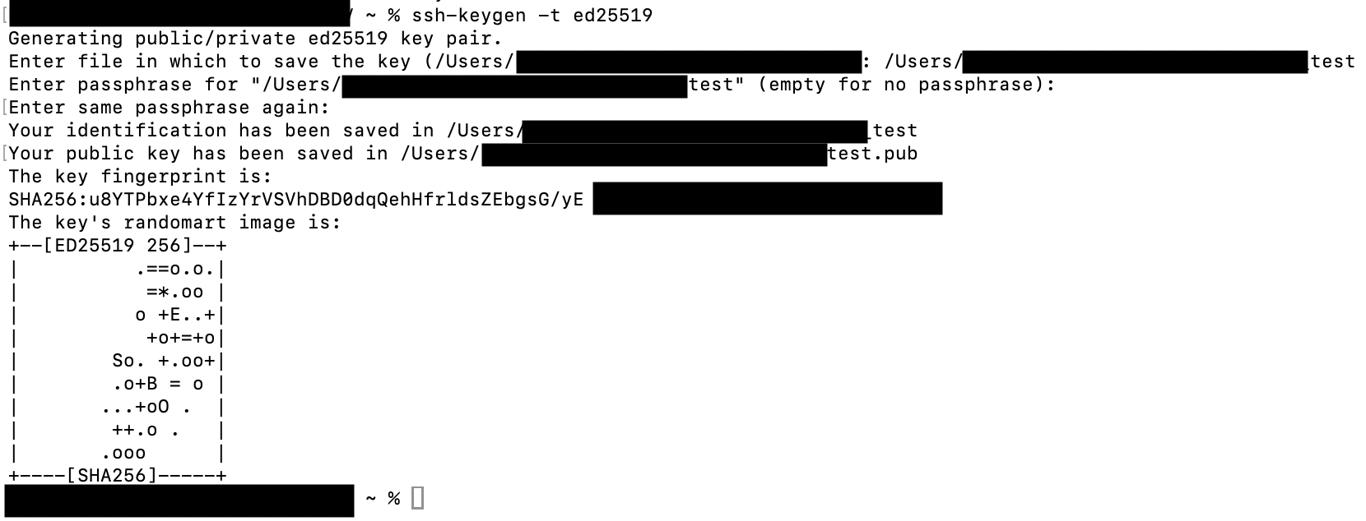
Open your terminal and run:
ssh-keygen -t ed25519
For RSA, use:
ssh-keygen -t rsa -b 4096
The rest of this tutorial uses Ed25519 file names. If you generated an RSA key, substitute id_rsa wherever you see id_ed25519.
You can also add a comment to label the key – useful when managing multiple keys for different servers or accounts:
ssh-keygen -t ed25519 -C "your-label"
Replace your-label with something identifiable, like a server name or project name.
Important! PuTTY uses its own key format and generator. If you’re on Windows using PuTTY, follow our guide to generate SSH keys with PuTTY instead.
3. Choose the key location and add a passphrase
After running ssh-keygen, the command asks where to save the key:
Enter file in which to save the key (/home/username/.ssh/id_ed25519):
Press Enter to save to the default ~/.ssh directory, or type a custom path if you’re managing multiple keys.
Warning! If you specify a file name that already exists, ssh-keygen will overwrite it. Make sure the existing key is no longer in use before proceeding.
Next, the command prompts for a passphrase:
Enter passphrase (empty for no passphrase):
A passphrase is optional, but strongly recommended. It encrypts the private key on disk, so if someone gains access to your machine, they still can’t use the key without knowing the passphrase.
Choose something long and unique. A short phrase or a mix of unrelated words works well.
Enter the passphrase twice to confirm. The command outputs a fingerprint and randomart image confirming the key was created.
Your two key files are now saved in the specified location. The public key has a .pub extension – for example, id_ed25519.pub. The private key has no extension.
4. Copy the public key to the remote server
The public key must be on the server for SSH key authentication to work. The server uses it to verify that your machine holds the matching private key. Only the public key goes to the server — never copy your private key file.
There are three ways to do this.
Option 1: Add the key through hPanel
Hostinger VPS users can add the public key directly through hPanel:
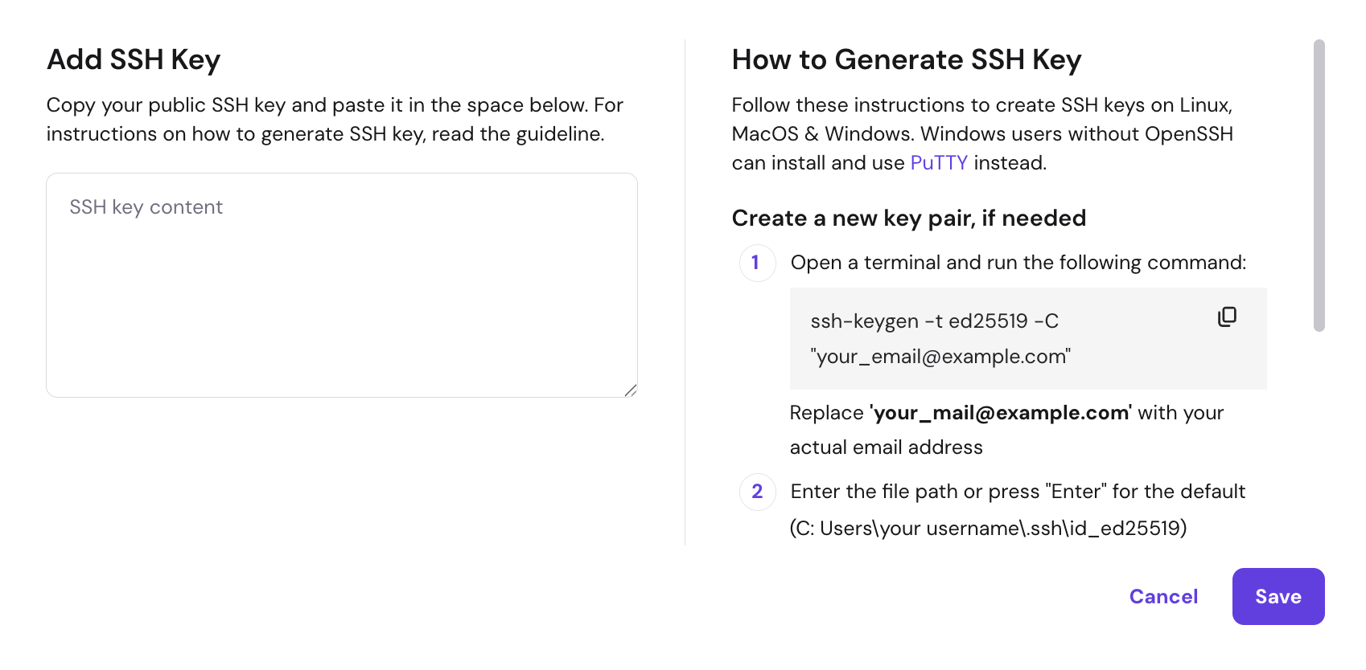
- Open the id_ed25519.pub file in a text editor and copy its contents.
- Log in to hPanel and go to VPS → your server → Settings → SSH keys.
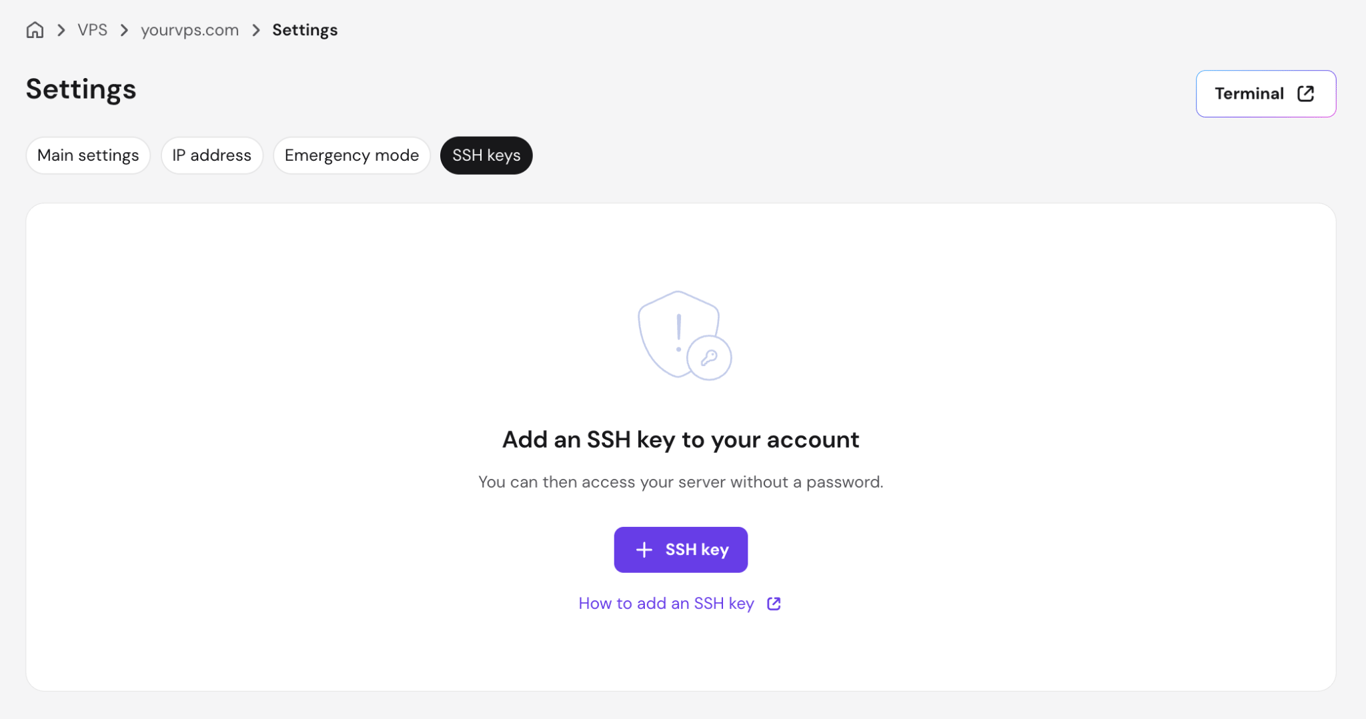
- Click + SSH key, paste the public key into the SSH key content field, then click Save.

Option 2: Use ssh-copy-id
ssh-copy-id copies the public key to the server automatically, enabling passwordless SSH login over an existing password connection:
ssh-copy-id username@192.0.2.1
Replace username with your server username and 192.0.2.1 with your server’s IP address. Enter your password when prompted. A successful transfer shows:
Number of key(s) added: 1
Option 3: Add the key manually
If ssh-copy-id isn’t available, log in to the server with your password and add the public key manually:
mkdir -p ~/.ssh chmod 700 ~/.ssh echo "your-public-key-content" >> ~/.ssh/authorized_keys chmod 600 ~/.ssh/authorized_keys
Replace your-public-key-content with the full contents of your .pub file.
5. Test SSH key authentication
Test the connection before making any other changes to your server’s SSH settings:
ssh username@192.0.2.1
A successful login takes you straight to the server prompt, or asks for your key passphrase if you set one. No password prompt means SSH key authentication is working.
If the server still asks for a password, there are three likely causes:
- The public key wasn’t added to the correct user account on the server.
- The wrong private key is being used locally.
- Password authentication is still enabled as a fallback.
- File permissions on ~/.ssh or authorized_keys are too open.
Check these before proceeding to the next step. A “Permission denied” error or persistent password prompt usually points to a misconfigured authorized_keys file or incorrect file permissions on the server.
6. Disable password authentication after SSH keys work
Once SSH key login is confirmed, disabling SSH password authentication removes one of the most common attack vectors on a server. Without password authentication exposed, brute-force and credential-stuffing attacks have nothing to target.
Warning! Only do this after testing SSH key login in a separate session. If you disable password authentication and your key doesn't work, you'll lose access to the server. Keep at least one active SSH session open as a safety net.
The process involves editing the sshd_config file on your server, setting PasswordAuthentication to no, and reloading the SSH service to apply the change.
How to manage SSH keys securely
SSH key management covers three areas: keeping passphrases accessible without retyping them, organizing multiple keys across servers, and responding quickly when a key is lost or compromised.
Use ssh-agent to manage passphrase-protected keys
ssh-agent runs in the background and stores your unlocked private keys for the duration of a session. Once you add a key to the agent, you don’t need to enter the passphrase every time you connect to a server.
To start the agent and add a key:
eval "$(ssh-agent -s)" ssh-add ~/.ssh/id_ed25519
Replace ~/.ssh/id_ed25519 with your private key path if it differs. To confirm the key was added:
ssh-add -l
This lists all identities currently held by the agent.
The commands above work on any Linux distribution. For other operating systems:
- macOS integrates with Keychain – add –apple-use-keychain to the ssh-add command to persist the passphrase across reboots.
- Windows PuTTY users can use Pageant, PuTTY’s equivalent key agent, available from the PuTTY downloads page.
Use the SSH config file for multiple servers
The SSH config file lets you define connection settings – server address, username, port, and private key – for each server in one place, so you don’t have to type them out every time you connect.
The file lives at ~/.ssh/config. Here’s an example entry:
Host my-server HostName 192.0.2.1 User username IdentityFile ~/.ssh/id_ed25519 Port 22
With this in place, ssh my-server connects using the settings defined above. You can add as many entries as needed, one per server or project.
Using a separate key pair for each server is recommended. If one private key is ever compromised, it only affects the server it’s associated with, not every server you manage.
What should you do if an SSH key is lost or compromised?
Deleting the private key from your local machine is not enough: any server that trusts the corresponding public key can still be accessed by anyone who has a copy of the private key.
The public key must be removed from every server it was added to. To do this:
- Remove the affected public key from the server’s authorized_keys file, or delete it through hPanel under Settings → SSH keys.
- Delete or quarantine the exposed private key from your local machine.
- Generate a new SSH key pair using ssh-keygen.
- Add the new public key to the server through hPanel, ssh-copy-id, or by editing authorized_keys manually.
- Test the new key to confirm it works before closing your session.
How to troubleshoot SSH key authentication
Most SSH key authentication failures come down to a small set of causes: wrong permissions, mismatched keys, or a configuration change that wasn’t applied.
Issue | Likely cause | What to check |
Server still asks for a password | Public key not installed correctly or password fallback enabled | Verify the public key is in ~/.ssh/authorized_keys on the server |
Permission denied error | Incorrect file permissions on ~/.ssh or authorized_keys | Set ~/.ssh to 700 and authorized_keys to 600 |
Wrong private key being used | SSH client defaulting to a different key | Use ssh -i ~/.ssh/id_ed25519 username@192.0.2.1 to specify the key explicitly |
Public key added to wrong user account | Key added to a different user’s authorized_keys | Confirm you’re connecting with the same username whose authorized_keys holds the public key |
SSH service not reloaded after config changes | sshd_config changes not applied | Run sudo systemctl reload ssh (for Ubuntu/Debian) or sudo systemctl reload sshd (for CentOS/Rocky Linux/AlmaLinux) to reload the SSH service |
Firewall, port, or IP address issues | Port 22 blocked or wrong IP used | Check your firewall rules and confirm the server’s IP address and SSH port are correct. SSH connection refused errors often point to a blocked port or incorrect IP |
Next steps after setting up SSH keys
With SSH key authentication in place, password-based login disabled, and your keys organized, the server connection is secure. Key-based authentication is the foundation – but it’s only the starting point for working with a remote server effectively.
From here, the priority is getting comfortable with day-to-day server operations. File management, process monitoring, user permissions, and service configuration all happen through the command line.
Learning basic SSH commands covers the essential operations you’ll use on every session, from navigating directories and transferring files to checking running processes and managing services.

Bruno is a Content Writer at Hostinger, focused on creating and optimizing helpful, engaging articles about web development and marketing. With a background in journalism, he combines storytelling with practical insights to make complex topics easier to understand. He has also contributed to publications like MacMagazine and Jornal A Tarde. Outside of work, Bruno enjoys exploring art, cooking, and technology.