How to set up WooCommerce Payments
Mar 10, 2026
/
Jordana A.
/
4 min Read

If you want to run an online store with WordPress, you should learn how to set up WooCommerce Payments. Also known as WooPayments, this native WooCommerce payment gateway supports over 135 currencies in 38 countries, enabling easy international payments.
In this tutorial, we’ll walk you through the steps to configure WooCommerce Payments on your website. By the end, you’ll be able to accept online payments from customers using various payment methods, from cards and Apple Pay to country-specific gateways.
Step-by-step guide to set up WooCommerce Payments
As one of the most popular WordPress eCommerce plugins, WooCommerce provides several payment options to accept local and international payments directly through your store. Popular options include bank transfer, PayPal, Stripe, and the plugin’s in-built payment solution ‒ WooPayments.
Unlike other WooCommerce payment gateways, the native payment solution integrates seamlessly with your WooCommerce store, letting you manage transactions directly from your dashboard. If it’s available in your region, you won’t need multiple plugins to handle different payment methods.
Follow these steps to set up WooCommerce Payments in your store using the WooPayments plugin.
1. Install and activate WooPayments plugins
WooPayments is designed for WooCommerce stores, so you must first install and activate WooCommerce. Check out our WooCommerce tutorial if you need help setting up your online store.
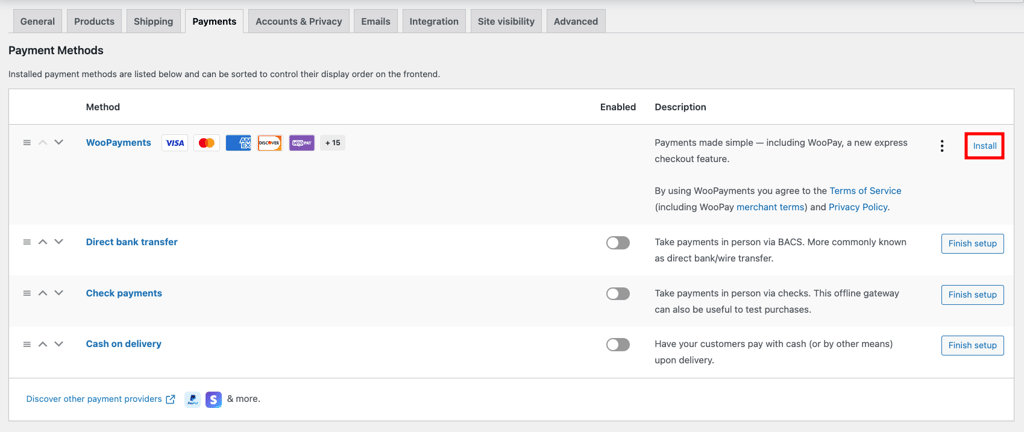
Once that’s done, find WooPayments in the plugin directory, then install and activate it. Alternatively, go to WooCommerce → Settings → Payments in your WordPress dashboard and hit Install next to the WooPayments option.
Did you know?
Hostinger’s Managed WooCommerce hosting plans include an onboarding flow for quick store setup and Smart WordPress Auto Updates for compatibility and security.
2. Connect WooPayments to your website
The Payments menu should appear in your admin dashboard by now. Access it and select Connect your store to start the configuration process.
Important! With Hostinger, you can build a WordPress website using a temporary domain. However, to set up WooPayments, your site must be connected to a registered domain.
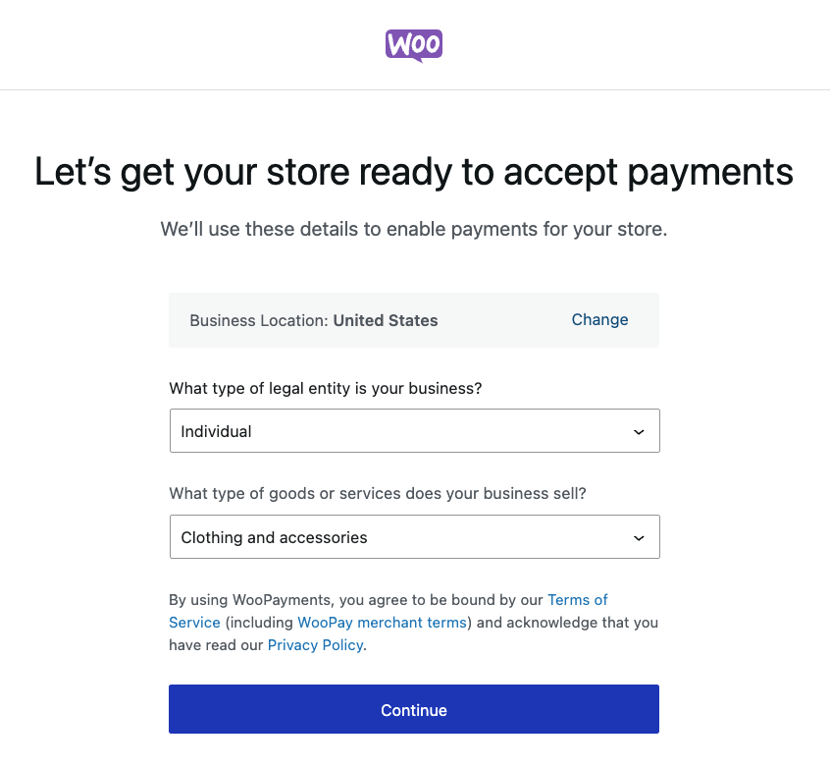
After approving the request to connect WooPayments with your WordPress website, verify your business details. Choose your business location, legal entity, and the products or services you want to offer. Hit Continue.
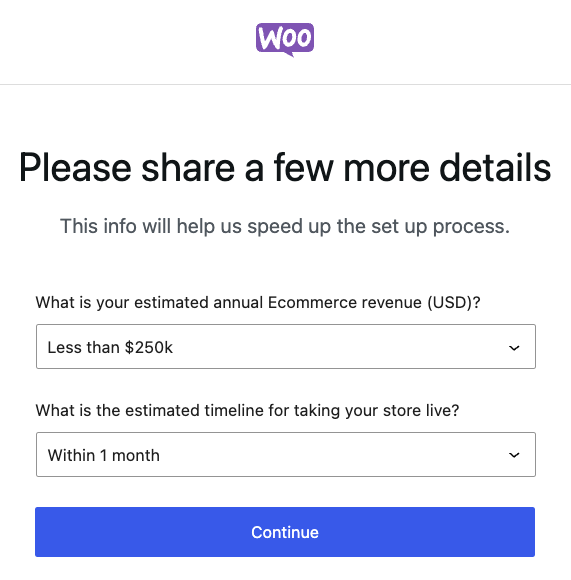
State your estimated annual revenue and the timeline for launching your business, then click Continue.
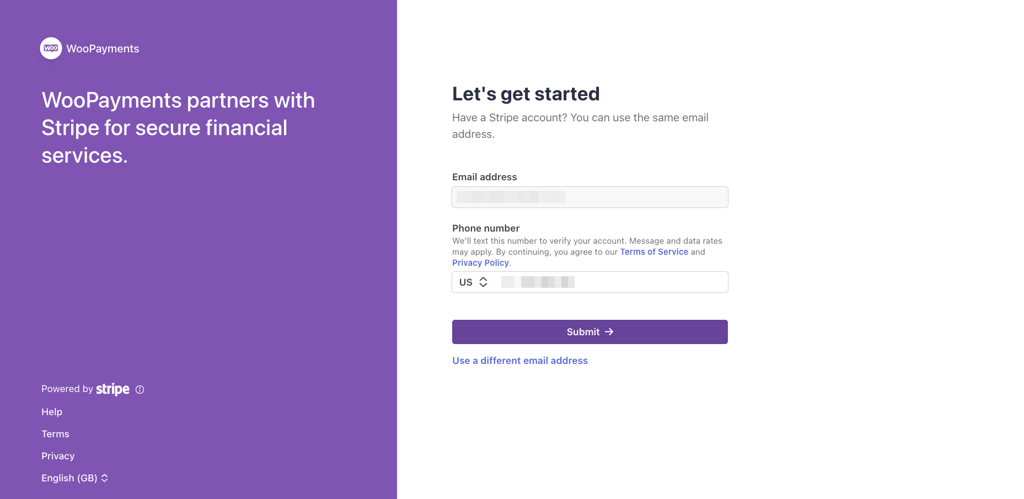
3. Connect WooPayments to your Stripe account
Since WooPayments is powered by Stripe, the next step is to connect the payment gateway with your Stripe account.
Here’s how:
- Enter your active email address and phone number to receive a verification code.
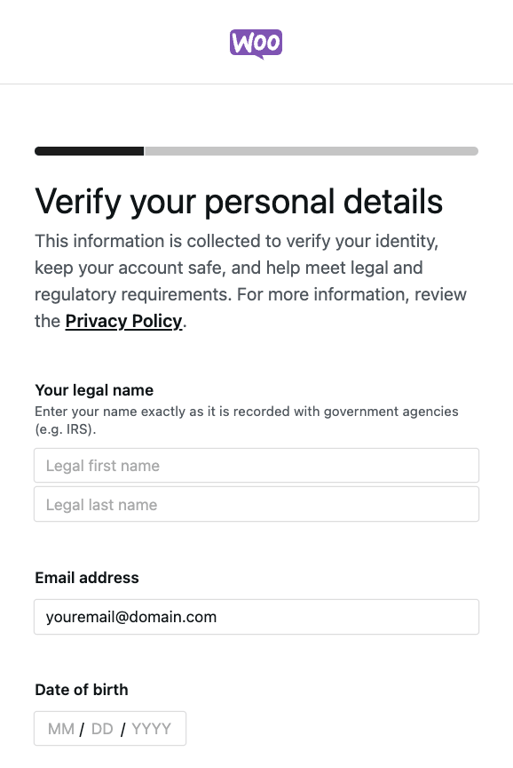
- Once Stripe verifies your account, you’ll see a form asking for your:
- Name
- Birth date
- Home address
- Phone number
- The last four digits of your Social Security number
Submit all the requested information and hit Continue.
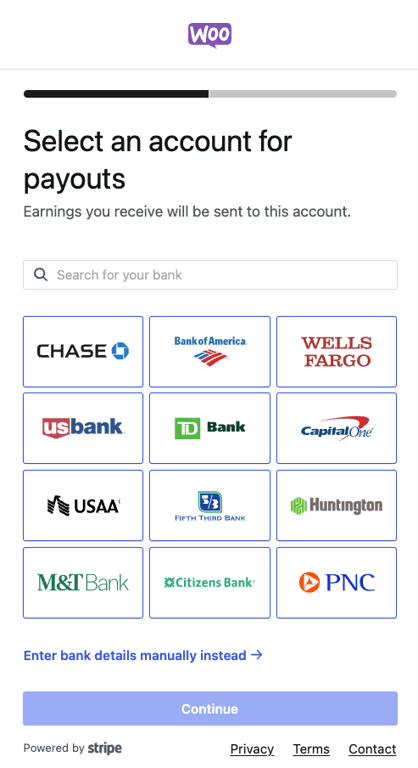
- Choose a bank for your payouts and log into your account to connect it to WooPayments. If you can’t find yours, look it up in the search bar or choose to enter your bank details manually.
- Review your information one more time, then hit Agree and submit.
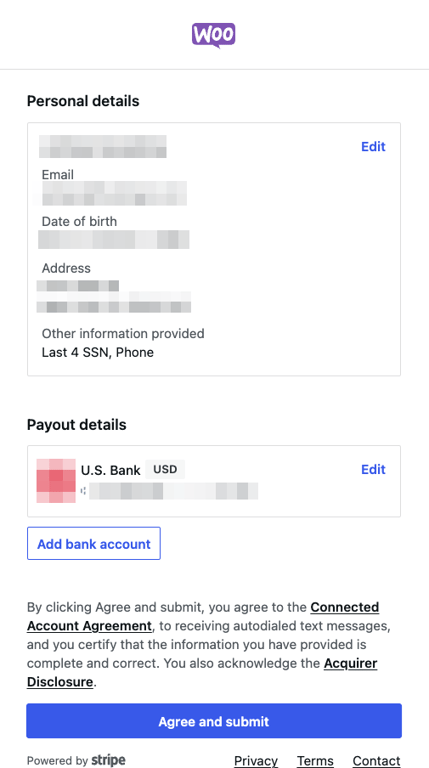
- Head to Payments → Overview and scroll down until you locate Account details. The Payments and Deposits options should be enabled if the process is successful.
4. Configure your WooCommerce payment settings
After connecting WooCommerce Payments to your store, set up the payment methods you want to offer. While it’s possible to enable all available options, focusing on the methods most relevant to your customers helps create a smoother checkout experience.
Head to Payments → Settings and check the Enable WooPayments option. Then, check your preferred payment methods from the list:
- Payments accepted on checkout: debit and credit cards, Bancontact, EPS, iDEAL, Przelewy24 (P24).
- Buy now, pay later: Affirm, Afterpay, Klarna.
- Express checkouts: WooPay, Apple Pay, Google Pay, Link by Stripe.
Make sure to configure other payment settings, including:
- Transaction preferences. Allow users to pay with a saved card and choose the interval for card payment authorization. You can also customize how your business name appears on customers’ bank statements and display contact information.
- Payouts. Manage your bank account and schedule your payout timing.
- Fraud protection. Set your payment risk level to avoid chargebacks. It defaults to Basic, which blocks payments if the card’s issuing bank can’t verify the CVV. Choose Advanced to set additional rules like IP address mismatch and order number threshold.
- Advanced settings. Enable multi-currency and log error messages to help with troubleshooting.
Remember to hit Save changes once you’re done.
5. Test and verify your payment setup
Your WooCommerce store is technically ready to accept payments through WooPayments. However, we recommend testing it first to make sure everything works correctly.
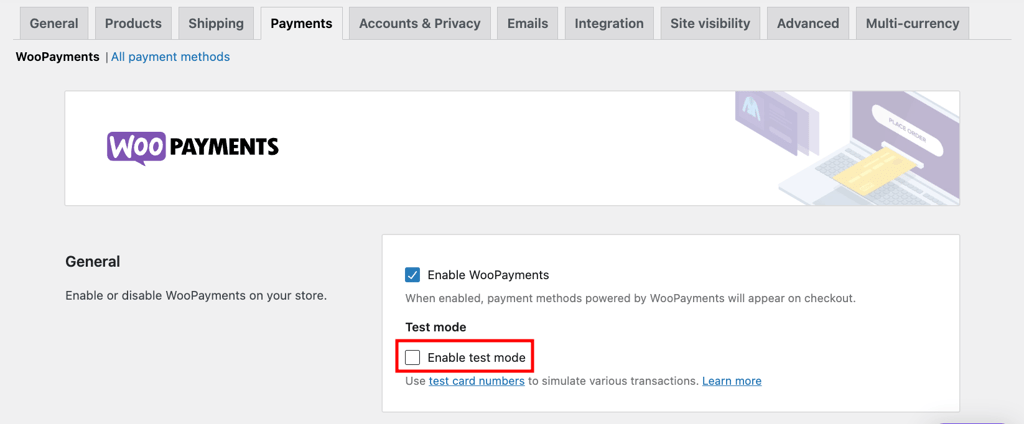
Luckily, WooCommerce Payments comes with a test mode. Here’s how to verify your payment setup:
- Go to WooCommerce → Settings and select the Manage button next to WooPayments. Check the Enable test mode option, then hit Enable once again to confirm. Scroll down and click Save changes.
- Open your WooCommerce catalog, add items to the cart, and proceed to checkout.
- On the checkout page, select a payment method and enter the payment details using one of the test cards provided by WooCommerce. Make sure you use these dummy cards, as WooCommerce won’t refund transaction fees for these orders.
- Head to Payments → Transactions to check whether the payment goes through. The transaction record should appear in WooCommerce → Orders.
Test all the payment methods you offer before going live to verify the customer journey is smooth and error-free.

Conclusion
WooCommerce Payments is a flexible payment gateway designed just for WooCommerce stores, so you don’t have to worry about compatibility issues. Plus, there are no setup or monthly fees.
Here’s a quick recap of how to set it up:
- Install and activate WooPayments.
- Connect WooPayments to your WordPress site.
- Link it to your Stripe account.
- Configure your payment settings.
- Test and verify your setup.
Need help setting up other payment methods in WooCommerce? Let us know in the comments below!
How to set up WoCommerce Payments FAQ
How do I accept payments in WooCommerce?
To accept payments in WooCommerce, you must enable the functionality. Head to WooCommerce → Settings → Payments and configure the settings of your chosen payment gateway. You can also install payment gateway plugins from the WooCommerce marketplace.
Do I need to set up a payment gateway for WooCommerce?
Yes, you need a payment gateway in WooCommerce to handle payments securely. It makes checkout smooth for your customers, supports different payment methods, and helps you process transactions safely ‒ all key for building trust and boosting sales.

Jordana is a Senior Content Writer with a background in Information Systems. She has over five years of experience in WordPress and is casually dabbling with PHP and MySQL. Her passion for writing and technology drives her to create tutorials for anyone wanting to build their online presence. Follow her on LinkedIn.


Comments
0 responses