How to set up an FTP server on an Ubuntu VPS
Dec 22, 2025
/
Domantas G.
/
7 min Read
File Transfer Protocol (FTP) is a method for sharing files between computers over the internet using the TCP/IP protocol. It incorporates a client-server framework and Secure Sockets Layer (SSL) to ensure secure data transfer.
FTP is similar to the Hypertext Transfer Protocol (HTTP) and Simple Mail Transfer Protocol (SMTP) but handles a different data type. It is essential for managing remote systems like a virtual private server (VPS).
In this article, we will explain how to set up an FTP server on an Ubuntu VPS. We’ll be using a vsftpd server, one of the fastest and most secure FTP servers for UNIX-like systems.

Prerequisites for setting up an FTP server
Before getting into the steps, purchase an Ubuntu VPS hosting plan with extensive software support, like Hostinger’s, to avoid incompatibility issues. For this tutorial, your server must be running Ubuntu as the commands may differ depending on the Linux distribution you’re using.
Connect to your server using an SSH client like PuTTY, Terminal, or Hostinger’s browser terminal. Hostinger users can find the IP address and login details in hPanel’s VPS overview menu.

By default, you will connect as root. We recommend creating a new account with superuser privileges to avoid accidental destructive command execution. Here are the commands:
adduser account
usermod -aG sudo account
Replace account with your desired username. Then, switch to the new user by running the following command and proceed with the setup:
su account
cd

How to set up an FTP server on Ubuntu
In this section, we’ll describe six steps to set up an FTP server on Ubuntu. If you encounter difficulties along the way, use Kodee, our VPS AI assistant, to help troubleshoot any issues.
1. Install vsftpd
Begin by installing vsftpd, which is responsible for enabling the FTP service on your VPS. Here are the steps:
- Download and install the package updates to ensure you get the latest vsftpd version. Run the command:
sudo apt-get update
- Wait until the update finishes and proceed with the vsftpd installation using this command:
sudo apt-get install vsftpd
- You will be prompted with a confirmation message. Type Y and hit Enter to continue with the vsftpd daemon installation.
- After the installation is complete, back up the original file so you can start with a blank configuration file:
sudo cp /etc/vsftpd.conf /etc/vsftpd.conf.original
2. Allow FTP traffic from the firewall
After installing, configure your system’s firewall rules to allow the Ubuntu FTP server to communicate via the internet. You can do so using the Ubuntu Uncomplicated Firewall (UFW). Here are the steps:
- Start by checking whether the firewall is already installed on your server using this command:
sudo ufw status
- If you see the ufw: command not found error, the Ubuntu firewall is not installed. Download and enable it by running the following commands subsequently. Skip this step if it is already configured:
sudo apt-get install ufw
sudo ufw enable
- Run this command to verify the firewall status:
sudo ufw status
- Once it’s active, run these commands individually to make sure FTP traffic is allowed:
sudo ufw allow OpenSSH
sudo ufw allow 20/tcp
sudo ufw allow 21/tcp
sudo ufw allow 990/tcp
sudo ufw allow 40000:50000/tcp
- Run the following command again to verify that you have added the new firewall rules correctly:
sudo ufw status
Check the Terminal output to ensure you have these ports open for the FTP server to work properly:
- OpenSSH is required if you wish to access your server via SSH. Sometimes, this option is enabled by default.
- Ports 20 and 21 for the FTP traffic.
- Ports 40000:50000 are reserved for the range of passive ports that will be set later in the configuration file.
- Port 990 allows TLS encryption when it is enabled.
Aside from UFW, Hostinger VPS users can ask Kodee to set up a new firewall rule on their server. For example, you can ask it, “Open port 20, 21, 22, 990, and 40000:50000 TCP on my server to any IP address.”
3. Create the user directory
After enabling communication for the protocol, create a new user that will use the FTP access. To do so, run the following:
sudo adduser hostinger
Replace the placeholder with your desired name. Then, enter a user password and fill in all the required details.
When configuring FTP, you should ideally restrict its access to one specific directory for security purposes. For this reason, vsftpd uses chroot jails to limit a local user to only their home directory by default.
However, vsftpd security might prevent non-FTP users from writing on their home directories. To solve this issue, create an FTP directory that acts as chroot, containing a writable folder for the transferred files. Here are the steps:
- Use the following command to create the FTP folder. Replace the account name accordingly:
sudo mkdir /home/hostinger/ftp
- Then, set the ownership using the chown command:
sudo chown nobody:nogroup /home/hostinger/ftp
- Remove the write permission:
sudo chmod a-w /home/hostinger/ftp
- Now, use the following command to verify the permissions:
sudo ls -la /home/hostinger/ftp
- The output should look like this:
total 8
dr-xr-xr-x 2 nobody nogroup 4096 Oct 8 11:32 .
drwxr-xr-x 3 hostinger hostinger 4096 Oct 8 11:32 ..
Hostinger VPS users can also use Kodee to list all files, including hidden ones, along with their permissions in a specific directory. All you need to do is ask something like “Can you list all files, including hidden ones, in /home/hostinger/ftp along with their permissions?”
- Next, create the directory to hold the files and assign ownership:
sudo mkdir /home/hostinger/ftp/files
sudo chown hostinger:hostinger /home/hostinger/ftp/files
- Finally, add a test file to the directory, which we will use to test everything later on:
echo "vsftpd sample file" | sudo tee /home/hostinger/ftp/files/sample.txt
4. Configure vsftpd
Next, configure vsftpd and the FTP access. In this example, we will allow a single user to connect using a local shell account. The two key configurations required for this are already set in the vsftpd.conf configuration file. Here are the steps:
- Open the vsftpd configuration file using the nano command:
sudo nano /etc/vsftpd.conf
- Check that the following settings exist:
# Allow anonymous FTP? (Disabled by default).
anonymous_enable=NO
#
# Uncomment this to allow local users to log in.
local_enable=YES
- Enable the write_enable parameter. To do so, uncomment it by removing the hash sign (#):
write_enable=YES
- Uncomment chroot_local_user and change the value to YES to limit FTP user access only to files within the allowed directory. In the file, there are two of these parameters, and you must do the same for both.
chroot_local_user=YES
- Next, add the user_sub_token setting in the local_root directory path at the bottom of the file. It will apply the configuration file to the current user and other accounts you add later:
user_sub_token=$USER local_root=/home/$USER/ftp
- Specify the number of ports at the bottom of the configuration file to ensure your FTP server can accept substantial connections. Your firewall rules must allow them:
pasv_min_port=40000 pasv_max_port=50000
- To improve security, allow FTP access only to users specified in the configuration file. To do so, add the following parameter at the bottom. Ensure you set the userlist_deny flag to NO.
userlist_enable=YES userlist_file=/etc/vsftpd.userlist userlist_deny=NO
- Once done, press Ctrl + X, Y, and Enter to confirm the file changes.
- After tweaking the configuration, create a user list and add your FTP account to the file. Run the following command in Terminal:
echo "hostinger" | sudo tee -a /etc/vsftpd.userlist
- Verify that the user is active by running the command below. Terminal should output the account name you added, which is “hostinger” in our case:
cat /etc/vsftpd.userlist

- Restart the FTP daemon using the following command to apply the changes:
sudo systemctl restart vsftpd
5. Secure the FTP server
Since FTP doesn’t encrypt data by default, install an SSL/TLS certificate to secure the file transfer. Here are the steps:
- Issue an SSL certificate for the Ubuntu FTP server. In our case, we will make a key that is valid for 365 days and utilizes a 2048-bit private RSA key using this command:
sudo openssl req -x509 -nodes -days 365 -newkey rsa:2048 -keyout /etc/ssl/private/vsftpd.pem -out /etc/ssl/private/vsftpd.pem
- Enter the corresponding personal details in the prompted field.
- After you finish creating the certificate, open the vsftpd configuration file again:
sudo nano /etc/vsftpd.conf
- Scroll down to the end of the file, and you should find these two lines that start with rsa. If they are uncommented, add the hash sign:
# rsa_cert_file=/etc/ssl/certs/ssl-cert-snakeoil.pem
# rsa_private_key_file=/etc/ssl/private/ssl-cert-snakeoil.key
- Now, point the configuration file to the newly created certificate. Add the following directories below the two lines:
rsa_cert_file=/etc/ssl/private/vsftpd.pem
rsa_private_key_file=/etc/ssl/private/vsftpd.pem
- Next, enable the SSL certificate and restrict the connection to only clients with an active certificate by adding this line:
ssl_enable=YES
- Then, add the following lines to reject anonymous connections over SSL:
allow_anon_ssl=NO

force_local_data_ssl=YES

force_local_logins_ssl=YES
- Enable the server to use TLS by adding the following parameters:
ssl_tlsv1=YES

ssl_sslv2=NO

ssl_sslv3=NO
- Next, disable SSL reuse to prevent FTP clients from breaking down and use high encryption cipher suites to set the key lengths to 128 bits or more. Do so by adding these lines:
require_ssl_reuse=NO

ssl_ciphers=HIGH
- Save the file by pressing Ctrl + X, Y, and Enter.
- Finish by restarting vsftpd to apply the new configurations:
sudo systemctl restart vsftpd
Great work! You have now configured the FTP server on your Ubuntu VPS to work over the SSL/TLS protocol.
6. Test the connection with FileZilla
The last step is to test whether your Ubuntu FTP server is working properly and securely. You can do so using an FTP client with encryption support. In this tutorial, we will use FileZilla.
After you download and install the FileZilla FTP client in your local system, follow these steps:
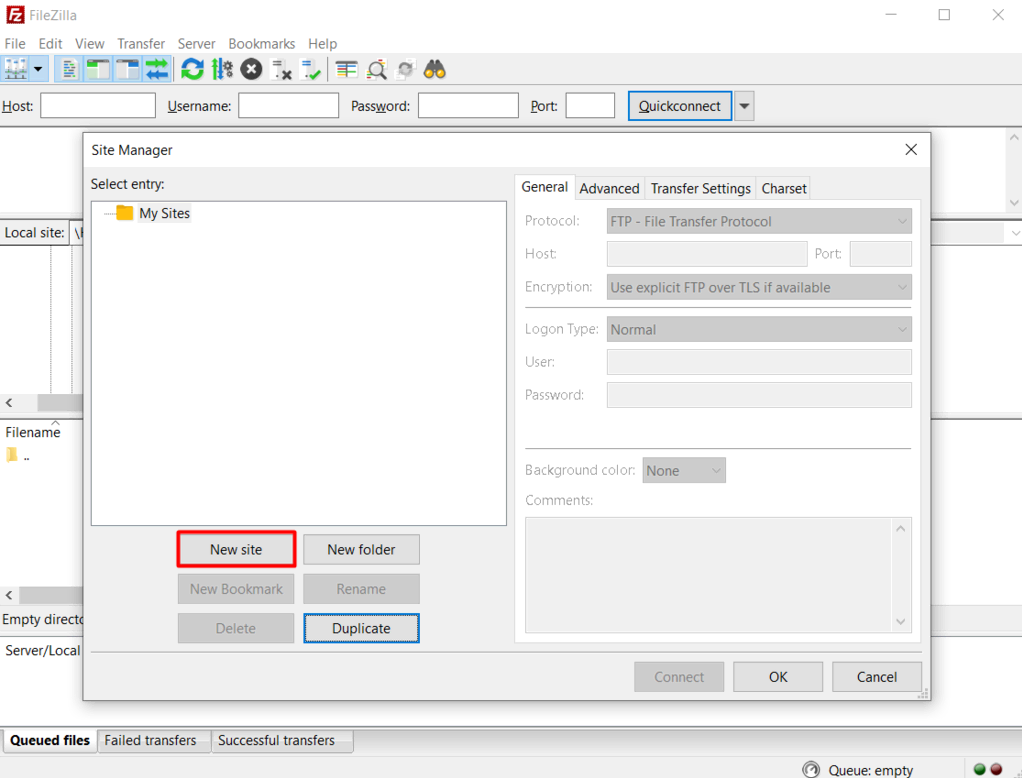
- Launch FileZilla and click on the Site Manager icon in the top right corner below File.
- A new window will appear. Click the New Site button and enter your Ubuntu FTP server details.
- Enter your newly created Ubuntu FTP server information in the corresponding fields. Since we configured it to use TLS, choose the Use explicit FTP over TLS option. The final configuration should look like this:
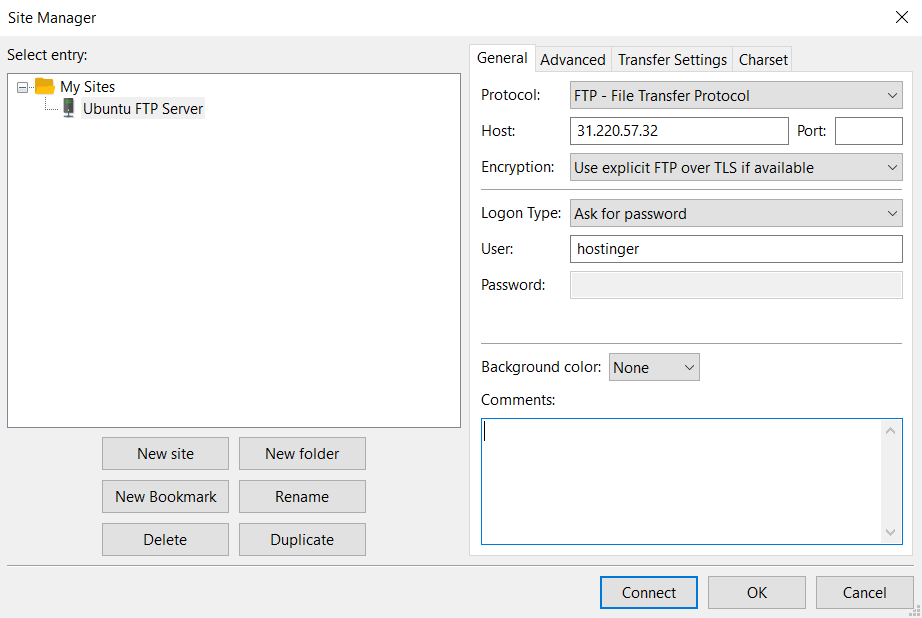
- Click Connect, and a screen asking you to enter the FTP user’s password will appear. Fill in the credentials and hit OK.
- Finally, verify the SSL certificate of your Ubuntu VPS FTP server. After confirming, the root directory with the test file should appear on your screen.
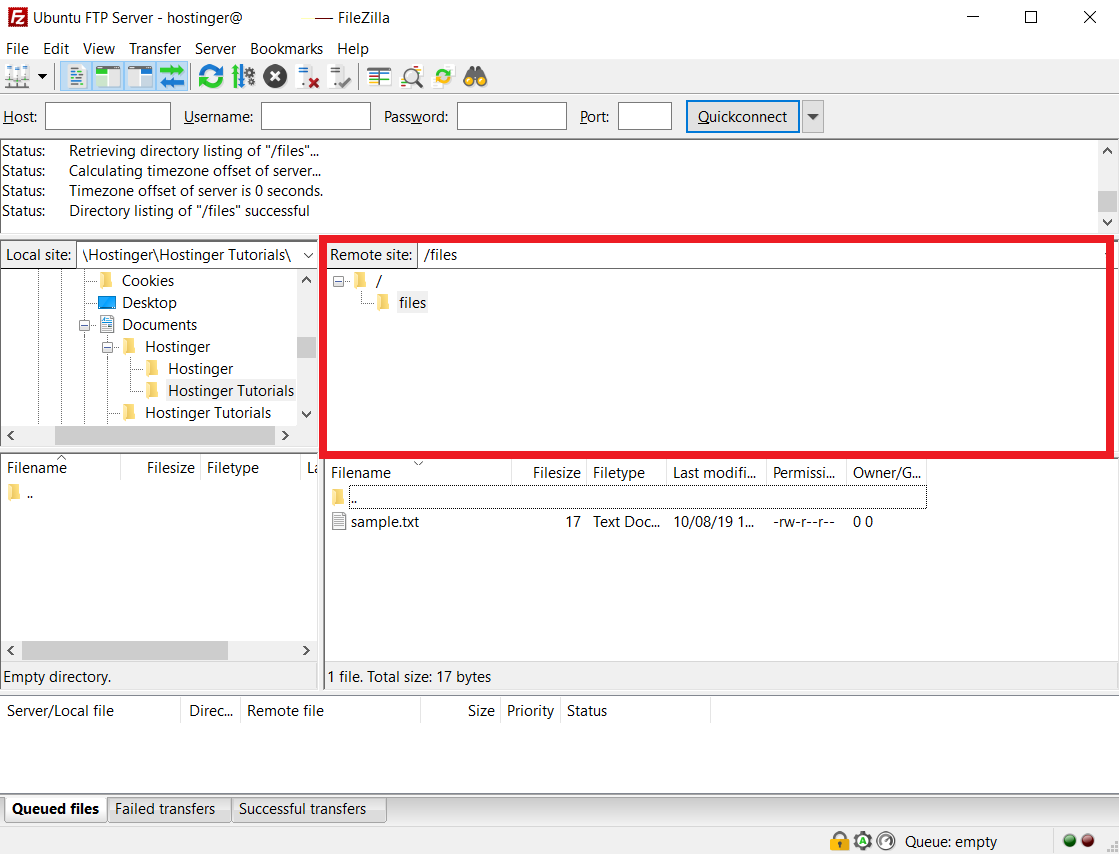
That’s all! Now, you can perform various file transfers from your computer to the Ubuntu FTP server and vice versa.
Conclusion
Setting up an Ubuntu FTP server simplifies file transfer between your remote server and local computer, improving development efficiency. In addition, it enhances security and ensures reliable connection by utilizing the SSL/TLS and TCP/IP protocols.
In this tutorial, we have explored how to set up an FTP server on an Ubuntu VPS using vsftpd in six steps. Here is a recap:
- Install vsftpd on your Ubuntu server and back up the original configuration file.
- Allow FTP connections through the firewall.
- Create a user directory accessible only for specified accounts.
- Configure the vsftpd settings.
- Secure the FTP server using SSL/TLS.
- Test your FTP connection with FileZilla.
Before setting up the FTP, remember to connect to your VPS via SSH and create a new superuser account. If you encounter difficulties during the process, use Kodee to help troubleshoot the issue quickly.
All of the tutorial content on this website is subject to Hostinger's rigorous editorial standards and values.

Domantas leads the content and SEO teams forward with fresh ideas and out of the box approaches. Armed with extensive SEO and marketing knowledge, he aims to spread the word of Hostinger to every corner of the world. During his free time, Domantas likes to hone his web development skills and travel to exotic places.