How to install WordPress on Ubuntu using Docker
Mar 10, 2026
/
Ariffud M. & Aris S.
/
6 min Read

Installing WordPress on an Ubuntu virtual private server (VPS) commonly requires LAMP (Linux, Apache, MySQL, PHP). However, you can also set up the platform using Docker, a containerization tool that packages applications and their dependencies together.
Using Docker, WordPress installation becomes simpler, as it runs from pre-built images containing all necessary components. This approach offers several benefits: it’s modular, easy to update and scale, and quick to redeploy should you need a new instance.
In this article, we’ll explain how to install WordPress on Ubuntu using Docker. You’ll learn each step, from preparing prerequisites to managing WordPress as a containerized content management system (CMS).
Download free docker cheat sheet
Prerequisites for installing WordPress with Docker
Before installing WordPress on Docker, make sure you have a VPS running a recent version of Ubuntu, such as 22.04 or later, to avoid compatibility issues.
Your server should also offer full root access to prevent permission errors when modifying system files. Additionally, point a domain name to your VPS so your WordPress website will be accessible to the public.
If you don’t have a VPS, we suggest getting a Hostinger Docker VPS plan. Since Docker and WordPress are relatively lightweight, our KVM 1 plan – with a single-core CPU, 4 GB of RAM, and 50 GB of storage – should be sufficient. You can upgrade to a higher-tier plan if you need more resources as your site grows.
With Hostinger, you can connect to your VPS as root directly from your web browser, making the installation process more efficient.
If you encounter difficulties during setup, our Kodee AI assistant is available to guide you through managing your WordPress instance. Simply type your questions or describe your needs, and Kodee will write a step-by-step guide for you.

How to install WordPress with Docker Compose
Follow these steps to install WordPress using Docker. Before proceeding, access your VPS command-line interface (CLI) using the PuTTY SSH client or terminal. Alternatively, use Hostinger Browser terminal if you need a simpler solution.
1. Install Docker and Docker Compose
Hostinger users can install Docker and Docker Compose in a few clicks without commands using the preconfigured VPS template. This method is simpler and suitable for beginners.
Warning! Installing a new VPS template will wipe your data. Back up important files before proceeding.
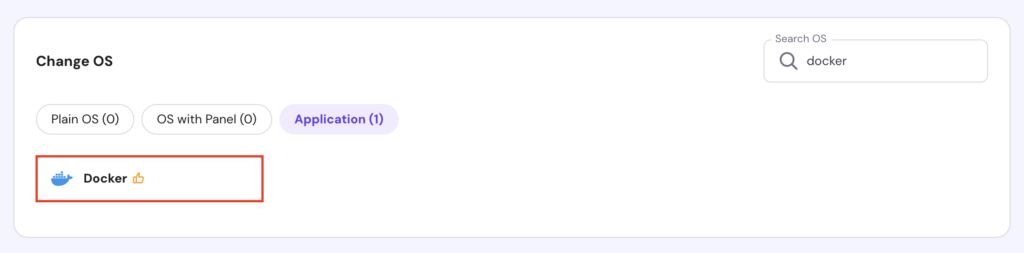
To do so, simply open your VPS management page on hPanel and navigate to OS & Panel → Operating System. Select Docker and click Change OS.
If you want more flexibility when configuring the tool, install Docker and Docker Compose using commands.
Now, verify if Docker and Docker Compose are configured correctly using the following commands:
docker --version
docker-compose --version
If these tools work properly, your CLI will output their version number:

2. Set up your project directory
Create a new project directory to house all your Docker and WordPress files using this command:
mkdir wordpress
By default, the command will create the wordpress folder in your current user’s home directory. You can create it in another location or use a different name.
Then, open the folder using the command below:
cd wordpress
Once inside, you can start setting up Docker and WordPress.
3. Create a Docker Compose file
The Docker Compose file provides information about software components to install in your container. In this case, it specifies the configuration for WordPress and the database application.
To create a Docker Compose file, run the following command:
sudo nano docker-compose.yml
Paste the following configuration. Replace the username, password, and database name with your desired value.
version: "3"
services:
  db:
    image: mysql:latest
    restart: always
    environment:
      MYSQL_ROOT_PASSWORD: MySQLRootPassword
      MYSQL_DATABASE: MySQLDatabaseName
      MYSQL_USER: MySQLUsername
      MYSQL_PASSWORD: MySQLUserPassword

  wordpress:
    depends_on:
      - db
    image: wordpress:latest
    restart: always
    ports:
      - "80:80"
    environment:
      WORDPRESS_DB_HOST: db:3306
      WORDPRESS_DB_USER: MySQLUsername
      WORDPRESS_DB_PASSWORD: MySQLUserPassword
      WORDPRESS_DB_NAME: MySQLDatabaseName
    volumes:
      - "./:/var/www/html"

  phpmyadmin:
    image: phpmyadmin/phpmyadmin
    restart: always
    ports:
      - "8080:80"
    environment:
      PMA_HOST: db
      PMA_USER: MySQLUsername
      PMA_PASSWORD: MySQLUserPassword

volumes:
  mysql: {}
Save the changes and return to the main shell by pressing Ctrl + X → Y → Enter.
4. Start the Docker container
Run Docker Compose using this command to install and launch WordPress in a container. Remember that it only works when you are inside the project directory:
docker-compose up -d
Docker Compose will pull images from Docker Hub as specified in your YAML file, configure the container, and set up the network connection. Depending on your internet speed, this setup process might take a few minutes.

Once finished, you should see the Done status and return to the main shell.
5. Access the WordPress installation
With your Docker container up and running, you can now access the new WordPress installation through your web browser. Since your domain name is already pointed to the VPS, simply enter it in the browser’s address bar.
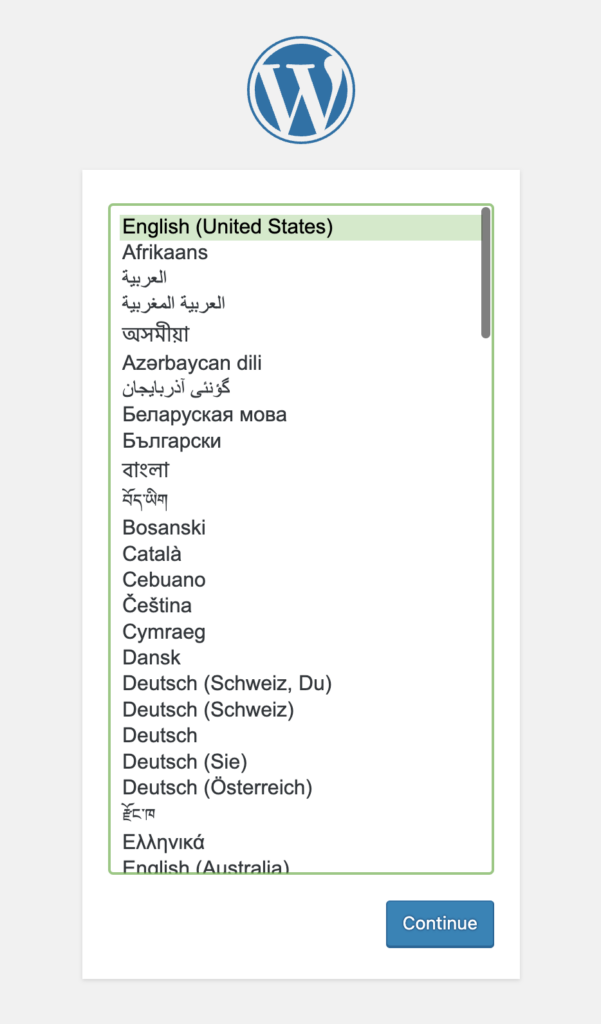
This will take you to the WordPress setup wizard. Choose your preferred language and click Continue.
Next, fill in the necessary information about your site, including the site title, username, password, and email address. Once complete, hit Install WordPress.

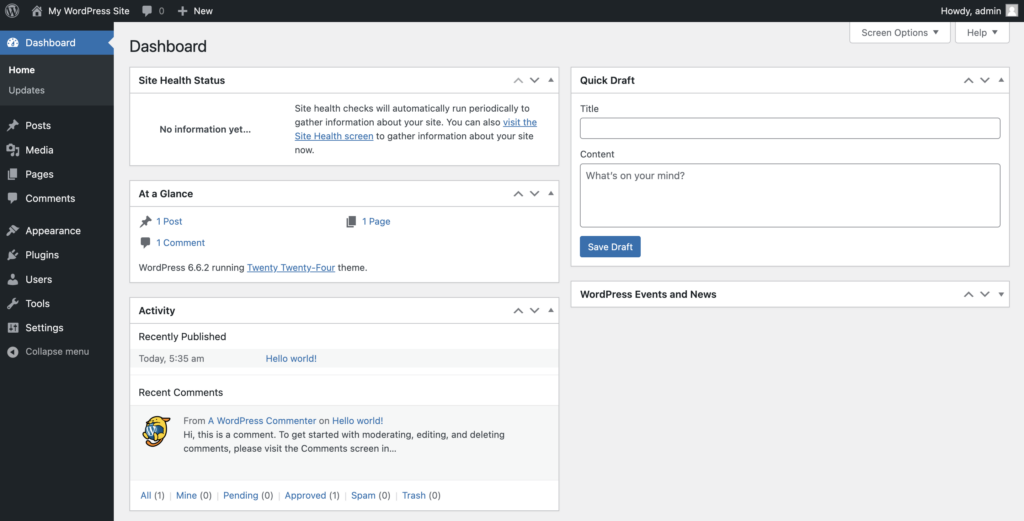
After that, click Log In to enter the WordPress dashboard. Use the credentials you just created to access your admin panel.
6. Customize your Docker configuration
For production environments, you’ll need additional configurations so that your WordPress site is secure and optimized for performance. Below are key customizations to deploy WordPress using Docker:
Using environment files
To protect sensitive data, avoid hardcoding credentials like database usernames and passwords in your Docker Compose file. Instead, store these values in an environment file (.env).
In your wordpress directory, create a .env file:
nano .env
Define your WordPress database credentials in the .env file, replacing placeholders with your own values:
MYSQL_ROOT_PASSWORD=MySQLRootPassword
MYSQL_DATABASE=MySQLDatabaseName
MYSQL_USER=MySQLUsername
MYSQL_PASSWORD=MySQLUserPassword
Save the file, then update the docker-compose.yml file to use these environment variables:
db:
  image: mysql:latest
  restart: always
  environment:
    MYSQL_ROOT_PASSWORD: ${MYSQL_ROOT_PASSWORD}
    MYSQL_DATABASE: ${MYSQL_DATABASE}
    MYSQL_USER: ${MYSQL_USER}
    MYSQL_PASSWORD: ${MYSQL_PASSWORD}
Save the changes and restart Docker Compose to apply the new configurations:
docker-compose up -d
Obtaining SSL certificates
An SSL certificate is important for protecting user data and improving search engine rankings. To enable automatic SSL certificates, add an NGINX proxy with Let’s Encrypt in your docker-compose.yml file:
services:
  nginx-proxy:
    image: jwilder/nginx-proxy
    container_name: nginx-proxy
    ports:
      - "80:80"
      - "443:443"
    volumes:
      - /var/run/docker.sock:/tmp/docker.sock:ro
  letsencrypt-nginx-proxy-companion:
    image: jrcs/letsencrypt-nginx-proxy-companion
    container_name: letsencrypt
    environment:
      NGINX_PROXY_CONTAINER: nginx-proxy
    volumes:
      - /var/run/docker.sock:/var/run/docker.sock:ro
      - ./certs:/etc/nginx/certs
      - ./vhost.d:/etc/nginx/vhost.d
      - ./html:/usr/share/nginx/html
Next, remove port mapping from the wordpress service to avoid conflicts with nginx-proxy. Also, include SSL labels by replacing your_email and your_domain.com with your actual credentials:
wordpress:
  image: wordpress:latest
  labels:
    - "VIRTUAL_HOST=your_domain.com"
    - "LETSENCRYPT_HOST=your_domain.com"
    - "LETSENCRYPT_EMAIL=your_email@your_domain.com"
In the same wordpress service, mount only the wp-content directory so that only necessary files are shared between the host and the container:
volumes:
  - ./wp-content:/var/www/html/wp-content
Here’s the final docker-compose.yml content after using environment variables and adding SSL support with NGINX:
version: "3"

services:
  db:
    image: mysql:latest
    restart: always
    environment:
      MYSQL_ROOT_PASSWORD: ${MYSQL_ROOT_PASSWORD}
      MYSQL_DATABASE: ${MYSQL_DATABASE}
      MYSQL_USER: ${MYSQL_USER}
      MYSQL_PASSWORD: ${MYSQL_PASSWORD}
    volumes:
      - mysql:/var/lib/mysql

  wordpress:
    depends_on:
      - db
    image: wordpress:latest
    restart: always
    environment:
      WORDPRESS_DB_HOST: db:3306
      WORDPRESS_DB_USER: ${MYSQL_USER}
      WORDPRESS_DB_PASSWORD: ${MYSQL_PASSWORD}
      WORDPRESS_DB_NAME: ${MYSQL_DATABASE}
    volumes:
      - ./wp-content:/var/www/html/wp-content
    labels:
      - "VIRTUAL_HOST=your_domain.com"
      - "LETSENCRYPT_HOST=your_domain.com"
      - "LETSENCRYPT_EMAIL=your_email@your_domain.com"

  phpmyadmin:
    image: phpmyadmin/phpmyadmin
    restart: always
    ports:
      - "8080:80"
    environment:
      PMA_HOST: db
      PMA_USER: ${MYSQL_USER}
      PMA_PASSWORD: ${MYSQL_PASSWORD}

  nginx-proxy:
    image: jwilder/nginx-proxy
    container_name: nginx-proxy
    ports:
      - "80:80"
      - "443:443"
    volumes:
      - /var/run/docker.sock:/tmp/docker.sock:ro
      - ./certs:/etc/nginx/certs
      - ./vhost.d:/etc/nginx/vhost.d
      - ./html:/usr/share/nginx/html

  letsencrypt-nginx-proxy-companion:
    image: jrcs/letsencrypt-nginx-proxy-companion
    container_name: letsencrypt
    environment:
      NGINX_PROXY_CONTAINER: nginx-proxy
    volumes:
      - /var/run/docker.sock:/var/run/docker.sock:ro
      - ./certs:/etc/nginx/certs
      - ./vhost.d:/etc/nginx/vhost.d
      - ./html:/usr/share/nginx/html

volumes:
  mysql: {}
Don’t forget to save these changes and restart Docker Compose afterward:
docker-compose up -d
7. Manage and scale WordPress with Docker
After running WordPress in Docker for a while, scale your setup to optimize its performance and regularly back up your files to maintain data integrity. Here’s how:
Scaling WordPress containers
As your site traffic grows, consider scaling your WordPress service to run multiple containers. It lets you evenly distribute user requests across different containers for optimal performance and uptime.
In your Docker Compose file, specify the desired number of replicas, such as 3, to add more instances of your WordPress container:
 wordpress:
    depends_on:
      - db
    image: wordpress:latest
    restart: always
    ports:
      - "80:80"
  environment:
    WORDPRESS_DB_HOST: db:3306
    WORDPRESS_DB_USER: ${MYSQL_USER}
    WORDPRESS_DB_PASSWORD: ${MYSQL_PASSWORD}
    WORDPRESS_DB_NAME: ${MYSQL_DATABASE}
  volumes:
    - "./:/var/www/html"
  deploy:
    replicas: 3
Apply your changes by running:
docker-compose up -d --scale wordpress=3
Docker will now start additional WordPress containers and distribute traffic evenly between them.
Backing up WordPress files
To protect your WordPress site against data loss or corruption, you should back up both WordPress files and the database.
Since Docker mounts the WordPress directory as a volume, you can back up this directory using a simple command like this:
cp -r /path/to/wordpress /path/to/backup/location
To back up your MySQL database, run the following command. Replace [db_container_name], [MYSQL_USER], [MYSQL_PASSWORD], and [MYSQL_DATABASE] with your actual database container name and credentials:
docker exec [db_container_name] /usr/bin/mysqldump -u [MYSQL_USER] -p[MYSQL_PASSWORD] [MYSQL_DATABASE] > backup.sql
This command creates a database dump, which you can restore later if needed.
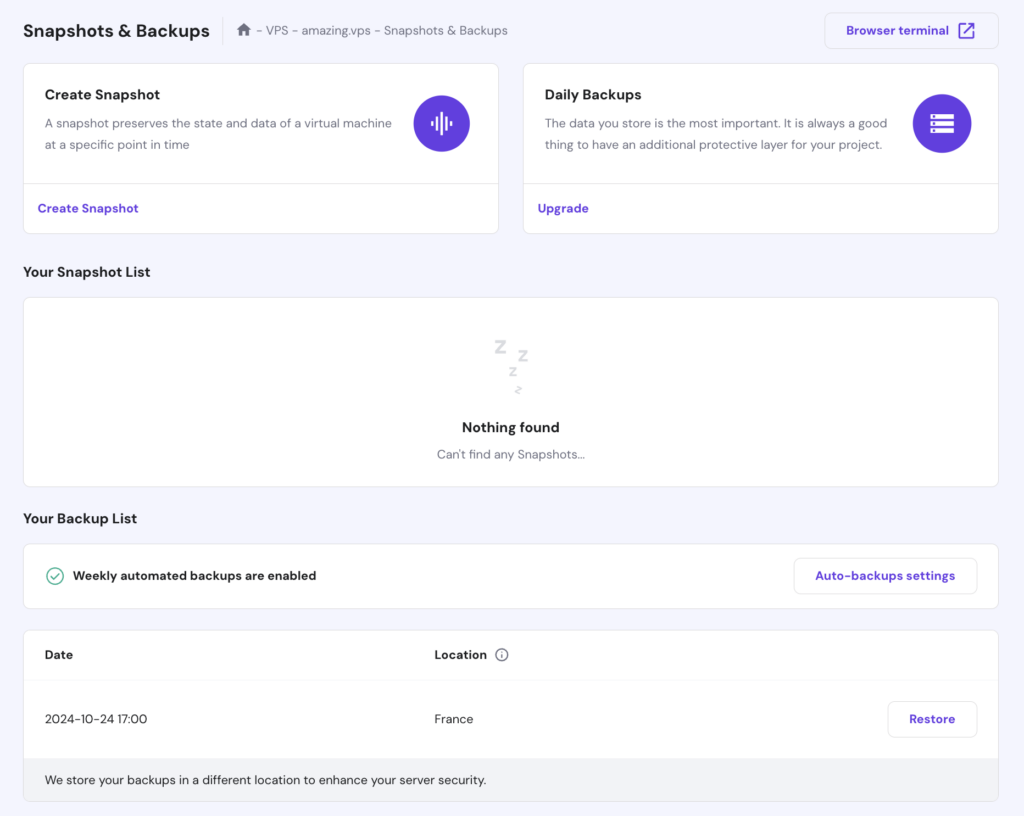
Alternatively, Hostinger VPS customers can use our built-in backup tools to easily back up and restore data. To access these features, go to Backup & Monitoring → Snapshots & Backups in your VPS dashboard’s left sidebar.
Then, choose to either create a snapshot to capture your current setup or restore previous data from an automated weekly backup.
Manage backups with Kodee
You can list available backups and manage backup schedule by simply asking Kodee. For example, ask, "List available backups on my hostname.com VPS."
Conclusion
In this article, you’ve learned how to install and configure WordPress using Docker on an Ubuntu VPS. From setting up Docker Compose to customizing for production environments, you now have a fully functional WordPress setup in a containerized environment.
After running WordPress using Docker, consider optimizing your site further, such as by using a content delivery network (CDN). You can also set up different Docker containers if you decide to host other applications on the same VPS.
If you have any questions or would like to share your experience developing WordPress websites with Docker, feel free to use the comment box below.
WordPress Docker FAQ
What are the benefits of using Docker for WordPress?
With Docker, you can deploy and scale your WordPress environment as needed. Docker isolates dependencies, making it easier to update, back up, and migrate your WordPress site efficiently.
Can I run multiple WordPress sites on a single server with Docker?
Yes, Docker lets you run multiple WordPress websites on a single server by using separate containers for each site. Set up each container with unique ports, volumes, and database connections for isolation.
How do I configure a WordPress Docker container?
To configure a WordPress Docker container, use a Docker Compose file to define services, ports, and environment variables. For sensitive data, such as database credentials, we suggest storing it in a .env file linked to the Compose file.

Ariffud is a Technical Content Writer with an educational background in Informatics. He has extensive expertise in Linux and VPS, authoring over 200 articles on server management and web development. Follow him on LinkedIn.

Aris is a Content Writer specializing in Linux and WordPress development. He has a passion for networking, front-end web development, and server administration. By combining his IT and writing experience, Aris creates content that helps people easily understand complex technical topics to start their online journey. Follow him on LinkedIn.

Comments
June 29 2017
Great tutorial. Thanks for putting this out there. Once someone is finished developing their wordpress based site, do you provide the container to a host or export the wordpress and associated database in the traditional sense? Maybe I'm picturing this inaccurately, but I'm assuming you shove the docker container into a slot on some docker compliant host and it just runs from there. Any guidance appreciated! Thanks.
September 10 2019
Great tutorial. Really helped me getting my first babysteps towards Docker. Two things that aren't mentioned and took some time for me to figure out, since newer versions are out. I got an error when I tried to run "docker-compose up -d" >> ERROR: client version 1.22 is too old. Minimum supported API version is 1.24, please upgrade your client to a newer version This one is very simple to solve: Open the yml file and change the version from 2 to 2.1 >> Pulling from library/php no matching manifest for windows/amd64 in the manifest list entries Also very simple to solve: 1 Right click Docker instance 2 Go to Settings 3 Daemon 4 Advanced 5 Set the "experimental": true 6 Restart Docker
September 24 2019
Hey Kenji, Thanks for your input!
November 22 2019
just followed this tutorial on my Mac (10.15) and I cannot believe how simple this is. It just works! Great!!
April 24 2021
Hey, Domantas G. Thanks to you I am able to set up WordPress using docker. thanks a lot
September 14 2021
If you're running this on Linux you have use "sudo docker-compose up-d" or you will receive an error message about http+docker://localhost not runnning.
December 19 2021
Excellent tutorial, I was stuck at a place as I was working with docker for one of my clients, and this article completely helped me in satisfying the cleint. Thank you so much Domantas, Kudos!
December 22 2021
Happy it worked out!
January 02 2022
Thanks, this worked amazingly well, and quickly! One thing though, I don't know where the active `wp_content` folder is. How do I develop themes and plugins in this?
January 04 2022
Hi Mike, generally your wp-content will be right next to wp-admin and wp-includes folder. You can use
findcommand on Linux or Mac to find the location of your folder! Here's how to use the find command :)March 26 2022
pleace i have "Error establishing a database connection"
March 29 2022
Hi there! It looks like you might have a problem with either of these things: (1) you haven't created a database yet; (2) your database credentials on your wp-config.php file are incorrect; (3) you're reaching the memory limit of your server. I'd suggest to start by checking them :)
March 30 2022
thanks
June 22 2022
Same here. I see the comment below saying that I haven't created a database. How do you do this? It might be helpful to include those steps in the instructions
July 01 2022
Hey there! Thanks for the feedback! You can setup a database inside Docker by checking out this resource! ?
August 21 2022
Where can the WordPress files be found so that I can customize themes and plugins? Since I have numerous wordpress installs on this computer it is not a simple search. Thanks!
August 25 2022
Hey! The installation folder of WordPress will be located in your website's public_html folder. You can access it through a File Manager or FTP client depending on where your websites are hosted ?
May 06 2023
I spent several hours debugging issues on this because WordPress would properly escape the special characters in the passwords but my database client and the mysql command line did not do this automatically. I ended up changing the password to "password" and it worked for me. However Docker also keeps the original username and password unless you delete the volume used. the combination of WordPress not having issues and not knowing that the volume had the old username and password caused a lot of grief. hopefully this comment can help someone avoid that in the future.
May 12 2023
Hello! Thank you for sharing Brandon.
September 05 2024
Followed this guide and it just errors everywhere. If you try to change the default settings this isn't liked. If you try and set up phpMA, it just gives a connection error. phpMA error always states the below (it doesn't even matter what you set the credentials to be) ``` phpMyAdmin tried to connect to the MySQL server, and the server rejected the connection. You should check the host, username and password in your configuration and make sure that they correspond to the information given by the administrator of the MySQL server. ``` This guide needs to be updated with working configurations. Time to find a guide that actually works and doesn't error everywhere. Shame because this has been the most concise guide I have seen so far
September 20 2024
Hello! Thanks for your feedback and for taking the time to point this out. We’ll be reviewing the tutorial to ensure that it reflects working configurations ;)
December 22 2024
Hello, it looks like you're exposing two containers ( wordpress and nginx ) with the same port in your setup, which will cause a conflict. Your sample as it stands won't work. Each service needs to expose a unique port on the host.
January 09 2025
Thank you for catching that! You’re absolutely right—having both containers exposing the same port would cause a conflict. We’ve updated the article to remove the port mapping from the WordPress service to fix the issue. We really appreciate your feedback :D