Linux cut command: Syntax, options, and practical examples
Dec 02, 2025
/
Alanas M.
/
7 min Read
When working with Linux, you’ll often deal with structured text data in a file, output from a command, or characters generated by a script. Most of the time, you don’t need all of it. You might just want a specific column, a few characters, or one particular part of each line. That’s where the cut command comes in.
cut is a simple, built-in Linux command that extracts parts of text from each input line. It can work based on character positions, byte offsets, or fields separated by a delimiter character. It’s fast, script-friendly, and great for trimming output to just the pieces you care about.
This guide will explain how cut works, how to use its main options, and where it fits in both everyday use and real-world scripts. If you’re getting more comfortable with the Linux command line utility, this is a tool you’ll use more often than you might expect.

Linux cut command Syntax overview
The basic syntax of the cut command in Linux depends on where the input data comes from. You can use cut in two main ways:
- With an input file – Pass the text file’s name as an argument, then cut reads and processes each line.
- With standard input (stdin) – Pipe the output of another command directly into cut using |.
This flexibility means the cut command works with almost anything that produces line-based output – files, command results like ls, ps, or cat, and even simple echo statements in scripts.
Here’s what the general syntax looks like:
cut [OPTION] [VALUE] [FILE]
[DATA] | cut [OPTION] [VALUE]
The cut command returns data in standard output (stdout).
Key options for the cut command
The cut command has three main options:
- -c (character) – selects a single character or multiple characters defined from each line based on their specified position.
- -b (byte) – selects a single byte or multiple bytes from each line.
- -f (field) – extracts fields split by a delimiter. This is the most commonly used option in practice.
The three primary options require a numerical value, which can indicate:
- Exact position – a single value. Using -f 2 will return the second field in a line. Fields can only use exact positions.
- Range – A list of numbers separated by a hyphen. Using -b 2-5 will return the specific bytes between 2 and 5.
- LIST argument – A combination of the above, separated by commas. Using -c 1,5-7 will return the first character and characters 5, 6, and 7.
You can also pass additional options to the cut command:
- -d – sets the input delimiter when working with fields. This acts as a field separator between multiple fields. The default delimiter is the Tab character.
- –output-delimiter – sets a different output delimiter when selecting multiple fields. It matches the -d option if not specified.
- –complement – inverts the selection. Instead of including the specified bytes, characters, or fields, it excludes them and returns everything else.
Linux cut command examples
Now that we’ve covered the fundamentals, let’s see how each cut option works in practice.
Using cut by characters and bytes
The cut command lets you extract specific parts of each line using either characters (-c) or bytes (-b). Theoretically, these options serve different purposes – –c for selecting specific characters, and -b for exact byte positions.
This made sense when Linux primarily used ASCII, where each character was exactly one byte, and it was standard for a specific byte to indicate a particular value, such as the first byte indicating the log level in a historical logging solution.
Modern systems use UTF-8, which supports multibyte characters like è or ñ. However, the cut command isn’t multibyte-aware, so when using -c, it still assumes single-byte characters. In practice, this means -b and -c behave the same in most modern use cases.
Here’s a quick example to demonstrate:
echo "crème" > sample.txt
cut -c 2-4 sample.txt
cut -b 2-4 sample.txt
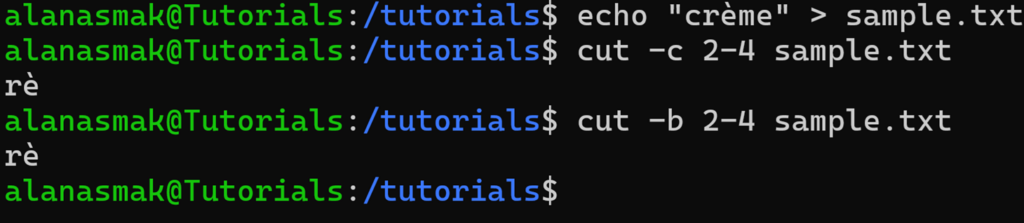
Let’s break down the word crème:
| Letter | c | r | è | m | e |
| Byte | 1 | 2 | 3-4 | 5 | 6 |
The key detail is that the special character è occupies 2 bytes of storage. Hence, even though you defined the starting position as 2 and the ending position as 4, which should result in three characters, you only get two.
If you try to extract just the third character, here’s what happens:
cut -c 3 sample.txt
cut -b 3 sample.txt

Since the 3rd byte’s position is half of the è character, the cut command prints an unintelligible symbol.
Pro tip
We recommend using the awk command if you expect to use multibyte characters. In this example, awk '{print substr($0, 3, 1)}' sample.txt would return the special character correctly, since it can understand UTF-8 encoding.
Using cut by fields
The -f option is used to extract specific fields from each input line. It can be used with a delimiter that separates these fields, like a comma or space character, or it can use the default tab delimiter.
Here’s an example that simulates a basic user status table:
printf "nametstatustrolenalicetactivetadminnbobtinactivetguestn" > users.txt
This command creates a file called users.txt with tab-separated values. Each line contains three fields: the user’s name, status, and role.
To extract just the usernames, you can use:
cut -f 1 users.txt

You can also ask for multiple fields. To get the username and role, you can run:
cut -f 1,3 users.txt

Using a custom delimiter
Most of the data you’ll encounter isn’t tab-separated. You’ll often work with files or command output where commas, colons, or other symbols separate fields, and the default tab delimiter won’t work. To make the cut command work in these cases, you can define a specific character as the delimiter with the -d option.
Let’s have a look at an environment file you could find in an application that’s hosted on a Linux server:
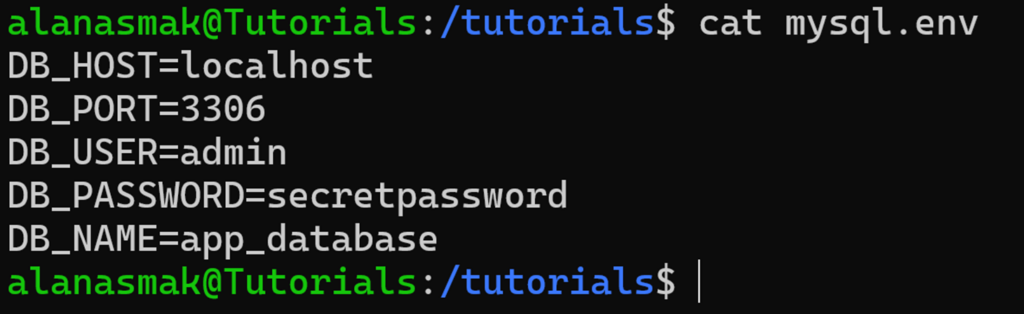
To get all of the values from this file, you can use:
cut -f 2 -d = mysql.env
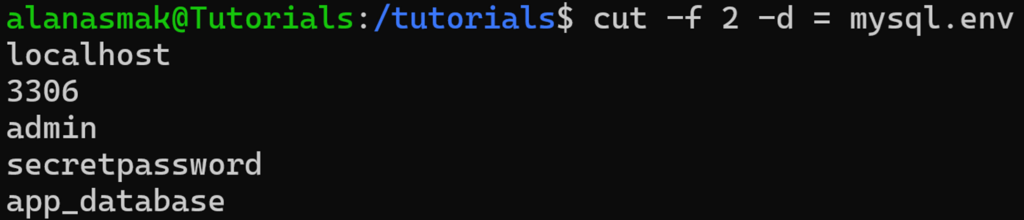
In this command, you define the field delimiter as =, which means anything before or after that symbol on each line is to be counted as a field. Then, you use cut to extract the field that you want.
Excluding non-delimited lines
By default, the cut command processes every line, even if a line doesn’t contain the delimiter you’ve specified. This can return unexpected results.
Let’s assume the mysql.env file has a comment in it:

If you run the same cut command as before, you now get:

Since the delimiter is absent in the line, it returns the entire row.
To exclude lines like these, the cut command also has an -s option. It excludes any lines from the output that do not contain the delimiter, so that only the values you care about are returned. Let’s run:
cut -f 2 -d = -s mysql.env

Now, it excludes any line where the specified delimiter is not present. Since our comment does not have the = symbol, it gets dropped.
Using cut with pipes
One of the most practical ways to use the cut command in Linux is as part of a pipeline. Instead of reading from a file, you can feed it the output of another command using the pipe operator (|).
Here’s a basic example:
echo "name=admin" | cut -d '=' -f 2

This works the same way as reading from a text file, but processes the standard output of the piped data instead.
Using cut in pipes is especially helpful in scripts or one-liners when you need to process text quickly without creating intermediate files.
Real-life use cases for the cut command
Now that you know how the cut command works, let’s see how to use it effectively in some real scenarios.
Cutting specific fields from a CSV file
Comma-separated value (CSV) files are a common way to store and share structured data – user lists, exports from web apps, billing reports, or logs. But most of the time, you don’t need the whole file – you just need one or two specific columns. That’s where the cut comes in.
In this example, you are managing a web app and must email all active users. You export your user list, and it gives you a users.csv file like this:
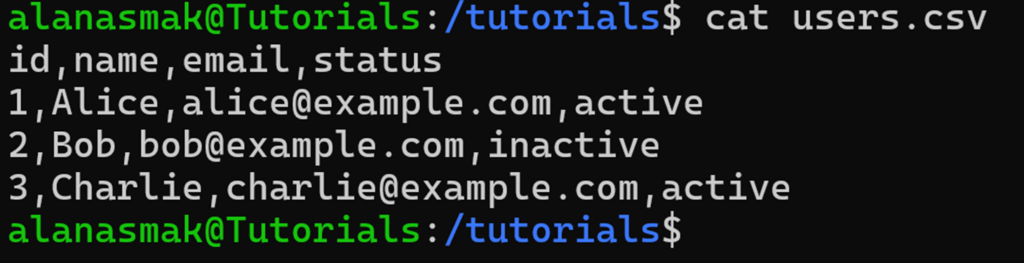
To get a list of just the active email addresses, you can combine grep and cut:
grep ',active$' users.csv | cut -d ',' -f 3 >> active.txt

This will store all the emails of all active users into an active.txt file, which you can then use as a mailing list.
This is where the cut command shines: the CSV file is already structured, and you only need one specific column. It’s fast, reliable, and easy to chain with other commands like grep when working directly in the terminal.
Loading database credentials from an .env file
Connecting to a MySQL database from the terminal is quite tedious. To make this easier, many developers use .env files to store database credentials and write simple scripts to automate the connection.
Let’s take another look at our mysql.env file from a previous example:
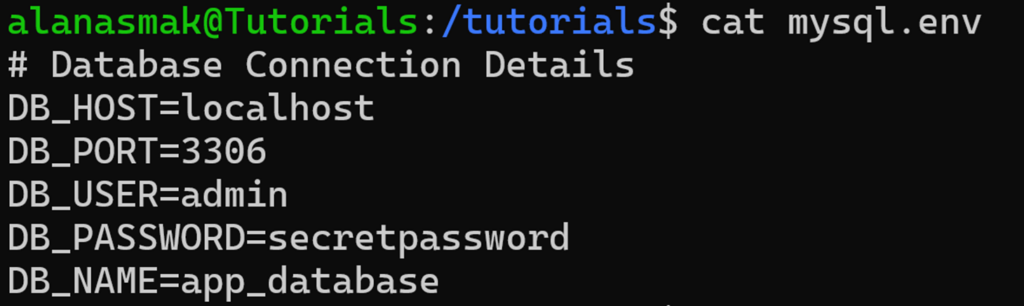
On paper, it has all you need to connect to a MySQL host, and all you need are the exact values to feed to the mysql command. But manually typing or hardcoding them into a script isn’t ideal. Instead, you can combine cut with other commands to extract and use only the values you need.
- Create a new script file:
touch connect.sh
chmod +x connect.sh
- Open the file with your preferred editor. For this example, we will use nano:
nano connect.sh
- Insert the following values:
#!/bin/bash

DB_HOST=$(grep DB_HOST mysql.env | cut -d '=' -f 2)
DB_PORT=$(grep DB_PORT mysql.env | cut -d '=' -f 2)
DB_USER=$(grep DB_USER mysql.env | cut -d '=' -f 2)
DB_PASSWORD=$(grep DB_PASSWORD mysql.env | cut -d '=' -f 2)
DB_NAME=$(grep DB_NAME mysql.env | cut -d '=' -f 2)
You use a combination of grep to fetch the exact line you need and cut to return the value, which gets stored as a shell variable.
- To test this, append the following string:
echo 'Connection string is: mysql -h ' $DB_HOST ' -P ' $DB_PORT ' -u ' $DB_USER ' -p ' $DB_PASSWORD $DB_NAME
The above command will output the parsed string in your terminal. Here’s how the full script looks:

- Save the file with CTRL+X → Y → Enter.
Now, if you execute the connect.sh script, you’ll get the full connection string for your database:

You can also replace the echo statement with:
mysql -h $DB_HOST -P $DB_PORT -u $DB_USER -p $DB_PASSWORD $DB_NAME
This way, instead of giving you the connection string, it will automatically attempt to connect.
The cut command is most powerful when used in combination with other commands. It’s a versatile tool for parsing data needed for automation.
Conclusion
The cut command in Linux is a simple but effective tool for working with structured data. It’s fast, reliable, and easy to use in scripts or one-liners. When the structure is consistent, cut often does the job quicker than heavier tools.
If you’re comfortable using the Linux terminal and want to automate parts of your workflow, you’ll find cut to be very useful – and even more so when combined with other Linux commands.
Linux cut command FAQ
What is the Linux cut command used for?
The cut command in Linux extracts specific sections from each line of text in a file or input stream. You can select bytes, characters, or fields based on delimiters. It’s commonly used to pull out columns from CSVs, config files, logs, or command output in scripts and one-liners.
How do I cut specific fields from a file using the cut command?
To cut specific fields, use the -f option along with -d to set the delimiter. For example, cut -d ‘,’ -f 2 file.csv extracts the second field from a comma-separated file. You can also use -f with a range or list, as with -f 1,3, to extract multiple fields.
Can I use multiple delimiters with the cut command?
No, cut only supports a single delimiter at a time, but you can set an output delimiter that differs from the one you’ve identified with the -d flag. If you need to use multiple input delimiters, pre-process your file with a command like sed to ensure all the delimiters match.

Alanas is a Content Writer with a foundation in IT and Operations. His expertise spans cloud engineering, DevOps, and process definition and optimization, gained through his experience in fintech and data-driven organizations of various sizes. Outside of work, he enjoys traveling, exploring history, gaming, and spending quality time with his family. Find him on LinkedIn.