How to add a favicon to your website
Mar 10, 2026
/
Aris S.
/
5 min Read
A favicon is a small icon that serves as your website’s visual identity in browser tabs, bookmarks, and history logs. It helps users recognize your site among other pages and enhances your branding. You can add it to your website using these methods:
- Writing HTML code. This method involves manually uploading your image file to your host server and adding a specific code snippet to the header of your website.
- Utilizing WordPress features. You can upload your icon directly through the WordPress Gutenberg editor, Customizer, or a plugin without needing to edit any code.
- Using Hostinger Website Builder. This platform provides a built-in interface in the general settings to upload and update your favicon.
Favicons in browser tabs are 16×16 px, while those in taskbar shortcuts are 32×32 px. They are commonly in .ico format, but you can also use .svg files for better scalability. Regardless, it’s best to keep favicons simple and maintain visibility by using mid-tone colors or borders.
How to add your website’s favicon using HTML
To add a favicon using HTML, you need to add a custom tag to your site’s index.html or header file. This manual method is best if you custom-code and design your website from scratch.
Before proceeding, ensure you have access to your website’s root folder and can edit the necessary files. Also, prepare a 64×64 px image called favicon.ico, favicon.svg, or favicon.png, depending on your preferred format. Then, follow these steps:
- Open your site’s project directory using an FTP client like FileZilla or your hosting provider’s file manager.
- Go to the root directory, which is typically /public_html or /var/www.
- Upload the favicon image file to the root folder of your website, in the same directory as your HTML file.
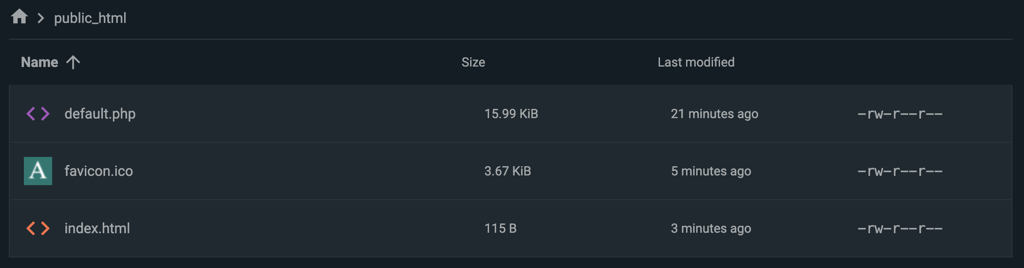
- Open your index.html file and paste the following code snippet inside the <head> </head> tags. Add one of these code snippets based on your image format:
<!-- For an ICO image -->

<link rel="icon" type="image/x-icon" href="favicon.ico">
<!-- For an SVG image -->

<link rel="icon" type="image/svg+xml" href="favicon.svg">
<!-- For a PNG image -->

<link rel="icon" type="image/png" href="favicon.png">
- Save the file and reload your website.
The favicon should appear in the browser tab. If not, check your code and try accessing the website in incognito mode to bypass the cache.
How to add a favicon to a WordPress website
There are different ways to add a favicon to a WordPress website. For example, you can do this with the Gutenberg editor by adding the image using the Site Logo block and enabling the Use as site icon option.
You can also add a favicon by going to your admin dashboard’s sidebar → Appearance → Customize → Site Identity and uploading your image. If you want more customization and insertion options, you can also install a plugin like RealFaviconGenerator.
For more details about all the methods, check out our guide on adding a favicon in WordPress.
How to add a favicon in Hostinger Website Builder
In Hostinger Website Builder, adding a favicon is a streamlined process because we offer a feature built into the tool. All you need to do is upload the file, and the builder handles the technical implementation for you.
Here’s how to add a favicon in Hostinger Website Builder:
- Log in to hPanel and go to the sidebar → Websites → Websites list.
- Click Edit website on the website where you want to add a favicon.
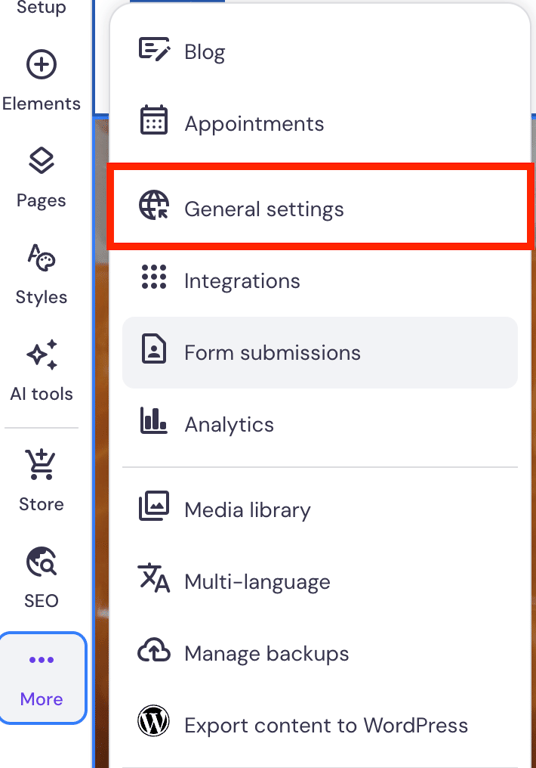
- Navigate to the sidebar and click the three-dot icon → General settings.
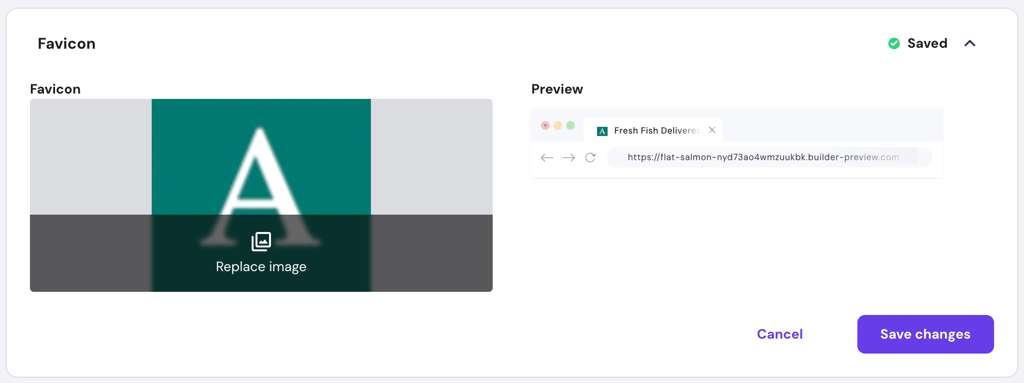
- Expand the Favicon menu and click Add image.
- In the media library, select the image you want to use as a favicon or upload one.
- Hit Save changes.
- Click Update website on the top right to push the changes live.
Your website’s favicon should now be updated.

Best practices for adding a website favicon
Following best practices when adding a website favicon ensures your icon is easily identifiable and serves as an effective branding tool. Here are several aspects to consider when adding a favicon:
- Use the correct image format. While .ico offers the best compatibility, other image formats might work better. For example, .svg is superior for modern browsers because it scales indefinitely without losing quality, while .png is a safe middle ground that balances visual clarity and compatibility.
- Create multiple sizes. If you aren’t using SVG or ICO, prepare favicons in 16×16 px, 32×32 px, and 192×192 px to cover tabs, taskbars, and mobile shortcuts. While your browser can adjust the size automatically, having different dimensions will result in a sharper image.
- Keep it simple. Since favicons are tiny, avoid complex text or detailed illustrations because they won’t be visible. Instead, use a simplified version of your logo or a single initial.
- Check contrast. Ensure your icon is visible on both light and dark browser modes. Use a transparent background with colors that contrast both themes, such as medium-toned blues, greens, or reds, or add a border for visibility
- Optimize file size. Keep the file size small, ideally less than 100 KB, to minimize its impact on your page load time. Check our guide to learn more about optimizing images for your website.
Troubleshooting common favicon issues
When adding a favicon to your website, several issues may arise that prevent the icon from showing or appearing correctly. Here are some of the most common technical issues, their causes, and solutions.
Browser caching
Web browsers temporarily store data about your website as cache to save bandwidth and speed up load time. If your favicon is not showing, it’s likely that your browser is still using the old version of your site.
This issue is on the user end, meaning there’s nothing wrong with your favicon or your website. To verify if the error is cache-related, access your website in incognito mode or hard reload the page by pressing Ctrl + Shift + R or Cmd + Shift + R on your browser.
Typically, browser caching problems will resolve automatically. If this issue persists after a few hours, consider flushing your website cache to force browsers to fetch the updated information.
Incorrect file path
If you set an incorrect file path inside your custom HTML code, web browsers won’t be able to find your image. Consider this snippet:
<link rel="icon" type="image/x-icon" href="favicon.ico">
The example above tells your web browser to look for an image called favicon.ico in the current folder. For example, if you add the code in index.html, the favicon should be located in the same directory as the HTML file.
To resolve this, simply specify the correct path to the file. For instance, if your index.html is located in /var/www/index.html and your favicon is inside /var/www/images/favicon.ico, the correct code would be:
<link rel="icon" type="image/x-icon" href="images/favicon.ico">
Also, the path and file name are case-sensitive. This means Favicon.ico is different from favicon.ico.
Syntax errors in HTML
A syntax error, like a missing quote or incorrect attribute in your link tag, can prevent your favicon from displaying correctly. Additionally, error messages may occasionally appear due to this issue.
Here are several issues that can cause syntax errors:
- Missing closing tags. Syntax errors commonly happen because your code is not enclosed properly. For example, rel=”icon causes an issue because of the missing quotation mark at the end.
- Invalid rel values. The rel attribute determines the relationship between the current HTML document and a linked resource. Since the values for the rel attribute are pre-determined, a typo like rel=”icons” can render your code invalid.
- Wrong code placement. Your favicon code must be placed inside the <head> </head> tags of your HTML code. Putting it inside other parts of your website, such as <body> </body>, will cause an error.
You can check for syntax errors manually or use an online validation tool. After identifying the problem, simply update your code and save your HTML file.
Important! Syntax errors rarely occur if you set up a favicon using the built-in feature of WordPress, a plugin, or a website builder because the process is automated and validated. If it happens, ask the developer for assistance since you can’t revise the code manually.
Next steps: Make your website discoverable
A favicon serves as the visual identifier of your website in search results, establishing branding and helping it stand out from other sites. With that in mind, the next step after finalizing the design of your site is to submit it to search engines.
Submitting your website to search engines allows platforms like Google to crawl your site’s content, including its new favicon, and display it on the search results page.
Although this procedure is automatic, manual submission may be necessary to speed up the process and help search engines index your web pages more accurately.
The steps for submitting your website vary depending on the search engine. Generally, you need to generate a sitemap and upload it to a search engine indexing platform, such as Google Search Console or Bing Webmaster Tools.

Aris is a Content Writer specializing in Linux and WordPress development. He has a passion for networking, front-end web development, and server administration. By combining his IT and writing experience, Aris creates content that helps people easily understand complex technical topics to start their online journey. Follow him on LinkedIn.


Comments
21 responsesDecember 25 2017
nice
April 22 2018
Try useful tool to generate favicon/icon online for website, applications & more. Hope you like it! iconmaker.me/
February 20 2020
it's really understandable thanks
April 10 2020
I looked this up a couple days ago. I don't know how I searched, but information was limited. I ended up on some kind of W3 spec sheet and figured, forget this. This search, wow. So easy. THANK YOU
April 17 2020
I did this on my site and it's not working. when i refresh i dont see any favicon
April 20 2020
Hey Francis, If you can’t see the new favicon, clear your browser cache and restart your browser. Let me know if it worked.
July 16 2020
Brilliant. That's so much quicker than trying to do it through the CMS. Cheers. Robin
October 15 2020
uhh, so if I am using hostinger's site builder and not wordpress, this is not helpful.
February 02 2021
Hi there, Allen! If you're using our legacy Website Builder, you can find how to create a favicon here.
April 17 2021
Thanks, got that favicon.
December 11 2021
This worked like a charm. I did have to clear cache and restart my browser, though. Thanks so much!
January 31 2022
I got my website a favicon and it shows when I visit it but when I linked it on my YouTube channel, it just shows an earth symbol and it's also that way on Google Search Console. How can I make my favicon show universally?
February 04 2022
Hi Sam, it looks like you might have set a different logo for your Google account. You can find how to do that on Google's support page :)
October 27 2023
Hi, I have created the web with Hostinger AI, I don't know how to add the favicon after reading this article. Could you help me please?
October 30 2023
Hello there! You can access the general website settings. Simply expand the Favicon section, click on 'Add Image' or 'Replace Image,' and upload your file. Don't forget to save the changes, and then update your website ?
October 31 2023
I followed the first method, Let Browsers Automatically Generate the Icon, but still the Favicon appears only when I open the site , and it doesn't appear in Google search result, what should I do , please help.
November 10 2023
Hi there! I'm sorry to hear that. To troubleshoot this, make sure your favicon is in the right format. Additionally, consider clearing your browser cache to ensure the updated favicon is reflected. It's worth noting that Google might take some time to index and display the favicon in search results. I hope this is helpful ?
November 20 2023
Guys, I am sorry to say, but it does not work for me. I tried both methods but it does not work. Even when I tried to add a fav icon in the WordPress dashboard Appearance> Customization still did not work. I make my own custom WordPress theme and when I upload it to a free domain and hosting using 000webhosting, it shows me fav icon there, but here in paid domain, hosting I can't see my fav icon. I tried for 2 days to solve this issue but still didn't find any solution for that. right now I'm feeling very disappointed. this issue needs to be fixed, even the fav icon is shown in free domain hosting, why not here???
December 08 2023
Hi Nouman! I'm sorry to hear that. Firstly, let's ensure that the favicon image is in the correct format (ICO or PNG) and that it's uploaded to the correct location on your WordPress site. If you still face the issue, don't hesitate to contact our Customer Success Team ?
May 29 2024
Wordpress response when dropped or uploaded to Media files “SCG-Trans3-sml.ico” has failed to upload. Sorry, you are not allowed to upload this file type.
June 06 2024
Hello, The error you're seeing occurs because WordPress restricts certain file types for security reasons. To allow .ico files, you can add the following code to your functions.php file:
function custom_mime_types($mimes) {
    $mimes['ico'] = 'image/x-icon';
    return $mimes;
}
add_filter('upload_mimes', 'custom_mime_types');
This will enable you to upload .ico files without issues ?