CodeIgniter tutorial: the complete guide
Mar 10, 2026
/
Ignas R.
/
8 min Read
Website development can seem challenging, especially if tackled without any assistance. Luckily, there are development tools like CodeIgniter. It’s a PHP framework maintained by the British Columbia Institute of Technology with a simple yet effective toolkit for developing web applications.
In this CodeIgniter tutorial, we’ll go through the process of installing and setting up the CodeIgniter framework on web hosting and a VPS and demonstrate how to create a simple web application.

Set Up CodeIgniter for Your Website
Before we start, keep in mind that CodeIgniter requires a Linux, Apache, MySQL, and PHP (LAMP) stack. Luckily, it comes pre-installed with Hostinger’s web hosting plans.
However, if you choose a VPS plan, you will need to install the LAMP stack first. Here’s how to install LAMP on Ubuntu or CentOS. When done, proceed with the CodeIgniter setup.

Step 1. Installing CodeIgniter
CodeIgniter can be installed automatically via Composer or manually by using File Manager.
Important! For the Composer method, SSH access is required. Use PuTTY / Powershell on Windows or the built-in terminal shell on Linux and macOS.
Install CodeIgniter 4 Using Composer
- Log in to your SSH account and navigate to the public_html root directory with this command:
cd domains/yourdomain.com/public_html
- Install CodeIgniter 4.
composer create-project codeigniter4/appstarter project-root
The command above will create a project-root directory for the CodeIgniter files. In this tutorial, we’re using the latest stable CodeIgniter version – 4.1.9. You can use the command below from your CodeIgniter directory to update it:
composer update
- For convenience, we recommend moving the contents of project-root to the public_html directory. First, determine the current directory with this command:
pwd
It will look something like this:
/home/u123456789/domains/yourdomain.com/public_html
Now move the files:
mv project-root/* /home/u123456789/domains/yourdomain.com/public_html
- Once that’s done, enter this URL into the browser:
https://yourdomain.com/public
Make sure to replace yourdomain.com with your domain.
CodeIgniter’s default screen will appear, letting you know it was installed successfully.
Install CodeIgniter 4 Manually
If you want to skip the SSH part needed for Composer, go with the manual installation.
Remember that even though the manual method is simple, you will need to check for merge conflicts when updating your website. Follow these steps to perform the manual installation:
- Download the latest version of CodeIgniter.
- Using File Manager, extract it in the root directory – yourdomain.com/public_html.
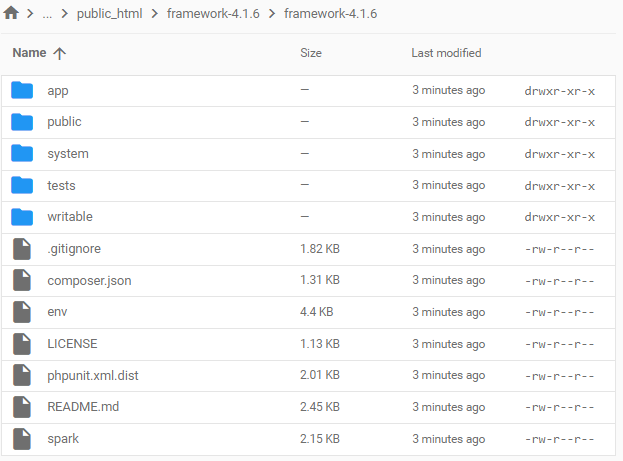
- The framework-4.1.9 folder will appear. Open it and double-click the folder within. You should see a window like this one:
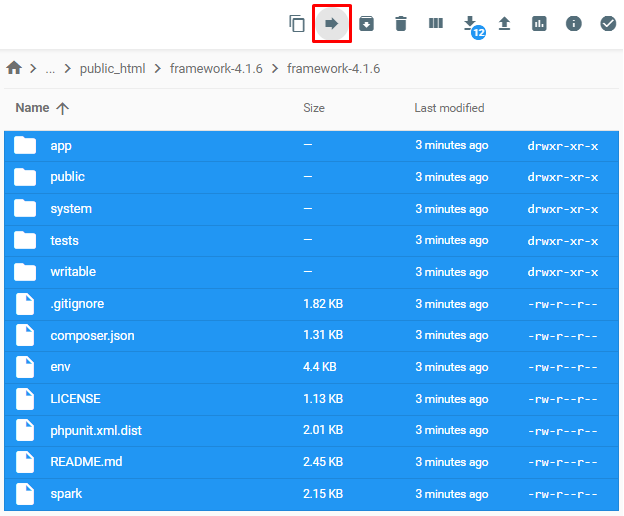
Press CTRL + A to select all the files and use the Move button to transfer everything to public_html:
The path will look like this:
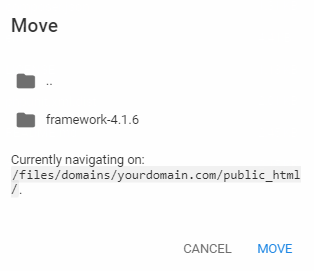
- Open the browser and enter this URL:
https://yourdomain.com/publicMake sure to replace yourdomain.com with your domain name.
CodeIgniter’s default screen will appear, which means it was installed successfully.
Step 2. Configuring CodeIgniter
After installing CodeIgniter, it’s crucial to configure it so it works correctly. We recommend starting by creating a .htaccess file and pasting this snippet into it:
RewriteEngine on
RewriteCond %{REQUEST_URI} !^public
RewriteRule ^(.*)$ public/$1 [L]
These .htaccess rules will make the CodeIgniter website URL look like this:
https://yourdomain.com
Instead of:
https://yourdomain.com/public
After that, proceed with the advanced configuration.
Configuring CodeIgniter for Web Hosting Plans
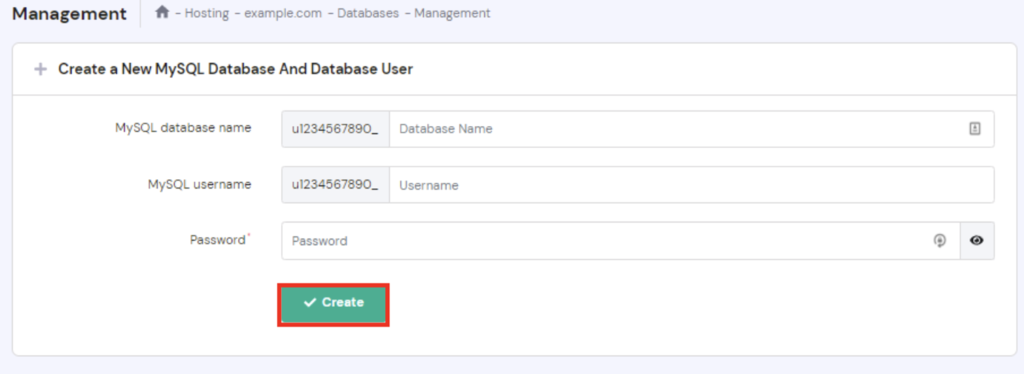
In this section, we’ll discuss the advanced settings for web hosting plans. Let’s start with a new MySQL database.
- Find the Hosting → Manage → MySQL Databases section on Hostinger’s hPanel:
- Once there, specify the database name, username, and password and click Create:
- Navigate to File Manager and open the Database.php file for editing. Here’s the full path:
/domains/yourdomain.com/public_html/app/Config/Database.php- Locate the following section of the file and replace the details with the information of your newly-created database – username, password, and database. The rest of the values should follow this example:
public $default = [
'DSN'      => '',
'hostname' => 'localhost',
'username' => 'u123456789_user',
'password' => 'Y0ur$tr0ngPa$$w0rd',
'database' => 'u123456789_name',
'DBDriver' => 'MySQLi',
'DBPrefix' => '',
'pConnect' => false,
'DBDebug'  => (ENVIRONMENT !== 'production'),
'charset'  => 'utf8',
'DBCollat' => 'utf8_general_ci',
'swapPre'  => '',
'encrypt'  => false,
'compress' => false,
'strictOn' => false,
'failover' => [],
'port'     => 3306,
];
- Set up your domain name by modifying CodeIgniter’s App.php file found here:
/domains/yourdomain.com/public_html/app/Config/App.php- Locate the following line and change its value to your real domain name:
public $baseURL = 'https://yourdomain.com/'; Save the file and exit.
The database is now synced with CodeIgniter.
Configuring Virtual Hosts on VPS
VPS users can run multiple CodeIgniter applications on a single domain name. To do so, they need to set up virtual hosts.
Important! Make sure that your VPS is using Apache and not Nginx or any other web server
- Ensure that the document root is synced with the installation directory of CodeIgniter. To do so, open the virtual host file.
sudo nano /etc/apache2/sites-enabled/000-default- Look for the following block:
<VirtualHost *:80>
DocumentRoot /path/to/codeigniter
[.......]
<VirtualHost *:80><br>
- Change /path/to/codeigniter with the actual path of the CodeIgniter installation directory. By doing this, all URLs will point to this folder. Save the changes by pressing CTRL + X and Y.
For a more efficient development process, get rid of index.php from CodeIgniter’s URL format. Here’s how to do it:
- Open the config.php file.
nano /public_html/app/Config/App.php
Locate the following line:
public $indexPage = 'index.php';
Replace it with this:
public $indexPage = '';
- It’s necessary to re-route future requests by modifying the .htaccess file to ensure that no errors appear. Before doing so, check whether mod_rewrite is enabled.
apache2ctl -M
The above command will output the capabilities of the server. If mod_rewrite is on the list, continue to the next step. Otherwise, execute this line:
a2enmod rewrite
Then, restart Apache.
sudo service apache2 restart - Create a .htaccess file in the root folder of CodeIgniter.
nano public_html/.htaccess
- Paste the following lines to the file. If .htaccess was already created during the configuration part of the tutorial, add all the lines except for the first one. Save the changes and exit the file.
RewriteEngine on
RewriteCond %{REQUEST_FILENAME} !-f
RewriteCond %{REQUEST_FILENAME} !-d
RewriteRule .* index.php?/$0 [PT,L]<br>- Let Apache know that it should look for the newly-created .htaccess file. To achieve this, open the virtual host file again:
sudo nano /etc/apache2/sites-enabled/000-default
Ensure that AllowOverride is set to All, as shown below:
<Directory>
Options Indexes FollowSymLinks MultiViews
AllowOverride All
Order allow,deny
allow from all
</Directory>
After confirming it, save the file.
If done correctly, index.php won’t appear, making the URL look cleaner.
Understanding MVC
Before continuing our CodeIgniter tutorial and learning how to build an application with the framework, we should cover the basics of the model-view-controller (MVC) pattern.
Simply put, MVC is a web development architecture paradigm. It states that the business logic in any application should be separated from the presentation.
- Model – deals with the database, carries out computations, and more. In short, it is where your business logic is located.
- View – forms the application’s presentation layer where the data from models is embedded.
- Controller – will route user requests to the appropriate model. Once the model has done its job, the controller will load the relevant view.
This architectural pattern also gives developers the flexibility to reuse code for multiple views. For example, it will allow you to implement the same navigation bar on every webpage of your application. Moreover, as both views and models are entirely separate, the front-end developers can work in parallel with the back-end team to speed up the development process.
Note that CodeIgniter also subscribes to the Object-Oriented Programming (OOP) paradigm. As such, models and controllers are PHP classes that extend the base classes provided by the framework. Views can also be called PHP files, although the bulk of their content is HTML/CSS. Only a few snippets of core PHP code are present and are used to display the data from models.
Routing Basics
This is how CodeIgniter formats its URL strings:
<base_url>/index.php/<controller_name>/<controller_function>/<function_parameter_1>/>/<function_parameter_2>…
We have shown you how to remove index.php from the format in the previous section. As a result, your URL will be similar to this example:
http://www.yourdomain.com/welcome/tester/1
Here, welcome is a controller class corresponding to a controller file named welcome.php. This class will call the tester() function and pass ‘1’ as a parameter. More parameters can be supplied similarly, separated by slashes.
Libraries
CodeIgniter encourages reuse of existing libraries and helper functions to perform common tasks. The framework also lets users decide which library to load and when. This on-demand process results in fast, lightweight, and feature-rich applications.
Loading a library is easy in CodeIgniter. For instance, to load the Database library, pass the following line in your model or controller:
$this->load->database();
We suggest autoloading common libraries so they’ll be ready whenever needed. CodeIgniter uses the PSR-4 standard, which makes autoloading straightforward:
- Open the autoload file:
nano app/Config/Autoload.php
- Add the libraries into the psr4 array:
$psr4 = [
'App'         => APPPATH,
'CodeIgniter' => SYSTEMPATH,
];
Create a Simple App with CodeIgniter
At this point of the CodeIgniter tutorial, you should have a running distribution of CodeIgniter and an understanding of how models, views, and controllers work. Now, we are going to create a simple CodeIgniter web application.
We’ll use the model to fetch agency names from our database and sort and display them using our view. The controller will be used to route the requests between the model and the view.
Once you have a basic knowledge on the fundamental CodeIgniter process, you can start building complete web applications.
Step 1. Creating a phpMyAdmin Table
This section will cover the steps to create a table with phpMyAdmin via hPanel. This table is essential because it will form the basis of our application.
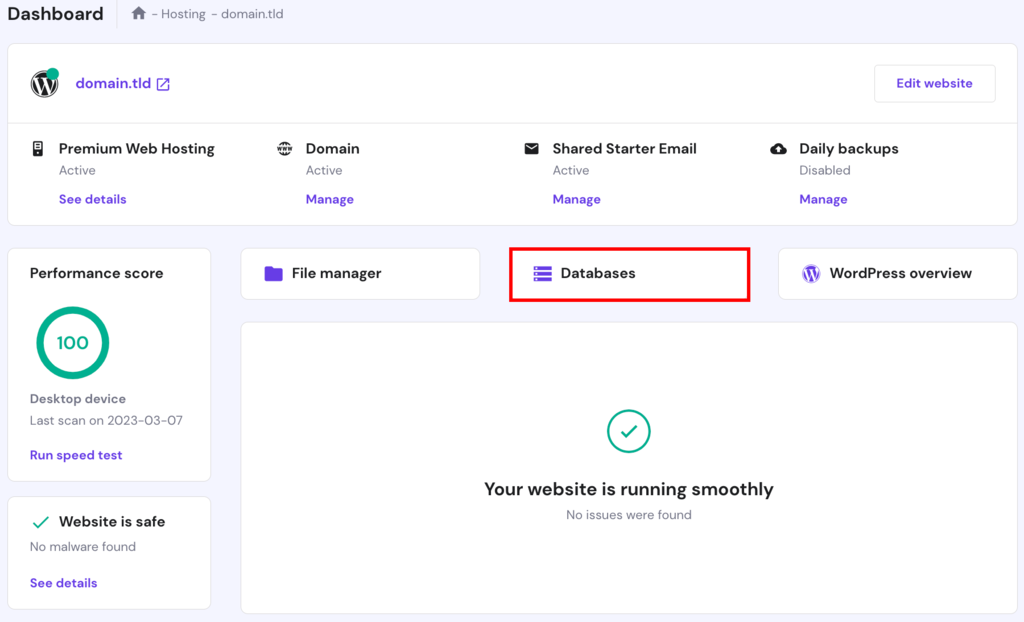
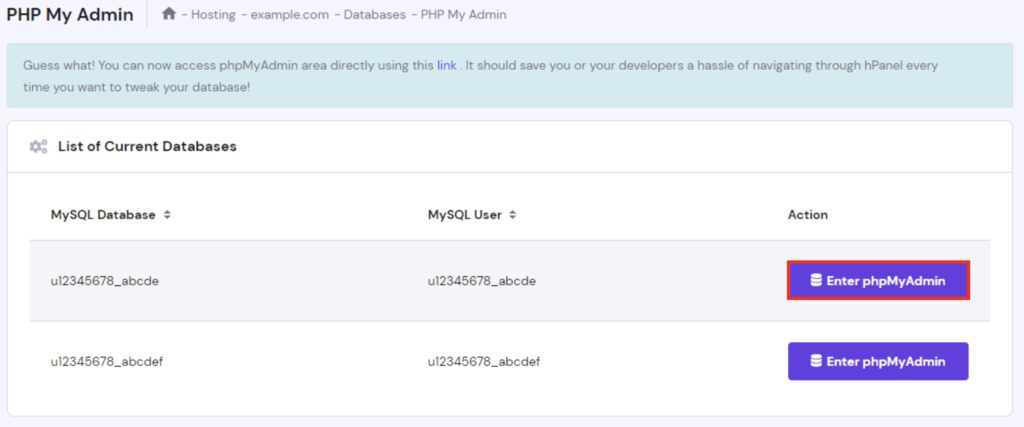
- Log in to your hosting account. Navigate to the Databases section and select phpMyAdmin.
- Look for the database that you have synced with CodeIgniter and click Enter phpMyAdmin:
- Once there, select the SQL section, paste in this query, and press Go:
CREATE TABLE agencies (
    id int(11) NOT NULL AUTO_INCREMENT COMMENT 'Primary Key',
    name varchar(100) NOT NULL COMMENT 'Name',
    email varchar(255) NOT NULL COMMENT 'Email Address',
    PRIMARY KEY (id)
  ) ENGINE=InnoDB DEFAULT CHARSET=latin1 COMMENT=''AUTO_INCREMENT=1;

    INSERT INTO agencies(id, name, email) VALUES
  (1, 'Development', 'awesomeinbox@domain.com'),
  (2, 'Production', 'sparkingjoy@domain.net'),
  (3, 'Testing', 'user@mydomain.com'),
  (4, 'Building', 'editor@mydomain.net'),
  (5, 'Debugging', 'anotherawesomeinbox@anotherdomain.com');
It will look like this:
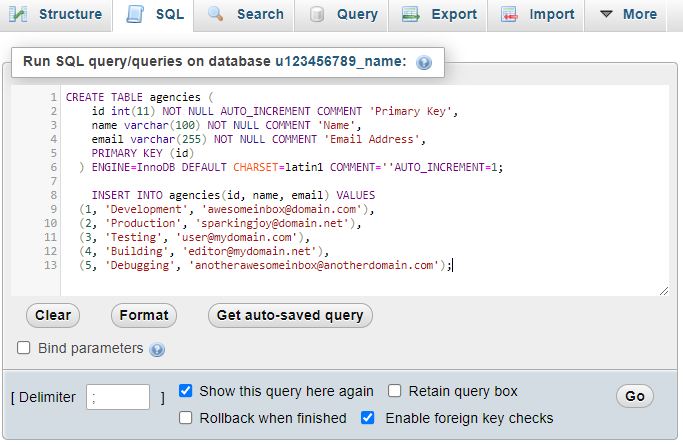
This query will automatically create a database filled with the data that we will be able to use later.
Step 2. Creating the Model
Once the database table has been created, begin working on the business logic. To do this, create a model that will retrieve the database values.
- Access File Manager
- Models are placed in the public_html/app/Models directory so they won’t interfere with application’s directory structure. Go to the Models directory and create a new PHP file called AgencyModel.php.
- Paste the following code into the AgencyModel.php file:
<?php namespace AppModels;
use CodeIgniterDatabaseConnectionInterface;
use CodeIgniterModel;
class AgencyModel extends Model
{
    protected $table = 'agencies';
     protected $allowedFields = ['name', 'email'];
}
As you can see, the model class (AgencyModel) extends the generic Model class that CodeIgniter provides. Note that CodeIgniter requires all class names to begin with a capital letter.
Step 3. Creating the Controller
Next, we’ll create a route using the controller. This way, whenever a user makes a request, the view will be supplied with the information from the model.
- To create a new controller, go to the app/Controllers directory and create a file named Agencies.php. Remember, CodeIgniter’s controllers must have the same name as the class inside it.
- Paste the following code into the file:
<?php namespace AppControllers;

use CodeIgniterController;
use AppModelsAgencyModel;

class Agencies extends Controller
{
}- We’ll create a simple function to sort all the database entries from highest to lowest. To do so, add this code snippet to the file:
public function index()
{
  $model = new AgencyModel();
  $data['agencies'] = $model->orderBy('id', 'DESC')->findAll();    return view('agencies', $data);
}- The complete code will look like this:
<?php namespace AppControllers;

use CodeIgniterController;
use AppModelsAgencyModel;

class Agencies extends Controller
{
public function index()
{
  $model = new AgencyModel();
  $data['agencies'] = $model->orderBy('id', 'DESC')->findAll();    return view('agencies', $data);
}
}
Step 4. Creating the View
Finally, we’ll create a view that will display the list of agencies.
- Enter the app/Views folder, and create a new file titled agencies.php. The file’s name has to correspond to the view that you told the controller to load, featured in the last line of the view() method.
- Paste in the following code and save the file:
<!doctype html>
<html lang="en">
  <head>
  <meta charset="utf-8">
  <meta name="viewport" content="width=device-width, initial-scale=1, shrink-to-fit=no">
</head>
<body>
<div class="row mt-3">
     <table class="table table-bordered" id="agencies">       <thead>
   <tr>
             <th>Id</th>
             <th>Name</th>
             <th>Email</th>
          </tr>
       </thead>
       <tbody>
          <?php if($agencies): ?>
          <?php foreach($agencies as $agencies1): ?>
          <tr>
             <td><?php echo $agencies1['id']; ?></td>
             <td><?php echo $agencies1['name']; ?></td>
             <td><?php echo $agencies1['email']; ?></td>
          </tr>
         <?php endforeach; ?>
         <?php endif; ?>
       </tbody>
     </table>
  </div>
</div>
</body>
</html>
The view will display the information passed by the controller in the $data array. The results won’t be stunning since we haven’t added styling to our view. However, you can add inline styling or reference a CSS stylesheet in the view later.
Our sample application is complete. You should be able to run this application by entering the following URL in your browser:
http://yourdomain.com/Agencies
The web application will call the agencies’ controller created in Step 3 and sort the elements of the database.
Conclusion
Learning how to build a web application is necessary if you wish to become a web developer. Luckily, CodeIgniter and its MVC architecture make the development process fast, efficient, and easy for anyone.
In this article, we’ve discussed the essentials of this framework and talked about what makes CodeIgniter so simple yet effective. We’ve also showcased how the MVC software design pattern operates and created a simple application.
If you have any remarks or questions, leave them in the comment section below.

Ignas takes great satisfaction in helping people tackle even the most complex technical issues. His current goal is to write easy-to-follow articles so that these issues will not happen at all. During his free time, Ignas likes to play video games and fix up things around his house.


Comments
7 responsesFebruary 20 2018
nice
October 17 2018
You didn't talk about routing as that's is my challenge now
November 13 2018
Excellent article, put in plain English and doesn't touch on the complexities of CodeIgniter. A fantastic read, thanks for sharing.
December 02 2019
very useful turorial thanks so much
March 18 2020
thanks helpful
August 18 2024
I just wanted to post this for anyone that struggled with getting their site working on shared hosting. So I installed codeigniter using shared hosting plan from Hostinger. I transfered all the controllers, models, views, app config and the main page was working fine. As soon as I had a get request it wouldn't work. I would get 404 Can't find a route for 'GET: . The url would change to example.com/pubic/getname. The public was added and I thought it was an issue with .htaccess in the main CI folder. So I searched forever trying to find the solution why this was happening. The thing is post routes worked fine, it was only a problem with get routes. Come to find out it was an issue with the .htaccess file in the /CI/public folder. # Redirect Trailing Slashes... RewriteCond %{REQUEST_FILENAME} !-d RewriteCond %{REQUEST_URI} (.+)/$ RewriteRule ^ %1 [L,R=301] The Redirect Trailing Slashes was causing this problem. I commented out the three lines in this group and it is working perfectly on the live shared hosting server.
August 21 2024
Thanks for sharing your solution—it could be really helpful for others facing the same problem! :)