WordPress changes not showing? three methods to fix WordPress not updating
Mar 10, 2026
/
Astari S.
/
10 min Read
Making updates to a WordPress site and not seeing any changes can be irritating. Some situations you might have encountered are:
- Seeing changes when logged in as an admin, but not as a visitor.
- WordPress not showing design changes after customizing the site’s layout or adding CSS scripts.
- WordPress not showing changes made to widgets, sidebars, and plugin configuration.
The most common cause of WordPress changes not showing is caching. Thus, in this troubleshooting guide, we will share three methods to fix caching issues.
However, if the problem is not due to caching, your WordPress site is probably not showing changes due to the permission setup, incorrect file names, or coding errors. For each cause, we will share how to fix WordPress not updating right away and help prevent it from happening again.
By the end of this WordPress tutorial, you will be able to determine what causes your WordPress site changes not showing and the right solution for it.
Download all-in-one WordPress cheat sheet
How to Fix Your WordPress Site Not Updating
The cache stores a subset of a web page’s data to serve it faster for future requests. However, there might be an issue with your website cache or browser caching that prevents showing updated data and displays a cached version instead.
Here are the three methods to recognize a caching issue and the troubleshooting steps to fix it.
1. Force Refresh Your Browser
If you visit the same site more than once, your web browser will cache the site’s content to load it faster. The browser cache saves static files on the local computer’s memory to reduce the number of requests sent.
However, the browser might also avoid downloading website files from a WordPress site’s server, preventing you from seeing changes.
To fix this situation, force refresh your browser to download the latest version of all files from your website’s server. There are different ways to do so on your WordPress site, depending on your browser and operating system:
- Google Chrome. Press Ctrl + F5 on Windows or Command + Shift + R on macOS.
- Mozilla Firefox. Either Ctrl + F5 or Ctrl + Shift + R on Windows, and Command + Shift + R on macOS.
- Microsoft Edge. Press Ctrl + F5 on Windows.
- Safari. Press Option + Command + E on macOS.
- Opera. Use Ctrl + F5 on Windows and Command + Option + R on macOs.
Hard refresh is often enough to get a new version of your site. However, this only works to refresh a particular URL. If the problem persists, another solution is to clear the entire cache in your browser.
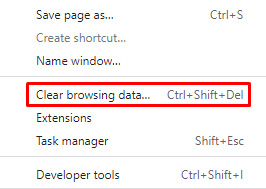
Every browser has its own steps to clear the browser cache manually. With Google Chrome, click on the three dots menu to the right of the address bar. Then, head to More tools → Clear browsing data, and Google Chrome will direct you to the Settings page.
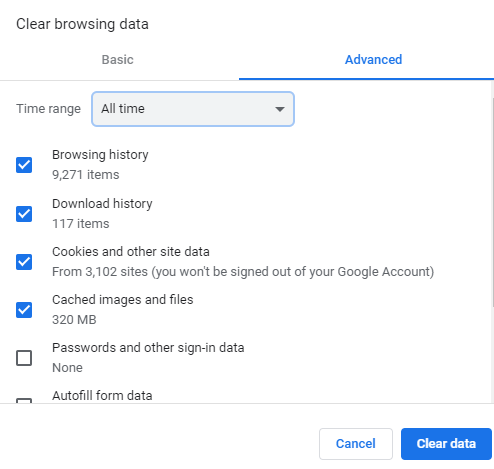
Under Clear browsing data, select the Time range and data to clear. The options for the time include Last hour, 24 hours, seven days, four weeks, and All time. When it comes to choosing the data to remove, the possibilities are:
- Browsing history – clears the browser cache of all web pages you have visited.
- Cookies and other site data – signs you out from accounts that you have logged in using the web browser.
- Cached images and files – clears the cached version files from previously visited sites, which means the loading time might be longer on the next visit.
We recommend clearing Cached images and files from All time to make sure you don’t leave the data that was causing the problem. Click Clear data to finish.
Pro Tip
Clearing the entire cache of your browser weekly will help prevent this issue from happening again.
However, this method only shows website changes on your browser. To show WordPress changes on your visitors’ browsers, apply the cache busting tactic – always use different names when creating or updating content.
To illustrate, instead of uploading a second image.jpeg to rewrite the previous one, rename it to image-2.jpeg. This method can also be used for CSS scripts if the CSS changes are not showing on your WordPress site.
The browser will request a new file from the origin server instead of retrieving the cached files. Then, the visitors will receive the most updated version of the site without refreshing their browser.
2. Clear Your WordPress Cache Using a Caching Plugin
If the changes are still not showing after you clear browser cache, the issue might be related to a WordPress caching plugin. Start by checking if you have installed one to make your site faster and improve its user experience.
Some caching plugins clear the cache for updates, including posting a blog entry, adding comments, and customizing the theme. However, your plugin might have configuration issues that prevent changes from showing.
The two clear indicators that your caching plugin is causing the issue are:
- Seeing the updates logged in but not logged out.
- Seeing a new post as a separate page but not on the homepage.
If your site is not showing changes because of a plugin, clear the cache on your WordPress site.
Each plugin has its own guide to clear the WordPress cache, so check your plugin’s documentation to see how to do it. Most caching plugins, like WP Rocket, WP Super Cache, or WP Fastest Cache, have a built-in cache feature.
Once you have cleared the cache, open a private browser tab or log out of your account and visit your site to see the modifications. Follow this guide if you are using one of these popular caching plugins.
Important! Use only one caching plugin at a time to avoid conflicts.
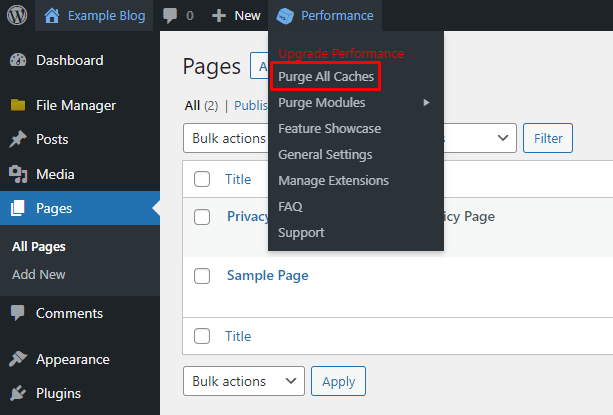
W3 Total Cache will automatically work on the background upon installation. It offers various ways to clear the site cache. Simply hover over the Performance menu on the WordPress toolbar and click Purge All Caches.
To enable or disable the plugin configurations, such as page, minify, opcode, and database cache, head to General Settings and click the option you prefer.

Once done, choose either Save all settings or Save Settings & Purge Caches. The former will only record the changes, while the latter will also clear the historical data.
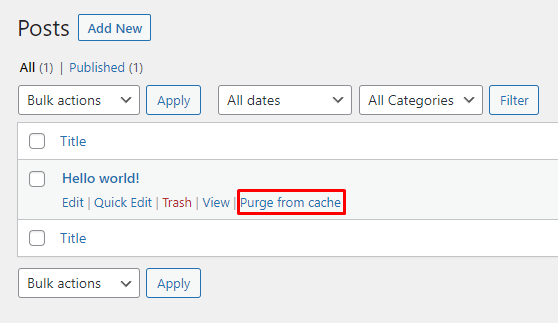
To clear a certain page cache, hover over the post and choose Purge from cache.
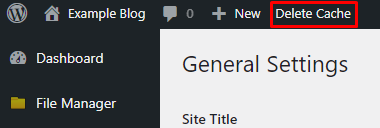
With WP Super Cache, there are two ways to clear the website cache. The first option is to click the Delete Cache option on the WordPress toolbar.
Another option is to go to Dashboard → Settings → WP Super Cache and click on the Delete Cache button.
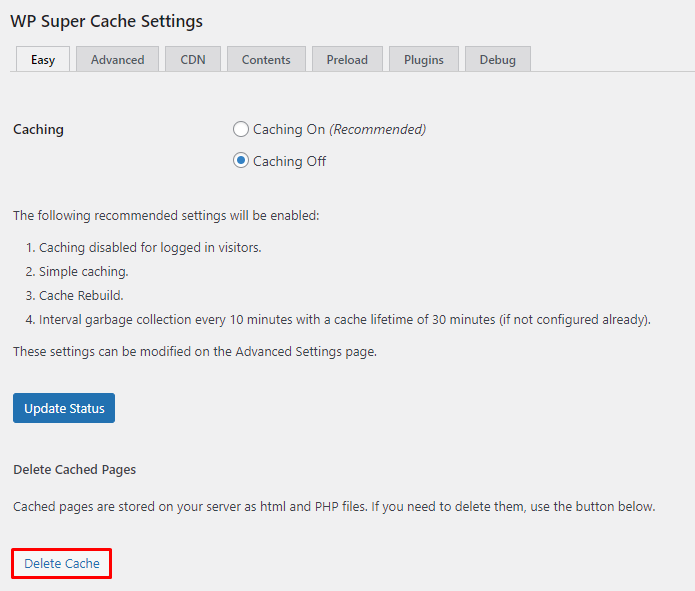
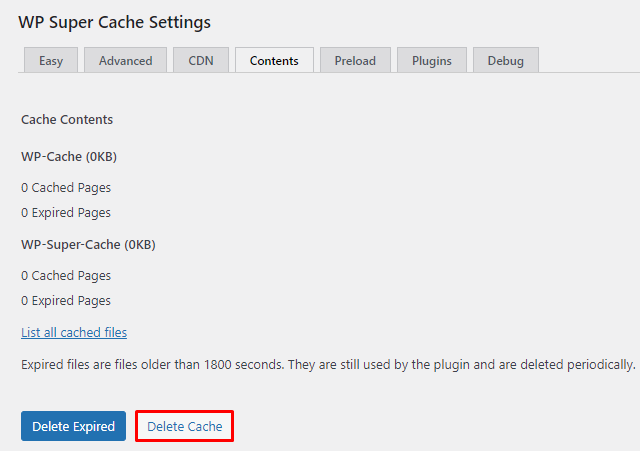
Both options will direct you to the Contents tab. There, click on the Delete Cache button to finalize the process. It is also possible to click on the List of all cached files to clear a specific cache.
To check if you have refreshed your WordPress site, open it using a different tab. If you already have it open, try doing a hard refresh instead.
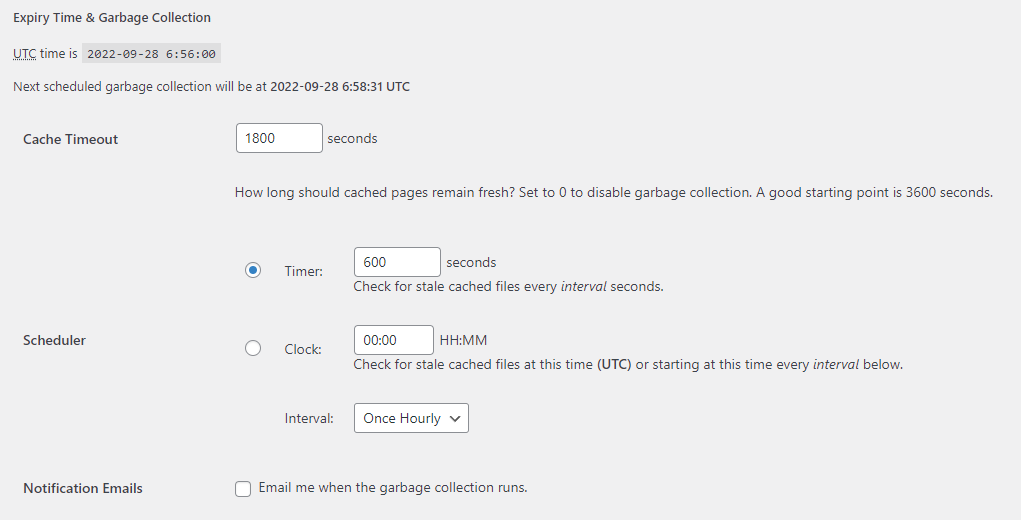
To prevent this issue from happening again, set a timeout for the WordPress plugin to clear the cached content accordingly. To do so, head to Dashboard → Settings → WP Super Cache → Advanced.

Scroll to the Expiry Time & Garbage Collection, and set the Cache Timeout accordingly. Setting it to 3600 is suitable for most sites, but those with high traffic can lower it to 1800. Click Change Expiration to finalize the process.
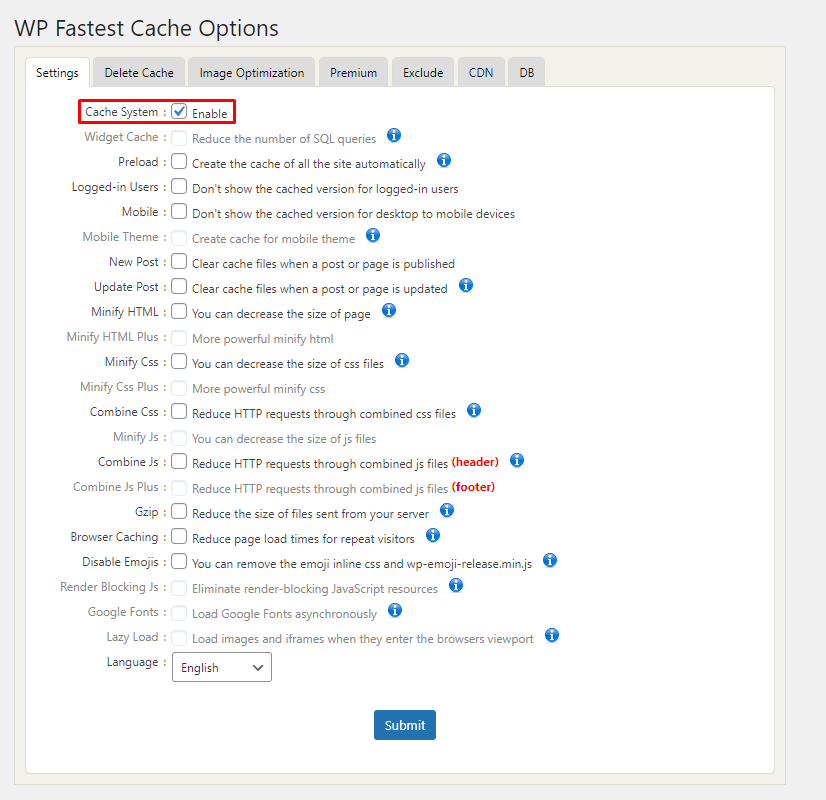
WP Fastest Cache can clear the cache of the whole website content or individual posts and pages. Furthermore, this caching plugin can clear cache automatically when you create new content or make changes to a page or post.
To clear the WordPress website cache, head to WP Fastest Cache on the Dashboard. From there, tick the box next to the Cache System to clear your cache regularly.
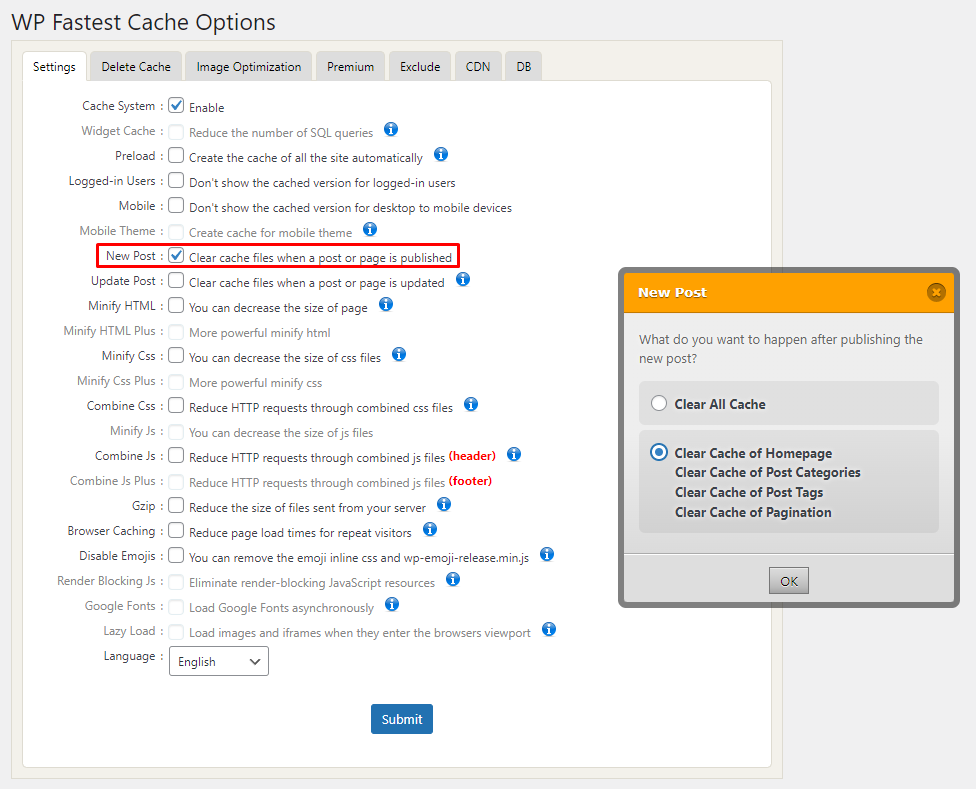
Then, tick the box next to New Post if you want to clear the cache whenever you publish a post or page by default. A pop-up box will appear for you to choose whether to Clear All Cache or only the cache of the Homepage, Post Categories, Post Tags, and Pagination.
Choosing the cached files to clear depends on your website. If you do not have a busy website, we recommend clearing its cache after publishing an article or any other post, but not regularly.
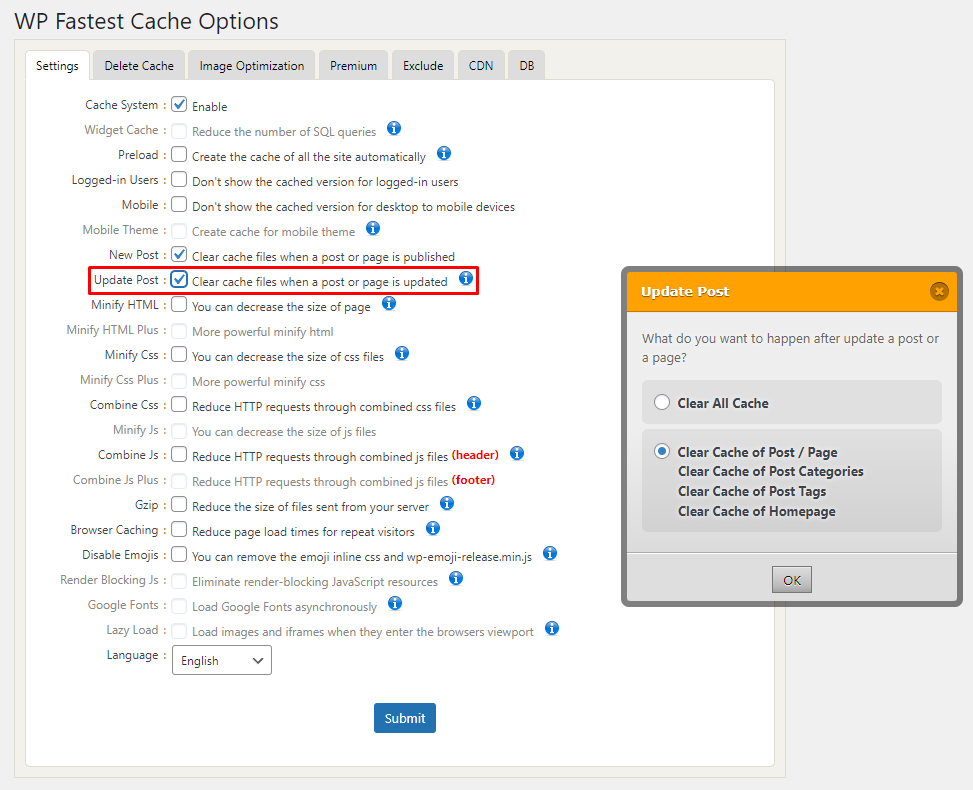
Another option is to check the Update Post window to clear the cache whenever you make changes to a post or page. Then, click on the Submit button to finalize the process.
To clear the cache on a specific article or page, hover over its title and click on Clear Cache.

3. Clear Your CDN Cache
In some cases, this problem can also occur because of your content delivery network (CDN). If the two previous troubleshooting steps did not solve the problem, try clearing the CDN cache.
WordPress websites use a CDN, such as Cloudflare or Stackpath, to speed up the load time globally, which improves user experience. A CDN caches a site’s static content on its international network of servers and uses the nearest location to visitors to show the website’s content.
However, it is possible that even though you have cleared the browser and website caches, the CDN still serves the old version of a static page. To fix CDN-related caching issues, clearing cached files will force it to fetch a new version of your website content from your web server.
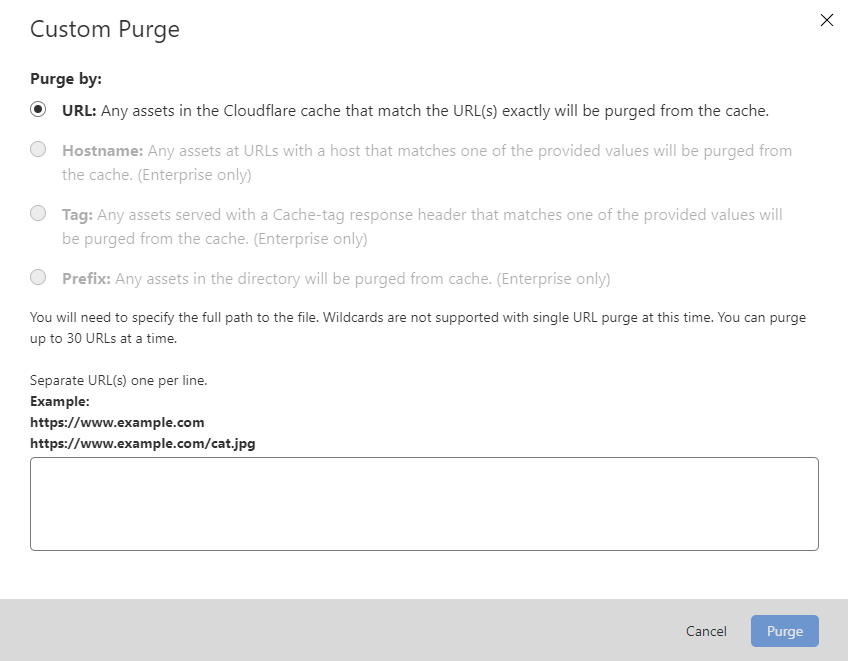
Different WordPress CDNs have their own way of clearing the cache. For example, there are two options to clear the cache with Cloudflare. First, log in to your Cloudflare account and head to Caching → Configuration.
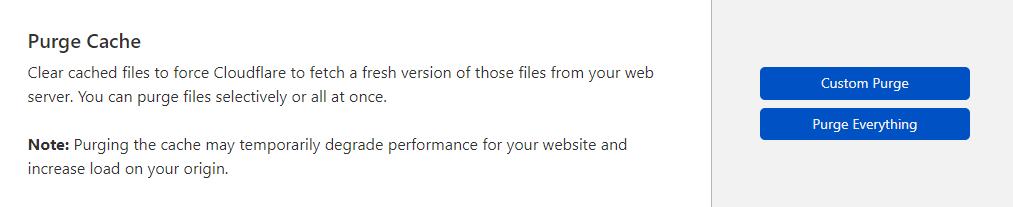
If you only want to clear the cache of a specific web page, click Custom Purge and insert the URL. Click Purge to finalize the process. In the pop-up box, enter up to 30 pages or files you want to clear.
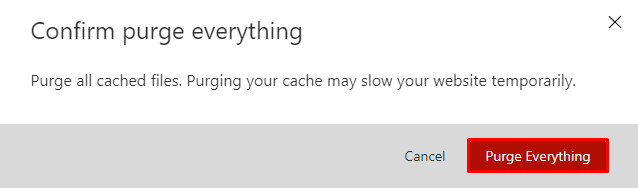
If you want to clear all website cached files, click on Purge Everything twice to finalize the process.
Another solution to clear the cache is by disabling the CDN temporarily. Every web hosting provider has different steps to do so.
Pro Tip
To prevent this WordPress problem from happening again, make sure to clear your CDN cache every other week.

Other Reasons Why WordPress Site Is Not Updating Right Away
When making any changes to your WordPress website, the updates should show up right after clicking save or publish both on your and your visitors’ browsers. If it takes longer than five minutes for an update to show, start looking for the cause of the problem.
While the most common cause of this problem is caching, there are also other reasons why WordPress changes are not showing right away. Here are some of the most common issues that cause your WordPress site to have this problem.
Visibility and Permission Setup
WordPress’ user role management settings give various access privileges to users accessing the website. On WordPress, an Administrator can have different access to certain content than a Subscriber. So, the permission setup might prevent a certain user from seeing modifications.
To check if this is the source of the issue of WordPress not showing changes, head to the page or post and look into the Post Visibility:
- Public – visible to all WordPress users and visitors.
- Private – visible only to administrators and editors.
- Password Protected – visible only to those with access to a previously-established password.
Other than the privacy settings, another way to help solve this problem is to look into the permission setup. This problem mainly occurs when you have multiple types of users that have access to your content. Check every email address to make sure each user has the right access to the posts and pages.
To see the different permissions of different roles, use the User Switching plugin.
Incorrect File Name
If the change you have made to your WordPress site is updating a file, make sure it is the right file. When there are similar file names for two or more documents, it is easy to select the wrong one.
For example, it is easy to miss that image1.jpeg, and imageI.jpeg are different file names. Check your media and other files to see if the names are all correct.
To avoid this issue, create different names whenever adding new files – especially when overriding an existing file with updated content.
Unsaved Changes
Another reason behind this WordPress problem is not saving the changes before exiting. For example, the WordPress site might not be updated because you haven’t clicked on the publish button. To check if this is the issue, go back to your editor to see if your modifications are there.
This applies not only to pages and posts. Sometimes making changes to WordPress widgets and plugins does not show because you haven’t clicked the Save button. Even though saving your content changes might seem like a simple task, it is common to miss this step.
Wrong Theme
Some themes only work on specific WordPress versions. So, if you are having issues with seeing changes after selecting a different template, it might be because it is not compatible with your WordPress version.
To help check if this is the cause, check the theme you are using and see if it works with your WordPress installation.
Coding Mistakes
Another mistake may occur when making coding modifications, either with HTML, CSS, or PHP. The slightest error in your code, such as skipping a comma or a semicolon, can impact the WordPress site’s functionality.
If changes don’t show after you edit or debug the WordPress code, recheck it to ensure everything is correct.
DNS Not Propagated Completely
Even though WordPress changes should show immediately, modifications to your Domain Name System (DNS) records can take 24-48 hours to propagate. So, if you do not see DNS-related changes right away, it might be because of DNS not being propagated completely yet.
Make sure to give the appropriate time before looking for the updated version. However, if the changes still do not show up after 48 hours, recheck the DNS or contact your web hosting provider.
Pro Tip
If you don't see the changes after the propagation process is over – flushing the DNS cache might help.
Wrong URL
In some cases, you might open the wrong URL when looking for the new version of your site. This issue often happens when you duplicate a page and end up opening the old version. So, recheck your URL to make sure you open the updated page.
To illustrate, www.hostingertutorials.com/blog/article looks similar to www.hostingertutorials.com/blog/article1 if you don’t pay close attention. Create clear distinctions between different pages to avoid this problem in the future.
Server-side Caching
Lastly, there is another reason that might prevent WordPress from showing modifications – server-side caching. This happens when your web hosting uses caching plugins in the backend. If this is the issue, contact your hosting provider to help with clearing the cache.
Conclusion
It can be frustrating when WordPress site modifications do not show right away. The most common reason for this issue is caching. We have shared the three methods to help solve caching issues:
- Force refresh browser – works for browser caching issues. We have demonstrated two ways to refresh your browser – force refreshing it and clearing the cache.
- Clear WordPress website cache – solves this issue if it is related to a WordPress caching plugin. Each plugin has its own guide to clear the website or individual page cache.
- Clear the CDN cache – if you are using a CDN to speed up your site, this method helps prevent your CDN from showing the cached version of your static pages. Different CDNs have their own ways to clear the cache.
Besides caching, there are also other reasons why your WordPress site changes might not be showing, including:
- Privacy and permission configuration – check if your page or post has the right privacy settings and if you are looking at it from the proper role. Remember that with different permissions, users can have separate access to a site.
- Incorrect document – look at your files and content to ensure you have the correct document, especially if you have previously overwritten a file with an updated version.
- Unsaved updates – go back to your post or page to see if you have published the modifications on your site.
- Coding errors – look through your PHP, HTML, or CSS changes to ensure that your coding is correct.
- Inserting the wrong URL – if you have previously duplicated a page or written similar posts, check the URL that you are opening. You may open an old page thinking that it is the modified one.
If none of these methods work, contact your web hosting provider to help fix the problem. Feel free to share which method works best for you in the comment section below.

Astari is a digital marketing expert, with a focus on SEO and WordPress. She loves to share her wealth of knowledge through her writing, and enjoys surfing the internet for new information when she's not out in the waves or hiking a mountain. Her mission is to learn something new every day, and she firmly believes that there is no such thing as too much knowledge.
Comments
1 responses