20 WordPress tips and tricks: Improve your website today
Jun 18, 2026
/
Ksenija
/
14 min Read

Whether you’re just launching your first blog or managing a growing online store, WordPress gives you a robust framework to build and maintain a successful website.
But to truly make the most of it, you need to go beyond the basics.
In this article, we’ll walk you through 20 practical WordPress tips and tricks to help you speed up page loading, tighten up security, streamline your workflows, and improve the user experience for your visitors.
From setting up a testing environment to using WP-CLI for quicker maintenance, this is your checklist for running a more efficient and resilient WordPress website.
The best WordPress tips and tricks to manage your website
Let’s take a closer look at the 20 most effective WordPress techniques you can implement to maintain a secure, high-performing, and user-friendly website.
1. Choose the right hosting platform
Selecting the right hosting platform is one of the most important decisions you can make for your website.
The quality of your hosting service affects everything from speed and uptime to security and scalability. Specifically, this can entail ease of use for your visitors, ease of expansion for your business, and much more.
When choosing hosting options, consider the following key factors:
- Reliable uptime – A good host should guarantee high uptime (ideally a minimum of 99.9%) to keep your site running around the clock.
- High performance – Top providers use optimized servers and caching technology to deliver quick page loading times.
- Scalability – Look for hosts that make it easy to scale up resources without having to migrate to a new platform.
- Robust security – A trustworthy host should offer built-in protections like firewalls, malware scanning, DDoS mitigation, and free, automatically-renewed SSL certificates.
Hostinger’s WordPress plans combine speed, affordability, and user-friendly features, such as:
- Reliable performance backed by a 99.9% uptime guarantee to keep your site consistently online.
- Fast load times worldwide, with tests showing average initial response times as low as 143 ms and fully loaded page times around 1.56 seconds.
- Strong security features, including free SSL, malware scanning, and daily or weekly backups.
- 24/7 customer support via live chat and email, plus a helpful knowledge base.
- Scalable hosting options include managed WordPress, cloud, and VPS hosting.

2. Clean up your database regularly
Your WordPress database stores your posts, pages, user data, plugin settings, and more.
Over time, it can accumulate clutter like draft revisions, spam comments, and leftover entries from uninstalled plugins, which may slow down your site’s performance.
When the database is overloaded with unnecessary data, MySQL queries that fetch content and serve it to users run more slowly.
This leads to sluggish load times, a higher Time to First Byte (TTFB), and a laggy experience for visitors.
Keeping your database clean helps WordPress fetch data faster, improves response times, and lightens the load on your server.
There are two main methods to clean your WordPress database: using optimization plugins for a quick and user-friendly approach, or manually optimizing it through phpMyAdmin for more direct control.
Using database optimization plugins
To avoid digging through code or editing raw database files, you can install one of the following WordPress database plugins to do the work for you:
- WP Rocket – Offers scheduled or one-click cleanups that remove post revisions, spam comments, and more.
- WP-Optimize – Combines database cleanup with image compression and page caching.
- Advanced Database Cleaner – Ideal for targeting orphaned tables and other leftover data from deleted plugins.
- WP-Sweep – Focuses on cleaning unused and duplicated entries.
Manually optimizing the database via phpMyAdmin (for advanced users)
If you’re comfortable working with database tools, manual optimization is an option:
- Log in to your hosting control panel and open phpMyAdmin.
- Select your WordPress database.
- Check all the tables and choose Optimize table from the dropdown.
This process reclaims unused space, streamlines table structures, and speeds up query execution.
If you are using Hostinger as your hosting provider, you can find detailed steps for optimizing your database in hPanel in our complete guide to WordPress database optimization.
Important! Before you make any significant changes, automated or manual, create a full backup of your site and database.
3. Back up your site regularly
Your WordPress site may be vulnerable to cyberattacks, plugin conflicts, server crashes, accidental deletions, or failed updates.
Performing regular backups gives you a safety net to protect your data and files in the event of a security breach or other significant problem.
You can back up your WordPress site in two main ways:
Using a plugin
Plugins make it easy to schedule and automate backups without digging into your server files and database directly.
Popular options include:
- UpdraftPlus – Offers full-site backups and easy restore options.
- Jetpack – Provides real-time backups and one-click restores (paid).
Performing manual backups
If you’re comfortable accessing your hosting dashboard or using FTP, you can perform a manual backup in two steps:
- Exporting your database to your computer via phpMyAdmin.
- Copying all your site files (themes, plugins, uploads) to your computer via FTP or File Manager in your control panel.
This method gives you more granular control but requires more effort and some technical knowledge.
Want more in-depth instructions? Explore our complete WordPress backup guide.
If you’re using Hostinger, you don’t need to worry about backing up your site regularly, as Hostinger includes automatic daily or weekly backups depending on your plan.
These backups are stored securely and can be restored with just a few clicks, giving you peace of mind and saving you precious time.
4. Password-protect the wp-admin directory
Your wp-admin directory is the heart of your WordPress site, housing all the critical files and tools needed to manage your content, plugins, and themes.
If a hacker gains access to it, they could steal sensitive data, delete your site, or even lock you out completely.
That’s why adding an extra layer of protection to this directory is a smart move that helps secure WordPress from unauthorized access.
Here’s how to manually password-protect your wp-admin folder:
Warning! Manually editing core files like .htaccess and .htpasswd can be risky. Even a small mistake can lead to critical site errors or downtime. This method is only recommended for advanced users who are comfortable working with server files.
- Generate a new username and strong password using a tool like HTPasswd Generator.
- Copy the encrypted result that looks like a long string of random characters starting with your chosen username.
- Connect to your web server via FTP or with your provider’s file manager.
- Navigate to the home directory of your hosting account (this is usually one level above public_html).
- Create a new file named .htpasswd, paste the encrypted line into it, and save.
- Now go to the public_html/wp-admin/ folder. If there’s no .htaccess file there, create one.
- Open the .htaccess file and add the following code:
AuthName "Admin Area"

AuthType Basic

AuthUserFile /home/yourusername/.htpasswd

Require valid-user
- Replace /home/yourusername/.htpasswd with the actual full path to your .htpasswd file.
- If you’re unsure what the actual path is, create a temporary PHP file called path.php in your public_html folder with this code:
<?php echo getcwd(); ?>
- Visit the file in your browser to see the correct path.
- To avoid breaking features like the WordPress Customizer, add this code below the previous snippet in the same .htaccess file:
<Files admin-ajax.php>

    Order allow,deny

    Allow from all

    Satisfy any

</Files>
- Save your changes.
- Open an incognito/private window and visit yourdomain.com/wp-admin to test it.
You should now see a pop-up asking for your new username and password before the standard WordPress login appears.
While this is a reliable method, many hosting providers also offer directory password protection via their control panels. The steps and terminology may vary depending on your host, but the outcome is the same.
If you’re a Hostinger user, you can see detailed instructions in our how to password-protect a website guide.
5. Use a staging environment to test changes
Staging environments are perfect for testing major updates, trying out new plugins, or even redesigning your entire site.
They mirror your live site, so you can see exactly how changes will behave before pushing them live.
If you have a plan with Hostinger, setting up a staging environment takes only a few clicks in your control panel. You’ll find a built-in staging tool that lets you clone your site, test changes, and deploy updates.
But even if your hosting provider doesn’t offer this feature, you still have options, like:
- Using a WordPress staging plugin like WP Staging or Duplicator. These tools can create a clone of your site within the same hosting environment, allowing you to make and test changes safely.
- Setting up a manual staging site by creating a subdomain (like staging.yoursite.com), installing a fresh copy of WordPress, and copying over your live site files and database. This method requires a bit more technical know-how.
Read our dedicated tutorial on WordPress staging environments for expert tips and a full setup guide.
6. Use a child theme to implement changes to theme files
A child theme in WordPress is a separate, customizable theme that inherits the design and functionality of another theme, known as the parent theme.
It’s a smart method if you want to customize some theme files without risking the loss of your customizations when the parent theme gets updated.
To create a child theme, follow these steps:
- Create a new folder in wp-content/themes/, naming it after your parent theme with -child at the end.
- Add a style.css file to your child theme folder. This file must include a header that tells WordPress which parent theme to use.
- Add a functions.php file (optional but recommended) to line up the parent theme’s styles and add custom PHP if needed.
- Activate your child theme via the WordPress dashboard under Appearance → Themes.
For more detailed steps, including code examples and best practices, explore our tutorial on how to create a WordPress child theme.
7. Learn WP-CLI
WP-CLI (WordPress Command Line Interface) is a powerful tool that lets you manage your WordPress site using text-based commands instead of the dashboard.
These commands can update plugins across dozens of sites simultaneously, perform database operations in seconds, and automate routine maintenance tasks.
Here are a few handy WP-CLI commands:
- wp plugin update –all updates all your plugins in one go.
- wp core update command updates WordPress.
- wp plugin list allows you to see all installed plugins.
- wp user create john john@example.com –role=editor creates a new user with a specific role and a randomly generated password.
WP-CLI is included by default with Hostinger’s Premium or higher-tier web hosting plans, as well as all managed WordPress hosting packages.
If you don’t have access to WP-CLI through your hosting provider, there are still steps you can take to install it, as explained in our how to use WP-CLI tutorial.
8. Monitor website analytics
Analytics tell the real story behind your traffic. Tracking the right analytics will allow you to:
- Identify which pages get the most visits.
- Understand where your traffic is coming from (search, social, direct, etc.).
- See what content keeps visitors engaged and what’s making them bounce.
- Track conversions and measure ROI for your marketing efforts.
Keep an eye on the following metrics:
- Traffic sources – Shows where your visitors are coming from (Google, social media, email, referrals).
- Bounce rate – Tells you the percentage of visitors who leave after viewing just one page.
- Average session duration – Gives a sense of how long users stay and engage with your content.
- Pageviews per session – Reflects how many pages a user visits in one go.
- Conversion rate – Shows the percentage of visitors who complete a desired action, like signing up for a newsletter or making a purchase.
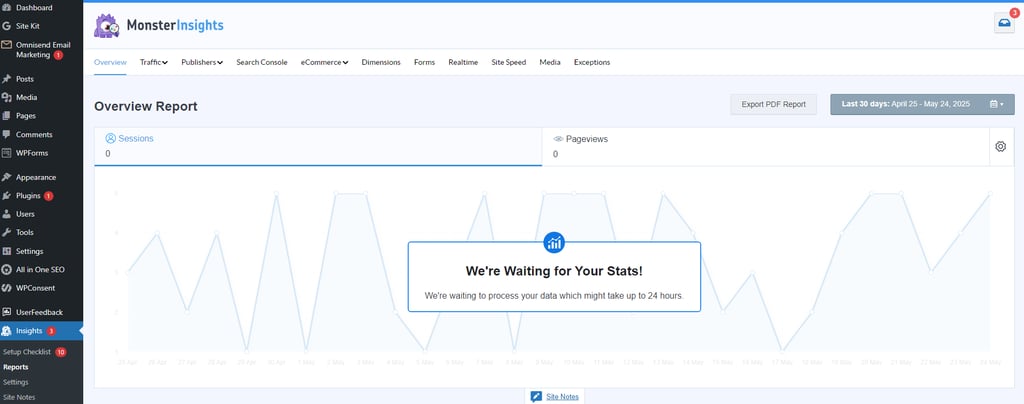
You can start tracking these insights by setting up Google Analytics on your WordPress site.
Here’s how:
- Create a Google Analytics account at analytics.google.com and set up a property for your website.
- Install a plugin like MonsterInsights to perform integration without touching code.
- Authenticate your account through the plugin and select the right property.
- Start tracking! Your dashboard will begin collecting data almost immediately, though it may take 24–48 hours to show full reports.
The easiest way to add Google Analytics is to use a plugin, but if you don’t want to add the performance overhead of another plugin or you’re just curious about other options, check out our beginner’s guide to adding Google Analytics to WordPress.
9. Split long posts into pages
Long-form content is great for in-depth coverage and SEO, but too much scrolling can overwhelm your readers.
That’s where post pagination comes in. It’s a method of dividing content across multiple pages instead of displaying everything on a single page.
It helps improve readability, speeds up load times, and can boost pageviews.
You don’t need a plugin or any technical knowledge to paginate a post in WordPress.
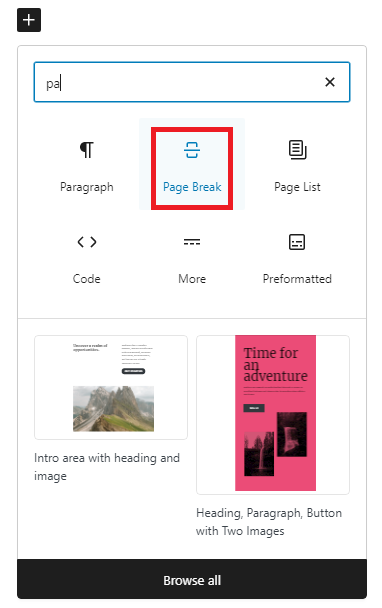
Simply switch to the Text or Code view in the WordPress editor and insert the <!–nextpage–> tag wherever you want the content to break into a new page.
Once you update or publish the post, WordPress will automatically split it at that point and display page navigation links at the bottom.
If you’re using the Gutenberg (block) editor, you can add a Page Break block anywhere you’d like the split to happen.
Pro tip
Consider pagination for tutorials, comprehensive guides, posts exceeding 2,000 words, or any long-form content that can be broken down into distinct sections naturally.
10. Display post excerpts
Instead of showing full blog posts on your homepage or archive pages, consider displaying short summaries of your content. These are called post excerpts.
By using excerpts, your visitors can quickly scan through post summaries to get more information about what is in a list of articles than they can get from the titles alone. Also, this is much more efficient than scrolling through full-length articles.
This not only improves user experience but also reduces blog page loading times, especially if your posts include images, embeds, or other pieces of heavy content.
Moreover, faster load times can help improve your Core Web Vitals, which can positively affect your rankings on search engines.
Most WordPress themes support excerpts, but some may display full posts by default.
To change this, go to your WordPress dashboard, edit a post, and locate the Add an excerpt field in the post editor.
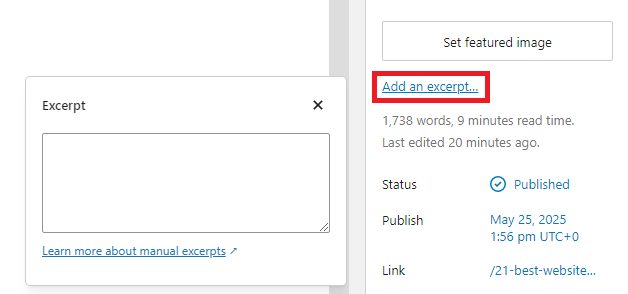
Write a concise summary in the Excerpt box, then update your post.
Some themes offer a toggle under Customize → Blog → Blog archives → Show Excerpt.
If your theme doesn’t support excerpts or you want more control over how they appear, try using a plugin like Advanced Excerpt or Simply Excerpts.
Pro tip
Write excerpts like mini hooks, keep them concise (30–40 words), highlight the main value of the post, and create just enough intrigue to make readers want to click Read More.
11. Utilize the Quick Edit feature
Quick Edit is a built-in feature that allows you to make fast changes to essential post or page settings directly from your WordPress dashboard, without opening each one individually.
With Quick Edit, you can modify:
- Title and slug (URL)
- Date and time of publication
- Author
- Password protection and privacy status
- Status (Published, Draft, Pending Review)
- Comments and pingbacks (enable/disable)
- Categories and tags
- Sticky status (whether to pin the post to the top)
- Parent page (for page hierarchy)
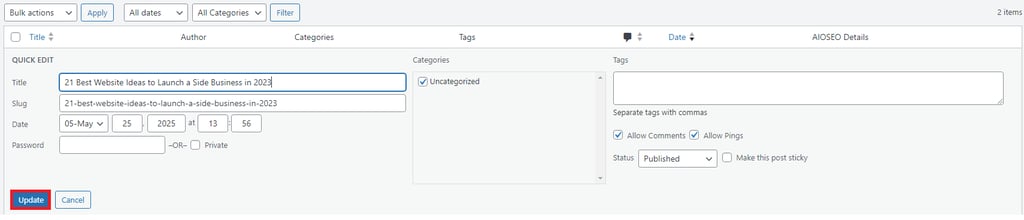
Accessing Quick Edits involves a few simple steps:
- Open the WordPress Dashboard and navigate to Posts or Pages.
- Hover over the item you want to update and click the Quick Edit link that appears.
- An inline editor will expand, displaying editable fields like the title, slug, date, author, categories, and more.
- Make your changes, then click Update to save instantly.
12. Use SEO-friendly permalinks and URLs
A permalink (short for permanent link) is the full URL of a page or post on your site, which can be used by other websites to link directly to specific content rather than sending people to your homepage.
A clean, appropriately written permalink can improve user trust, click-through rates, and overall site credibility. It can also help your visitors and search engines understand what the page is about.
To set up SEO-friendly permalinks in WordPress, start by opening your WordPress dashboard and navigating to Settings → Permalinks.
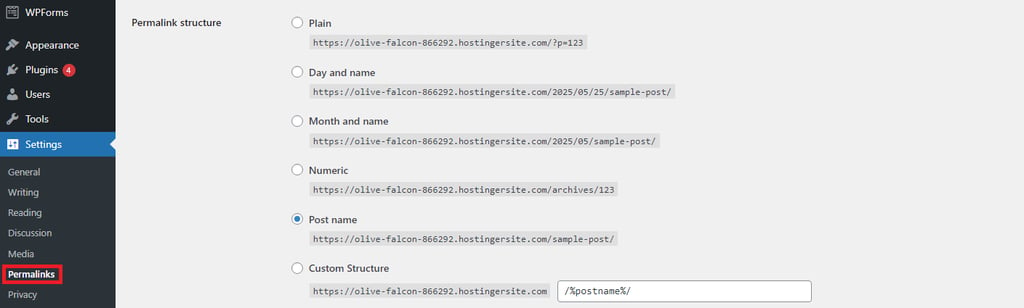
From there, you can choose a permalink structure.
The most SEO-friendly options should be clean and concise URLs like https://example.com/sample-post/.
If you are running content-heavy sites with multiple categories, you can include a category in the URL, which would look something like this: https://example.com/category/sample-post/.
Pro tip
Use hyphens, keep URLs short and keyword-rich, and stick to lowercase to prevent conflicts or duplicates.
13. Create an organized site structure
Besides being more user-friendly, a well-structured website is also easier for search engines to crawl and index.
WordPress helps you create this structure with built-in taxonomy tools. This system groups posts and pages into organized collections.
The two default types of groupings are categories and tags. Categories handle broad grouping, while tags focus on specific details.
Categories are hierarchical. You can create parent and child categories to reflect your content structure. For example, a food blog might have a main Recipes category, with subcategories like Desserts or Quick Meals.
Assigning each post to one primary category keeps things clean and prevents confusion.
Tags are non-hierarchical and used to describe specific details or keywords within a post. For instance, a post in the Desserts category might include tags like chocolate, no-bake, or vegan.
Tags help users discover related content across categories and give search engines more context about your page.
Used together, categories and tags improve internal linking, improve content discovery, and make your site easier to browse for both humans and crawlers.
By default, WordPress doesn’t assign categories or tags to pages, but you can enable this using a plugin or adding a bit of custom code to your theme’s functions.php file, like this:
function add_taxonomies_to_pages() {

    register_taxonomy_for_object_type('category', 'page');

    register_taxonomy_for_object_type('post_tag', 'page');

}

add_action('init', 'add_taxonomies_to_pages');
What this code does:
- register_taxonomy_for_object_type() tells WordPress to allow categories (‘category’) and tags (‘post_tag’) to be used on pages (‘page’).
- add_action(‘init’, …) runs this function when WordPress initializes.
For more detailed instructions, visit Hostinger’s WordPress taxonomy guide.
14. Customize block styles to design your content
WordPress’s block editor (Gutenberg) allows you to structure your pages using a series of blocks, each one containing a different type of content.
When you click on any block in the editor, look to the right-hand sidebar. You’ll find style settings specific to that block.
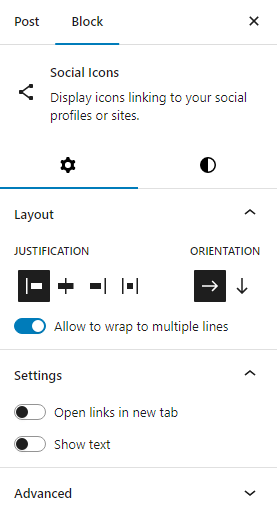
You can also switch between block styles (like default vs. outline) where available, or even apply custom CSS classes if you want to go beyond the built-in tools.
Customizing block styles helps you create visually consistent, professional-looking pages that reflect your brand, without needing to write HTML and CSS code.
15. Create and use patterns
Block patterns in WordPress are pre-designed layouts made up of multiple blocks.
They are reusable content sections, like a feature list, a testimonial row, or a call-to-action banner, that you can drop into any post or page with a single click.
Patterns speed up content creation, ensure consistent design across your site, and reduce repetitive work. Instead of recreating the same layout every time, you simply insert a saved pattern and tweak the content.
To create your own pattern, click the three-dot menu and choose Create pattern (or Add to Reusable blocks, depending on your version of WordPress).
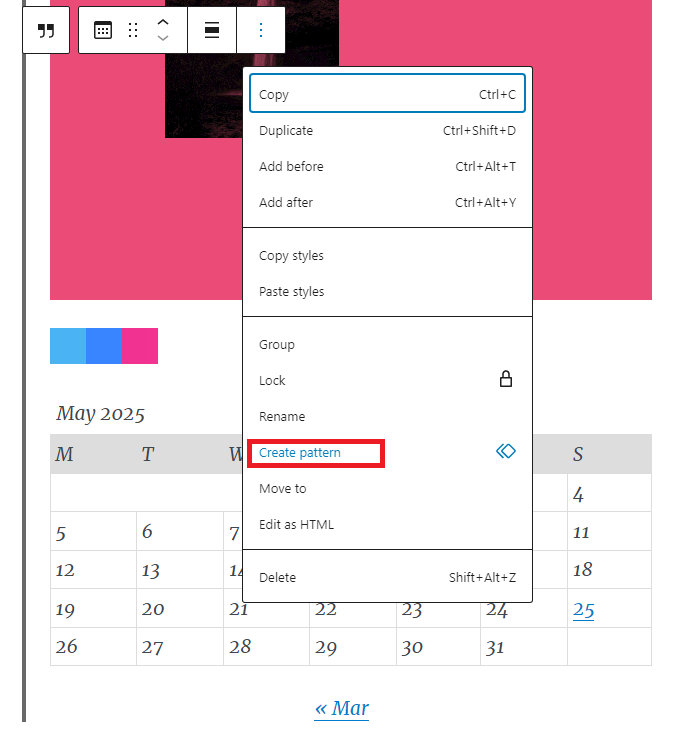
Select all the blocks you want to include and click Add.
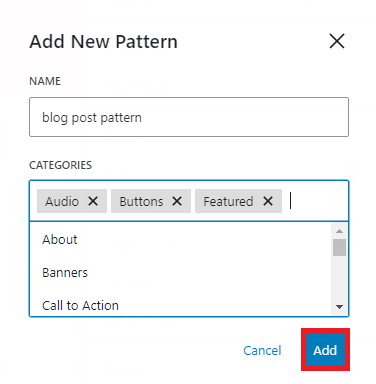
Then, the next time you’re editing content, open the Patterns tab in the block inserter, and simply drag and drop your saved pattern into the page.
16. Display the last updated date on posts
Showing the last updated date on your WordPress posts can help build readers’ trust, especially for time-sensitive content like tutorials, reviews, or industry news.
It shows your content is fresh and regularly maintained, which can improve your click-through rates in search results.
WordPress themes usually show the original publish date by default, but you can modify your theme to display the last updated date instead.
Add the following PHP code snippet to your theme’s functions.php file or a custom plugin:
function show_last_updated_date() {

    $updated = get_the_modified_time('U');

    $published = get_the_time('U');

    if ($updated != $published) {

        echo '<p class="last-updated">Last updated on ' . get_the_modified_time('F j, Y') . '</p>';

    }

}
Then, insert this function into your post template file (single.php or content-single.php), ideally right below the post title:
<?php show_last_updated_date(); ?>
That’s it! Your posts will now display the most recent update date.
17. Set up redirects for changed URLs
Changing a page’s URL without setting up a redirect can cause drops in traffic, hurt your search rankings, and leave users confused when they land on a missing page.
That’s where 301 redirects come in. They tell search engines and visitors that a page has permanently moved to a new address.
Without them, backlinks pointing to your old URL will break, and users might land on a 404 error page.
The easiest way to set up a 301 redirect is to use a plugin like Redirection or Yoast SEO Premium.
These let you create redirects directly from your WordPress dashboard without the need to mess with the code.
If you prefer a hands-on approach, you can add redirect rules manually to your site’s .htaccess file (Apache servers) or configure them in your functions.php file with PHP code.
To find out how, explore our comprehensive guide on how to set up 301 redirects in WordPress.
18. Use a custom login URL
By default, every WordPress site uses the same login URL (/wp-login.php or /wp-admin). This makes it an easy target for bots and attackers who use automated scripts to brute-force their way in.
Changing your login URL doesn’t make your site bulletproof, but it does add a helpful layer of security by hiding the front door.
Plugins like WPS Hide Login allow you to safely change your login URL without editing WordPress core files.
After installing the plugin, go to the plugin settings, enter your desired custom login slug (e.g., /secure-login), save changes, and bookmark the new login URL.
Important! If your plugin fails or is deactivated, WordPress will revert to the default login URL.
19. Be selective with plugins
Plugins can extend your WordPress site’s functionality in powerful ways, but installing too many plugins can do more harm than good.
Every one you add is a piece of third-party code, and not all of them are created with the same standard of performance or security.
Poorly coded or outdated plugins can slow down your site, create conflicts, introduce security vulnerabilities, and make maintenance a nightmare.
Before adding a plugin, ask yourself:
- Do I really need this?
- Could I achieve the same result with a built-in WordPress feature or by combining existing tools?
- Is the developer reputable and actively maintaining it?
- Am I solving a real problem, or just adding a shiny new feature?
If you still think you need a new plugin, it’s time to evaluate it properly, by:
- Checking ratings and reviews. Look for consistently positive feedback and a strong user base.
- Testing compatibility. Always verify that the plugin works with your current WordPress version.
- Avoiding plugin overlap. Don’t install multiple plugins that do similar things, as it can lead to conflicts and performance issues.
Regularly update your plugins to patch vulnerabilities, and delete any you’re not actively using.
20. Manage custom code properly
Custom code can help you fine-tune your WordPress site beyond what themes and plugins offer, but it must be implemented with care.
Instead of editing your theme’s core files directly (which can break your site or be overwritten during updates), create a child theme and add your custom CSS or PHP to style.css, functions.php, or any other files from the parent theme that you choose to modify.
This lets you safely override styles, templates, and functions while keeping the original theme untouched.
For smaller tweaks, a code snippets plugin like Code Snippets or WPCode is a safer, user-friendly option.
These tools let you add and manage custom functions from the dashboard without touching your theme files.
Once you start adding snippets, it’s important to document them. Label each snippet clearly with comments explaining its purpose, and avoid cluttering your site with unnecessary or experimental code.
If you’re managing more extensive customizations, especially in a team or for client work, consider using version control with Git.
This lets you track every change, revert mistakes, and collaborate more efficiently.
Conclusion
WordPress is incredibly flexible, but managing it effectively takes more than just hitting Publish.
The 20 tips we covered can help you fine-tune your site’s performance, improve security, and create a better experience for your visitors.
Whether you’re a hobbyist or a full-time site owner, implementing even a few of these strategies can make a big difference.
Key takeaways:
- Speed and security are essential – optimize your database, use quality web hosting, and back up your site regularly.
- Customization and content design are easier with child themes, block patterns, and excerpts.
- Site management tools like WP-CLI and site staging make development smoother.
- Clean structure and smart plugin use help to keep your site running efficiently.
WordPress tips FAQ
What are the best tips to speed up WordPress?
To speed up your WordPress site, choose a top-quality hosting provider, use caching, compress images, clean your database regularly, and minimize plugin usage.
Using a lightweight theme and a CDN can also significantly boost load times.
What are the best tips to secure my WordPress site?
Strengthen your WordPress security by keeping themes and plugins updated, using strong passwords, enabling two-factor authentication, hiding your login URL, and protecting the wp-admin directory.
Regular backups and reputable security plugins can also help prevent attacks.
Where can I learn to manage a WordPress site?
You can learn WordPress site management through online tutorials, courses, and guides.
You can also explore Hostinger’s beginner-friendly WordPress tutorials that offer instructions on everything from setup and optimization to advanced features.

Ksenija is a digital marketing enthusiast with extensive expertise in content creation and website optimization. Specializing in WordPress, she enjoys writing about the platform’s nuances, from design to functionality, and sharing her insights with others. When she’s not perfecting her trade, you’ll find her on the local basketball court or at home enjoying a crime story. Follow her on LinkedIn.