How to install Docker using Ansible on Ubuntu
Mar 10, 2026
/
Dovydas
/
7 min Read
Installing Docker manually works fine – until you have to do it more than once. That’s precisely the kind of problem Ansible was made to solve. With Ansible, you can automate Docker setup and keep the configuration consistent across every server you manage.
Docker is a platform for running applications in fast, lightweight, and portable environments called containers that run independently from the host system. Ansible is a tool designed to automate the setup of those environments so you don’t have to do it manually every time.
Ansible uses a simple text file called a playbook where you define your server configuration. This can include everything from installing packages to setting up various services. There’s no coding required – just write your playbook once, and Ansible will apply it precisely the same way every time you run it.
This guide will show you how to use Ansible to install Docker on an Ubuntu server. You’ll learn to configure Ansible, create an inventory file, write a playbook, and run it to install and configure Docker automatically. Along the way, you’ll also learn how to verify your setup and customize it for more advanced use cases.
Prerequisites
Before you get started, make sure you have:
- An Ubuntu server – version 20.04 or later. Hostinger offers Ubuntu VPS hosting that is quick and easy to set up.
- Basic command line knowledge – you don’t need to be an expert, but you should be comfortable using the terminal.
- A user with sudo privileges – required for installing packages and running Ansible tasks.
- SSH access – to connect to your remote server.
That should cover everything you’ll need. The rest will be handled step by step in the guide.

How to use Ansible to install Docker
This process is divided into six steps, from setting up Ansible to customizing the playbook. Let’s start with installing and configuring Ansible.
1. Install and configure Ansible
Before you can install Docker with Ansible, you’ll need to set up Ansible itself. For this tutorial, you’ll install it on the same server where you plan to install Docker – this machine will act as both the control node and the one being managed. Having everything happen on a single server keeps things simple if you’re just getting started or working with a VPS.
To begin, connect to your Ubuntu server via SSH. Once connected, you’ll need to update the system’s package list. This step makes sure your server has the latest available software and security patches:
sudo apt update
Running this command doesn’t install anything. It simply refreshes the list of packages your system can access – a quick step that helps avoid issues during the Ansible installation.
Now you’re ready to install Ansible. Ubuntu includes it in its standard software libraries, so installation is straightforward:
sudo apt install ansible -y
This command installs the main Ansible tool and everything it needs to run.
Once that’s done, it’s a good idea to check that Ansible was installed correctly:
ansible --version
You should see version details on the screen. If you do, you’re ready to move forward.

That’s it. With Ansible in place, you’re ready to configure which servers it will manage in the next step.
2. Set up the inventory file
Ansible uses an inventory file to know which servers it should manage. Think of it as a list of hosts that Ansible can connect to and run tasks on. Even if you’re only going to be managing one server, like in this tutorial, you’ll still need to define it in the inventory.
By default, the inventory file is located at /etc/ansible/hosts. You can edit this file directly or create your own. For this guide, we’ll create a simple custom inventory file in your working directory to keep things organized.
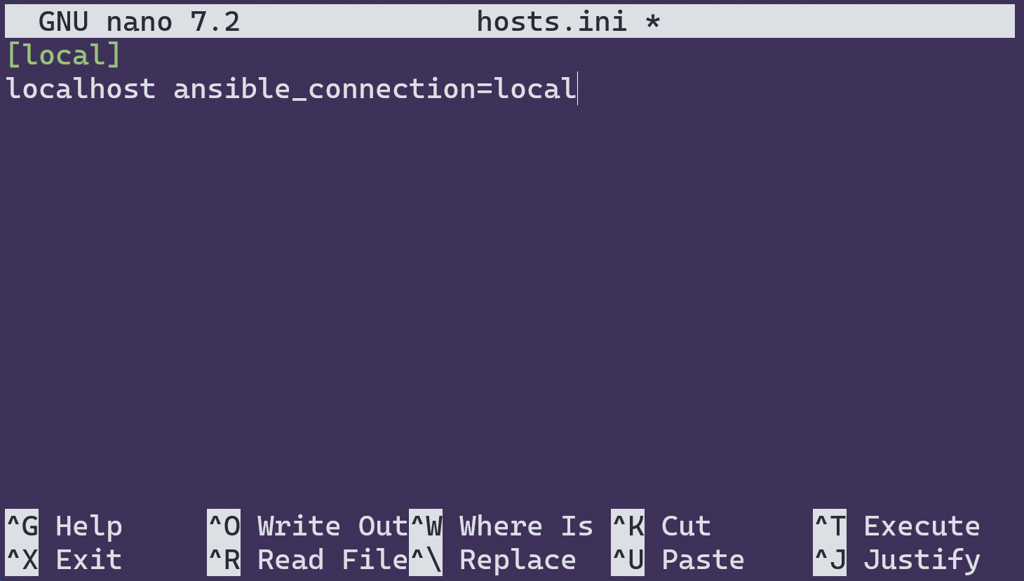
Create a file called hosts.ini:
nano hosts.ini
Then, add the following:
[local]
localhost ansible_connection=local
Here’s what this means:
- [local] is the name of the group. You can name groups however you like.
- localhost tells Ansible to run tasks on the same machine.
- ansible_connection=local tells Ansible to skip the SSH connection step because it’s managing the same machine it’s installed on.
If you want to manage multiple remote servers, your inventory must contain their IP addresses or hostnames. You would also need to specify the SSH connection type and the username of the remote host that Ansible would use for connection.
Important! To enhance security, we strongly recommend using SSH keys for Ansible SSH authentication between your control node and remote host.
But for this guide, localhost is all you need. Be sure to replace “server.hostname.tld” with your own server address and “username” with your own username.
[webservers]
192.168.1.10		ansible_connection=ssh	ansible_user=username
server.hostname.tld 	ansible_connection=ssh	ansible_user=username
Save the file, then you’re done setting up the inventory. Next, you’ll write the playbook – the set of instructions that tells Ansible how to install Docker.
3. Write the Ansible playbook
Next, it’s time to write the Ansible playbook, which contains a list of tasks Ansible will execute to install and configure Docker for you. Instead of manually entering commands one by one, you’ll define everything in a structured format, and Ansible will handle the rest.
Create a file called install-docker.yml:
nano install-docker.yml
Then paste in the following content:
- name: Install Docker on Ubuntu
  hosts: local
  become: true
  tasks:
    - name: Install required packages
      apt:
        name:
          - apt-transport-https
          - ca-certificates
          - curl
          - software-properties-common
        state: present
        update_cache: true

    - name: Add Docker’s official GPG key
      apt_key:
        url: https://download.docker.com/linux/ubuntu/gpg
        state: present

    - name: Add Docker repository
      apt_repository:
        repo: deb https://download.docker.com/linux/ubuntu focal stable
        state: present

    - name: Install Docker
      apt:
        name: docker-ce
        state: latest
        update_cache: true
Let’s break it down:
- name is a description of what the playbook is doing, making logs more readable.
- hosts: local tells Ansible to run the tasks on the localhost group from your inventory.
- become: true runs the tasks with admin privileges, just like using sudo in the terminal.
- Under tasks, each item is a step in the installation process.

Here’s what each of the tasks does:
- Installing required packages. The playbook starts by installing a set of tools your system needs before it can install Docker.
These include:- curl for downloading files
- apt-transport-https for accessing secure repositories
- ca-certificates for handling SSL certificates
- software-properties-common, which helps manage software sources
- Adding Docker’s GNU Privacy Guard (GPG) key. This lets your system verify the authenticity of the Docker packages by adding Docker’s official GPG key before installing them.
- Adding Docker’s repository. Switches to the official Docker repository instead of the built-in Ubuntu one. That way, your server will always install the latest stable release of Docker straight from the source.
- Installing Docker itself. The playbook refreshes the package list one more time to ensure the latest version is pulled in, then installs it.
Writing the playbook this way ensures that Docker is installed in a consistent, repeatable manner, which is exactly what Ansible is designed for. You can reuse this file if you need to do it again on another Ubuntu machine.
Save and close the file – you’re now ready to run the playbook.
4. Run the Ansible playbook
To execute the playbook, use the following command:
ansible-playbook -i hosts.ini install-docker.yml
Here’s what’s happening in this command:
- ansible-playbook is the Ansible tool used to run your playbook
- -i hosts.ini tells Ansible to use the inventory file you created earlier
- install-docker.yml is the playbook that contains your Docker installation steps
After you run the command, Ansible begins connecting to the server listed in your inventory. Since you’re using localhost with ansible_connection=local, it doesn’t use SSH. Instead, it runs the tasks directly on the same machine upon which Ansible is installed.
You’ll see each task printed out in the terminal as it runs along with a success or failure message. This makes it easy to spot any issues and monitor progress.
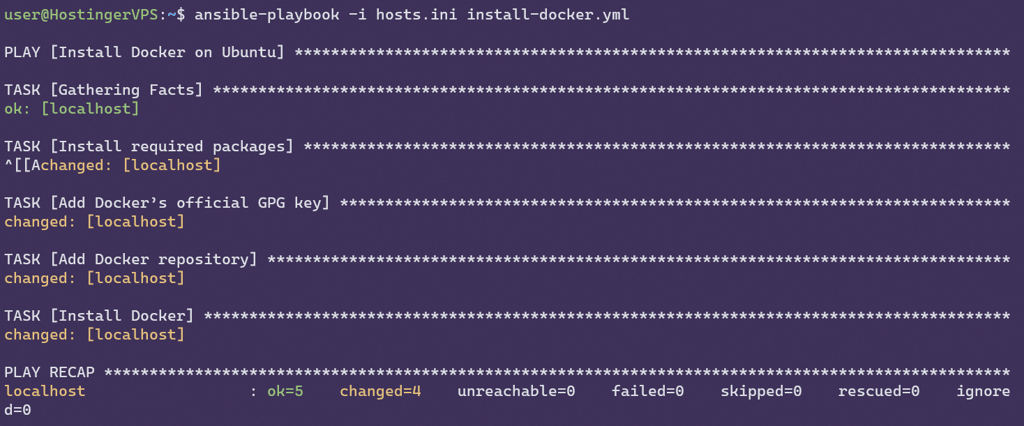
Behind the scenes, Ansible checks if each task needs to be run or if it’s already been completed. For example, if Docker is already installed on the target host, Ansible will skip that step. This is one of the key benefits of using Ansible: it only runs steps when they are needed.
Once the playbook finishes, Docker should be installed and ready to use. The next step is to make sure everything worked.
5. Verify the installation
Once the playbook finishes running, check if Docker was installed correctly. First, check the version to confirm that Docker is available:
docker --version
If the installation worked, you’ll see the version number printed in the terminal.

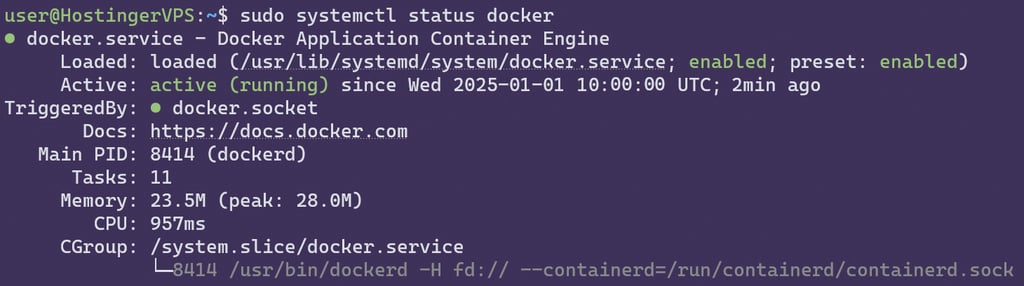
Next, make sure the Docker service is running:
sudo systemctl status docker
You should see a status of active (running). Press q to exit the status screen.
Finally, run a quick test that pulls a small Docker image from Docker Hub, the default image registry, and runs it in a container:
sudo docker run hello-world
If everything is set up successfully, you’ll see a Hello from Docker! message printed out.

With Docker installed and verified, you’re ready to customize your Ansible playbook.
6. Customize the playbook
Now that you’ve successfully installed Docker, you can expand your playbook to include additional tools and configurations.
One popular addition is Docker Compose. It allows you to define and run multi-container applications. To add it to your playbook, you could include a task that downloads the latest version and places it in your system’s binary directory.
- name: Install Docker Compose

  get_url:

    url: https://github.com/docker/compose/releases/latest/download/docker-compose-linux-x86_64

    dest: /usr/local/bin/docker-compose

    mode: '0755'
Docker Swarm is another useful built-in Docker tool for more efficiently managing multiple containers across different servers. You can use Ansible to initialize Docker Swarm or join nodes to an existing one.
- name: Initialize Docker Swarm
  command: docker swarm init
You can also configure Docker with custom settings. For example, you might want to set a custom storage driver or data directory, or specify how the Docker daemon communicates with a Docker host. These adjustments can be made by adding a task that edits the Docker daemon configuration file, typically located at /etc/docker/daemon.json.
These are just a few ideas. The real advantage of using Ansible is that once you’ve added these tasks to your playbook, they’ll run automatically and consistently on any server you set up in the future.
Conclusion
Setting up Docker with Ansible isn’t just about saving time. It’s about making your setup repeatable and reliable. Instead of manually going through all the installation steps every time, you’ll now have a playbook that does it all for you.
The best part? You’re not locked into just the basics. Whether you’re managing a single VPS or preparing for a more complex setup, this approach gives you a solid and flexible foundation. You can keep building your playbook over time by updating it and testing the changes as your setup evolves.
Install Docker using Ansible FAQ
What is Ansible, and how does it work with Docker?
Ansible is a tool for automating tasks – like installing software – on one or more servers. It works with Docker by handling its setup for you. Instead of running commands manually, you can just write them in a playbook and let Ansible handle the rest.
Can this playbook be used for other Linux distributions?
It can, with a few adjustments. This playbook is made specifically for Ubuntu, but the working principle is the same on other distributions. You’ll need to change a few commands, especially ones that deal with package installation.
How do I manage multiple servers with Ansible?
You can simply list all your servers in the inventory file. Ansible will connect to each of the servers (usually over SSH) and run the playbook on each of them. That’s why Ansible is one of the easiest ways to handle installations and changes on multiple machines at once.

Dovydas has worked in cloud engineering and IT operations, focusing on maintaining and improving complex systems. He’s especially interested in software development and automation and is always looking for ways to make things more efficient and reliable. You can find him on LinkedIn.


Comments
0 responses