How to integrate n8n with Discord
Mar 10, 2026
/
Aris S.
/
8 min Read
There are many platforms you can integrate with n8n, Discord being one of the most popular options. This compatibility lets you automate various tasks in the messaging app, from sending a notification to managing users.
In this article, we will explain how to integrate n8n with Discord. We will discuss how to do so using a webhook, an HTTP request, and OpenAI so you can find the best method based on your needs.
Before getting started, let’s dive into the prerequisites and the initial n8n setup.
Setting up n8n for Discord workflows
Before going into the steps, let’s set up n8n. This platform offers an officially hosted plan, but we will self-host it on a virtual private server (VPS) because it is more affordable.
Since n8n is relatively lightweight, a system with 4 GB of SSD storage and 2 GB of RAM is enough.
If you don’t have a server, we recommend Hostinger n8n self-hosted solution, which starts CA$ 9.09/month.
After purchasing a VPS hosting plan, install n8n on your server. Hostinger users can do so with one click using the OS template, which makes the process much easier.

Once installed, open n8n using your server’s IP address on port 5678. Otherwise, you can access it from n8n.hostname.com, with hostname.com being your actual server hostname.
In the n8n dashboard, complete the configuration by creating an account and a project.
If you face difficulties during this initial setup process, watch and follow our video guide below.
Popular n8n integrations for Discord
In this section, we will explain how to integrate Discord with n8n using a webhook, OpenAI, and an HTTP request. Since each platform suits different automation workflows and use cases, we will also discuss when it is best to use it.
How to integrate n8n with Discord and Webhook
Webhook is a lightweight, event-driven communication method that lets multiple applications communicate via HTTP. It is a versatile method for triggering n8n workflow.
A webhook is sent after a specific action that was previously determined occurs. Depending on how you define it, this action can be different events.
When a webhook starts, it triggers an action in Discord using n8n, such as sending a message or deleting a channel.
For demonstration purposes, let’s create a basic integration that sends a message in Discord when the webhook is called:
- Open Discord and create a new webhook. Save the URL and return to n8n.
- Click the + icon on the top right corner to create a new node. Select Webhook.
- Double-click the Webhook node to open the configuration menu.
- Select the HTTP method that will trigger the hook. We will choose GET.
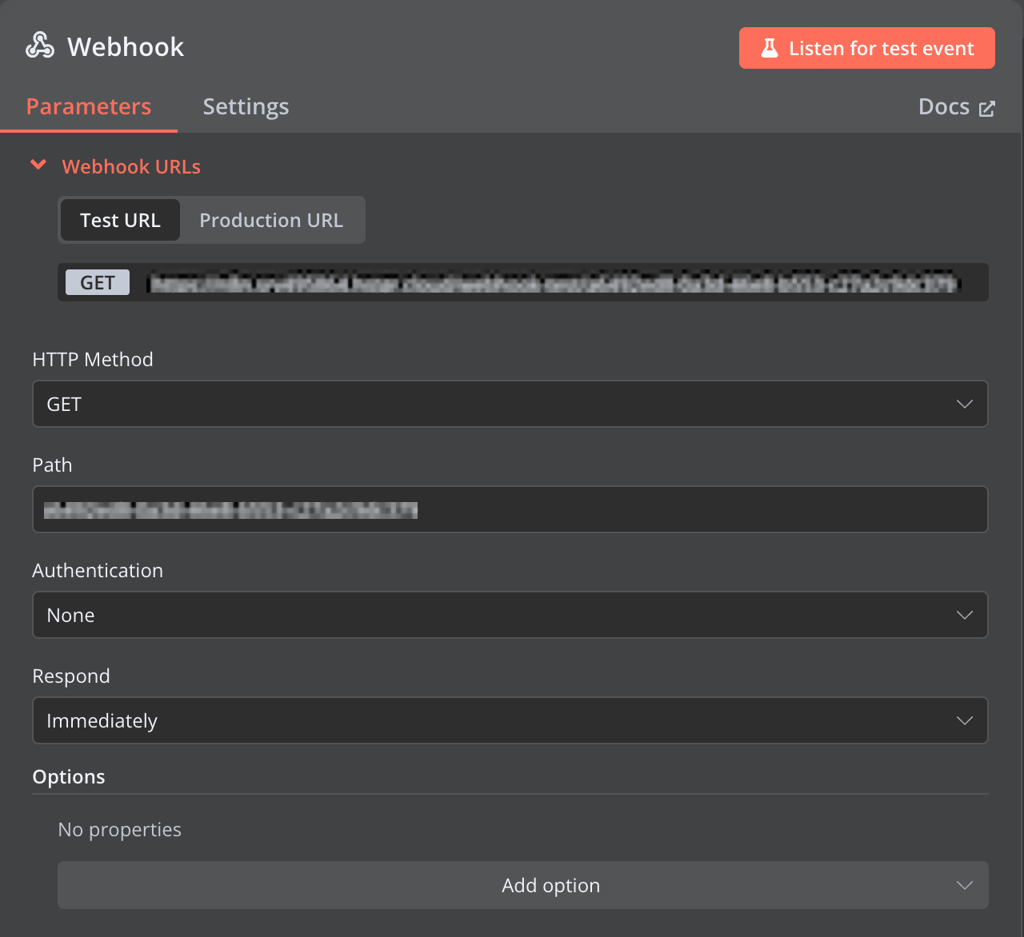
- Click Back to canvas.
- Create a new node and select Discord. Pick the type of action the webhook will trigger, like sending a message.
- Enter the following configurations:
- Connection Type: Webhook.
- Credential for Discord Webhook: the Discord webhook you created earlier.
- Message: the message you want to send to your Discord server.
- Return to the canvas and click Test workflow.
- Open the webhook URL on your browser, and a new message will pop up in your Discord server.

Note that this is a basic implementation of n8n with Discord using a webhook. By adding more nodes, you can automate a more complex workflow.
For instance, you can make a new user registration in Discord trigger a webhook, which then assigns a role to the person. Check out n8n’s DIscord and webhook integration page for more examples and templates.
Important! Since Discord API limits the number of calls for webhooks and bots, avoid sending too many requests in a short time.
How to integrate n8n with Discord and OpenAI
Integrating n8n with Discord using OpenAI creates an AI-powered bot that can analyze messages, write content, or search for information on your server.
The steps to integrate n8n with Discord and OpenAI are similar to those when using a webhook but require an additional node. You also need an OpenAI API key to access the large language model (LLM).
If you don’t have one, open OpenAI’s API key generation page and log in to your account. Then, click Create new secret key.

Enter a name for your secret key and hit Create secret key. Copy your new API credential and store it in a safe location. Click Done to finish.
Warning! Once you click Done, you won’t be able to see the full API key anymore. Make sure you properly copy the credential and store it in a safe location before proceeding.
For example, you have an application that takes message submission. You want a workflow to evaluate the inputted message for harmful content and notify the developers about it. Here’s how to do so:
- Add a Webhook node.
- Open the node and select the POST method that will trigger the hook when a user submits a message.
- Copy the Webhook URL and add it to your application.
- Return to n8n and add an OpenAI node. Choose Classify Text for Violations.
- Open the OpenAI node. Click Create new credential and enter your API key.
- For the Text input, choose Expression and enter the following prompt. This will forward the received message to OpenAI for evaluation:
Evaluate this: {{ $json.message.text }}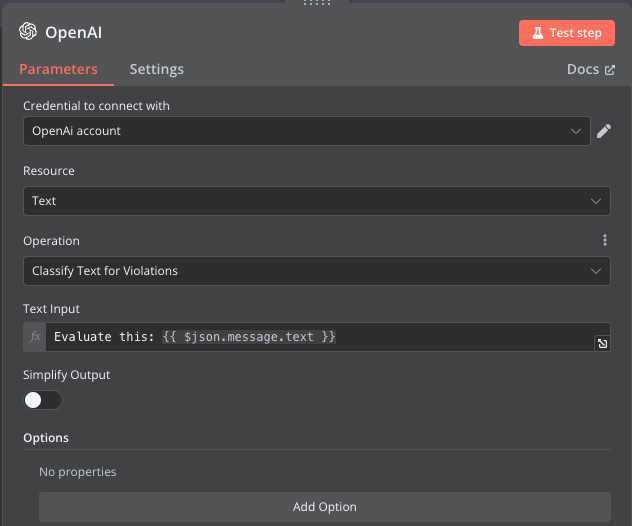
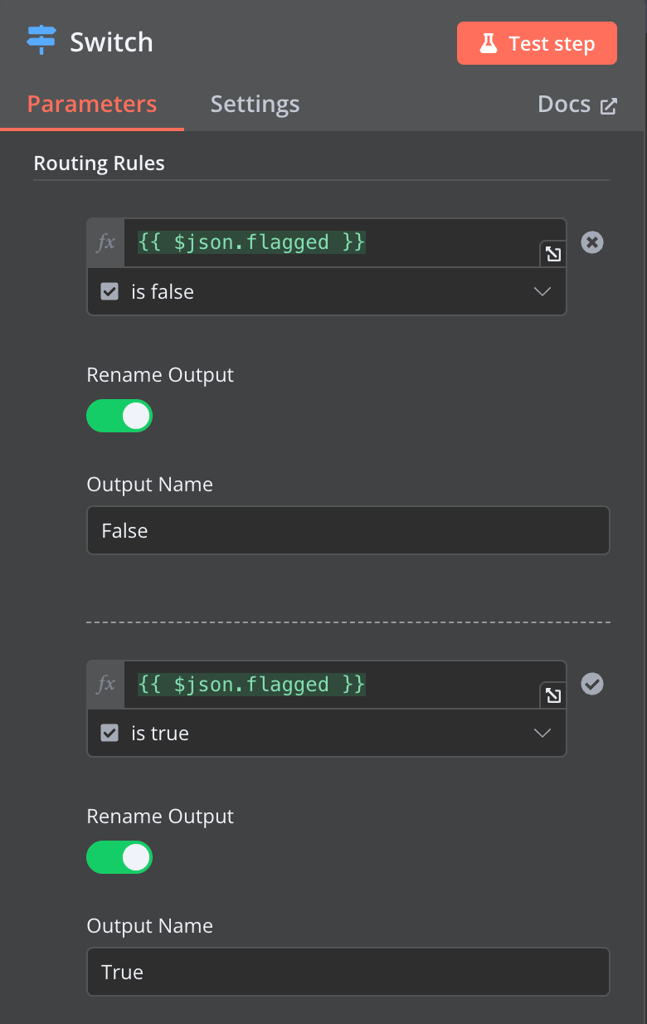
- Return to the canvas and add a Switch node to route the output according to the evaluation result.
- Open the Switch node and add two rules for when {{ $json.flagged }} value is true and false.
- Add the Discord send message node, configure the webhook, and enter the automated message.
- Add the No operation node, which we will use to ignore unflagged messages.
- Connect the Switch node’s TRUE endpoint to the Discord node and FALSE to the No operation one.
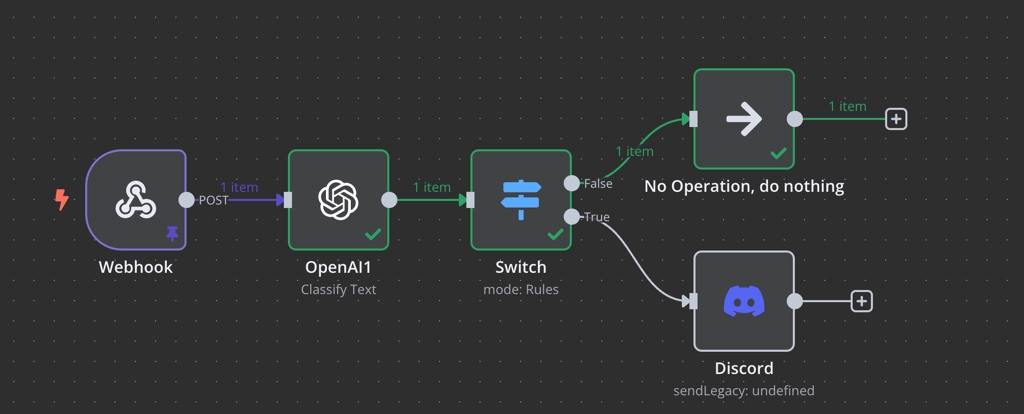
Now, when a user enters a message in your application, the OpenAI LLM evaluates it for harmful content. n8n will send a Discord notification if it deems the message inappropriate and does nothing if otherwise.
Using mock data
If you can’t call the webhook URL, set up a mock data. This is enough to test the workflow without properly triggering the webhook.
Check out the n8n’s Discord and OpenAI integration page to learn more about other example workflows.
How to integrate n8n with HTTP Request
For a more complex workflow with direct API interactions, you can integrate n8n with Discord and other platforms using HTTPS requests. There are two ways to do so – by using node parameters and importing the cURL command.
For a basic request, using the default node parameters is enough. Meanwhile, you should import the cURL command if the service you want to integrate provides a specific API configuration.
As a demo, let’s integrate n8n with Discord and YouTube using HTTP requests. In this workflow, we want to summarize newly uploaded videos and send the synopsis to Discord. Here’s how to do that:
- Add a new RSS feed node to track new uploads on your YouTube channel.
- Open the RSS node and enter the following Feed URL. Replace CHANNEL_ID with your actual YouTube channel ID.
https://www.youtube.com/feeds/videos.xml?channel_id=CHANNEL _ID
- Head to your YouTube channel and generate the OAuth 2.0 client ID and secret key. Once finished, store them in a safe location.
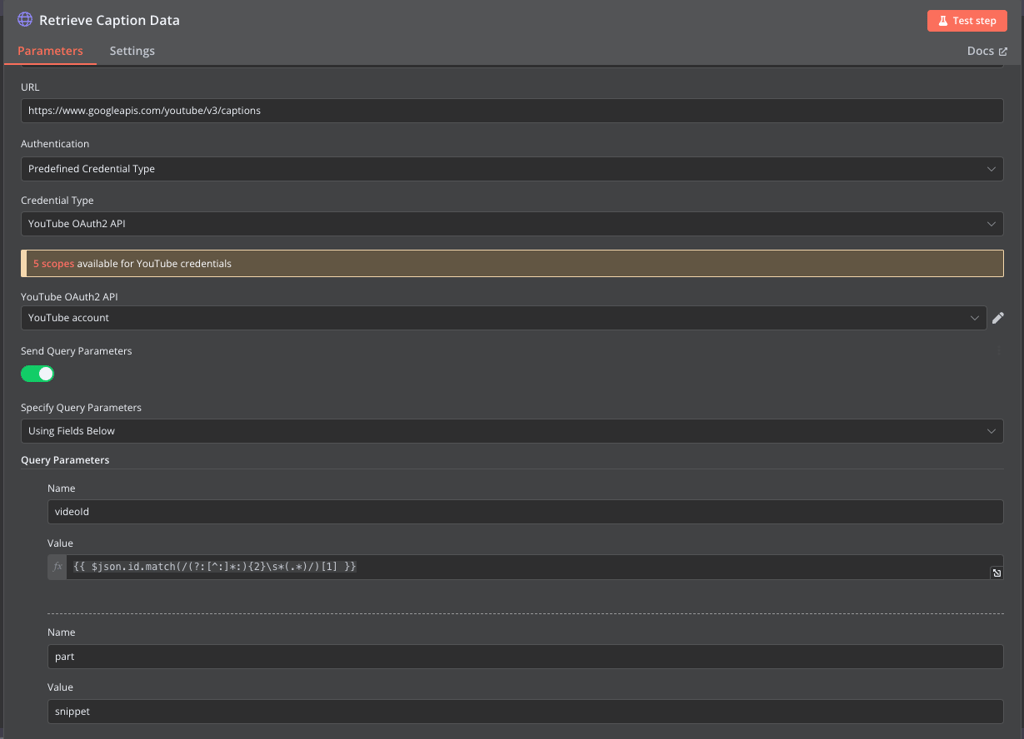
- Return to n8n and add a new HTTP request node. In the Parameters tab, add the following configuration:
- Method: GET
- URL: https://www.googleapis.com/youtube/v3/captions
- Authentication: Predefined Credential Type
- Credential Type: YouTube OAuth2 API
- YouTube OAuth2 API: your client ID and secret key
- Send Query Parameters: on
- Specify Query Parameters: Using Fields Below
- In the query parameter fields, enter the following configuration:
- Name: videoid
- Value: {{ $json.id.match(/(?:[^:]*:){2}s*(.*)/)[1] }}
- Name: part
- Value: snippet
- Create an Edit Fields node and open its configuration panel.
- Click Add fields, add a name, and select Object. Then, enter the following setting:
{{ $jmespath( $json.items, "[?snippet.language == 'en'] | [0]" ) }}- Add another HTTP request node. Use the same configuration as the previous HTTP request node, but turn off Send Query Parameters and insert the following URL instead:
https://www.googleapis.com/youtube/v3/captions/{{ $json.caption.id }}- Add an Extract from Text File node and change the Destination Output Field to Content.
- Add an OpenAI node to summarize the video transcript. Choose Text as the resource and use the following prompt:
Summarise this transcript into three bullet points to sum up what the video is about and why someone should watch it: {{ $json["content"] }}- Add a Discord node to send the message using Webhook. Your message might look as follows:
New video out!

**{{ $('YouTube Video Trigger').item.json["title"] }}**

{{ $json["message"]["content"] }}

[Watch NOW]({{ $('YouTube Video Trigger').item.json["link"] }}) and remember to share and comment!
Setting up Discord bot with n8n
Leveraging n8n’s integration with various platforms, you can easily create a Discord bot for different purposes with minimal coding.
Traditionally, you would have had to manually write the bot’s function and integrate it with external services for data processing. With n8n, simply add the required nodes and connect them to set up the data flow.
However, n8n currently doesn’t have a Discord trigger node, meaning it can’t read messages from a server. That said, we can still take input by creating a basic bot.
For example, let’s create a bot that generates an image based on a Discord message. Let’s start with the n8n workflow:
- Add a Webhook node with the POST method to forward your Discord message. Copy the webhook and store it for later.
- Add an OpenAI node to generate an image, and then configure your OpenAI account API key.
- Go to the Prompt field, select Expression, and enter the following:
{{ $json.body.content }}- Insert a Discord node to send a message. Use the following configuration:
- Connection Type: Bot token
- Credential for Discord Bot API: Your Discord bot token
- Server: The Discord server you want to send the image to
- Send to: Channel
- Channel: The Discord channel you want to send the image to
- Files: Data

This workflow starts when the Discord bot receives a message, sends the message as a prompt to OpenAI, and forwards the generated image to Discord.
Now, let’s configure the Discord bot. Here are the steps:
- Create a Discord bot and invite it to your server, but skip the coding process for now.
- Open a code editor like VSCode and create a new folder containing two files – main.py and .env.
- In VSCode’s Terminal, enter this command to install the Python dependencies:
python3 -m pip install discord python-dotenv requests
- Open main.py in VSCode and enter the following code to define your bot’s functionality:
# Import the required modules

import discord

import os

import logging

from discord.ext import commands

from dotenv import load_dotenv

import requests

load_dotenv()

WEBHOOK_URL = os.getenv("WEBHOOK_URL")

# Create a Discord client instance and set the command prefix

intents = discord.Intents.all()

client = discord.Client(intents=intents)

bot = commands.Bot(command_prefix='!', intents=intents)

logging.basicConfig(

    level=logging.INFO,

    format='[%(asctime)s] [%(levelname)s]: %(message)s',

    handlers=[

        logging.FileHandler('bot.log'),

        logging.StreamHandler()

    ]

)

# Set the confirmation message when the bot is ready

@bot.event

async def on_ready():

    print(f'Logged in as {bot.user.name}')

@bot.event

async def on_command_error(ctx, error):

    error_message = f'Error occured while processing command: {error}'

    logging.error(error_message)

    await ctx.send(error_message)

# Set the commands for your bot

@bot.command()

async def message(ctx, *, content: str = None):

    """Sends a message to the webhook when !message is used"""

    # Check if the user provided a message

    if not content:

        await ctx.send("Please provide a message after !message.")

        return

    # Prepare the payload for the webhook

    payload = {

        'username': ctx.author.display_name,

        'content': content,

        'avatar_url': ctx.author.avatar.url if ctx.author.avatar else None,

    }

    # Send the payload to the webhook URL

    try:

        response = requests.post(WEBHOOK_URL, json=payload)

        response.raise_for_status()

        await ctx.send("Message sent successfully!")

        print(f'Message forwarded: {content}')

    except requests.exceptions.RequestException as e:

        await ctx.send("Failed to send the message.")

        print(f'Failed to forward message: {e}')

# Retrieve token from the .env file

bot.run(os.getenv('TOKEN'))- Open the .env file, then add your bot token and n8n webhook in their respective placeholders.
WEBHOOK_URL=your-webhook-url

TOKEN=your-discord-bot-token
- Save both files by hitting Ctrl + S.
Now, let’s launch your bot by hitting the Run button on the top right of VSCode. You should see “Logged in as Bot-name” in the Terminal.
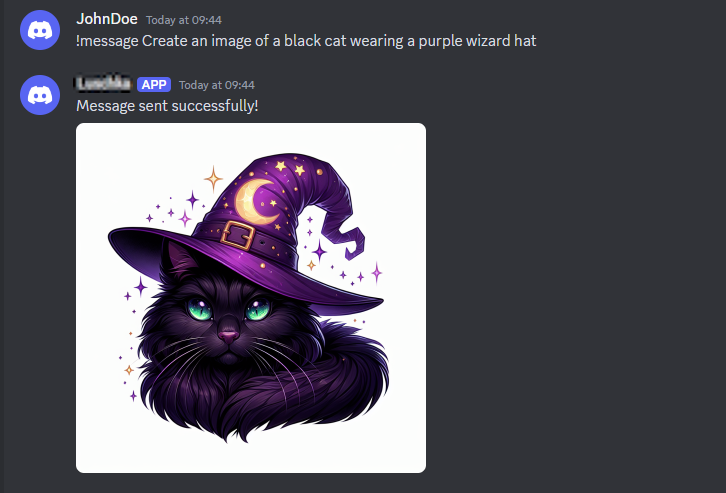
Head to n8n and start your workflow. Then, return to your Discord server and try generating an image using this message:
!message create an image of a black cat with a purple wizard hat
Your bot should return the AI-generated image like so.
To create a more complex Discord bot, simply add more nodes or integrate another workflow. For example, you can integrate n8n with Google Sheets to post data recap to your server.
Conclusion
Integrating n8n with Discord lets you create a custom workflow to automate various tasks. For example, you can create an image generator bot, a message analysis pipeline, or an alerting tool.
To integrate Discord with n8n, start by defining the trigger that starts your workflow. Use a webhook for a simpler, event-driven flow or HTTP requests to pull data from third-party APIs.
Optionally add the OpenAI node to process the passed data. For example, you can feed messages sent through a webhook to the LLM for analysis or use them as prompts for generating images.
Finally, add the Discord node to perform an action based on the previous node’s output, which ranges from sending a message to removing a user form your server.
After learning to integrate n8n with Discord, it’s now your time to create your custom workflow! You can purchase an officially hosted plan or self-host n8n on Hostinger’s VPS platform.
How to integrate n8n with Discord FAQ
How do I connect n8n to Discord?
Simply add the Discord node in n8n and connect it with the trigger event. The trigger event can be a manual action, webhook, or an HTTP request.
Select the action that Discord will perform, which ranges from sending a response message to managing a user role. Then, activate it by adding a webhook or bot token.
What can I do with n8n and Discord?
You can automate various tasks with n8n and Discord. For example, you can create a workflow that pulls a user-submitted message and filters it based on OpenAI’s moderation rule. You can also create an automated bot that sends a summary of a newly uploaded YouTube video.
Are there any pre-built workflows for n8n and Discord?
Yes, n8n has user-shared pre-built workflow templates for Discord. You can access them from the n8n Discord integration page under the Popular ways to use Discord integration section. Simply select the template you want, click Use template, and import it to your server.

Aris is a Content Writer specializing in Linux and WordPress development. He has a passion for networking, front-end web development, and server administration. By combining his IT and writing experience, Aris creates content that helps people easily understand complex technical topics to start their online journey. Follow him on LinkedIn.

Comments
0 responses