Mar 02, 2026
Ariffud M.
11min Read
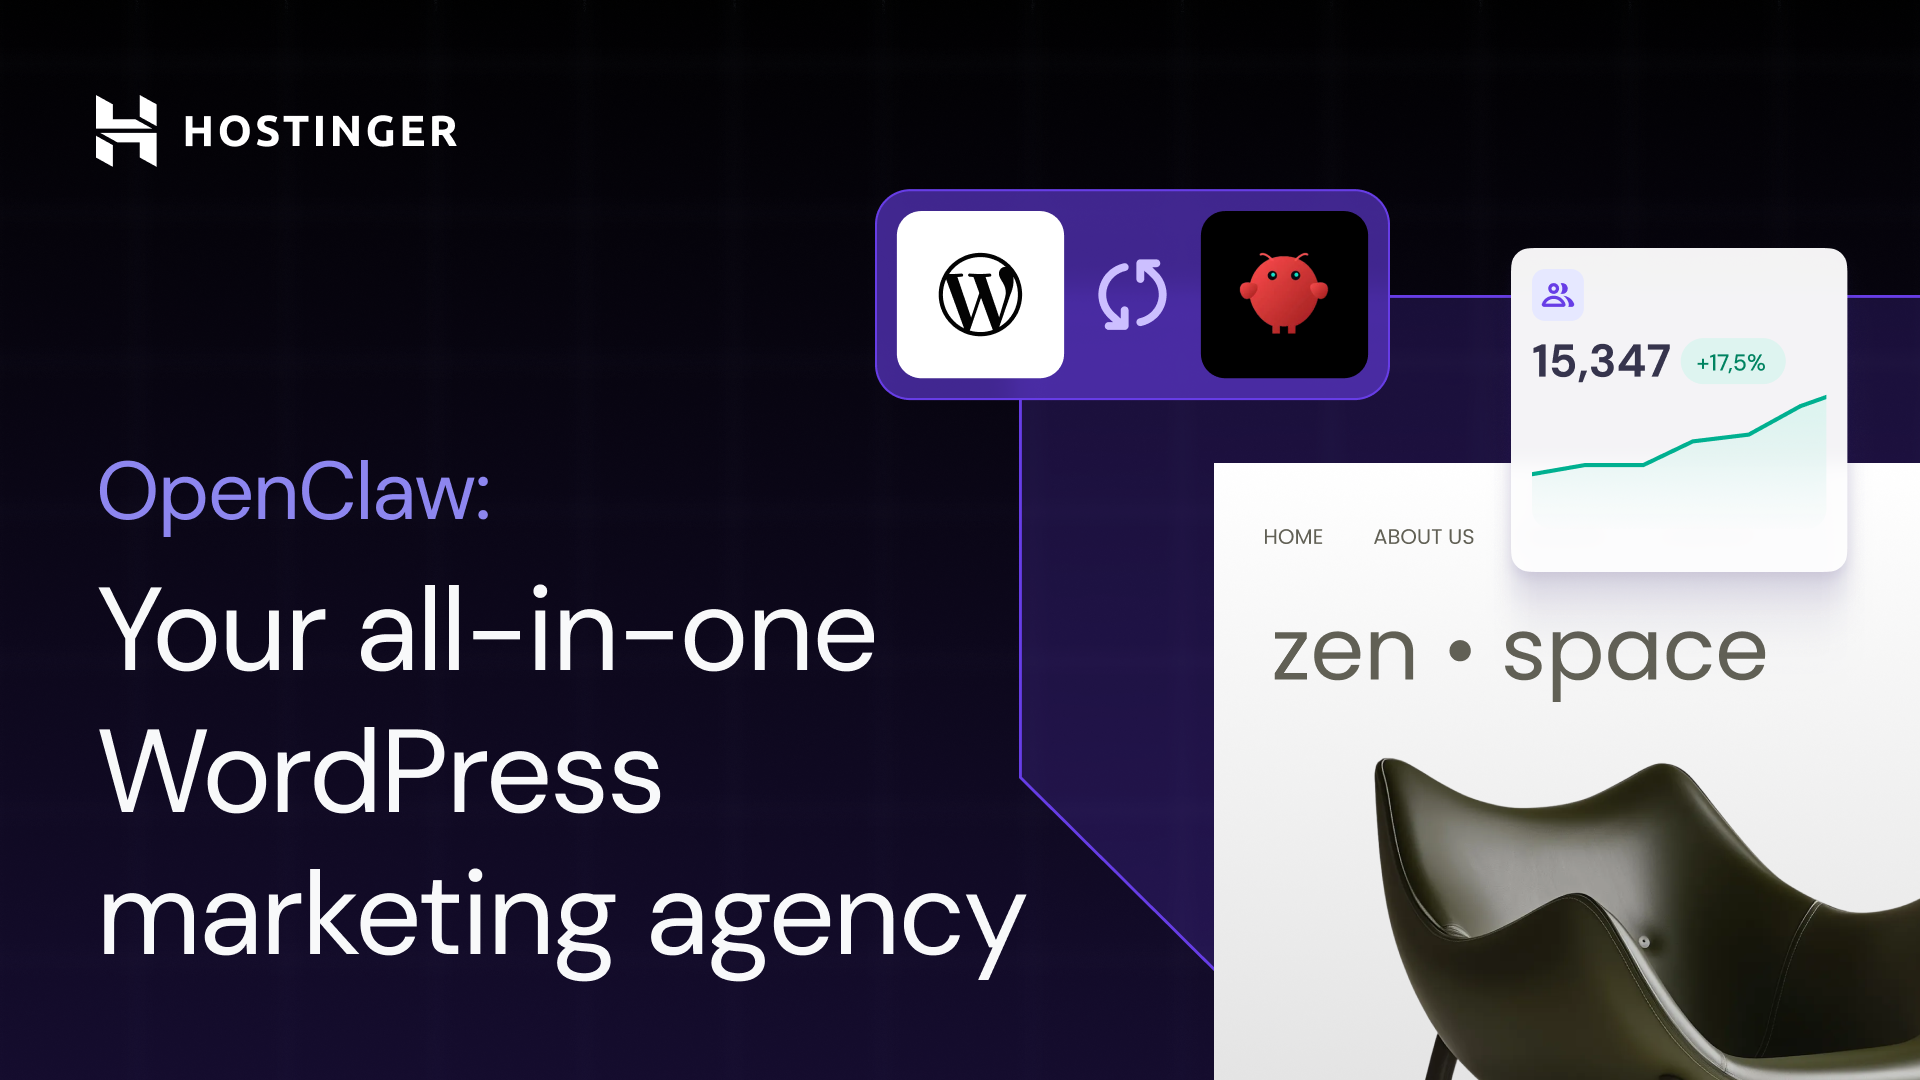
OpenClaw is an autonomous AI agent framework you can host on a virtual private server (VPS). It integrates with different tools and platforms, including WordPress.
Once you connect it to your WordPress site, OpenClaw can work as an AI editor. It can draft blog posts, edit existing content, optimize articles for SEO, publish or schedule posts, and manage categories and tags.
You authenticate OpenClaw through the WordPress REST API using an application password. This gives the agent secure permission to create and update content on your site.
If you’re generating a draft in an AI chatbot, polishing it in Google Docs, and then copying everything into WordPress, you already know how inefficient that workflow feels.
OpenClaw simplifies the process. You prompt it, it writes, you refine the draft together, and then it publishes. Everything happens in the same chat window, reducing manual steps and keeping you focused.
Here’s how to use OpenClaw as an AI content editor for WordPress:
If you already know how to add a new post in WordPress, OpenClaw automates that same process through its chat interface. But before it can interact with your WordPress site, you need to prepare the server.
To set up OpenClaw on a VPS, install Docker, clone the OpenClaw repository, run the Docker setup script, and add your AI provider credentials, such as an Anthropic or OpenAI API key.
If you’re using Hostinger’s OpenClaw VPS, you can skip the manual setup. The system configures everything automatically once you complete your purchase.
You can also buy Nexos AI credits. This lets you access models from OpenAI, Anthropic, Google, and xAI without setting up separate APIs for each provider.
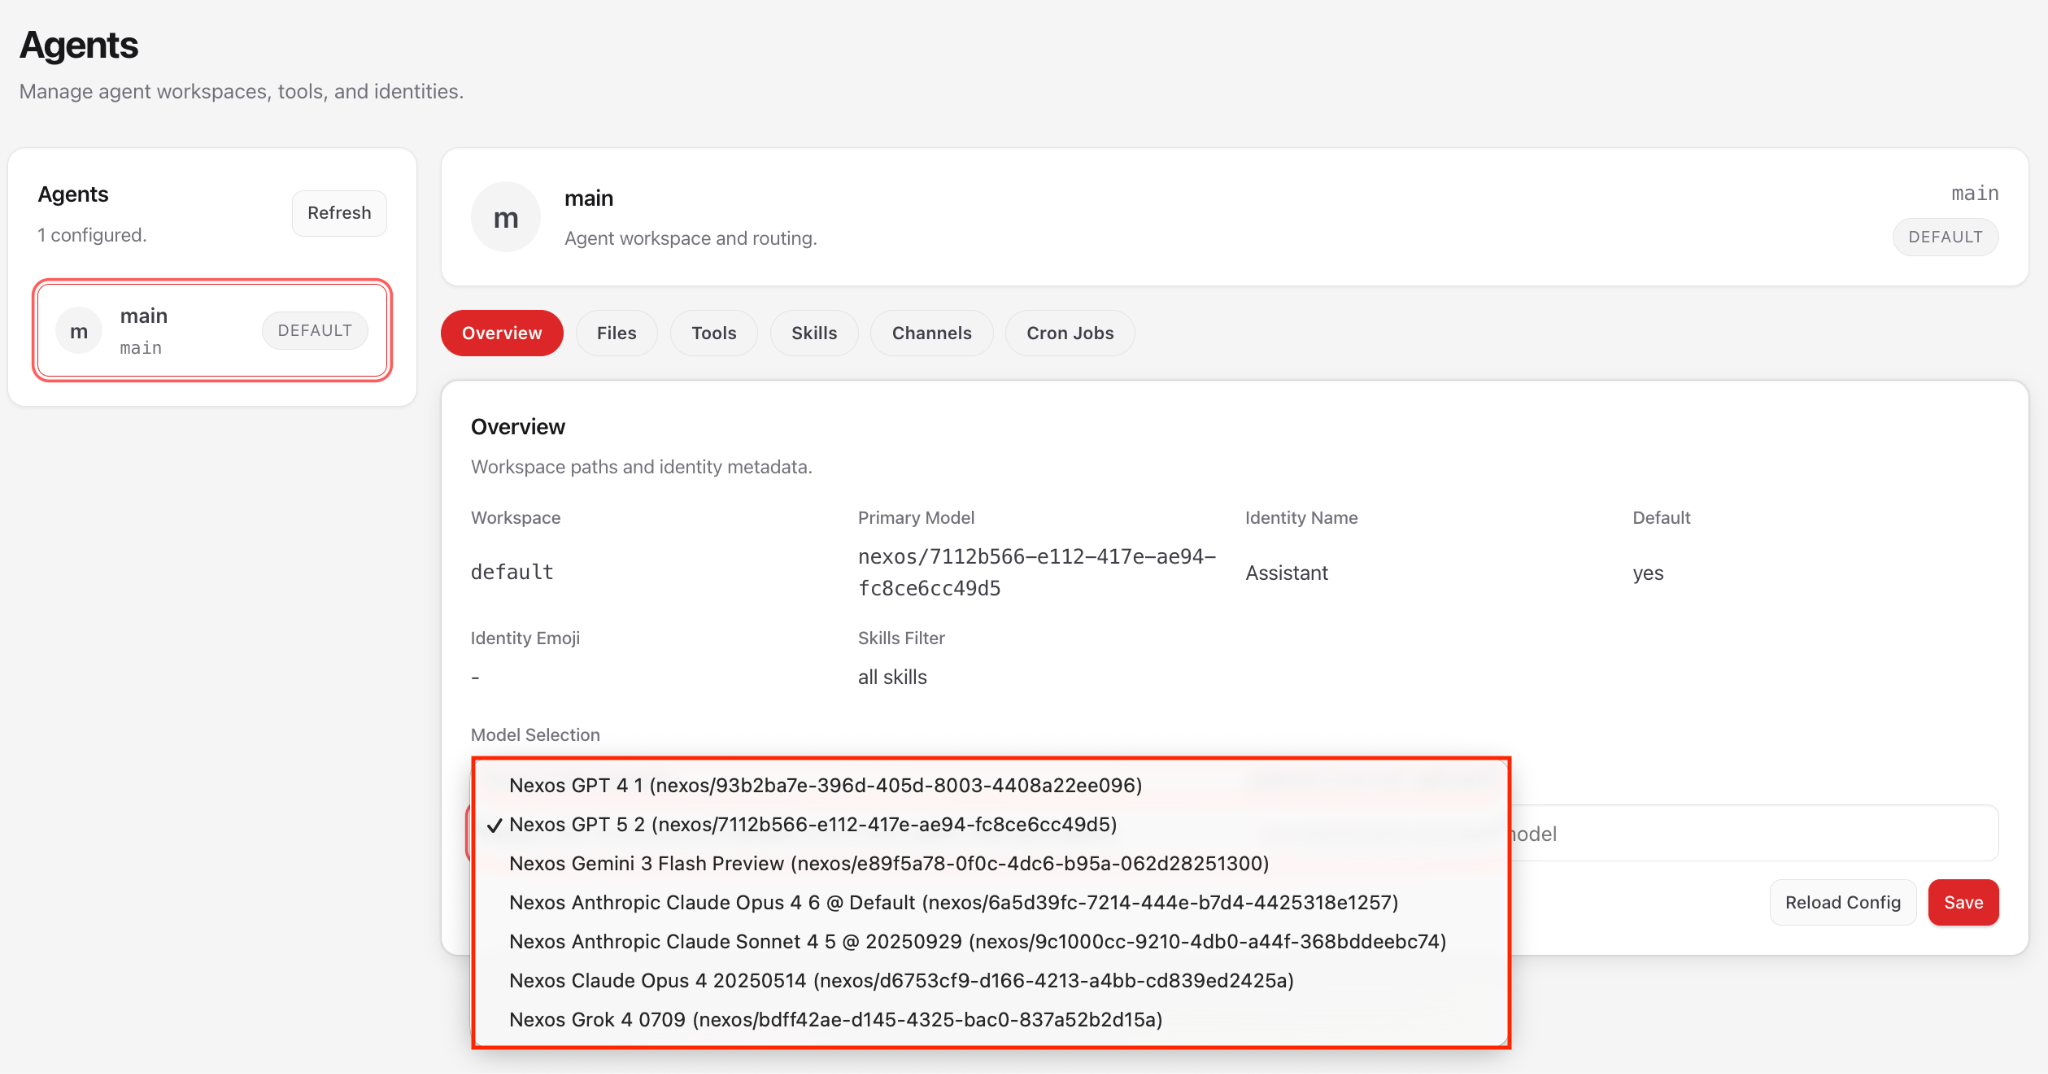
Once your instance is live, open the OpenClaw dashboard, go to the Agents menu, and select your preferred AI model for this workflow.

To connect OpenClaw to your WordPress site, you’ll need three things: the WordPress agent skills installed in OpenClaw, your site URL, and an application password for REST API authentication.
These let OpenClaw read and write content, so it can create, edit, publish, and manage posts directly.
Start by prompting OpenClaw in its chat interface to install the WordPress AI agent skills. It will automatically clone the skills repository from GitHub.
Next, generate an application password in WordPress by going to Users → Profile → Application Passwords. This keeps your main admin password separate and gives you a more secure way to authenticate.
Finally, share your site URL with OpenClaw and authenticate using your WordPress username and the application password you just created.
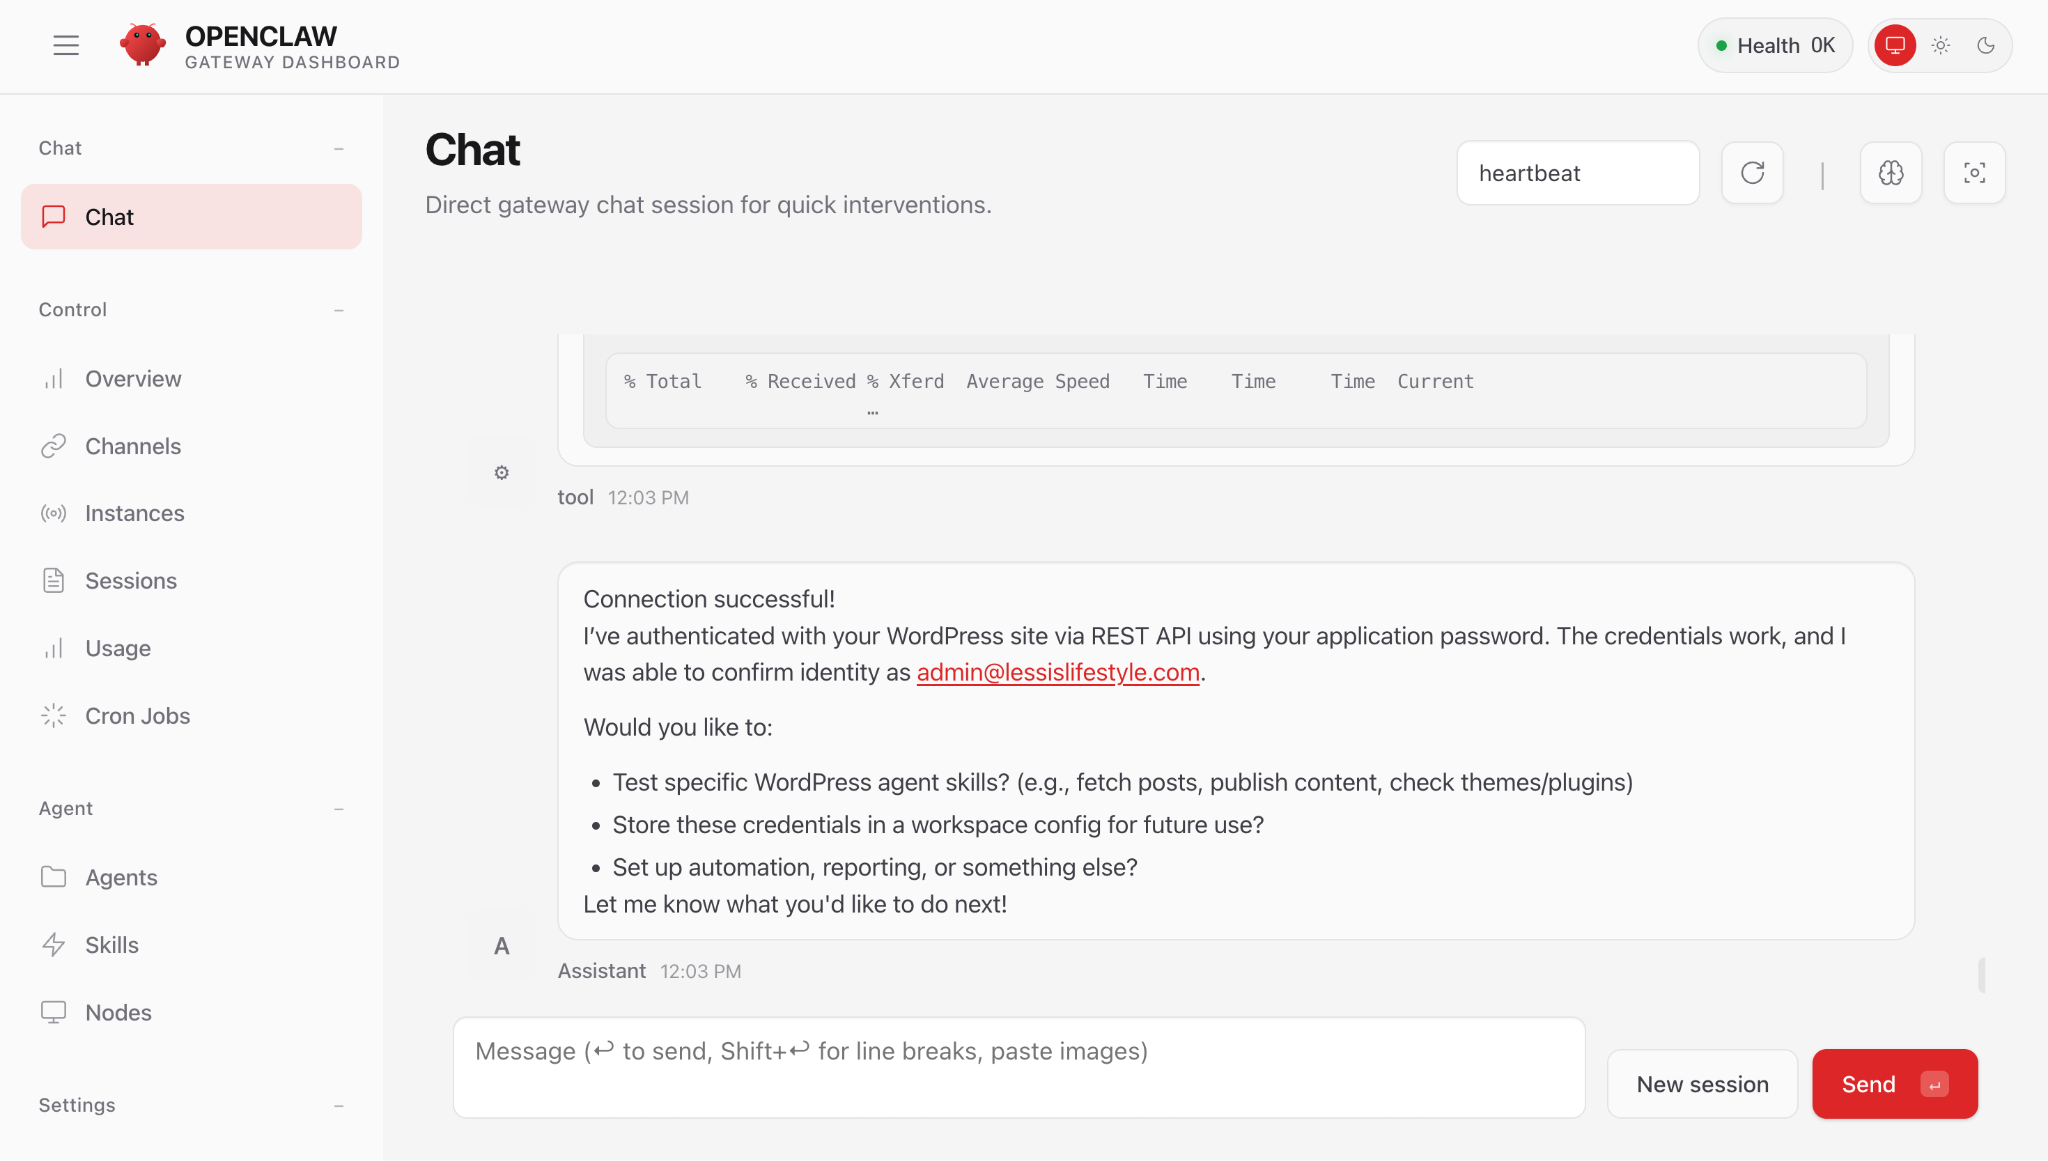
Once OpenClaw confirms the connection, it can follow your commands to read from and write to your WordPress site.
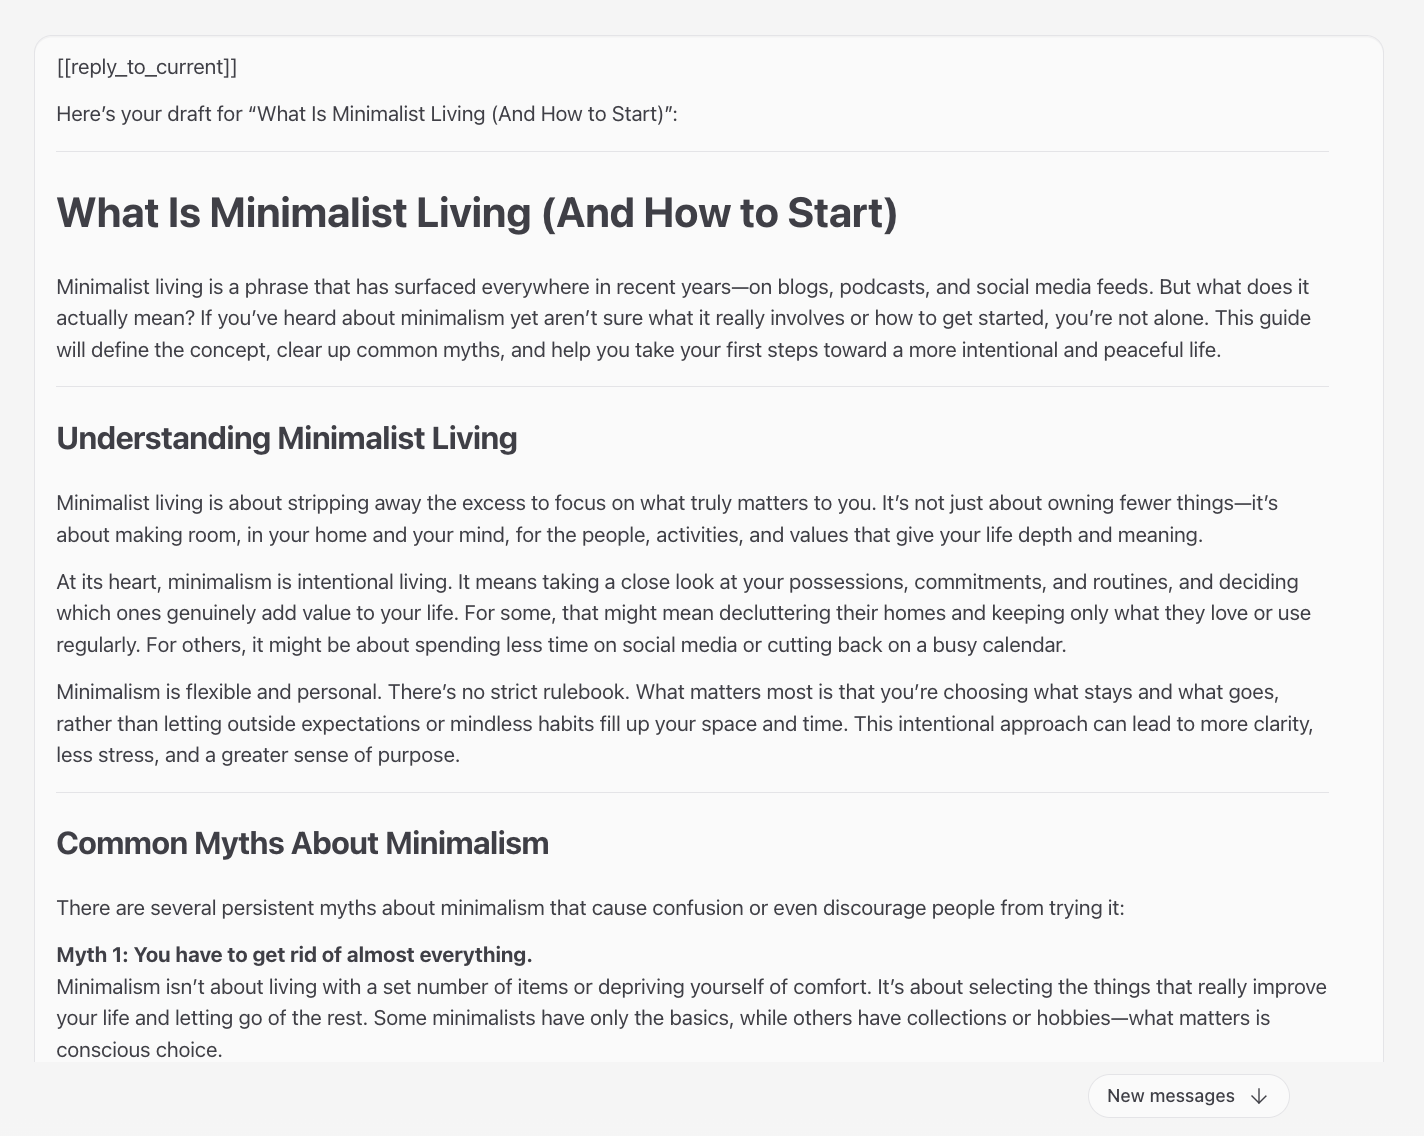
After you connect your site, OpenClaw can generate a first draft from a prompt. You describe what you want, and the agent creates the draft in the same interface you’ll use to edit and publish it.
Your draft quality depends on how specific your prompt is. Vague input leads to vague output. Include these details to get a stronger first draft:
There are two drafting approaches, depending on how much control you want over the structure before OpenClaw starts writing.
This is the safer option, especially for longer posts. You should confirm the structure before OpenClaw writes anything, which helps you avoid heavy rewrites later.
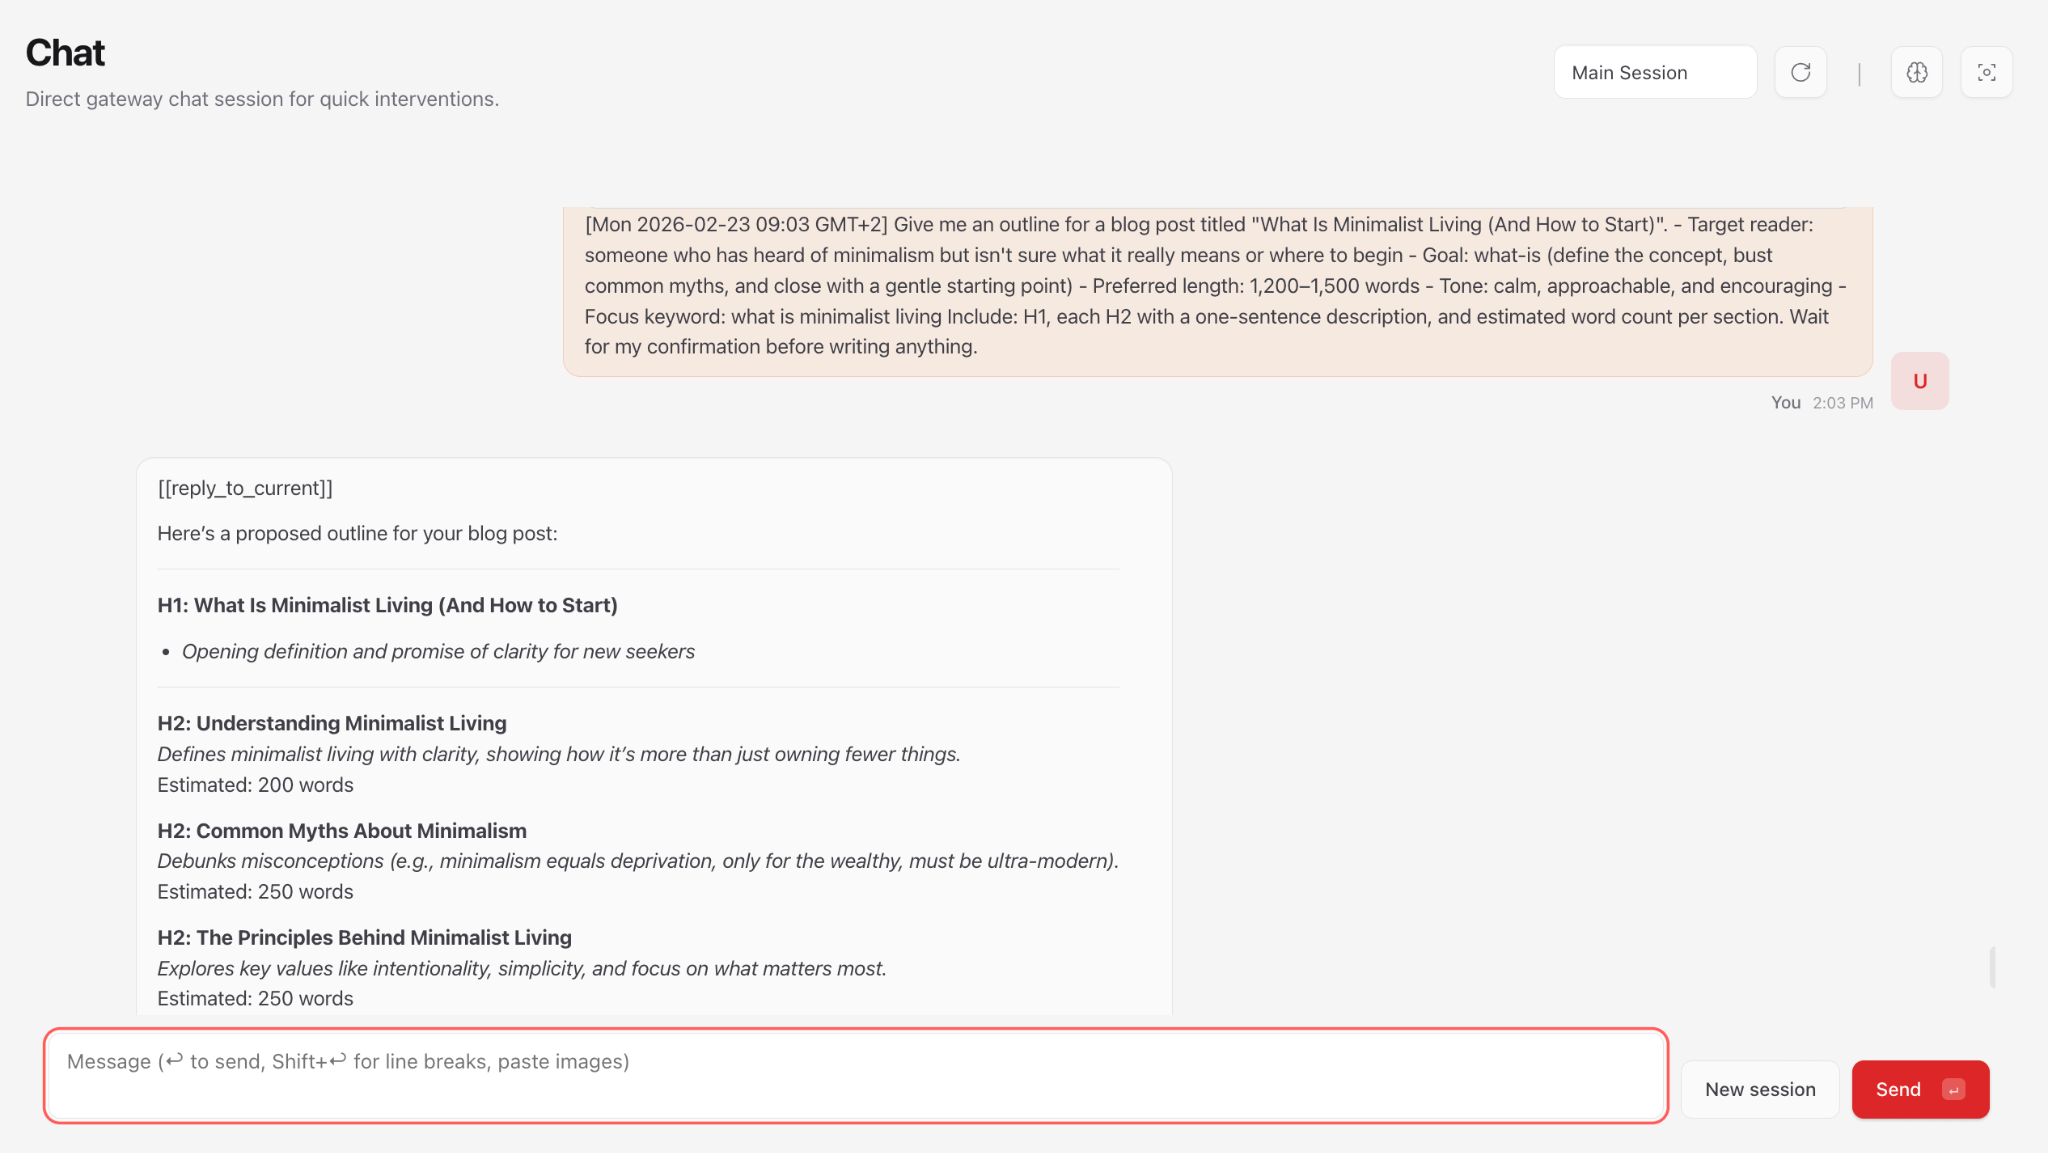
Start by asking for an outline:
Give me an outline for a blog post titled "Your Post Title".
- Target reader: [describe your audience]
- Format: [what-is / how-to / listicle]
- Preferred length: [word count]
- Tone: [describe the voice]
- Focus keyword: [your-target-keyword]
Include: H1, each H2 with a one-sentence description, and an estimated word count per section. Wait for my confirmation before writing.
Before you start writing, search your focus keyword and each H2 heading on Google to review the AI Overview (AIO) result. Then paste that AIO summary into your OpenClaw prompt as reference context when drafting, for example: “Here’s the AI Overview result Google shows for this topic: [paste AIO result].”
For the focus keyword, paste the full AIO. For individual H2 headings, the first 1–2 paragraphs of the AIO are usually enough, as the rest often covers supporting content outside the section’s scope.
This gives the agent a clear benchmark for what Google already considers the most relevant answer, including the right angle and key points to cover, so your draft aligns with search intent from the start.

After you review the outline, choose one of these options.
The outline looks good. Now write the complete draft based on it. Keep paragraphs short, 2–3 sentences max. Use plain language. No fluff.
The outline looks good. Now write the introduction only. Keep it under 150 words. Don't open with a question. Start with a relatable feeling, then transition into what the post covers.
Repeat for each remaining section:
Write [H2 section name] based on the outline. Use plain language. No fluff.
Once all sections are ready, assemble them:
Combine all the sections we've written into one complete draft. Keep the order from the outline. Don't add or change anything. Just assemble the full post.
This option skips the outline and generates a complete first draft. Use it when you already know what you want and prefer revising a whole piece instead of building the structure first.
It’s initially faster, but you’ll usually spend more time fixing the structure later. OpenClaw often creates a reasonable outline on its own, but it may not match the structure you had in mind.
Below are prompt templates you can copy and adjust. Choose the one that fits your post format.
Write a complete blog post draft titled "What Is [Your Topic]".
- Topic and angle: define the concept, address common misconceptions, and end with a practical starting point
- Target reader: someone who has heard of the topic but isn't sure what it means
- Format: what-is
- Preferred length: 1,200–1,500 words
- Tone: clear, approachable, encouraging
- Focus keyword: your-target-keyword
Write the full draft.
Write a complete blog post draft titled "How to [Your Task]".
- Topic and angle: explain the specific process
- Target reader: beginners who feel overwhelmed by complex instructions
- Format: how-to (include prerequisites, clear numbered steps, a troubleshooting section, and a conclusion)
- Preferred length: 1,200–1,500 words
- Tone: practical and encouraging
- Focus keyword: your-target-keyword
- Internal links to include: paste relevant URLs from your site
Write the full draft.
Write a complete blog post draft titled "10 [Your List Items]".
- Format: listicle (10 items)
- Each item: short title, 2–3 sentence explanation, one practical tip
- Criteria: explain what qualifies each item for the list
- Target reader: [describe your audience]
- Tone: friendly and motivating
- Focus keyword: your-target-keyword
- Length: 1,000–1,200 words
Write the full draft.
Rewrite the [existing article link] to match this new search intent: [describe the new angle]. Keep the structure where it still works, remove anything off topic, update the introduction, refresh the headings, and tighten the conclusion. Focus keyword: [your-target-keyword].
When rewriting, tell OpenClaw why the post needs updating, not just what to change. Add a line like: “I’m rewriting this article because [insert reason, such as search intent shifted, rankings dropped, content is outdated].”
This context helps the agent prioritize the right fixes instead of rewriting without direction.

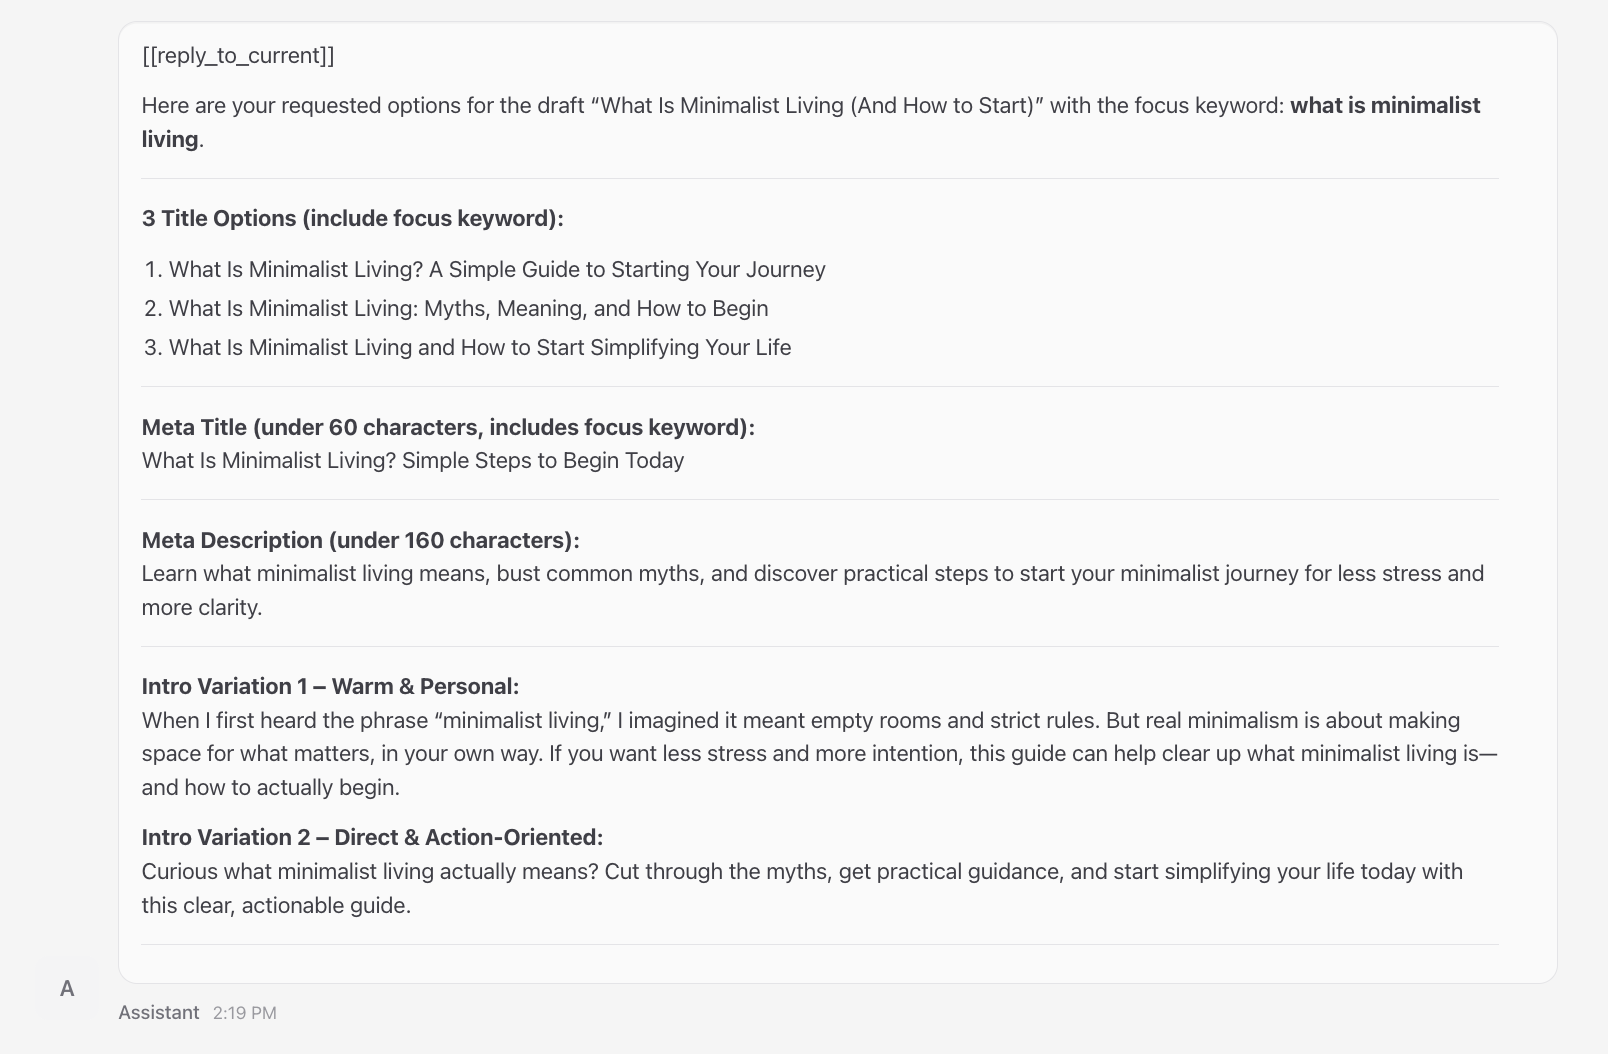
Once your draft is ready, ask OpenClaw to generate the supporting elements you’d usually create separately.
Based on this draft, give me:
- 3 title options that include the focus keyword
- 1 meta title (under 60 characters, include the focus keyword)
- 1 meta description (under 160 characters, summarize the value)
- 2 introduction variations: one warmer and more personal, one direct and action-oriented
Based on this draft, suggest 5 FAQ questions a beginner would realistically search for. For each question, write a 2–3 sentence answer.
The first draft is raw material. Now switch from writer mode to editor mode. OpenClaw helps here because it can spot structural issues, filler, and weak sections faster than you can on a first read.
The prompts below are split into two tiers. The core editing prompt covers what every post needs before publishing. The extended ones include targeted prompts for specific issues. Use those only when your draft actually needs them.
These form your minimum editing workflow. Run them for every post.
Review this complete draft. Does it fully satisfy the search intent? What's missing, weak, off topic, or incomplete? Apply all fixes directly and show me the revised version.
Rewrite the introduction of this post. Remove filler and weak openers. Make the first sentence immediately useful or compelling. Keep it under 120 words. Apply the changes directly and show me the revised version.
Scan this draft for common AI patterns and rewrite each one in plain English. Look for: fluffy openers, formal transitions ("moreover", "furthermore"), grandiose verbs ("delve into", "elevate"), corporate jargon ("leverage", "seamlessly"), empty emphasis without proof, "it's not about X; it's about Y" structures, overused dashes, and repetitive sentence rhythm. Flag and rewrite every instance.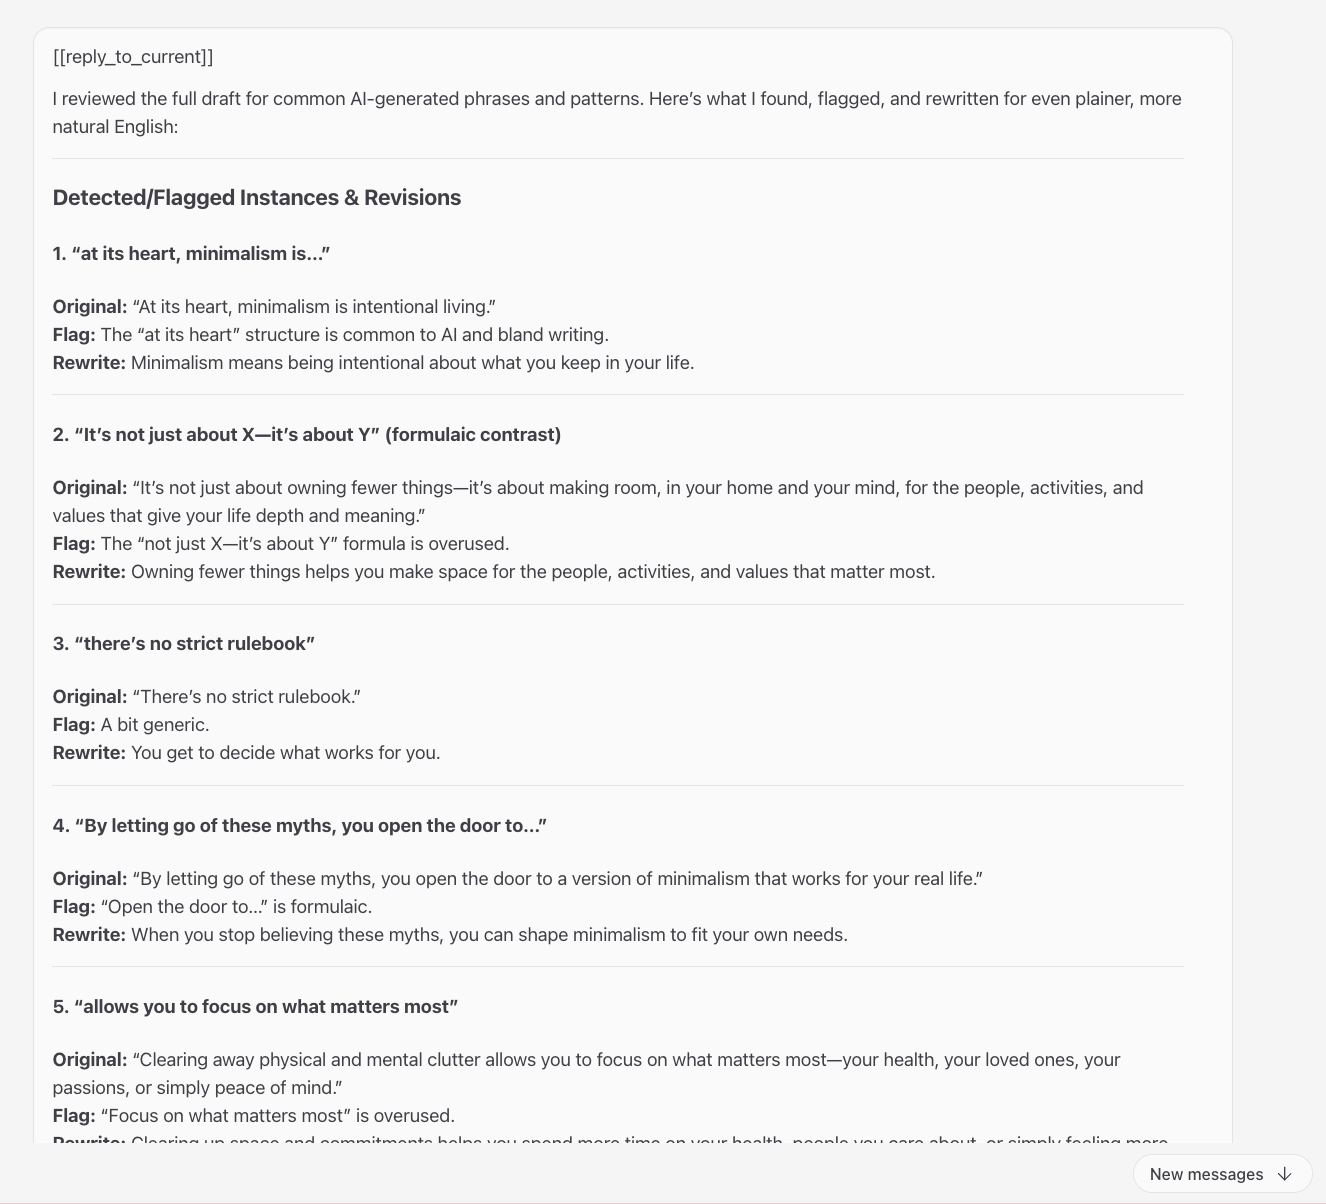
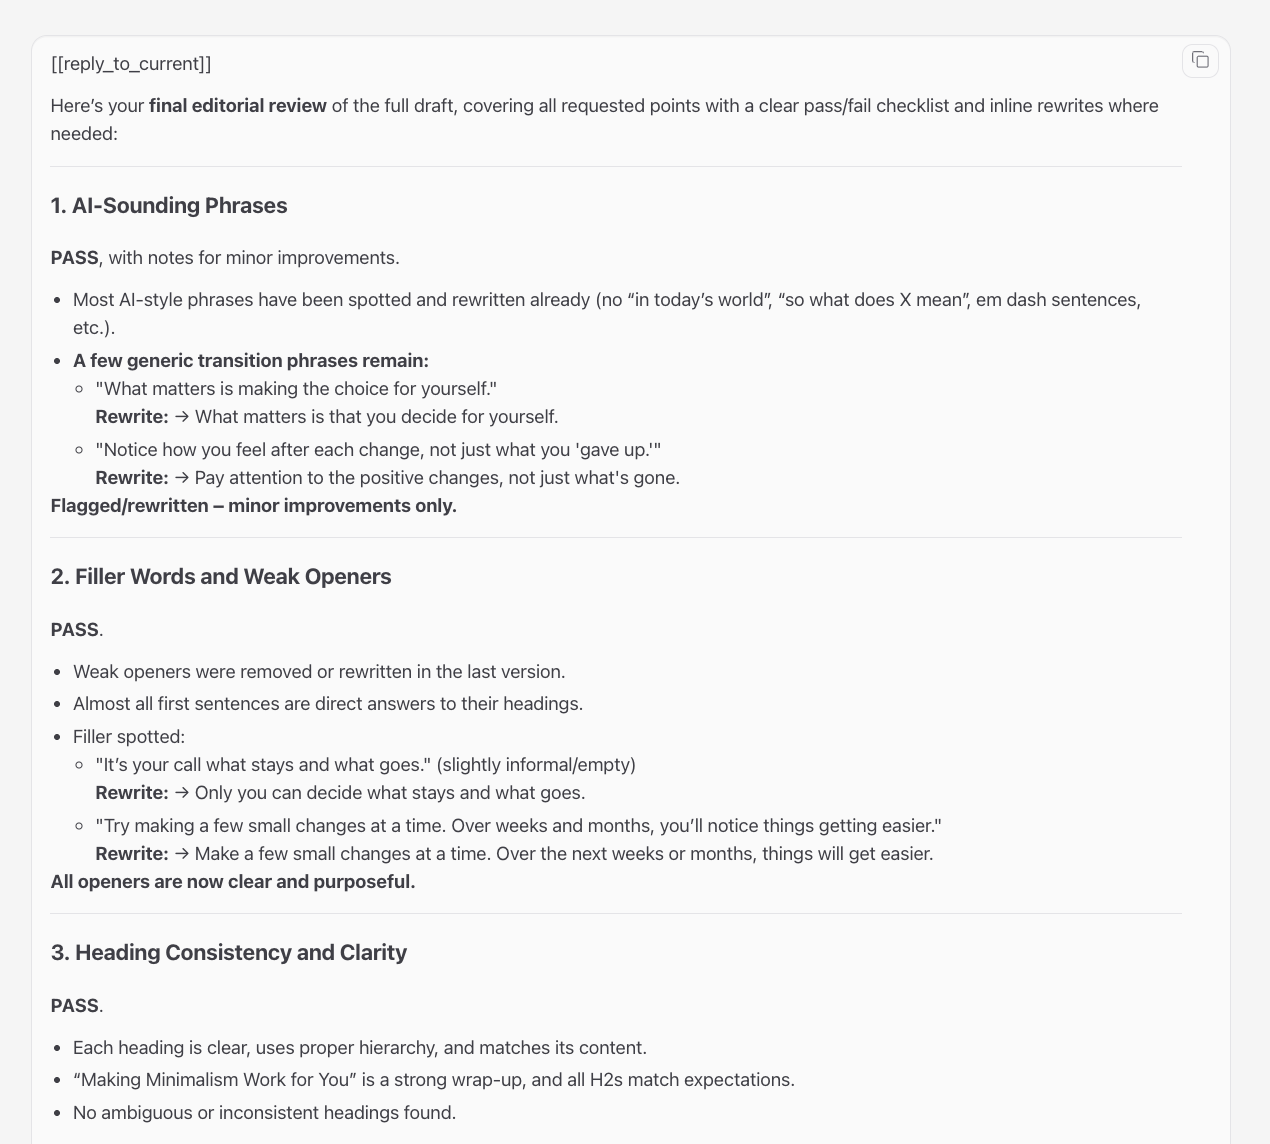
Do a final editorial review of this full draft. Check for:
- AI-sounding phrases (flag and rewrite)
- Filler words and weak openers
- Heading consistency and clarity
- Missing or unclear content
- Focus keyword placement
- Overall readability
Output a pass/fail checklist for each item. Show inline rewrites where needed.
Not every post needs every prompt. Review the list and choose what fits your draft’s weaknesses.
Rewrite this section for a complete beginner. Keep it short and practical. Remove jargon. If a point has more than one idea, split it into separate sentences.
Review this post. Is there anything a beginner should know before diving in, such as expectations or mindset shifts? If yes, add a short "Before you start" section near the top.
Give me 5 alternative H2 options for this heading: "[paste current H2]". Make them clear, specific, and benefit-driven. No clickbait.
Review the examples in this draft. Are they specific and relatable for the target reader? Suggest stronger, more concrete alternatives where needed.
Write a TL;DR summary for this post. Maximum 3 sentences. Place it right after the introduction. Use plain language.
Add a short section titled "Common challenges (and how to handle them)" covering 3 realistic obstacles a beginner might face. Keep the tone encouraging. Write 2–3 sentences per challenge.
Write a conclusion for this post. Briefly recap the key takeaway, encourage the reader to start small, and end with one clear call to action. Keep it under 100 words.
Find gaps in this post. What important content is missing?
OpenClaw edits quickly, but it’s still an AI agent, not a fact-checker. It can generate statistics that sound real but aren’t, outdated version numbers, or instructions that skip steps. Always review facts, tone, and overall quality before publishing. Treat every edit as a suggestion, not a final answer.
Once the content reads well, run a round of SEO-focused prompts. Treat these as a finishing pass. Adjusting keywords in a structurally weak draft only hides deeper problems.
Review this draft for SEO. Check whether the focus keyword appears naturally in the introduction, at least one H2, and the conclusion. Suggest improvements where it's missing or forced. Don't keyword-stuff.
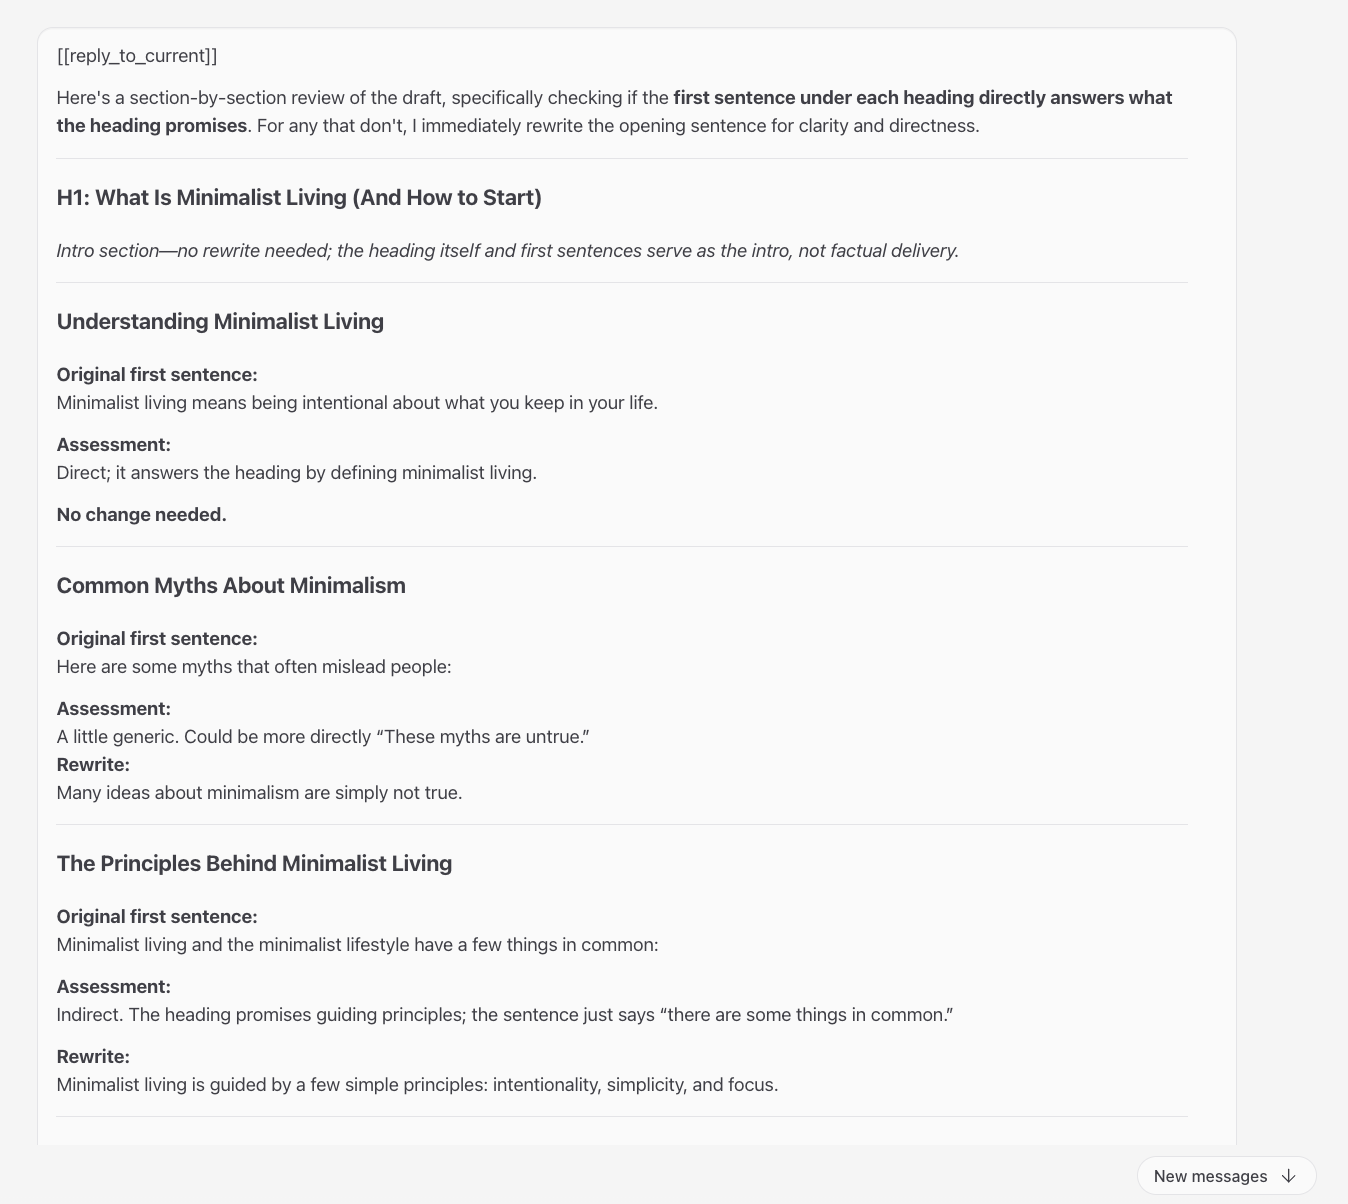
Review each H2 section in this draft. Does the first sentence directly answer the heading? If not, rewrite the opening sentence to deliver the core point immediately. No warm-up sentences.
Fetch a list of published posts from my WordPress site.
Based on this draft and the list of published posts, suggest 3–5 internal links. For each one, specify: which post to link to, the anchor text, and where it should appear in the draft.
Ask OpenClaw to flag parts of the draft that lack strong Experience, Expertise, Authoritativeness, and Trustworthiness (E-E-A-T) signals. Google uses these quality signals to evaluate content, so strengthening them can directly affect how your post performs in search.
For example, if your draft claims “this practice boosts SEO,” it should explain why and provide credible proof. If it says “monitor key metrics,” it should specify which metrics to track and what good or bad values look like. Where possible, back claims with your own firsthand experience rather than citing external sources.

You can publish right away or schedule a post for later without leaving the OpenClaw interface.
Before you publish, convert the draft from Markdown to HTML. OpenClaw generates content in Markdown by default, but WordPress needs clean HTML for consistent formatting.
Convert this draft from Markdown to clean HTML that's ready for WordPress. Use proper HTML tags: <h2> for headings, <p> for paragraphs, <ul><li> for bullet lists, <ol><li> for numbered lists, <strong> for bold, and <em> for italics. Don't add inline styles or wrapper divs. Show me the full HTML output.
Don’t skip this step. Otherwise, you may see broken headings or spacing issues in WordPress.
Follow these steps to publish or schedule your post:
Which WordPress site am I currently connected to? Show me the site URL and the authenticated username.
Save this post as a draft on my WordPress site. Title: [Your Post Title]. Don't publish yet. Confirm the draft ID and URL when you're done.
Update the slug of this post on my WordPress site to: [your-post-slug]. Confirm when you're done.
Write a 1–2 sentence excerpt for this article. Summarize the value in natural language, not like a meta description. Then add it to the WordPress draft.
Set the featured image for this post using this image URL: [paste-image-url-here]. Confirm when you're done.
Once done, you can choose between publishing it now or scheduling it for later:
Publish the draft post titled "[Your Post Title]" on my WordPress site now. Confirm the live URL when you're done.
Schedule the post titled "[Your Post Title]" to publish on March 15 at 9:00 AM UTC. Set the post status to "scheduled" and confirm the scheduled URL.
After publishing, open the post in WordPress and double-check the formatting, featured image, and permalink. This final review helps you catch issues that might not show up in the OpenClaw preview.
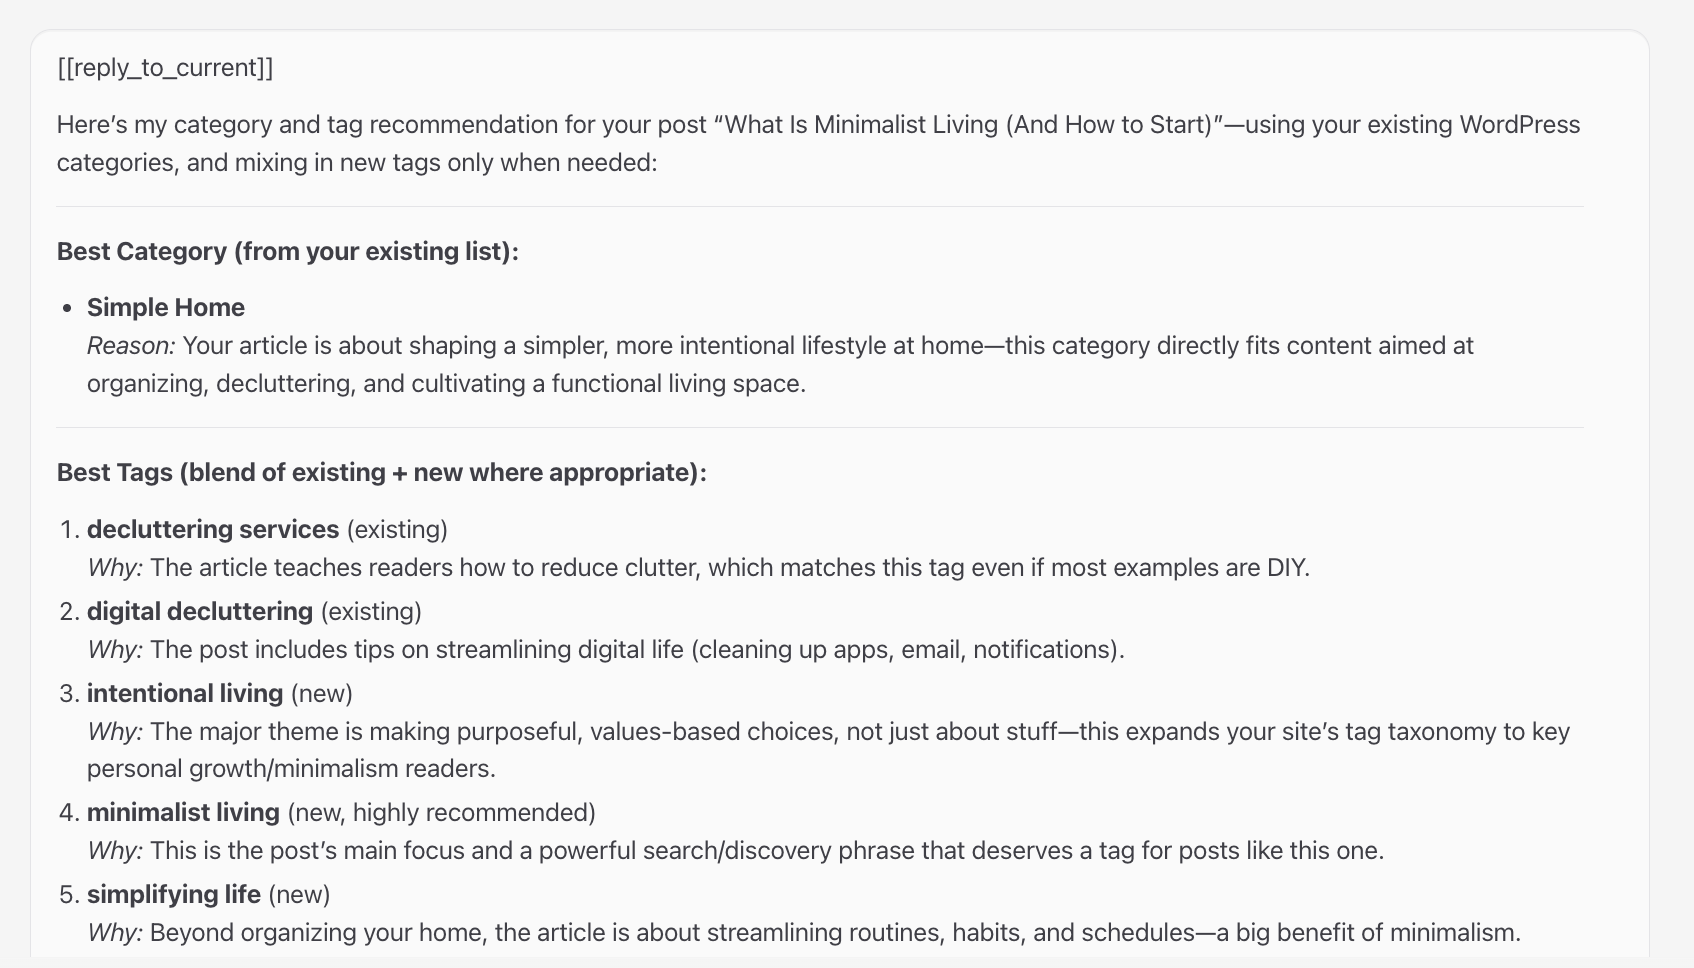
Categories and tags organize your WordPress content. Categories define your site’s broad structure. Tags highlight specific subtopics within a post and help WordPress surface related content for readers.
Proper taxonomy improves user navigation and gives search engines clearer signals about your site structure.
Here’s how to assign categories and tags through OpenClaw:
Fetch all existing categories and tags from my WordPress site and list them.
Based on the content of this post, suggest the best category from my existing WordPress categories. For tags, suggest five. Use existing tags where they fit. If none are relevant, suggest new ones. Briefly explain why each one fits.
If you’re unsure about two similar tags, ask for a comparison:
Compare these two tags: [tag 1] and [tag 2]. Based on this post, which one fits better and why?
Assign the category [category name] and the tags [paste chosen tags] to the post titled "[your post title]" on my WordPress site. If any tags don't exist yet, create them first, then assign them. Confirm when done.
This keeps your site structure clean and makes future content easier to manage.
Important! If you assign categories and tags immediately after publishing, you might hit the WordPress REST API rate limit. If OpenClaw returns an error during publishing or tag assignment, wait 30–60 seconds, then rerun the same prompt.

OpenClaw isn’t the only way to automate content publishing in WordPress. Depending on your needs, a dedicated automation platform like n8n might handle certain publishing tasks better.
n8n connects to WordPress and hundreds of other services through visual workflows. You build these workflows using nodes, which trigger actions automatically based on specific conditions.
For example, you could publish a new WordPress post whenever a new row appears in a spreadsheet. Or you could automatically share content on social media after a post goes live.
To use n8n with WordPress, connect your site as a WordPress node. Then define a trigger, such as a schedule or a new spreadsheet entry.
Add content generation nodes like OpenAI and Google Sheets for topic filtering. Finally, map the output to a WordPress Create Post node to publish automatically.

Ariffud is a Technical Content Writer with an educational background in Informatics. He has extensive expertise in Linux and VPS, authoring over 200 articles on server management and web development. Follow him on LinkedIn.

OpenClaw is an open-source, self-hosted AI agent that runs on your own server and can interact with the tools you already use, including WordPress and...

To secure WordPress for AI automation, you need to protect the APIs, user accounts, plugins, and automated workflows that allow AI tools to operate...
Setting up OpenClaw for WordPress involves three main stages: deploying OpenClaw on a server, installing the WordPress skill, and authenticating it...