How to set up OpenClaw on a private server
Mar 10, 2026
/
Simon L.
/
10 min Read
Setting up OpenClaw (formerly known as Moltbot/Clawdbot) on a private server involves preparing your VPS (Virtual Private Server) environment, cloning the OpenClaw repository, running the Docker setup script, configuring your AI provider credentials, and connecting to a messaging platform.
It’s a straightforward process that takes about 30 minutes from start to finish, and by the end, you’ll have your own AI assistant responding to messages 24/7.
You can technically run OpenClaw on your own laptop, but that has limits. If you close your computer or lose internet connection, your bot goes offline.
That’s why running it on a private server is so helpful. It provides consistent availability and background execution, even when you’re offline, so your bot runs 24/7 without you needing to babysit it.
Prefer watching instead of reading? This video walks you through the OpenClaw setup step by step.

1. Prepare a private server for OpenClaw
To prepare a private server for OpenClaw, you need a Linux VPS with full administrative access. This is the foundation of your project because an always-on server ensures your bot never sleeps.
You don’t need a supercomputer for this, but you do need specific OpenClaw server requirements to ensure stability.
Here is your checklist for the server:
- Linux operating system (Ubuntu 22.04 or 24.04 works great).
- Administrative access (root or sudo privileges).
- Docker and Docker Compose.
- At least 2GB RAM (4GB recommended for better performance).
- 10GB+ disk space for Docker images, application data, and logs.
We’ll be using Hostinger OpenClaw hosting for this setup, because our Docker Manager makes things easier, but the same principles apply to any other VPS provider.
If you’re brand new to VPS setup, learn how to set up VPS first. Follow the initial setup there to make sure you can SSH into your server.

2. Make sure Docker is available on the VPS
Docker is how we’ll run OpenClaw. Think of Docker as a container that packages everything OpenClaw needs into one tidy unit. Instead of manually installing dependencies and configuring different details, Docker handles it all. It’s cleaner, more reliable, and way easier to manage.
Within Hostinger’s hPanel dashboard, look for Docker Manager. It should show Docker as installed or give you an option to enable it. That’s the easiest path.
If you’re on a different VPS or want to verify from the command line, SSH into your server and run:
docker --version

docker compose version
You should see version numbers for both Docker and Docker Compose. If you get “command not found,” Docker isn’t installed yet.
A proper OpenClaw Docker setup relies on the Docker container system being healthy, so to install it manually, learn how to install Docker on Ubuntu, and then verify it again.
Once Docker is confirmed and running, you’re ready for the actual OpenClaw deployment.
3. Clone the OpenClaw repository
Now we’re getting to the good stuff. We’re going to clone the OpenClaw repository and use the official Docker setup script to build and deploy everything.
First, you need to get the OpenClaw code on your server:
# Install git if you don't have it

sudo apt install git -y

# Clone the repository

git clone https://github.com/openclaw/openclaw.git

# Navigate into the directory

cd openclaw
Then run the Docker setup script. OpenClaw includes a setup script that handles everything automatically:
./docker-setup.sh
This setup script is your one-stop shop for getting OpenClaw running. Here’s what it does:
- Builds the OpenClaw Docker image locally (from the included Dockerfile).
- Runs the onboarding wizard inside a Docker container.
- Generates a gateway token for accessing the Control UI.
- Creates necessary configuration directories.
- Starts the OpenClaw gateway via Docker Compose.
The entire process is automated. Unlike many Docker applications, where you pull a pre-built image, OpenClaw builds the image locally on your server. This means:
- You’re always running the exact version from the repository.
- The first build takes a few minutes.
- Subsequent rebuilds are faster thanks to Docker’s layer caching.
- You have full control over what’s included.
4. Configure OpenClaw credentials and settings
The Docker setup script launches an interactive onboarding wizard that configures OpenClaw for you. This is where you’ll set up your AI provider credentials and other essential settings.
When you run ./docker-setup.sh, after building the image, you’ll see the onboarding wizard. It asks several important questions:
Gateway mode:
- Local (run on this machine)
- Remote (connect to existing gateway)
Choose Local. This means the gateway runs on your VPS.
Authentication method:
This is the most critical part. You need to tell OpenClaw how to access AI models:
- Anthropic API Key (recommended)
- OpenAI API Key
- OAuth (Claude Pro/Max subscription)
- OpenAI Code (Codex subscription)
If you go with the recommended option of Anthropic API Key, then you need to sign up or log in to Anthropic, navigate to API Keys, create a new key, copy it, and paste it into the setup wizard.
Keep this key secure. Anyone with this key can use Claude on your account and you’ll be charged for their usage.
The process is the same with the other options – you get a key from the AI platform, and add it into the setup. The wizard stores these credentials as Linux environment variables in your configuration files.
You then choose the model for the selected AI platform and pick security settings.
The most common OpenClaw config mistake is a missing API key. Without a valid Anthropic or OpenAI API key, OpenClaw won’t work. Both Anthropic and OpenAI require a payment method on file for API access, so make sure your API key is active and has billing set up.
5. Start OpenClaw and verify it is running
Once the setup script completes, OpenClaw should already be running.
To verify everything is working correctly, check the container status:
# Make sure you're in the openclaw directory

cd ~/openclaw

# Check running containers

docker compose ps
You should see openclaw-gateway with status “Up” or “Running”. Other signs that everything is working correctly include seeing:
- A “OpenClaw initialized” message
- Model provider connected (Anthropic/OpenAI)
- No authentication errors
On the other hand, if you see “Invalid API key,” “Authentication failed,” “Connection refused,” or if the container just keeps restarting, then you’ve got an error.
Stop here and fix them before continuing by checking the logs:
docker compose logs openclaw-gateway
This is important for troubleshooting. The OpenClaw logs tell you what the bot is actually doing, so you can address the issues.
6. Access the OpenClaw interface
OpenClaw dashboard is accessible via your VPS IP address on port 18789:
http://your-vps-ip:18789
For example: http://45.123.45.67:18789
When you first visit the Control UI, you’ll need the gateway token that was generated during setup. Find it in:
cat ~/.clawdbot/.env | grep CLAWDBOT_GATEWAY_TOKEN
Or check the output from when you ran ./docker-setup.sh – it displays the token at the end.
Note: While the project has been renamed to OpenClaw, configuration files and directories still use “clawdbot” naming (like ~/.clawdbot/ and CLAWDBOT_GATEWAY_TOKEN). This is normal during the transition and doesn’t affect functionality.
Once you’re in the dashboard, go to Settings → Token (or you may be prompted immediately). Paste your gateway token, then click Save or Authenticate.
This OpenClaw interface is your control center. You don’t need to configure everything right now – just confirm you can access it and that OpenClaw shows as healthy.
If you can’t reach the interface, follow these troubleshooting steps:
- Check that the container is actually running: docker compose ps
- Verify your firewall isn’t blocking the port
- Make sure you’re using HTTP, not HTTPS
- Try accessing from the server itself in the command line: curl http://localhost:18789
7. Connect a messaging channel to OpenClaw
The web dashboard we just configured is for management, but you’ll interact with OpenClaw via a messaging app where AI conversations take place.
We’ll go through how to set things up with Telegram since it’s straightforward, but the process is similar for other platforms.
Here is how to handle a OpenClaw Telegram setup:
Step 1: Create a Telegram bot
- Open Telegram and search for @BotFather
- Start a chat and send /newbot
- Follow the prompts:
- Choose a name (for example, My OpenClaw Assistant)
- Choose a username (must end in “bot”, like “myawesomemoltbot”)
- BotFather will give you a bot token. Copy this.
Step 2: Add Telegram to OpenClaw
Back on your server, run:
# Make sure you're in the openclaw directory

cd ~/openclaw

# Add Telegram with your bot token

docker compose exec openclaw-gateway node dist/index.js providers add --provider telegram --token YOUR_BOT_TOKEN
Replace YOUR_BOT_TOKEN with the actual token from BotFather.
Step 3: Enable required bot permissions
In the BotFather chat:
- Send /mybots
- Select your bot
- Go to Bot Settings → Group Privacy
- Disable group privacy (this allows the bot to read messages in groups)
Step 4: Start chatting
- Open Telegram and search for your bot (by the username you chose)
- Start a conversation
- Send a message to test it
If you set up DM pairing during setup, you’ll get a pairing code. On your server, approve it:
docker compose exec openclaw-gateway node dist/index.js pairing approve telegram <the-code-you-received>
After approval, send another message. OpenClaw should respond!
If messages aren’t working in your OpenClaw Telegram setup:
- Check the OpenClaw logs for errors.
- Verify the API keys are still valid.
- Make sure the container didn’t restart or crash.
- Confirm your messaging platform credentials are correct.
How to set up OpenClaw on Hostinger
Hostinger customers can skip the manual command-line OpenClaw setup.
Our team built a preconfigured template that installs OpenClaw automatically and handles all Docker dependencies and environment setup for you.
This option is faster and less error-prone than installing everything manually.
If you’re new to Hostinger, visit the OpenClaw VPS hosting page and choose your preferred plan, billing period, and server location.
You can also purchase nexos.ai credits. This add-on lets you connect to LLMs from OpenAI, Anthropic, Google, and xAI without setting up individual APIs. Everything works out of the box.
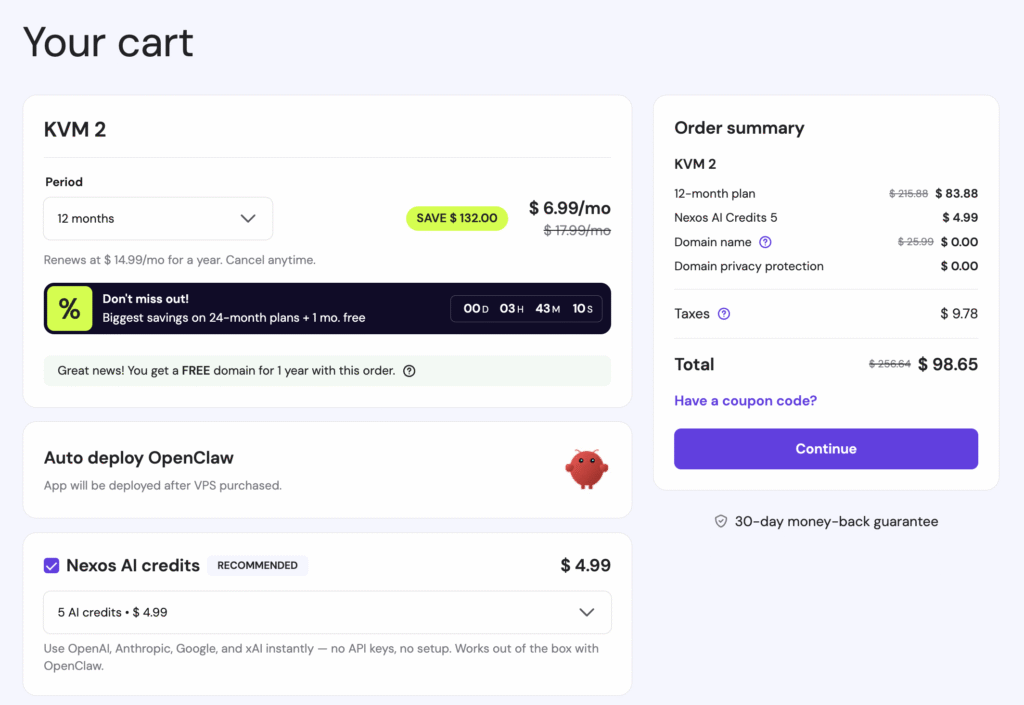
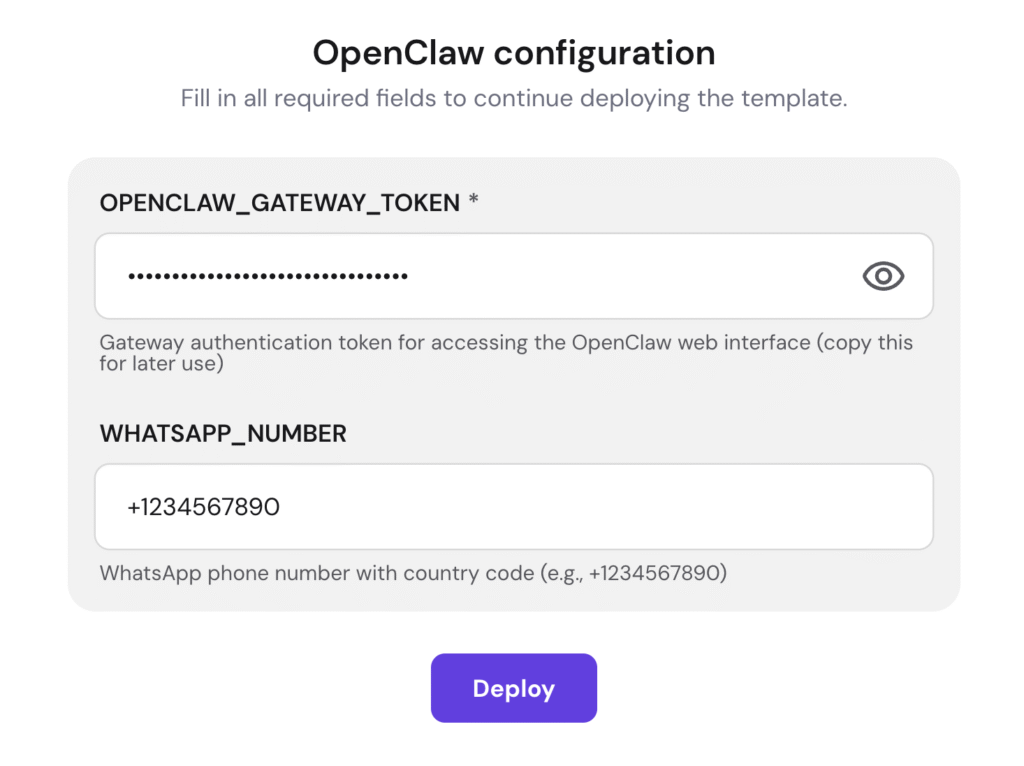
After completing the purchase, copy the OpenClaw gateway token. You’ll need it later to access the web interface. You’ll also be asked to enter your WhatsApp number to connect your account to messaging channels.
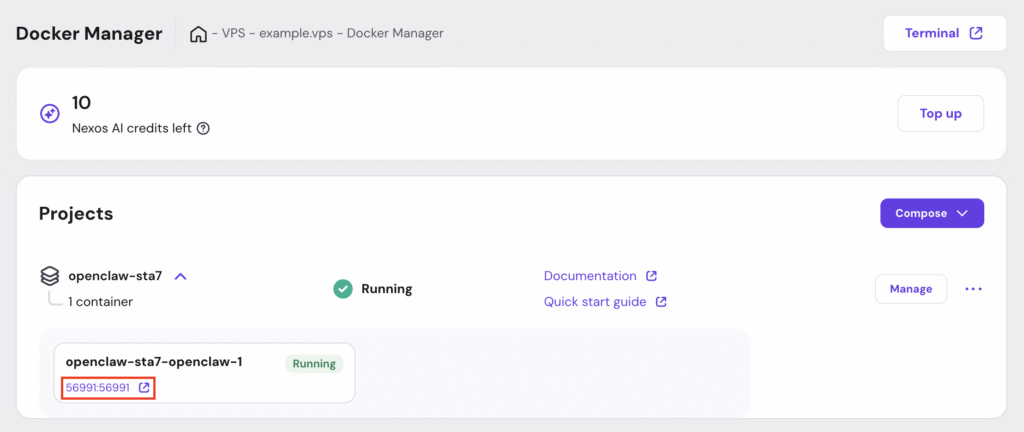
Hostinger then automatically deploys OpenClaw and redirects you to the Docker Manager page. Once it’s ready, you should see your OpenClaw project running.
Click the link below your project name to open the OpenClaw web interface, then paste the gateway token you copied earlier.
After that, finish the OpenClaw post-configuration and connect it to your preferred messaging channels.
If you already have a VPS on Hostinger, you can set up OpenClaw by switching your server to the Docker template and deploying OpenClaw from Docker Manager.
Important! Changing your operating system permanently deletes all data on your server. Back up your VPS data, including important files and configurations, before you continue.
Follow these steps to install Docker and deploy OpenClaw:
- Log in to hPanel and go to VPS → Manage next to your server.
- In the left sidebar, select OS & Panel → Operating System.
- Scroll to the Change OS section, type Docker in the search bar, and select it from the results.
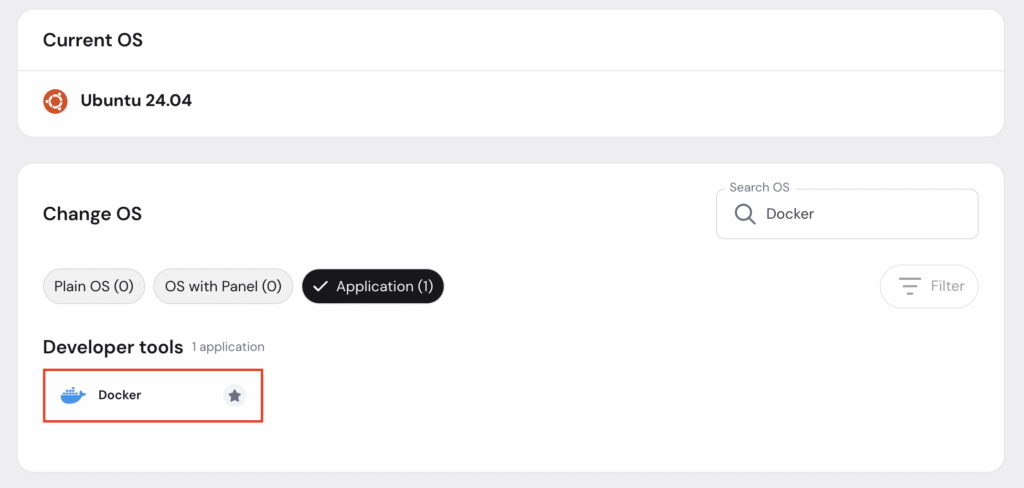
- Click Change OS and confirm the installation.
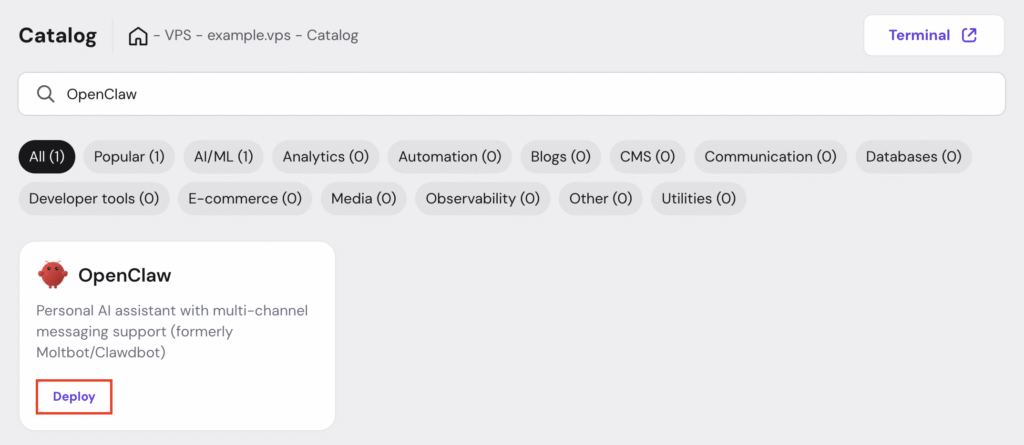
Once Docker is ready, open Docker Manager → Catalog, search for OpenClaw, and click Deploy. Copy the gateway token and enter your WhatsApp number.
After the setup finishes, go to Docker Manager → Projects to find and access your OpenClaw project.
If you want to purchase nexos.ai credits, click Top up from the same page.
How to troubleshoot common OpenClaw setup issues
To troubleshoot common OpenClaw setup issues, check container status first, verify your gateway token, and examine the logs for specific error messages. Most problems fall into a few predictable categories, and once you know what to look for, they’re quick to fix.
Here are the most common problems you might encounter with OpenClaw not working.
Container keeps stopping
If your container starts, then immediately stops:
- Check container status: docker compose ps
- View logs for errors: docker compose logs openclaw-gateway
- Look for the specific error: docker compose logs openclaw-gateway | grep -i “error”
Common causes include a missing or invalid API key, port 18789 already in use, Docker Compose configuration issues, or insufficient permissions.
Authentication failures
The most common problem by far. If you see “authentication failed”, “invalid API key”, or model requests failing, then check your API key:
cat ~/.clawdbot/.env
Look for ANTHROPIC_API_KEY or OPENAI_API_KEY. Make sure:
- The key is present and not empty
- There are no extra spaces or quotes
- The key hasn’t been revoked or expired
You also need to verify the key is valid in the AI platform dashboard and check the billing status, as both Anthropic and OpenAI require active billing.
Then re-add your credentials:
# Edit the .env file

nano ~/.clawdbot/.env

# Add or update your API key

ANTHROPIC_API_KEY=your_actual_key_here

# Restart the gateway

docker compose restart openclaw-gateway
Port conflicts
If you get “port already in use” or “address already in use” errors:
- Check what’s using the port: sudo lsof -i :18789
- Change OpenClaw’s port by editing docker-compose.yml
- Use a different port mapping: -p 18790:18789
Container restart loops
If the container keeps restarting, this usually means there are missing environment variables, corrupted configuration files, invalid model configuration, or permission issues.
To fix this:
- Stop everything: docker compose down
- Remove old containers and volumes: docker compose down -v
- Rebuild and restart: ./docker-setup.sh
Can’t access the interface
If the container is running but you can’t reach the dashboard:
- Check firewall rules and allow port 18789: sudo ufw allow 18789/tcp
- Verify the container is listening: curl http://localhost:18789
- Check VPS provider settings since some providers require you to configure security groups to allow inbound traffic on port 18789
Restarting safely
You’ll need to restart OpenClaw when you change environment variables, if the bot becomes unresponsive, or after specific configuration updates.
A restart is also useful for troubleshooting weird behavior, since a fresh start can clear up issues that don’t show obvious errors in the logs.
If you need to restart OpenClaw quickly without stopping the container first:
docker restart openclaw-gateway
Or for a clean restart where you manually stop and then start the container (useful when you want more control over the process or need to verify the container stops completely):
docker stop openclaw-gateway

docker start openclaw-gateway
What are the best practices for running OpenClaw?
Best practices for running OpenClaw include keeping your gateway token secure, monitoring resource usage regularly, and staying current with updates.
Running an AI bot on a server comes with responsibilities, but they’re manageable if you establish good habits early in specific areas.
Security practices
- Never share your gateway token. Treat it like a password because anyone who has it can control your bot.
- Use a firewall. Only expose the ports you actually need (like port 18789 for the interface).
- Keep SSH secure. Use key-based authentication instead of passwords for server access.
- Restrict interface access. Consider using a VPN or IP whitelist if you don’t need public access to the dashboard.
Resource management
OpenClaw is relatively lightweight, but you should still keep an eye on:
- Memory usage. Check occasionally with docker stats openclaw-gateway
- Disk space. Logs can accumulate. Consider log rotation if running long-term.
- CPU usage. Spikes are normal during active conversations, but sustained high usage might indicate a problem.
If you notice resource issues, you might need to upgrade your VPS or investigate what’s causing excessive usage.
Update strategy
New OpenClaw versions are released periodically with improvements and fixes.
- Check for updates monthly (or subscribe to OpenClaw announcements).
- Test updates in a non-production environment first if possible.
- Keep a backup of your current working configuration before updating.
- Read release notes to understand what changed.
Monitoring uptime
Set up basic monitoring so you know if OpenClaw goes down:
- Docker’s restart policy helps with automatic recovery.
- Consider a simple uptime monitor (many free services exist).
- Check logs periodically for unusual errors or warnings.
- Test your messaging channels occasionally to confirm functionality.
Backup configuration
Your environment variables (especially that gateway token) are essential to the setup. Document them securely:
- Store your token in a password manager.
- Keep notes on your configuration settings.
- Document any custom environment variables you’ve added.
How to manage OpenClaw after setup
To manage OpenClaw after setup, monitor logs regularly, update the container when new versions are released, and keep an eye on performance metrics.
Day-to-day management is minimal once everything is running smoothly, but a little ongoing attention keeps things healthy. Here’s what you need to do.
Check logs regularly
Make it a habit to peek at the logs weekly using:
docker compose logs --tail 100 openclaw-gateway
Look for repeated errors or warnings, performance issues, connection problems, or unusual patterns.
Most of the time, you’ll see regular operation, but catching issues early prevents bigger problems.
Update OpenClaw
When a new version is released, use the setup script to pull the latest code:
git pull
Then rerun setup (this preserves your config):
./docker-setup.sh
Monitor uptime
Check container status periodically. It should show status as “Up,” but if it’s restarting frequently, investigate the logs.
Monitor performance
Every few weeks, check resource usage:
docker stats openclaw-gateway
This shows CPU, memory, and network usage in real-time. If usage seems high, you might need to:
- Investigate what’s causing it (check logs)
- Upgrade your VPS if you’ve outgrown the current specs
- Optimize your configuration
You don’t need to worry about scaling, clustering, or complex optimizations for most use cases. OpenClawruns well on a single VPS for personal or small team use.
Focus on keeping it running reliably, updating when needed, monitoring for errors, and maintaining security basics.
For quick reference to Docker commands you’ll use while managing OpenClaw, see this Docker cheat sheet.

Simon is a dynamic Content Writer who loves helping people transform their creative ideas into thriving businesses. With extensive marketing experience, he constantly strives to connect the right message with the right audience. In his spare time, Simon enjoys long runs, nurturing his chilli plants, and hiking through forests. Follow him on LinkedIn.

Comments
0 responses