Laravel tutorial: Everything you need to know to get started with this framework
May 31, 2026
/
Aris S.
/
12 min Read
Laravel is an open-source PHP framework known for its user-friendly, elegant syntax, and active community. It is popular among PHP developers for building various web applications, such as online stores, social media platforms, and content management systems.
This Laravel tutorial will explain all about this framework, including its benefits, installation process, and important terms. You will also learn more advanced concepts like PHP Artisan command and error handling.
Getting started with Laravel
Frameworks like Laravel provide pre-built tools and resources that allow developers to create an application without writing all the code from scratch. For example, you can install the Bagisto package to add eCommerce functionality, like inventory management.
Laravel is widely popular due to the following features. We will cover them in more detail in the following sections:
- Elegant syntax – Laravel lets you use simpler PHP code that is more efficient and readable to streamline the development process.
- MVC architecture – The Model-view-controller model in Laravel provides a clearer structure for your application components.
- PHP Artisan – A command-line tool that simplifies complex tasks during development, like database updates or component creation.
- Eloquent ORM – Eloquent object-relational mapping provides a more straightforward database communication through the object-oriented approach.
You can install Laravel on Ubuntu, CentOS, and other popular Linux distributions. Before doing so, however, you must configure several software components, including PHP runtime, Composer, and Apache. If you want a simpler installation process, purchase a Hostinger Laravel VPS hosting plan. Then, complete the onboarding process, and have Laravel set up automatically in 15 minutes or so.

Additionally, you must set up an integrated development environment on your local computer to write your application’s code. To deploy a Laravel app to your VPS, you need Git or automation software like Jenkins.
Important! Depending on your Laravel version, several concepts might might be different. For this tutorial, we will focus on Laravel 11.X.
Understanding the MVC architecture
One of the most important concepts in Laravel is its MVC architecture. Simply put, this model enables developers to divide an application into three components for easier code management, prioritization, and concern isolation.
Model components
The model component represents your application’s business logic and storage. It is responsible for database operations, including writing and fetching specific information from the back end based on the user’s request.
Laravel relies on Eloquent ORM to handle model-related operations, which uses the object-oriented approach. This makes manipulating data much faster and more flexible than using SQL.
View components
The view layer defines the area of your application that users can see on their device’s screen and interact with. It covers elements like drop-down menus, text boxes, and form fields.
To simplify the view component development process, Laravel provides a Blade engine that lets you incorporate PHP into HTML templates. This feature enables you to create reusable code and display data from the back-end more easily.
Controller components
The controller connects the previous two components in your Laravel application. It fetches the data request from the model layer and presents the processed information on the front end to the view component.
You can use various methods to tell the controller to interact with the data differently. For example, index retrieves records from the database while store inserts new resources.
Creating routes and URLs
When a user accesses your application, they send a request which a controller will handle. Route directs the incoming request through a specific URL to reach the appropriate controller and return data to the view layer.
You can create multiple Laravel routes based on the request’s HTTP methods, like GET, POST, PUT, DELETE, and PATCH. By default, they are located in web.php inside the routes folder of your Laravel project directory.
To create a route, call the Route helper function or facade by adding the following line at the top of your web.php file:
use IlluminateSupportFacadesRoute;
Then, specify your route. For example, the following will handle users who send the GET HTTP request to the domain.tld/welcome URL:
Route::get('/welcome', function () {
   //Write your controller logic here;
});
If you want to set up a route for a specific controller, you can also call its facade and add the route like the following:
use AppHttpControllersHomeController;

Route::get('/home', [HomeController::class, 'index']);
In the example, we route requests with the GET method from domain.tld/home to the HomeController controller, which will handle it using the INDEX method. The ::class syntax allows you to use the controller without specifying its full facade path.
Laravel can process requests through middleware before passing them to controllers for additional processing, like logging or authentication. Consider this example:
Route::get('/welcome', function () {
    return view('welcome');
})->middleware('log.request');
Remember, you must create the middleware through PHP Artisan. We will explain how to do so in the later section about advanced Laravel techniques.
Working with controllers
Controllers group requests with the same logic into a class. It makes the processing more efficient since you can do so in bulk using a single handler.
For example, you create a HomeController to process all requests coming from the /home URL. By default, controllers are located in app/Http/Controllers. To set one up, run the following PHP artisan command:
php artisan make:controller ControllerName
Then, define the methods of handling requests inside the new controller file. For example, the following handle GET requests sent through the product/id route:
namespace AppHttpControllers;

use AppModelsProduct;
use IlluminateHttpRequest;

class ProductController extends Controller
{
    // GET /product/{id}
    public function show($id)
    {
        $product = Product::find($id);

        if (!$product) {
            abort(404); // Return a 404 error if the product is not found
        }

        return view('products.show', compact('product')); // Return a view with the product data
    }
}
To handle common create, read, update, and delete (CRUD) operations, you can set up a resource controller with a set of predetermined methods. Here’s the command:
php artisan make:controller ControllerName --controller
Creating views with Blade templating engine
The Blade templating engine enables seamless PHP integration into HTML using a simpler syntax. It helps you create view components for your application more easily.
To build a view using Blade, create a file with the .blade.php extension inside your Laravel project’s resources/views directory.
The code structure is the same as that of HTML but with additional syntaxes for PHP. For example, you can insert a variable like so:
<h1>{{ $title }}</h1>In the above example, Laravel passes the value of the $title PHP variable to the view component, displaying it to users.
You can also add directives that manipulate your HTML elements using PHP functions. For instance, @if lets you display specific content if a condition is met, like the following:
@if($user->'Username')
  <h1>Glad to see you, Username!</h1>
@endif
To improve code reusability, Blade offers a template inheritance feature that lets you create a master layout and add smaller components called child views separately. You can do so using the @extends, @section, and @yield directives.
For example, we have a master template with the following code:
<title>@yield('websitetitle')</title>The @yield directive is a placeholder for content from a child view marked with @section. For instance, the following will insert Your Awesome Website into the title tag:
@section('websitetitle', 'Your Awesome Website') Lastly, add the @extends directive to the child view to tell the master template which file it should use to extend its content.
Managing database with Eloquent ORM
Eloquent ORM enables your application to interact with the database tables more efficiently using shorter code than traditional SQL. Instead of directly manipulating data directly using tables, Laravel assigns a model to simplify CRUD operations.
You can create a new Eloquent model anywhere within your Laravel project’s app folder since the Composer.json file will automatically locate it. If you don’t specify a directory, the web application framework will use the default app/Models directory. To create a new model, run the PHP Artisan command like this. Replace Name with your desired model name:
php artisan make:model Name
By default, Laravel assumes the corresponding table is the plural form of your model name. For instance, the following command will assign the Post model to the posts database column.
php artisan make:model Post
Now, let’s write Eloquent code inside your controller for CRUD operation. For instance, the following will retrieve accounts from the User model with the Active status:
$activeUsers = User::where('status', 'active')->get();Normally, we need the following for the same operation using SQL:
$activeUsers = DB::select('SELECT * FROM users WHERE status = ?', ['active']);Laravel also lets you establish relationships between records in different Eloquent models for more efficient data organization. Here are the supported connections:
- One-to-one – A record is associated with another record in a different model. For example, a username with their user ID.
- One-to-many – A record connects to multiple values from a model. For instance, an eCommerce user with their order invoices.
- Many-to-many – multiple records relate to several records from another table. An example of this relationship is products and tags.
Laravel also has a migration feature that helps maintain consistency between databases in different environments or versions. It also lets you create columns in a new model with a single execution.
To create a migration file for a table, run the following command:
php artisan make:migration create_example_table
You can also create a migration file while setting up a model by adding the -m or –migration option like so:
php artisan make:model Post --migration
Laravel will create a migration file within the database/migrations directory. Inside it, specify two commands – up() and down().The up() function defines the changes to make when you run the PHP Artisan migrate command, while down() specifies the method to revert the modifications. Here’s an example of the full code:
<?php

use IlluminateDatabaseMigrationsMigration;
use IlluminateDatabaseSchemaBlueprint;
use IlluminateSupportFacadesSchema;

class CreatePostsTable extends Migration
{
    /**
     * Run the migrations.
     *
     * @return void
     */
    public function up()
    {
            Schema::create('posts', function (Blueprint $table) {
            $table->id(); // Auto-incrementing primary key
            $table->string('title'); // Column for post title
            $table->text('body'); // Column for post content
            $table->timestamps(); // Created and updated timestamps
        });
    }

    /**
     * Reverse the migrations.
     *
     * @return void
     */
    public function down()
    {
        Schema::dropIfExists('posts');
    }
}
If you execute the following command, the functions within up() will run, creating the id, string, text, and timestamps columns inside the posts table.
php artisan migrate
To revert the changes, run the following command. It will execute the down() function, removing the newly created posts table:
php artisan migrate:rollback
Commonly, developers and system administrators migrate the database if they need to modify the schemas, whether it is during testing, deployment, or setting up a new environment.
Implementing authentication and authorization
Implementing a proper authentication and authorization mechanism is crucial for your web application’s integrity and safety. Since building this system manually is complicated, Laravel provides a toolkit that lets you develop it more easily.
Laravel authentication
Laravel uses guards to define the user authentication method and providers to retrieve the account information from a persistent storage, like a database. The authentication logic is located inside the config/auth.php file. Here’s what it might look like:
'guards' => [
    'web' => [
        'driver' => 'session',
        'provider' => 'users',
    ],
'providers' => [
    'users' => [
        'driver' => 'eloquent',
        'model' => AppModelsUser::class,
    ],
],
In the example above, we use a guard to authenticate requests to our web application using a cookie-based session method. It utilizes a provider called users, which uses the Eloquent ORM mechanism to retrieve the account’s records from the user model.
Laravel also offers Jetstream and Breeze starter kits, which provide a ready-to-use authentication system. We recommend installing them to get a basic understanding of the code implementation, which can help you set up custom logic later on.
Laravel authorization
Laravel authorization uses two components – gates and policies. Gates check if a user has permission to take a specific action. Meanwhile, policies define an authorization logic for collective actions within the same model.
Gates are suitable for one-off actions, while policies are useful for authorizing more complicated processes. Depending on your Laravel applications, you might use one or both.
Register a gate using the boot method inside App/Providers/AppServiceProvider. For example, the following compares the user ID of an account who wants to edit a post and its author:
use AppModelsPost;
use AppModelsUser;
use IlluminateSupportFacadesGate;

public function boot(): void
{
    Gate::define('update-post', function (User $user, Post $post) {
        return $user->id === $post->user_id;
    });
}
Then, you can call the gate to your controllers or Blade templates and specify the response based on the authorization result. For example, you can set your application to return a message when encountering validation errors.Meanwhile, create a policy using the PHP Artisan command. For example, the following will create the PostPolicy policy:
php artisan make:policy PostPolicy
Then, register it using the boot method inside AuthServiceProvider.php. In this example, we assign the policy to the Post model:
namespace AppProviders;

use AppModelsPost;
use AppPoliciesPostPolicy;
use IlluminateFoundationSupportProvidersAuthServiceProvider as ServiceProvider;
use IlluminateSupportFacadesGate;

class AuthServiceProvider extends ServiceProvider
{
    protected $policies = [
        Post::class => PostPolicy::class, // Registering the policy for the Post model
    ];

    public function boot(): void
    {
    // Specify gate here
    }
}
Now you can write the authorization logic inside your new policy’s file, which in our case is PostPolicy.php. To apply it, call the function to your controller and specify the response.
Handling forms and validation
Laravel’s ability to efficiently communicate and authorize databases enables you to create forms easily.
For example, let’s create a form that collects usernames and email addresses. To start, create a view component using Blade. Here’s what the code might look like:
<!DOCTYPE html>
<html lang="en">
<head>
    <meta charset="UTF-8">
    <meta name="viewport" content="width=device-width, initial-scale=1.0">
    <title>Simple Form</title>
</head>
<body>
    <h1>Submit Your Info</h1>

    @if (session('success'))
        <div style="color: green;">{{ session('success') }}</div>
    @endif

    @if ($errors->any())
        <div style="color: red;">
            <ul>
                @foreach ($errors->all() as $error)
                    <li>{{ $error }}</li>
                @endforeach
            </ul>
        </div>
    @endif

    <form action="{{ route('form.submit') }}" method="POST">
        @csrf
        <label for="name">Name:</label>
        <input type="text" id="name" name="name" required>

        <label for="email">Email:</label>
        <input type="email" id="email" name="email" required>
        <button type="submit">Submit</button>
    </form>
</body>
</html>
Then, add the routes into web.php, specifying which controller will handle the form submissions. In our case, we need two for the GET and POST methods:
use AppHttpControllersFormController;

Route::get('/form', [FormController::class, 'show'])->name('form.show');
Route::post('/form-submit', [FormController::class, 'submit'])->name('form.submit');
Now, let’s create the controller using the following command:
php artisan make:controller FormController
Add the following code to the FormController.php file to set up your controller, which will validate the user input and compare the data against database entries:
namespace AppHttpControllers;

use IlluminateHttpRequest;
use AppModelsUser; // Make sure to import your User model

class FormController extends Controller
{
    public function show()
    {
        return view('simple-form');
    }

    public function submit(Request $request)
    {
        // Validate input
        $request->validate([
            'name' => 'required|string|max:255',
            'email' => 'required|email|max:255|exists:users,email', // Check if email exists
        ]);

        return redirect()->route('form.show')->with('success', 'Form submitted successfully!');
    }
}
As specified in the Blade file, if the input username and email exist in the database, your front-end view will return a success message. Otherwise, it will output an error.
If you want more thorough checks, you can enforce an authorization system using gates and policies.
Advanced Laravel techniques
Here are several advanced Laravel techniques that can improve your web application development efficiency.
Using Laravel PHP Artisan command line
PHP Artisan is a command-line application that lets you interact with your application framework, automate complex tasks, and manage resources for a more efficient development process. It comes pre-configured with your Laravel installation.
To list the available PHP Artisan commands, run the following:
php artisan list
Meanwhile, use the help argument to check a command’s manual, including the acceptable options. For example, run the following to check the migrate utility:
php artisan help migrate
One of the most commonly used PHP Artisan commands is make, which lets you create various items, including another command, controller, and middleware. Here’s the syntax:
php artisan make:item [option]
Another important command is serve, which lets you deploy your Laravel application:
php artisan serve
You can also manage caches with the PHP artisan command. For example, use the following to wipe your Laravel routing cache:
php artisan route:clear
Suggested Reading
New to Laravel Artisan commands? Check our article on Laravel commands.
Middleware
Laravel middleware is intermediary software between your application and the client. It intercepts user requests before they reach your server and is typically used for filtering traffic and logging. Laravel provides pre-built middleware that you can directly use in your application code base. By default, they are located in your project’s app/Http/Middleware. To create a new one, run the following PHP Artisan command:
php artisan make:middleware-name
Then, write your PHP script to define the handling logic. Once finished, you can apply middleware to a specific route or globally, intercepting all HTTP requests and methods.
To apply your middleware globally, add it to the $middleware property inside app/Http/Kernel.php. When working with multiple middleware services, you can group them to simplify routing. To do so, list them under the $middlewareGroups property inside the Kernel.php file. Consider this example:
protected $middlewareGroups = [
    'custom' => [
        AppHttpMiddlewareEncryptCookies::class,
        IlluminateCookieMiddlewareAddQueuedCookiesToResponse::class,
]
In the snippet, the custom group contains two middleware components. You can call them simultaneously into a route using the group name like so:
Route::get('/example', function () {
    return 'This route uses the custom middleware group.';
})->middleware('custom');
Error handling and debugging
Laravel ships with an error handling mechanism that helps you handle issues more flexibly. To set up a custom exception handler, add the logic inside the AppExceptionsHandler class.
You can use different methods to customize how Laravel will display an exception. For example, the following code uses render() to display specific errors as HTTP responses:
public function render($request, Throwable $exception)
{
    if ($exception instanceof CustomException) {
        return response()->view('errors.custom', [], 500);
    }

    return parent::render($request, $exception);
}
Another method is report(), which modifies how Laravel logs errors in the storage/logs directory. You can also create a custom exception class by extending the base Exception class, like in this code:
namespace AppExceptions;

use Exception;

class CustomException extends Exception
{
    // Custom logic or properties
}
In addition to enabling you to catch exceptions more efficiently, Laravel provides tools for debugging errors. For example, the dd() and dump() lets you check values from a variable, allowing you to see if the output is correct:
dd($variable)
Alternatively, use a third-party solution, like Laravel Debugbar, which provides a graphical user interface in your web browser that displays useful information about your application. For example, you can check its routes, queries, and requests.
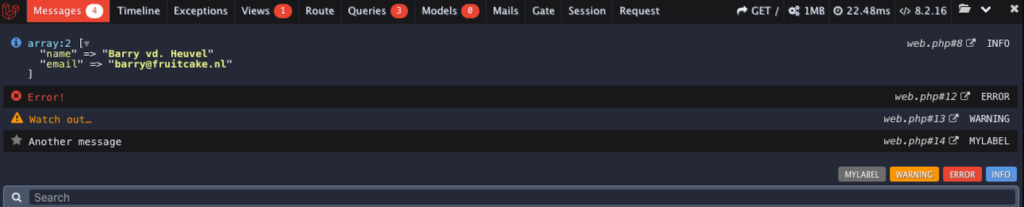
You can install this tool via Composer. If you want to learn more about it, check the Laravel Debugbar GitHub repository.
Building RESTful APIs with Laravel
RESTful application programming interface (API) enables applications to communicate using HTTP methods like GET, POST, and DELETE. It lets you integrate services, share data, or set up third-party tools, like monitoring, more easily.
Laravel’s robust routing and controller mechanism makes it suitable for developing a RESTful API. Here’s how:
- Open the routes/api.php file. It comes with your Laravel installation by default.
- Define the route for each API endpoint by specifying which HTTP methods correspond to an action. Here’s an example:
use AppHttpControllersItemController;
Route::get('/items', [ItemController::class, 'index']);- Create a controller for handling the request from all endpoints:
php artisan make:controller ItemController
- Define the methods ItemController will use to handle CRUD operation:
namespace AppHttpControllers;

use IlluminateHttpRequest;
use AppModelsItem;

class ItemController extends Controller
{
    // GET /items
    public function index()
    {
        return Item::all();
}- Create a model and database migration file to store the application’s data for the Item resource:
php artisan make:model Item -m
- Set the structure of your items database table by adding the following code:
public function up()
{
    Schema::create('items', function (Blueprint $table) {
        $table->id();
        $table->string('name');
        $table->timestamps();
    });
}- Run the migration to set up the database table:
php artisan migrate
Now, check if your API endpoint works properly by sending a GET request using cURL or Postman.
Conclusion
Laravel is a full-stack PHP web development framework that provides various tools to simplify application development. For example, the Blade template lets you seamlessly integrate PHP into HTML, while the Breeze starter kit simplifies authentication system creation.
In this article, we have explained important tools and concepts in Laravel. Here’s a short recap:
- PHP Artisan – command-line tool for creating and managing Laravel application components.
- Routes – a system that redirects user requests to a specific controller based on the HTTP request for processing.
- Controller – a logic that handles CRUD operations based on the incoming client request.
- Model – a method that enables controllers to interact with schemas from a specific database table.
- Views – the front-end interface of your application, used for taking inputs and showing outputs.
To familiarize yourself with this PHP framework, we suggest creating a new project for practice. If you use Hostinger’s VPS plan, ask Kodee, our AI assistant, to guide you through the process. Simply ask, “How do I create a new Laravel project on my VPS?” and Kodee will provide step-by-step instructions tailored to your server setup.
Laravel tutorial FAQ
What is Laravel, and what can it be used for?
u003ca href=u0022https://www.hostinger.com/tutorials/what-is-laravelu0022u003eLaravelu003c/au003e is a PHP web development framework that provides a complete solution for developing various types of applications. For example, you can develop an eCommerce platform or a RESTful application programming interface (API). Since it is a full-stack technology, you can develop both your application’s front and back end.
What are the key features of Laravel?
Laravel’s key features include the Blade templating engine, which lets you embed PHP into HTML components, PHP Artisan, which enables a more efficient object-oriented database call, and elegant code syntaxes to streamline the development process. It also uses the MVC structure, which helps developers organize their application components more easily.
Is Laravel back-end or front-end?
The Laravel framework is full-stack and can handle both the back and front end. Based on its MVC architecture, you can develop the back end as the model and controller layer while the front end as the view component.
What are some Laravel alternatives for creating web apps?
Symfony and CodeIgniter are popular u003ca href=u0022/tutorials/laravel-alternativesu0022u003eLaravel alternativesu003c/au003e, while Django and FastAPI work for Python. JavaScript options like Next.js and Express.js are also widely used. Recently, AI no-code tools like Hostinger Horizons have emerged, enabling users to u003ca href=u0022/horizons/ai-app-builderu0022u003ecreate full-stack web appsu003c/au003e using natural language prompts.
All of the tutorial content on this website is subject to Hostinger's rigorous editorial standards and values.

Aris is a Content Writer specializing in Linux and WordPress development. He has a passion for networking, front-end web development, and server administration. By combining his IT and writing experience, Aris creates content that helps people easily understand complex technical topics to start their online journey. Follow him on LinkedIn.