How to fix the Docker permission denied error on Ubuntu
Mar 10, 2026
/
Ariffud M.
/
4 min Read
The Docker permission denied error usually occurs when your user account doesn’t have permission to access the Docker daemon socket or required files and directories.
Docker uses these restrictions to prevent unauthorized access. But they can disrupt your workflow when you set up development environments on Ubuntu.
To fix the Docker permission denied error, follow these six proven solutions:
- Modify user group membership. Add your user account to the docker group so you can run Docker commands without sudo.
- Adjust file and directory ownership. Update the ownership of configuration files and mounted volumes to ensure the Docker engine can read and write data.
- Inspect socket permissions. Check the permission levels of the Docker Unix socket to confirm that the communication channel isn’t restricted.
- Update script execution rights. Make sure Dockerfile commands and ENTRYPOINT scripts have execute permissions to avoid container startup failures.
- Configure hardware access. Allow containers to access specific devices, such as USB devices or GPUs, to resolve hardware-related permission issues.
- Refresh the Docker daemon. Restart the Docker service and your user session to apply all permission and group changes.
Prerequisites
Before fixing the Docker’ permission denied ‘error, ensure your Linux system meets the requirements for changing administrative settings.
- Administrative access. You need sudo or root privileges to modify user groups and file permissions.
- User group verification. Check your current group memberships by running the groups $USER command.

- Docker installation. Confirm that Docker is installed and running by executing docker –version.

While these instructions focus on Ubuntu, they also apply to most Debian-based distributions.
1. Add your user to the Docker group
The most common cause of the permission denied error is that your user account isn’t part of the docker group.
By default, the Docker daemon runs as a root-owned service. Only users in the docker group can communicate with it without using sudo.
To fix this issue, add your current user to the docker group:
sudo usermod -aG docker $USER
This command updates your user account by appending it (-a) to the specified group (-G). As a result, your user gains permission to access the Docker daemon socket and run Docker commands directly.
To apply the new group membership, log out and then log back in.
After logging back in, confirm the change took effect:
id -nG
The output should include docker in the list of groups.

If you want to test immediately without logging out, run:
newgrp docker
This command applies the group change to your current terminal session only.
2. Fix file and directory permission issues
If adding your user to the group doesn’t resolve the issue, incorrect permissions on configuration files or mounted volumes may cause the error.
Docker needs read and write access to its configuration files, especially config.json.
First, check the permissions of your local Docker configuration directory:
ls -l ~/.docker/

If the output shows that the files are owned by root instead of your user, change the ownership with the chown command:
sudo chown -R "$USER":"$USER" "$HOME/.docker"
This command recursively changes the ownership of the .docker directory to your current user.
Next, fix permission issues related to mounted volumes. When you mount a host directory into a container, the container user needs permission to read from or write to that directory.
For example, if you run a container with a volume mount:
docker run -v ~/data:/app/data ubuntu
Make sure the host directory ~/data has the correct permissions. You can grant read and write access to the user (u) with the following chmod command:
chmod u+rw ~/data
This guarantees that the user who owns the directory has enough permissions to manage data inside the mounted volume.
3. Check Docker socket permissions
The Docker daemon communicates through a Unix socket located at /var/run/docker.sock. If this socket has incorrect permissions, the Docker client can’t send commands to the daemon.
Check the current socket permissions:
ls -l /var/run/docker.sock
You should see output similar to the following:
srw-rw---- 1 root docker 0 Dec 18 10:00 /var/run/docker.sock
This output shows that root owns the socket and the docker group has read and write access. If you see this output and your user belongs to the docker group, the socket configuration is correct.

If the group isn’t docker or the permissions differ, don’t change them manually by running chmod 666 /var/run/docker.sock, especially in production environments.
This command creates a serious security risk by giving all system users access to the Docker daemon, which effectively grants root-level control over the host.
Instead, rely on group membership by adding your user to the docker group. The Docker daemon automatically sets the correct socket permissions on startup.
4. Fix Dockerfile or ENTRYPOINT script permissions
A Docker permission denied error can also occur inside a container when the entrypoint script lacks execute permissions.
This issue often appears when you move scripts from a non-Linux file system, such as Windows, into the Docker build context. In these cases, the executable bit can be lost.
When this happens, the container fails to start because it can’t run the script defined in the ENTRYPOINT or CMD instruction.
To fix the issue, add a RUN instruction after the COPY line in your Dockerfile. This grants execute permissions to the script.
RUN chmod +x /usr/local/bin/entrypoint.sh
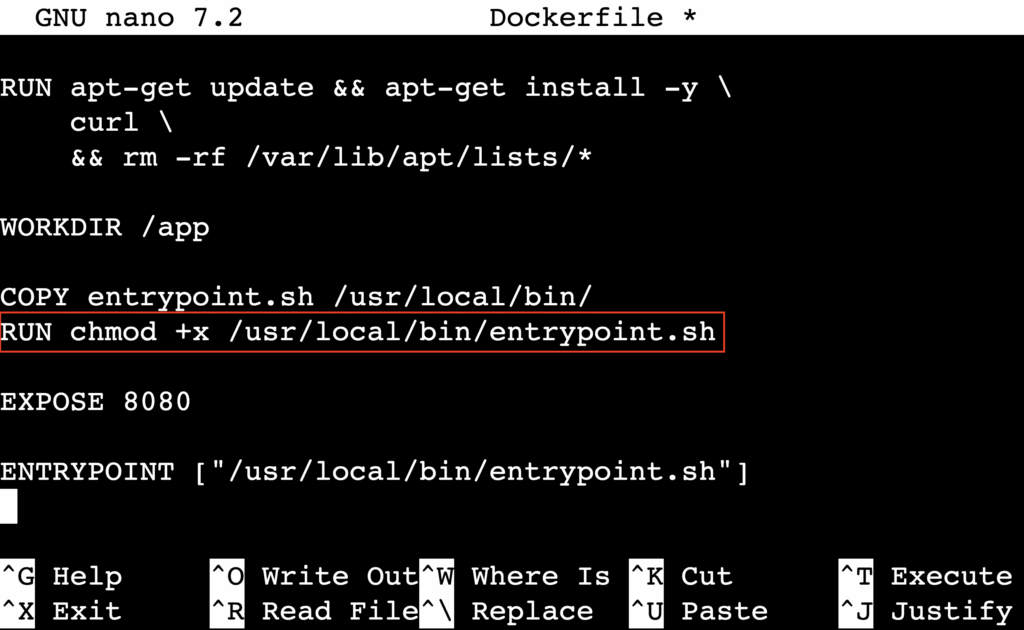
This guarantees the script remains executable regardless of its permissions on the host machine. You’ll often need this step when building custom images that rely on startup scripts.
5. Grant device access to Docker containers
If a container needs to interact with hardware devices, such as a USB drive, webcam, or GPU, you may see a permission denied error for a device path like /dev/ttyUSB0.
By default, containers run in isolation and can’t access host devices. To allow access, explicitly pass the device when you start the container using the –device flag:
docker run --device=/dev/ttyUSB0 my-image
If the container needs broader permissions but not full device access, grant specific Linux capabilities with the –cap-add flag:
docker run --cap-add=SYS_ADMIN my-image
This approach follows the principle of least privilege – grant only the capabilities the container actually needs. Common capabilities include NET_ADMIN for network configuration and SYS_PTRACE for debugging.
When specific devices or capabilities aren’t enough, you can use the –privileged flag:
docker run --privileged my-image

This option gives the container full access to all host devices and disables most security isolation features.
Containers started in this mode can gain root-level control over the host system. Use –privileged only in trusted local development environments or when no safer alternatives are applicable.
For production workloads, always prefer –device for specific hardware or –cap-add for specific capabilities.
6. Restart Docker and test your setup
After you apply user group changes or permission fixes, restart the Docker service so the daemon recognizes the updated configuration.
Restart Docker with systemctl:
sudo systemctl restart docker
After the service restarts, verify the fix by running the standard hello-world container without using sudo:
docker run hello-world
If the image downloads and runs successfully and displays a welcome message, you’ve resolved the permission issue.
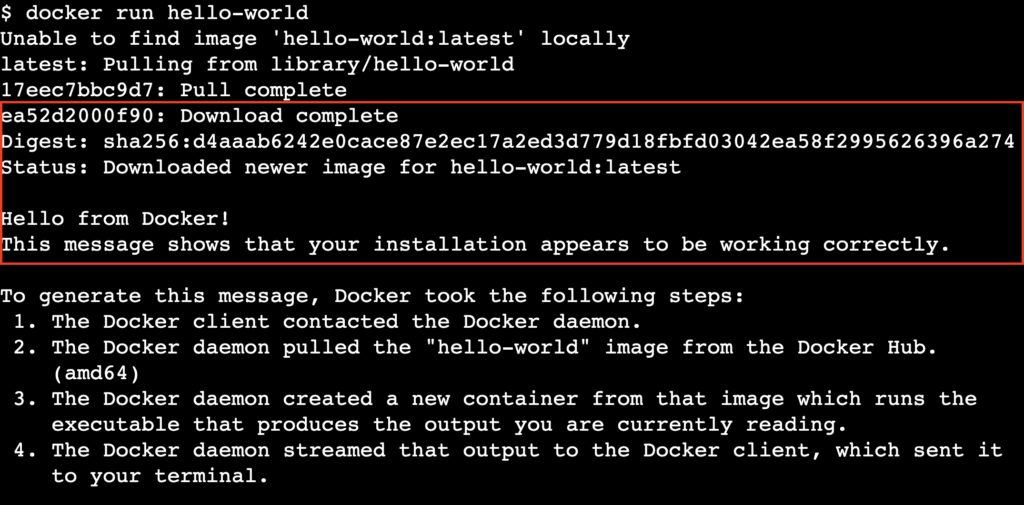
If the error persists, restart the entire system to make sure all group memberships and session changes take effect:
sudo reboot
What should you learn next in Docker?
Now that your Docker installation works without permission errors, you’re ready to work with containers confidently and securely.
Fixing environment issues is an essential first step in your Docker learning path. It lets you focus on building and deploying applications instead of troubleshooting setup problems.
As a next step, build a deeper understanding of core Docker concepts by reading our complete Docker tutorial. It covers image management, container lifecycles, Docker Compose, data persistence, and container networking.
All of the tutorial content on this website is subject to Hostinger's rigorous editorial standards and values.

Ariffud is a Technical Content Writer with an educational background in Informatics. He has extensive expertise in Linux and VPS, authoring over 200 articles on server management and web development. Follow him on LinkedIn.

Comments
0 responses