Hostinger email: creating an email account, setting up email clients, and troubleshooting
Mar 09, 2026
/
Matleena S. & Saulius L.
/
6 min Read

Hostinger offers versatile email solutions to help you maintain a professional image and keep your communications streamlined. Whether you need a simple setup for personal use or a robust solution for a business, we have the tools you need.
This guide will walk you through Hostinger’s email services and how to set them up across different email clients. We will also provide tips on email security and how to troubleshoot common issues.
Types of Hostinger Email services
Let’s go over the types of email services we offer to help you choose the one that best suits your needs.
Free email
We provide a free email service bundled with most of our web hosting plans, starting at ₦2900.00/month. This service is ideal for personal use or small businesses that are just starting out.
Free email is a cost-effective way to get a professional email address that matches your domain, like yourname@yourwebsite.com. It helps you build credibility and trust with your audience without additional costs.
Google Workspace
The Google Workspace email service lets you use Google’s suite of tools, which includes Gmail, Calendar, Drive, and Docs, with your custom domain email.
Google Workspace comes with collaboration tools, professional email hosting with Gmail’s interface, and seamless integration with other Google services, making it an ideal solution for businesses of all sizes.
As our most premium email solution, our Google Workspace plan starts at $5.99/month.
Business email
Our business email solution starts at $0.99/month and has more advanced features and greater reliability than its free counterpart, making it suitable for professional environments.
The business email plans offer advanced spam protection, larger storage, and more email aliases, which are crucial for maintaining a professional image and ensuring efficient communication. If you don’t have a domain name yet, you can get one free with the Business Premium plan.

Pro tip
If you’re migrating from another email provider, follow our guide on how to migrate your emails. This process helps you move all your emails to Hostinger without losing important data.
Creating an email account
hPanel centralizes all your email management tasks in one place, making it easy to configure, monitor, and update your email settings.
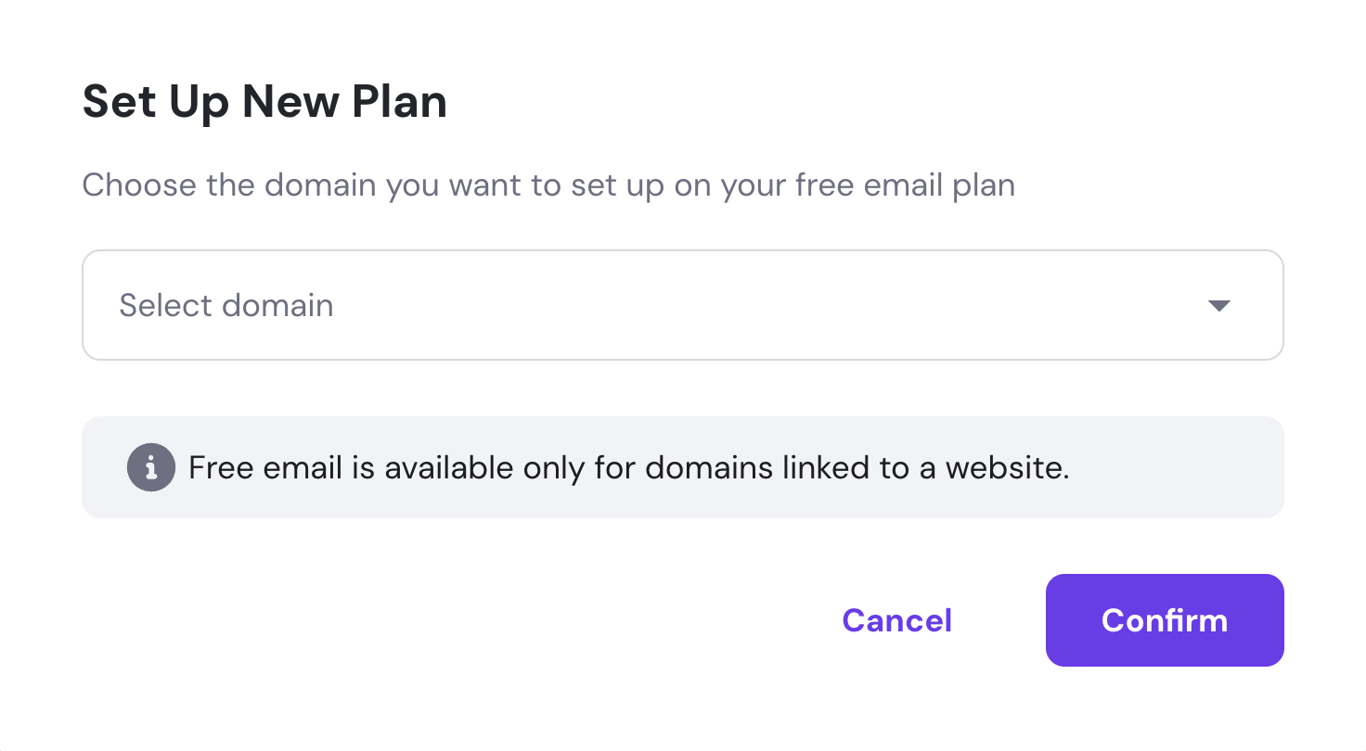
To create an email account, you must first make sure that you have a domain linked to a website. Then, follow these steps:
- Log in to hPanel and navigate to Emails → Set up free email service → Set up.

- Choose the domain for which you want to create an email account and click Confirm.
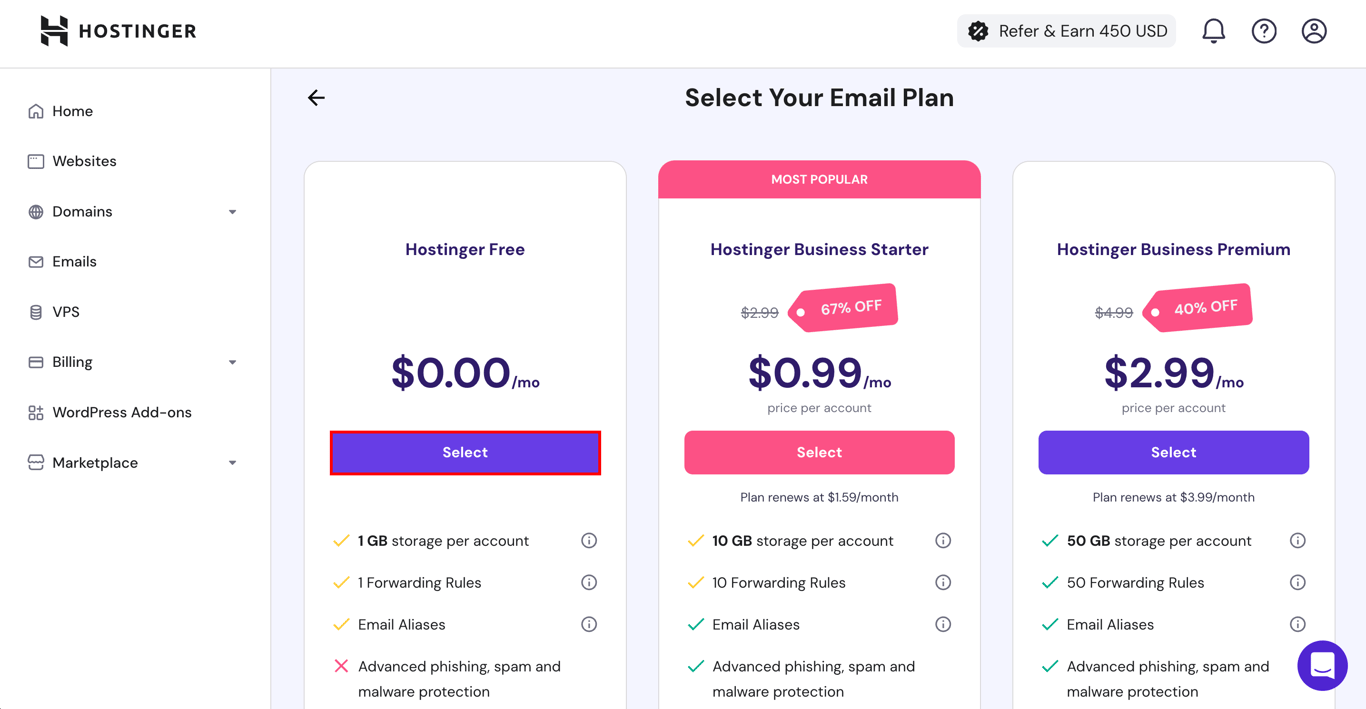
- Select your email plan. For this tutorial, we will choose Hostinger Free. You can always upgrade your email plan later.
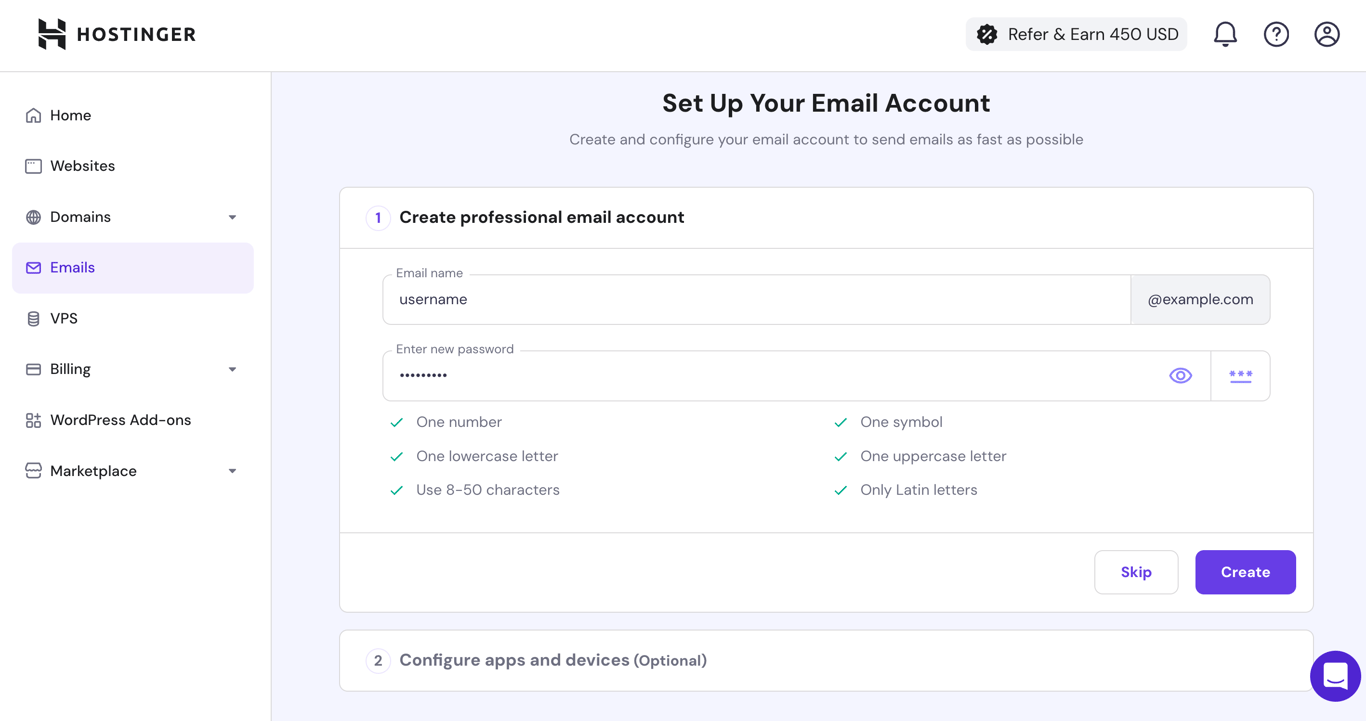
- Enter your preferred custom email name and a strong password, then click Create.
Pro tip
Securing your email account is crucial for ensuring the confidentiality of your communications. Always use SSL/TLS encryption to prevent unauthorized access to your data. Use port 465 for SMTP with SSL or port 587 for SMTP with STARTTLS. Ensure that your IMAP and POP3 settings also use secure ports – 993 for IMAP and 995 for POP3.
Configuring email clients
Although you can access your mailbox directly from the browser by going to mail.hostinger.com, you can also connect Hostinger Email to various email clients. Email clients usually offer additional features, such as offline access and the ability to manage multiple accounts in one app.
You can find instructions on connecting to various email clients in Step 2 of the Set Up Your Email Client on hPanel screen. Under Recommended apps, you can learn how to set up Hostinger email on Apple Mail, Outlook, Thunderbird, and Gmail.
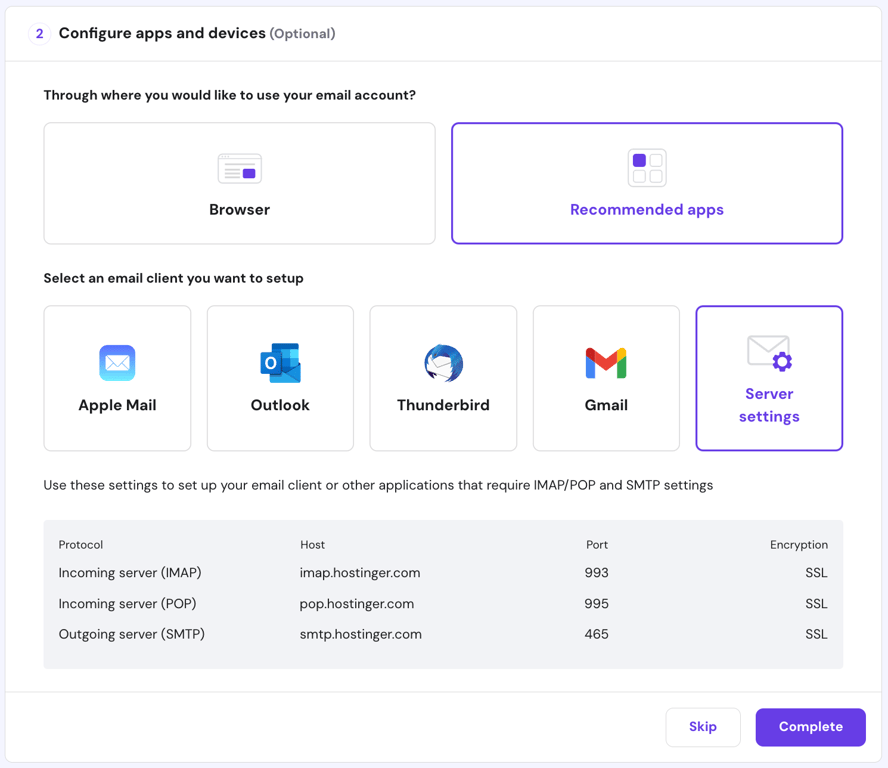
Can’t find the email client you want to set up? Most clients usually ask for IMAP/POP and SMTP values during setup, which you can find under Server settings or by going to Emails → Manage → Connect Apps & Devices.
Simple Mail Transfer Protocol (SMTP) is needed to send outgoing mail from the email client to the server. Meanwhile, IMAP and POP are internet mail protocols that allow email clients to retrieve emails from a mail server. For most scenarios, we recommend the IMAP protocol because it’s typically more secure and flexible than POP.
Let’s go over how to set up your new email account on two of the most popular email clients: Apple Mail and Gmail.
Apple Mail
You can automatically configure Hostinger Email on all your Apple devices via hPanel.
- Go to hPanel → Manage → Connect Apps & Devices.
- Under Apple auto-configuration, click Set up Apple devices.
- Enter the name you want displayed in your emails and select the Hostinger email address to which you’d like to connect. Click Continue.
- Scan the QR code or click Download profile.
- Go to your Apple device’s settings. If you used Safari to download the profile, you will see the Profile Downloaded option.
- Install the profile.
- Enter your name and password for your Hostinger email account. You may also need to enter your device password.
Gmail
Connecting Hostinger Email to Gmail’s web client or mobile app is also simple. Follow these steps:
Web
- Open Gmail and go to Settings → See all settings.
- Click on Accounts and Import.
- In the Send mail as section, click Add another email address.
- Enter the name you want displayed in your emails and your Hostinger email address. If you want to combine the mailbox with other existing email accounts, feel free to check Treat as an alias.
- Enter the smtp.hostinger.com into the SMTP Server field and select 465 as the port. Then, enter your Hostinger email account’s username and password.
- Click Add Account.
- Open mail.hostinger.com to view the confirmation email from Gmail.
- Open the confirmation link and click Confirm to finalize the setup.
Mobile
- Open the Gmail mobile app and go to Settings.
- Click Add Account → Other.
- Enter your Hostinger email address and click Next.
- Choose between POP3 and IMAP as the account type. For this tutorial, we will choose IMAP.
- Enter your email address’ password.
- In the Incoming server settings screen, enter imap.hostinger.com in the Server field.
- In the Outgoing server settings screen, enter smtp.hostinger.com in the SMTP server field.
- Feel free to set up your preferences, such as the email sync frequency, notifications, and more.
- Finally, enter the name you want displayed on your emails.
Suggested reading
Interested in connecting Hostinger Email to other popular email clients? Check out our step-by-step tutorials on how to set up Hostinger Email on Outlook and Thunderbird.
Troubleshooting common issues
Knowing how to solve common issues with your email account helps ensure smooth communication at all times. Here’s how to solve seven common email issues.
Can’t send or receive emails
If you’re having trouble sending or receiving emails, try the following to diagnose and resolve it:
- Verify email services. Ensure that your email services are not disabled or suspended.
- Check for maintenance. If there’s ongoing maintenance affecting email services, try sending or receiving the email after it’s done.
- Configure MX records. Ensure your domain’s DNS settings include the correct MX records for your email. Make sure they’re fully propagated.
Disappearing emails
If your emails are disappearing from your inbox, try these:
- Check forwarders. Look for active email forwarders that might be moving emails to another address without leaving a copy on the server.
- IMAP vs. POP3. Ensure your email client is set to IMAP instead of POP3. If you POP3, configure it to leave a copy of emails on the server.
Delayed email deliveries
It can be frustrating when emails take an abnormally long time to get delivered. Here are some methods to address this issue:
- Check the email queue. If emails are stuck in the queue, check your email client and server settings to ensure there are no misconfigurations.
- Monitor email load. High email traffic can slow down delivery times. Monitor your email sending patterns and adjust as needed.
Emails bouncing back
If your emails are not delivering, try these possible fixes:
- Review bounce message. Read the bounce message carefully to understand the reason for the failed delivery. Common causes include a full inbox or an incorrect email address, which should be easy enough to fix.
- Check blacklists. Emails can bounce back if your domain or IP address is blacklisted. Use an email blacklist checker to find out whether you’re blacklisted or not.
Spam and junk folder issues
If your emails are landing in spam or junk folders, do these:
- Review email content. Avoid spammy language and excessive links in your email content, which can trigger spam filters.
- Authenticate emails. Use SPF, DKIM, and DMARC records to authenticate your emails.
Recovering deleted email accounts
In case you accidentally deleted an email account, you can easily restore it by following these steps:
- If less than 15 minutes have passed after deletion, recreate the email account, and all of the data will be restored.
- If the account was deleted more than 15 minutes and less than 7 days ago, contact our Customer Success team, and we will help restore your emails.
Keep in mind that after 7 days, all of the email data associated with the deleted account will be lost permanently.
SMTP encryption issues
If you experience encryption issues during the network testing process while using SMTP port 465, consider switching to port 587.
For more information, refer to our guide on how to check if port 587 is open to establish more secure connections between your mail client and server.
Conclusion
Hostinger offers various email services tailored to different needs, from free emails bundled with web hosting to advanced business email solutions and Google Workspace integration.
Setting up and managing your Hostinger email account effectively ensures that you remain connected and organized no matter which device you’re using.
Whether you’re managing personal communications or running a business, our robust email solutions and comprehensive support resources provide everything you need to maintain seamless and professional email interactions.

Matleena is a seasoned Content Writer with 5 years of content marketing experience. She has a particular interest in emerging digital marketing trends, website building, and AI. In her free time, Matleena enjoys cups of good coffee, tends to her balcony garden, and studies Japanese. Follow her on LinkedIn

As VP of Product at Hostinger, Saulius oversees Web Hosting Platform & Tools, Managed WordPress, and WebPro Experience. Saulius enjoys observing users through their daily life activities, looking for problems to solve, and building products that make users more efficient online, help them spend more time on the things they love, and leave all the rest for technology to solve. Follow him on LinkedIn.