How to set up Paperclip on a VPS: A step-by-step guide
Apr 17, 2026
/
Larassatti D.
/
8 min Read
Paperclip is an open-source orchestration platform that lets you build, manage, and coordinate multiple AI agents toward a shared goal. Setting it up on a VPS gives you a persistent, self-hosted environment for running a company of autonomous agents.
Hosting Paperclip on your own server also means you retain full control over your data, agent configurations, and infrastructure costs.
To set up Paperclip on a VPS, you’ll need to provision a server with enough resources to keep your agents running around the clock, deploy the application using Docker, and configure your AI agents’ organization through the dashboard.
Here’s the step-by-step breakdown of how to set up Paperclip on a VPS:
- Choose a VPS plan. Pick one with enough resources to keep your agents running continuously. A setup with 2 vCPU cores, 4 GB of RAM, and 50 GB of SSD storage is enough for a basic configuration.
- Deploy Paperclip using Docker. Docker bundles Paperclip and all its dependencies into a single container, so you can skip much of the manual work.
- Log in to the Paperclip dashboard. Access your live Paperclip environment through your browser and sign in with the credentials you set during deployment.
- Set a goal and define workflows. Give your AI company a name and a specific, measurable goal. This is the target to which every agent’s work will trace back.
- Add agents with defined roles. Build out your org chart by assigning agents to roles like CEO, CTO, or Marketer, each with its own responsibilities and adapter configuration.
- Set LLM token budgets. Apply spending limits at the agent or project level to keep API costs predictable as your agents start running tasks.
- Monitor your agents. Track task progress, review heartbeat logs, and spot any misconfigurations or inefficiencies early before they compound.
- Optimize and scale. Refine role definitions, adjust reporting lines, and upgrade your VPS resources as your agent organization grows.
If you’d rather follow along with an audio-visual demonstration, watch this video tutorial to set up Paperclip on Hostinger VPS:

1. Choose a VPS for running Paperclip
A virtual private server (VPS) is the perfect fit for Paperclip, as it keeps your agents running continuously. This means your agents can continue working on tasks, hitting scheduled cycles, and updating their logs even when you’re offline.
A VPS environment is also beneficial for AI workloads, which are more resource-intensive than a typical web app. Agents process large language model (LLM) responses, write to a database, and run background jobs simultaneously.
That said, the requirements are still manageable for smaller setups. For a basic configuration with a small team of agents, setting up a VPS with 2 vCPU cores, 4 GB of RAM, and 50 GB of SSD storage is enough to get started, especially when running on Ubuntu 22.04 or Debian 12.
Beyond raw specs, it’s worth prioritizing ease of setup when comparing the best Paperclip hosting providers. Look for platforms that offer preconfigured application templates and full root SSH access.
These features significantly reduce setup time, simplify ongoing management, and still give you the flexibility to implement more advanced server-level customizations when needed.
Most VPS plans for running Paperclip cost between $4 and $30 per month. And since Paperclip is open source, your only ongoing costs are the server and API tokens of the AI agents you use.
2. Deploy Paperclip using Docker
Docker is a tool that packages an application and all its dependencies into a set of containers, which are self-contained units that run the same way on any server.
For Paperclip, this means you don’t have to manually install Node.js, configure a database, or set environment variables one by one.
There are three different ways to deploy Paperclip with Docker, depending on whether you’ve set up a VPS before.
If you’re setting up a new VPS, the fastest option is Hostinger’s pre-configured Paperclip template. Purchase a plan through the Paperclip hosting page, follow the onboarding steps, and you’ll be taken directly to the Paperclip configuration screen.
Fill in your admin name, email address, and password, then optionally add an API key for your preferred AI model provider.
If you skip adding an API key, Paperclip will still deploy successfully, but your agents won’t be able to run tasks until you add a key later through the dashboard.
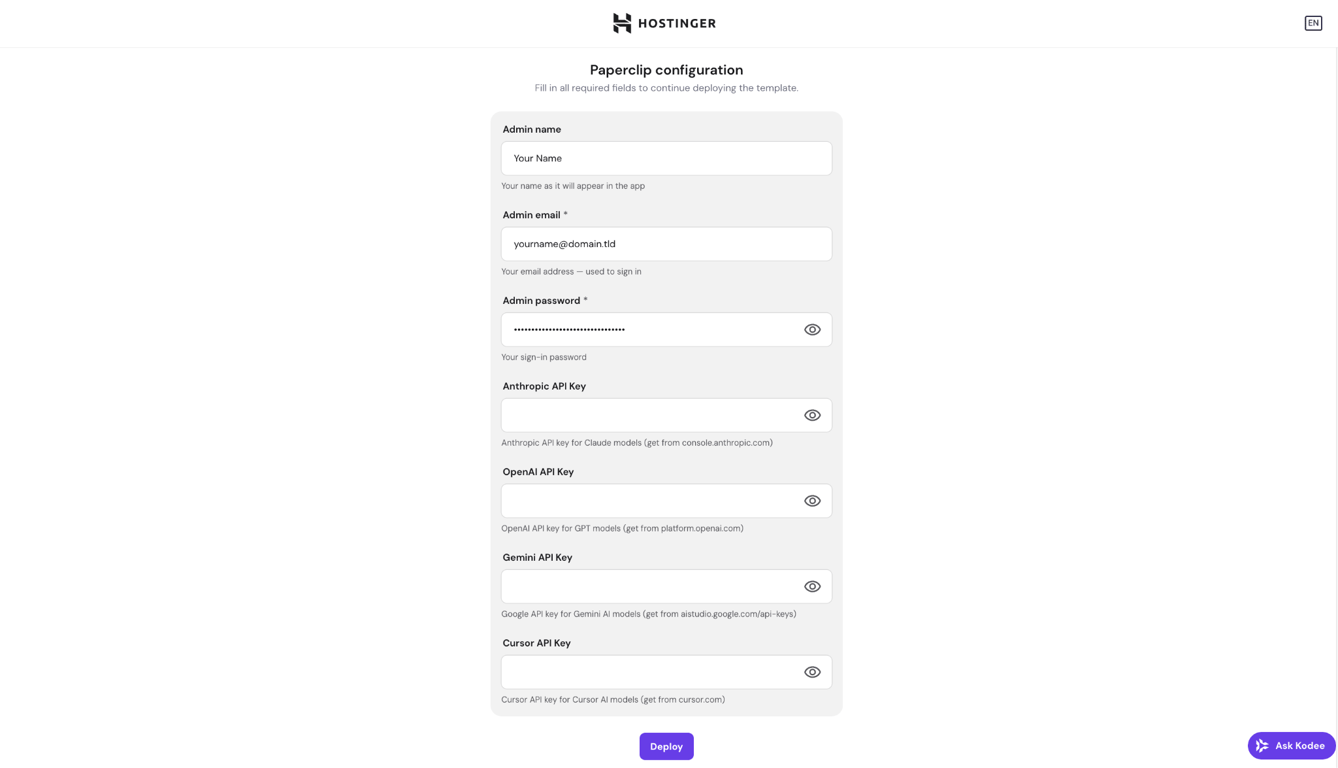
After clicking Deploy, Paperclip will be up and running on your server in a few moments.
If you already have a Hostinger VPS, log in to hPanel and navigate to VPS → OS & Panel → Operating System. Make sure Docker is installed, then find Paperclip in the Docker application menu to deploy it.
If you’re on a different VPS provider, you’ll need to set up a Docker instance first, then install Paperclip using Docker Compose by running this command:
docker compose -f docker-compose.quickstart.yml up --build
Expert tip
💡 Pro tip: If you're more comfortable with Node.js, you can also install Paperclip directly without Docker. Connect to your VPS via SSH, then run npx paperclipai onboard to start an interactive setup to configure server access, the database, and deployment mode. Note that you'll need Node.js 20+ and pnpm installed on your server before you start.
3. Log in to the Paperclip dashboard
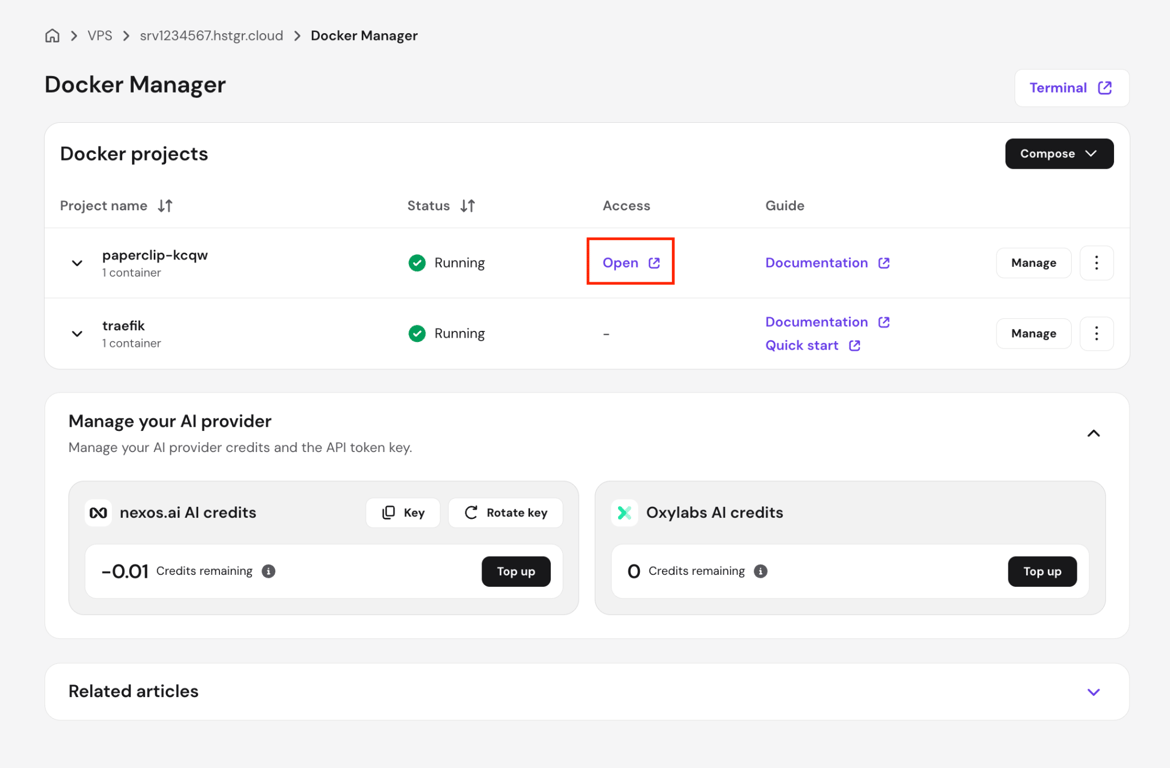
If you used Hostinger’s one-click installer, you’ll be taken directly to the Docker Manager page on your VPS dashboard. Locate your project and click Open to launch the Paperclip dashboard in your browser.
Alternatively, you can access it by typing your server’s IP address directly into a browser and adding the Paperclip port:
http://203.0.113.1:3100
Replace 203.0.113.1 with your actual server IP address, while port 3100 is Paperclip’s default.
This method works as long as port 3100 is open on your server and Paperclip is configured to accept external connections – both of which are handled automatically by Hostinger’s one-click installer.
Then, you’ll be prompted to log in to Paperclip. If you used Hostinger’s one-click installer, enter the email address and password you set during the Paperclip configuration step.

If you’re setting up on a different VPS, you may need to create an admin account before you can log in.
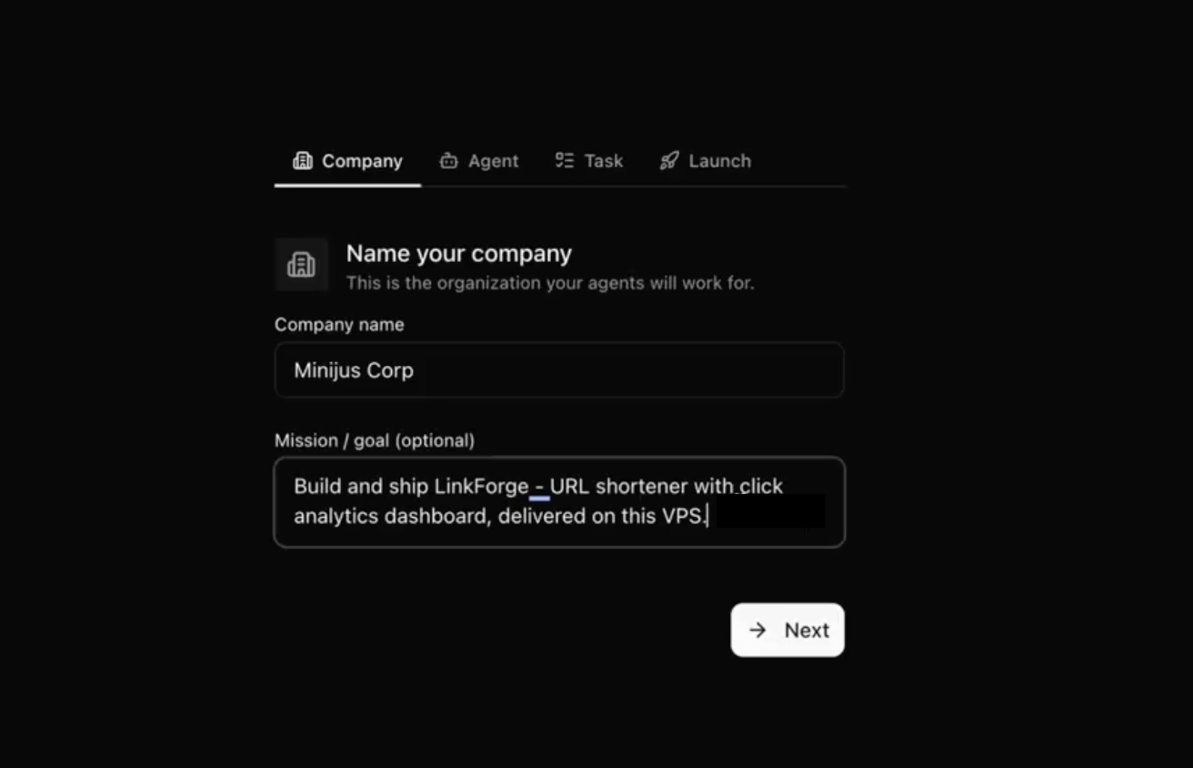
4. Set a goal and define workflows for your AI company
Right after logging in to Paperclip, you’ll be prompted to set up your first AI company. Start by giving it a name and a goal.
We recommend setting a goal even though it’s technically optional – it’s what every agent’s work ultimately traces back to.
Make sure the goal is specific to make the output more useful. Instead of writing “Build a note app,” aim for something like “Build the #1 AI note-taking app to $1M MRR in three months.” Agents work best when they have a clear target.
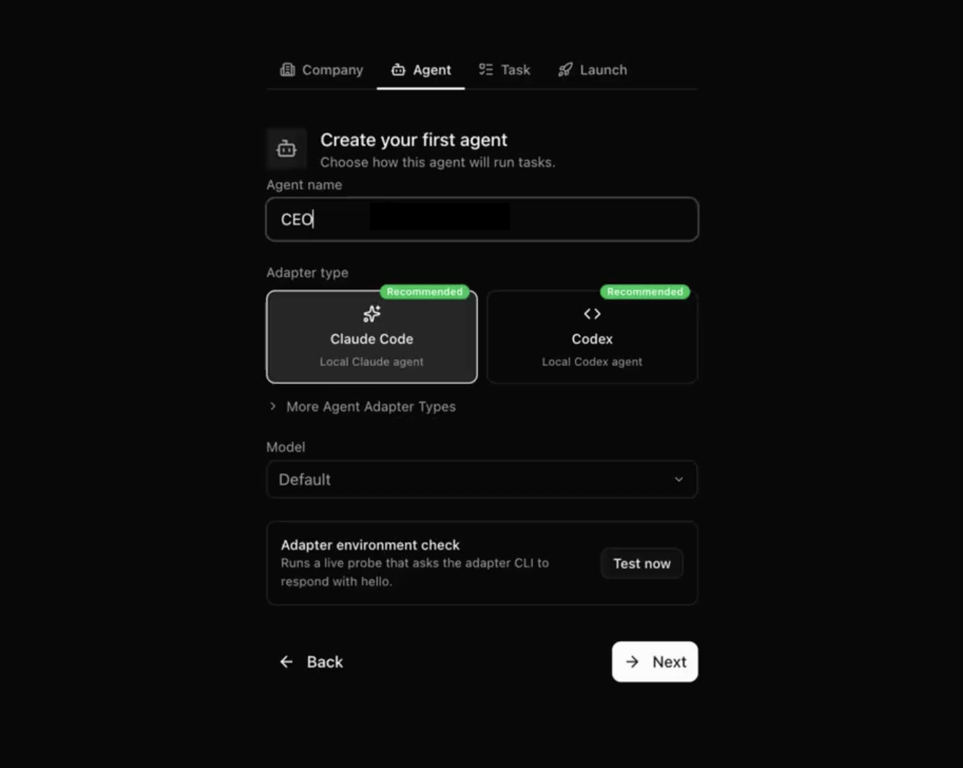
Click Next, and you’ll be asked to set up your first agent’s role. By default, Paperclip assigns the CEO role, which is the top of your org chart. From there, choose an adapter type and the AI model you prefer to run the tasks.
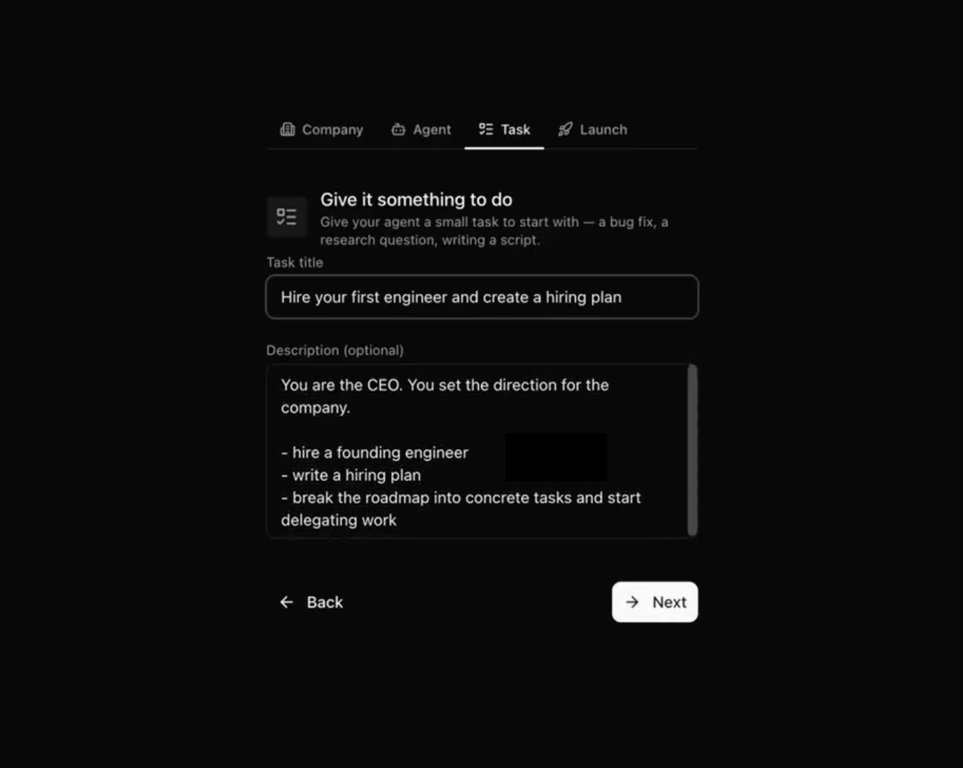
Click Next to continue assigning tasks for the CEO role. You’ll find a task description field where you can write a system prompt that explains what the agent should do and what to prioritize.
Paperclip structures agents using an org chart, just as a company organizes its team. Each agent has a defined role, reports to another agent or to you, and handles a specific type of work.
The CEO serves as the top-level coordinator, receiving goals, breaking them into high-level tasks, and delegating work down the org chart.
You can ask the CEO to hire role-specific agents, like a CTO agent for technical tasks, a Marketing agent for content and outreach, a Research agent for information gathering, and so on. Specify these needs on your initial system prompt for the CEO agent.
Once that’s done, click Next to review your organization summary. If everything looks right, click Create & Open Issue to finish setup.
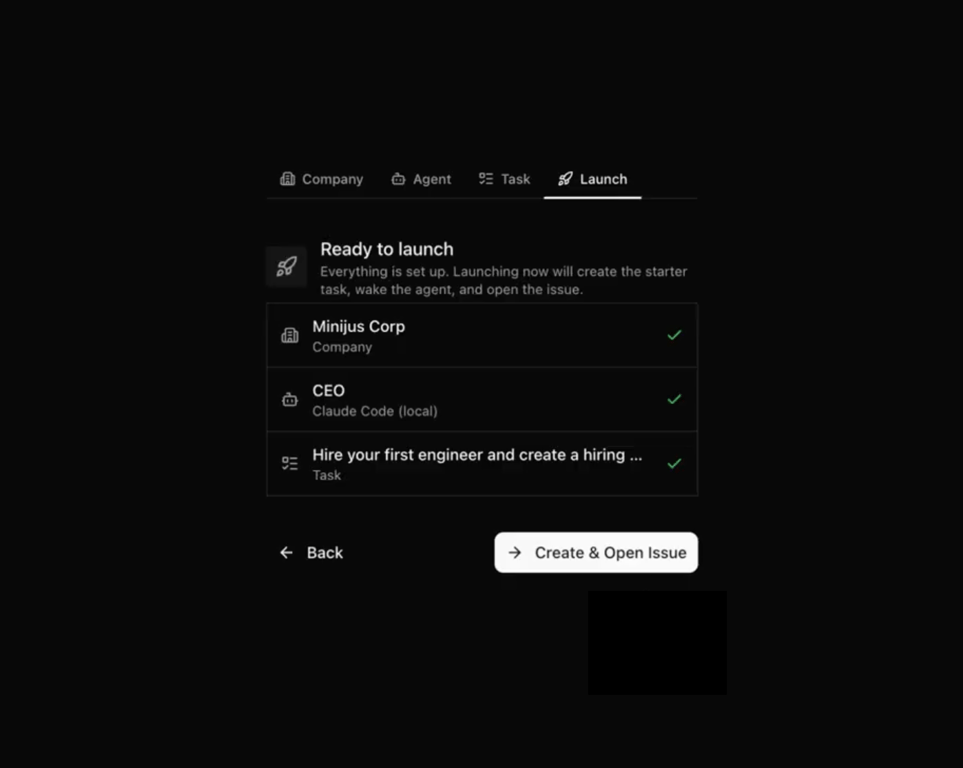
This creates your organization and opens the CEO agent’s first task, which is the starting point for all the work that follows.
5. Add other AI agents with the roles you need
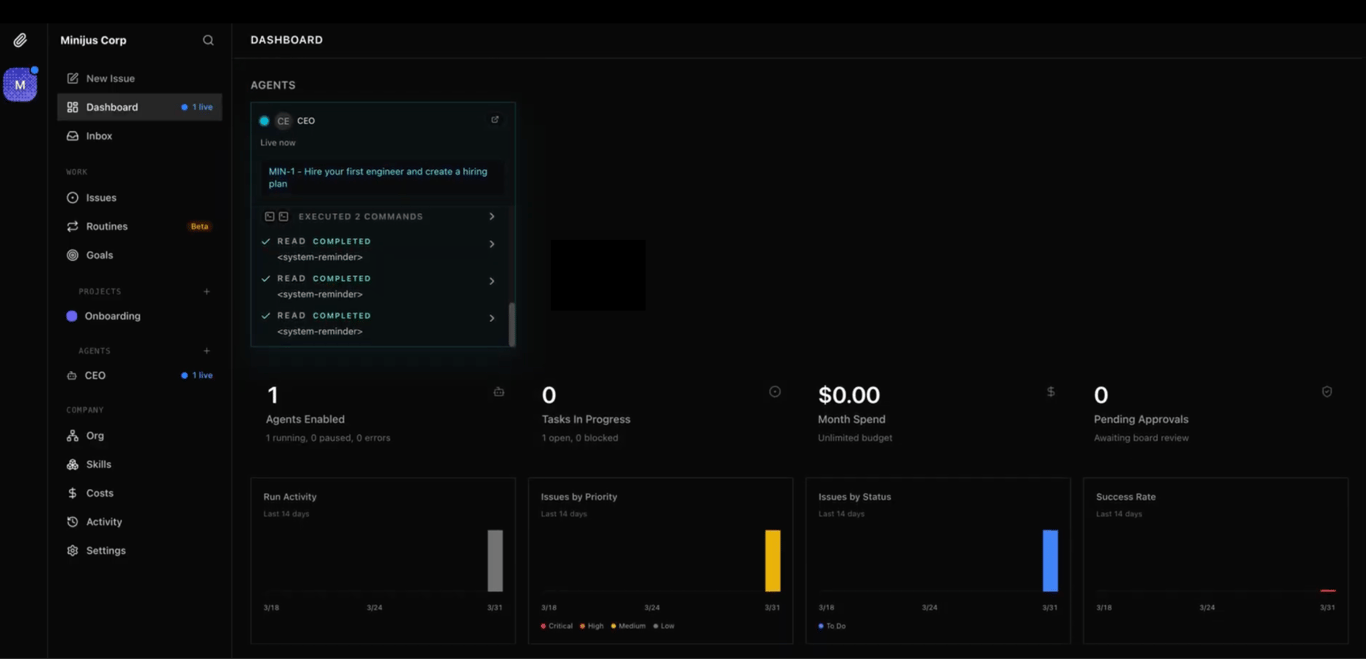
After launching your first issue, you’ll be redirected to the Paperclip dashboard, where you can watch the AI CEO agent execute its first heartbeat. It will work according to the company goal you set and the task you gave earlier.
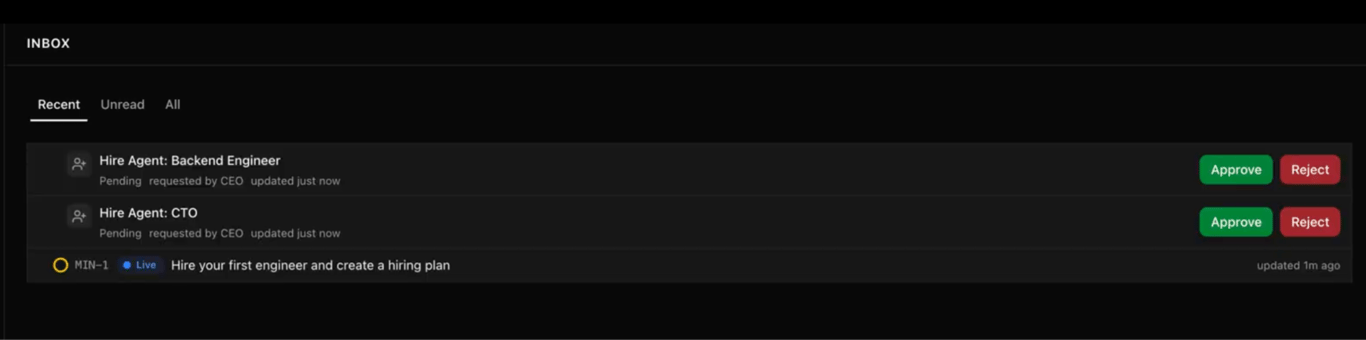
There are two ways to add agents to your organization. If you included an org structure in your CEO’s system prompt, it will generate hiring requests automatically – these will appear in the Inbox of your Paperclip dashboard, where you can approve the ones that fit your setup.
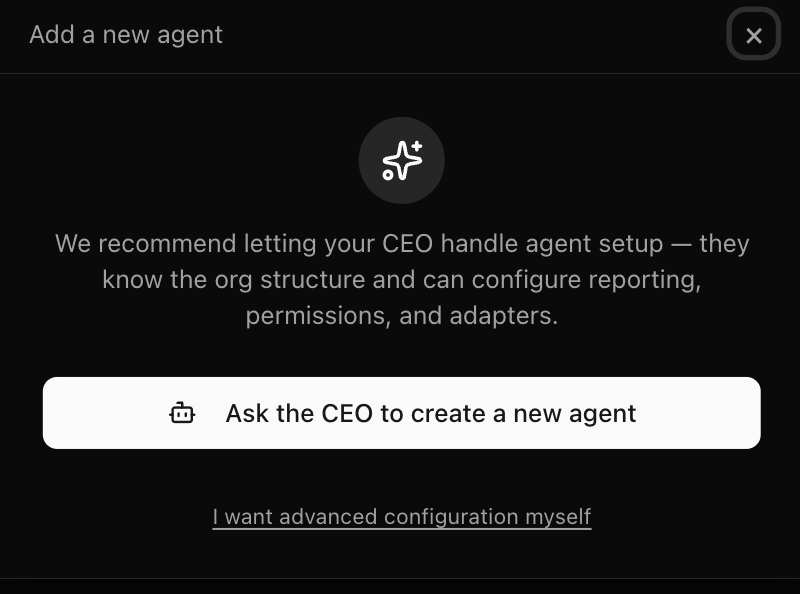
Alternatively, you can add agents manually by clicking the plus (+) button in the Agents menu, which lets you configure each agent from scratch using custom parameters like adapter type, prompt template, model, and capabilities.
The manual route is especially useful if you want different roles running on different adapters – for instance, a Backend Engineer on Claude Code and a Frontend Engineer on Gemini CLI.
Start with creating three to five agents at most – one coordinator and two to four specialists – so you can debug easily and build confidence before adding complexity.
6. Set your LLM token budgets
Every time an agent runs a task, it uses tokens – the unit of measure for LLM API usage. Those tokens come at a cost, so in a busy multi-agent setup, expenses can add up quickly, especially if the AI agents fall into loops or repeat work unnecessarily.
Paperclip addresses this with a built-in budget system that lets you set LLM spending limits at the agent or project level, across the entire organization.
To set a usage limit, open the agent or project and navigate to the Budget tab. From there, enter your desired amount in the Budget (USD) field and click Update budget to apply it.
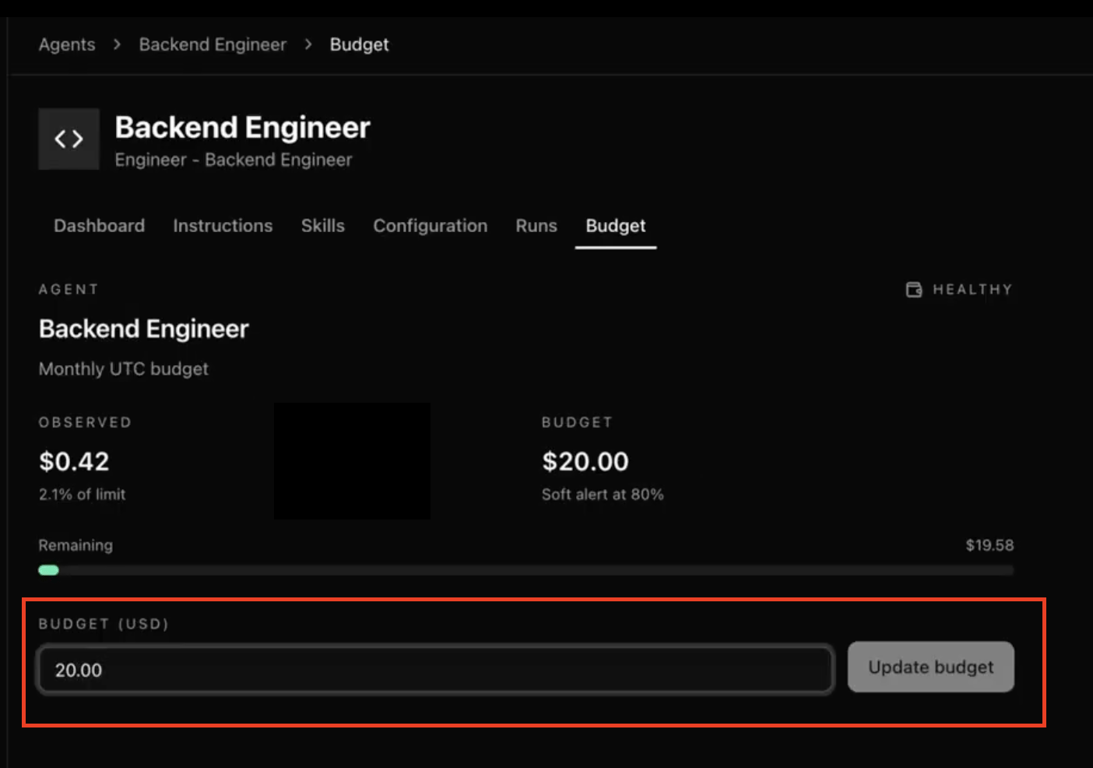
We recommend starting with conservative limits while testing, then adjusting them as you learn how much each task type costs.
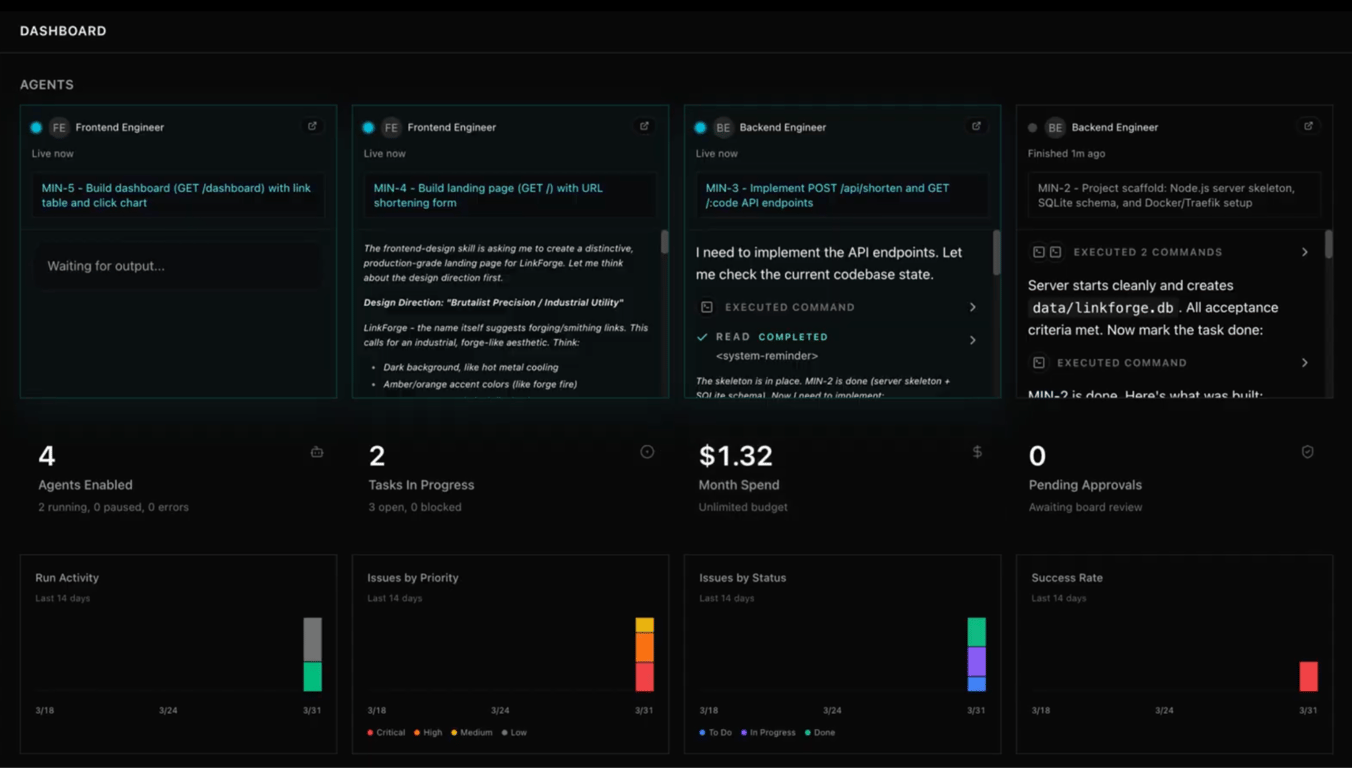
You can track this directly from your Paperclip dashboard, which shows a real-time breakdown of token usage per agent. Review it regularly in the first few days to identify which agents are most active – and spot any that are using tokens inefficiently.
7. Monitor your AI agents
Each Paperclip agent runs on a heartbeat schedule: it wakes up at set intervals, reviews its current assignments and company goals, decides what to do next, executes, logs its results, and then goes idle until the next cycle.
The default interval for a CEO agent is 30-60 minutes. You can also trigger a heartbeat manually from the agent’s settings if you want an agent to act immediately without waiting for its next scheduled cycle.
The main place to monitor your agents is the Issues section of the dashboard, which shows every task across your organization – who it’s assigned to, its status, and how it ties back to your company goal.
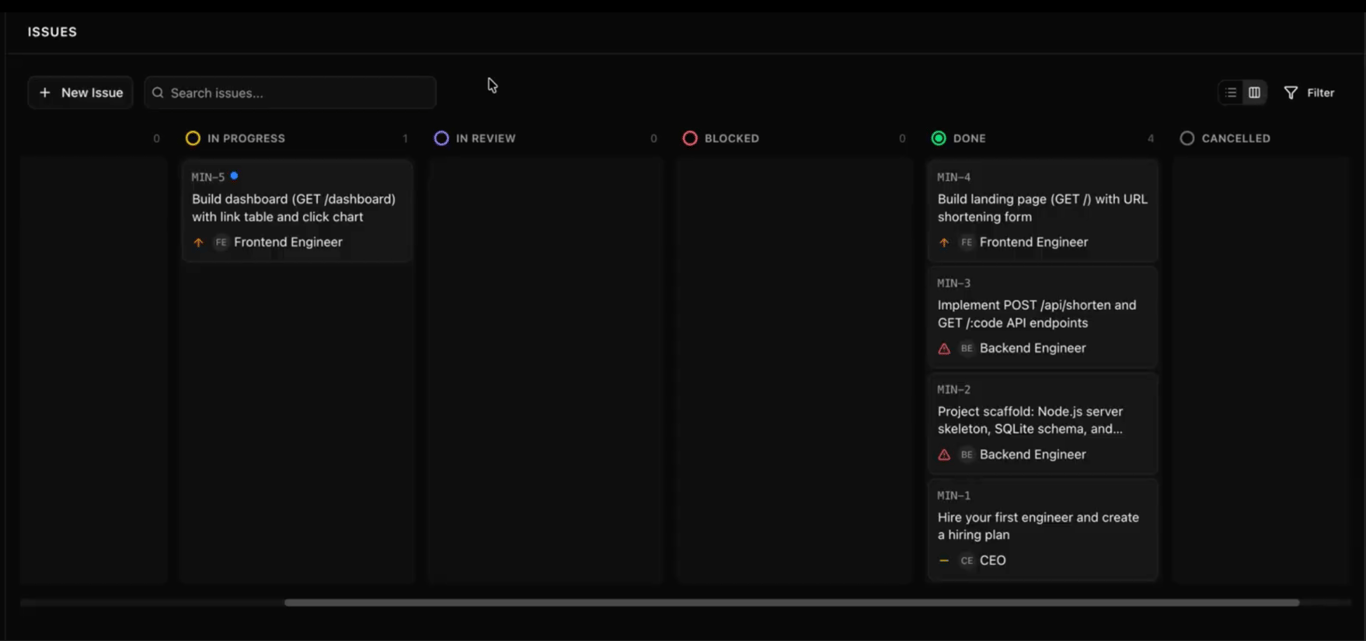
Click into any issue to read the agent’s reasoning, tool calls, and the full log of what it did during that heartbeat.
Meanwhile, the Paperclip main dashboard provides a high-level view of your organization: active agents, recent activity, and budget consumption at a glance.
If something goes wrong – an agent gets stuck, stops progressing, or produces low-quality output – the heartbeat logs are the first place to check.
Common causes of errors or low-quality output in Paperclip include vague task descriptions, missing API keys, or an agent trying to delegate to another agent that doesn’t have the required capabilities.
8. Optimize and scale your setup
As your Paperclip organization grows, improving workflow quality comes down to clearer goals and better role definitions.
If an agent is producing unhelpful output, revisit its role description, add more specific responsibilities, and include examples of what good work looks like.
If tasks are being dropped or misrouted, review your reporting lines and ensure your delegation logic still holds up.
On the technical side, you may need to scale your VPS infrastructure as usage grows, so regularly monitor CPU and RAM usage through your control panel.
If usage consistently stays above 70-80%, it’s a good signal to upgrade to the next tier. Most providers allow you to scale without downtime or data loss, so you can adjust resources gradually.
Finally, expect your structure to evolve. After a week or two of real usage, patterns will start to emerge – some roles may be overloaded, certain agents may overlap, or goals may prove too broad to delegate effectively. Treat this as expected, not as failure. Review your logs, observe how work actually flows, and refine your setup accordingly.
Best practices for setting up Paperclip
The steps above get Paperclip running. These practices help it run well over time:
- Write your own system prompt. When adding AI agents and defining their tasks, write your own prompts to enhance the output quality. Follow prompt engineering best practices when writing it – include the agent’s responsibilities, how it should approach decisions, and what good output looks like for its role.
- Test one workflow before building another. Define a single goal, let your agents work through it end to end, and review the output before adding more agents or goals. Parallel workflows are harder to troubleshoot when things go wrong.
- Review logs early and often. The first 48 hours are the most informative. Agents will quickly surface misconfigurations, unclear roles, and missing API keys. Reading through the logs in this window saves a lot of time later.
- Keep goals current. Every task your agents create traces back to the active goal – an outdated goal means your agents keep working toward something you no longer care about. Navigate to Goals on your Paperclip dashboard to edit your company goal or add a new one.
- Use approval requests as a feedback loop. If the CEO’s requests don’t match what you expected, that’s usually a sign that the system prompt or goal needs to be more specific.
- Back up your data directory. Your Paperclip org structure, agent history, and audit logs live in a single data directory on your server. Back it up regularly, especially before upgrading Paperclip or changing your VPS configuration.
- Document your org structure. As your agent team grows, keep a simple record of what each agent does, which adapter it uses, and what goals it contributes to. This makes it much easier to revisit the setup after a few weeks away or onboard someone else to manage it.
For more on how to put Paperclip to work once your setup is stable, check out our Paperclip use cases guide.

All of the tutorial content on this website is subject to Hostinger's rigorous editorial standards and values.

Larassatti Dharma is a content writer with 4+ years of experience in the web hosting industry. She has populated the internet with over 100 YouTube scripts and articles around web hosting, digital marketing, and email marketing. When she's not writing, Laras enjoys solo traveling around the globe or trying new recipes in her kitchen. Follow her on LinkedIn