How Does an SSL Certificate Protect Your Site
Most websites collect information from their users, whether it’s through contact forms, newsletter subscriptions, or online sales.
Especially if online transactions happen on your site, the last thing you want is to have your customers’ credit card or other personal information stolen. This is where SSL certificate comes into play.
An SSL certificate is not only for business sites – any kind of website benefits from an added layer of security. Not only does an SSL certificate help ensure the protection of customer data, but it also improves the site’s position on search engine results and its credibility.
In this article, we will discuss different aspects related to SSL – from its definition and benefits to its misconceptions.

SSL Explained in a Video Tutorial
Learn what is SSL and secure your site and its visitors.

What Is SSL and How Does It Work?
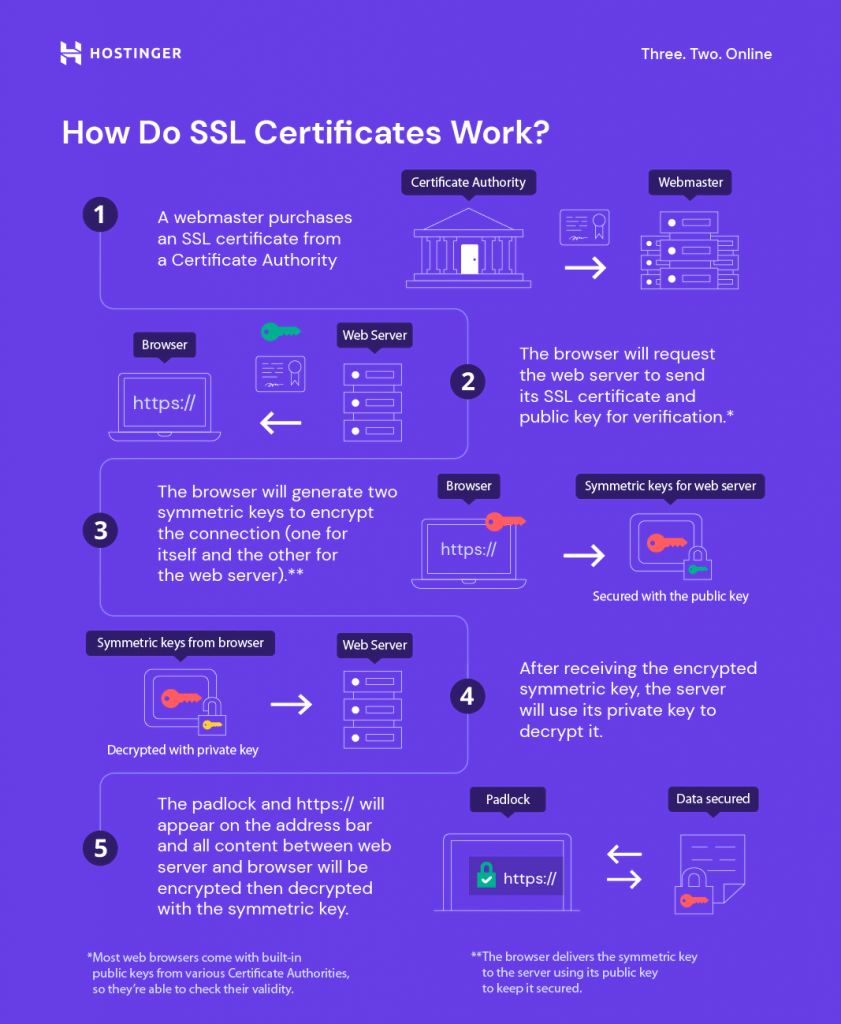
Secure Sockets Layer (SSL) is a security protocol that creates an encrypted connection between a web server and a browser. It provides a secure connection and prevents third parties from accessing or modifying information transferred.
To get an SSL certificate, website owners must buy it from a Certificate Authority (CA). The CA will use the CSR or Certificate Signing Request to create the certificate.
The CSR is an encrypted text generated on the server where the certificate will be installed. It includes information such as the website’s domain name, contact details, and the public key to encrypt the data sent.
When the visitor’s browser tries to access the website, the web server will send a copy of the certificate for verification.
If the process is successful, an SSL-secured connection will be established. The website will use an URL that starts with HTTPS and, depending on the browser, a padlock icon will be displayed in the address bar.
Why Do I Need an SSL Certificate?
Having an SSL certificate is not only about protecting sensitive information. This section will cover other reasons why you need this digital certificate.
Improve Security
There are many ways to make your site secure. Adding an SSL certificate provides an extra and crucial layer of protection against malicious attacks.
Even if the website doesn’t accept transactions, you still need to protect users’ login details, addresses, and other personal information.
Websites without SSL certificates use HTTP, a text-based protocol, meaning it’s easier to intercept and read its traffic. HTTPS uses cryptographic keys to encrypt data, providing more complex security and making it difficult for potential attackers to intercept the data exchange.
Thus, the HTTPS protocol protects your website against digital threats such as man-in-the-middle (MITM) attacks. These attacks take place when someone intercepts the traffic between the website’s server or the client’s browser.
Attackers may either steal information exchanged or redirect traffic to a phishing website, where they ask for login credentials or other sensitive data.
Even if an attacker intercepts your connection, having an SSL certificate ensures that they cannot decrypt the information passed.
Establish Trust
Establishing trust with your customers is essential. Particularly in the case of online businesses, your customers need concrete proof that it’s safe to provide their data. Research shows that 17% of shoppers abandon their carts because they don’t trust the website enough to enter their credit card details.
An SSL certificate communicates to visitors that they can safely exchange information with the website, encouraging them to use your service and keeping you ahead of competitors who don’t have one.
Furthermore, it helps visitors verify ownership of the website before signing in or providing other sensitive information.
Strengthen SEO
Another advantage of installing an SSL certificate is boosting your SEO strategy. Google and other search engines have made website security an important factor when determining page rankings.
Since they aim to provide users with a safe web browsing experience, Google Chrome and other web browsers display a “Not Secure” warning message on all non-SSL websites to alert visitors.
Having an SSL certificate gives you an advantage over competitors who do not have one, improving your site’s position on search engine results pages (SERPs).
When Does My Website Need an SSL Certificate?
Installing an SSL certificate should be a top priority for all website owners. Whether it collects data or not, it is essential to provide a worry-free browsing experience for all website visitors.
Let’s look at several common website types that require SSL certificates:
eCommerce Websites
Online stores handle payments from customers, so ensuring a secure data transfer is essential. SSL protects unauthorized parties from easily intercepting information collected from your website and customer, such as usernames, passwords, or payment details.
Popular internet browsers like Chrome and Safari warn visitors not to submit any personal information on an HTTP website. This leads customers to worry that they’re at risk of having their credit card information stolen, making them leave your online store.
Furthermore, since PCI requirements include encrypting the transmission of cardholder data across open networks, having an SSL certificate is necessary for all websites that collect money online. Alternatively, use a third-party SSL-certified payment processor such as Paypal to receive online payments.
Personal Websites
A portfolio website, for example, is just as vulnerable as an eCommerce website. When a prospective client fills a contact form, SSL encrypts the submitted information so hackers cannot have access to it.
Governmental Websites
It is critical for any public service agency to protect the users’ privacy. Data entry forms must be safeguarded to prevent cybercriminals from snooping or modifying information.
Static Websites
While a static website doesn’t collect data or accept payments, the content must still be protected as hackers can target anyone who visits HTTP sites.
What If My Website Doesn’t Have an SSL Certificate?
As technology has advanced, so have security attacks. According to research, the average cost of a data breach in 2021 reached $4.24 million. Having an SSL certificate can help prevent and minimize cyberattack risks.
In addition to financial losses, cyberattacks may jeopardize the privacy of millions of users and affect a business’s reputation. The Equifax data breach is one example.
Equifax is a giant credit reporting agency in the United States. In September 2017, they announced that their systems had been breached, compromising the personal information of 148 million Americans. Later, it was revealed their SSL certificates had passed their expiration date.
The company agreed to a $425 million global settlement to compensate customers affected by the data breach. However, it’s difficult to measure the total impact of data breaches regarding customers’ trust and business reputation.
Additionally, a website that receives visitors from the European Union must comply with the GDPR (General Data Protection Regulation). Essentially, it is a law established to protect EU citizens’ personal information and privacy online. Those who fail to do so are at risk of fines of up to €20 million.
Does SSL Have Any Disadvantages?
By now, you have learned the many benefits of using SSL certificates. However, several misconceptions involving HTTPS sites have led many people to doubt their security and efficiency.
In this section, we will address some of the most common misconceptions concerning SSL certificates and HTTPS websites.
Changing From HTTP to HTTPS Affects Website Speed
Speed is one of the main concerns when it comes to site performance. Many people mistakenly think that HTTP sites load faster than HTTPS since the latter has to encrypt data before transferring or receiving it.
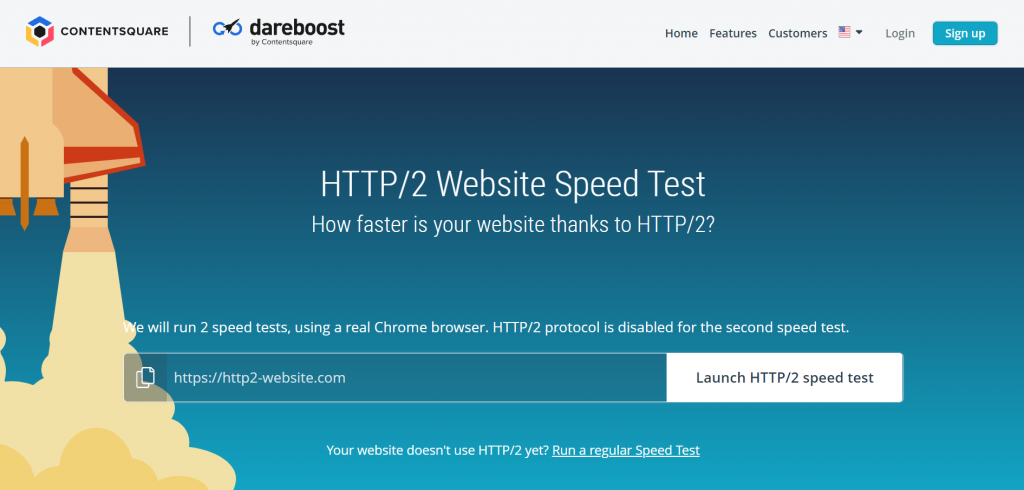
However, SSL encryption does not have a significant impact on your site speed. In fact, the latest HTTP/2 protocol used in SSL can boost load times. Free website speed test tools like Dareboost let you compare page load times when using HTTP/1 and HTTP/2.
SSL Certificates Keep Your Site Completely Secure
Installing an SSL certificate does not mean your site is hackproof. It simply enhances the security of the data exchanged.
Thus, it’s still necessary to observe basic account and password precautions. Also, make sure that your website is updated and free from malware.
Using an SSL certificate and implementing these measures will significantly increase the security of your website and its visitors.
SSL Only Protects Websites That Process Payments
Whether you run a personal blog or a business site, your internet security can be compromised instantly if a piece of information falls into the wrong hands.
Credit cards and bank details are not the only information that cybercriminals are after. As it turns out, hackers can use seemingly harmless email addresses provided in web forms to guess login credentials and try to log in to other websites.
Thus, all websites where visitors provide their personal information, such as membership sites, need an SSL certificate to strengthen their security.
Only Login Pages Need SSL
Going past the login page without HTTPS increases the likelihood of other page sessions being hijacked. Users are at even greater risk if they access your website using public WiFi networks in coffee shops or airports.
Thus, SSL protection provides a more secure browsing experience in every single page session.
SSL Certificates Cost a Lot
Several hosting companies offer free SSL certificates with their hosting plans. Depending on the SSL certificate type that your website needs, many providers also sell SSL certificates at affordable prices.
Regardless of the type you choose, make sure to purchase it from a credible certificate issuing authority.
How Can I Get an SSL Certificate For My Site?
Before getting one, determine which SSL certificate type suits your website’s security needs and budget best.
Installing an SSL certificate depends on how and where your website is hosted. Typically, your hosting company offers to install an SSL certificate for you.
Here at Hostinger, all of our hosting plans come with free SSL certificates. To install them, users only need to access their hPanel – the process will take only a few minutes.

If you purchased your certificate separately or use a different provider, configure WordPress to use HTTPS by setting a redirect through the dashboard or installing an SSL plugin such as Really Simple SSL.
Conclusion
Users always expect a secure browsing experience, no matter the website’s size. An SSL certificate ensures that sensitive data exchanged between the web server and the browser is safe, improving the website’s trustworthiness.
In addition to providing an extra layer of protection against malicious intent, SSL is also important to strengthen the site’s SEO performance. Secure websites have a greater opportunity to rank better on search engine results.
However, an SSL certificate is only the first line of defense in preventing attackers from intercepting sensitive data. Additional security measures are still necessary to protect your website and its visitors.
We hope this article has cleared up any doubts regarding why you need an SSL certificate. If you have further questions, do not hesitate to leave a comment.


Comments
February 16 2022
Hello there, Do I need to pay for the SSL every year or its paid once for a life time?
February 22 2022
Hi Edwin, if you purchase Lifetime SSL from Hostinger, then you only need to pay a one-time fee. However, if you purchase Comodo SSL, a yearly renewal will be necessary.
December 09 2023
Where do I intall the ssl certificate from which webpage
December 12 2023
Hey there! At Hostinger, you get free lifetime SSL certificates for all of your domains and subdomains when you purchase any of our Web and Cloud hosting plans. That means each of your domains and subdomains will have its own SSL certificate installed automatically as soon as you add them to your hosting plan. If you need further assistance, feel free to contact our Customer Success Team ?