How to redirect non-www to www URLs
Mar 09, 2026
/
Merkys M.
/
5 min Read
As a website owner, you might have wondered whether using a www or non-www website domain is simply a matter of user preference.
Even though a non-www domain may be simpler and easier for your audience to remember, it has some disadvantages compared to a www domain.
A www domain helps avoid both the possibility of split page ranking or split inbound links and any duplicate content when search engines index the site. Thus, it improves your site’s search engine optimization (SEO).
If you use a non-www URL, redirecting it to www may seem intimidating, but it’s not a complicated process. Keep reading, as this article will show you three different methods to redirect non-www to www URLs.

Why Redirect Non-www URLs to www?
Sticking with a non-www domain has some drawbacks, including the lack of overload protection and control over cookies.
Traffic from non-www domains can’t be redirected to another server because they don’t have a CNAME record. Due to that, if your server experiences an overload, you won’t be able to redirect traffic to a healthy server.
Thus, visitors may have a hard time accessing your website, negatively affecting its performance and SEO.
In addition to that, search engines consider https://www.yourdomain.com and http://yourdomain.com different websites. Therefore, they are ranked separately and require distinct SEO strategies.
Also, with a non-www domain, you can’t use a cookie-free subdomain unless you create a separate domain to deliver static content.
On the other hand, a www URL allows you to restrict cookies to the root domain or a specific subdomain, reducing the number of HTTP requests and improving the performance of the website.
Redirecting Non-www URLs to www
There are several ways to redirect non-www URLs to www – via your hosting account’s control panel, a content delivery network (CDN), or web server software.
To avoid losing your ranking power, we recommend performing a permanent 301 redirect instead of a temporary one.
Warning! Before proceeding to the tutorial, make sure you have a backup of your website files. This way, you can restore the site to a previous version if an error occurs during the process.
hPanel
The easiest way of redirecting a non-www URL to www is to place a rule in the .htaccess file. You can do so via FTP, SSH, or your hosting account’s control panel.
hPanel users can easily access and edit the .htaccess file. Here are the steps to do it:
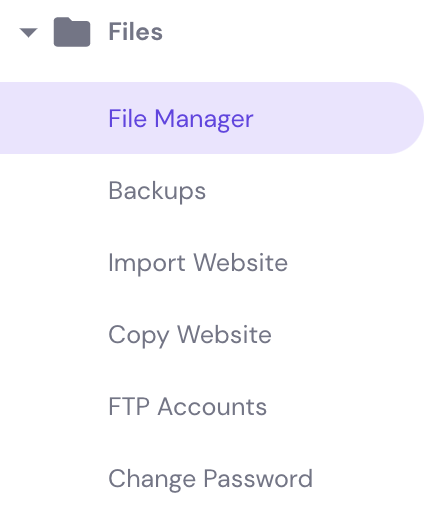
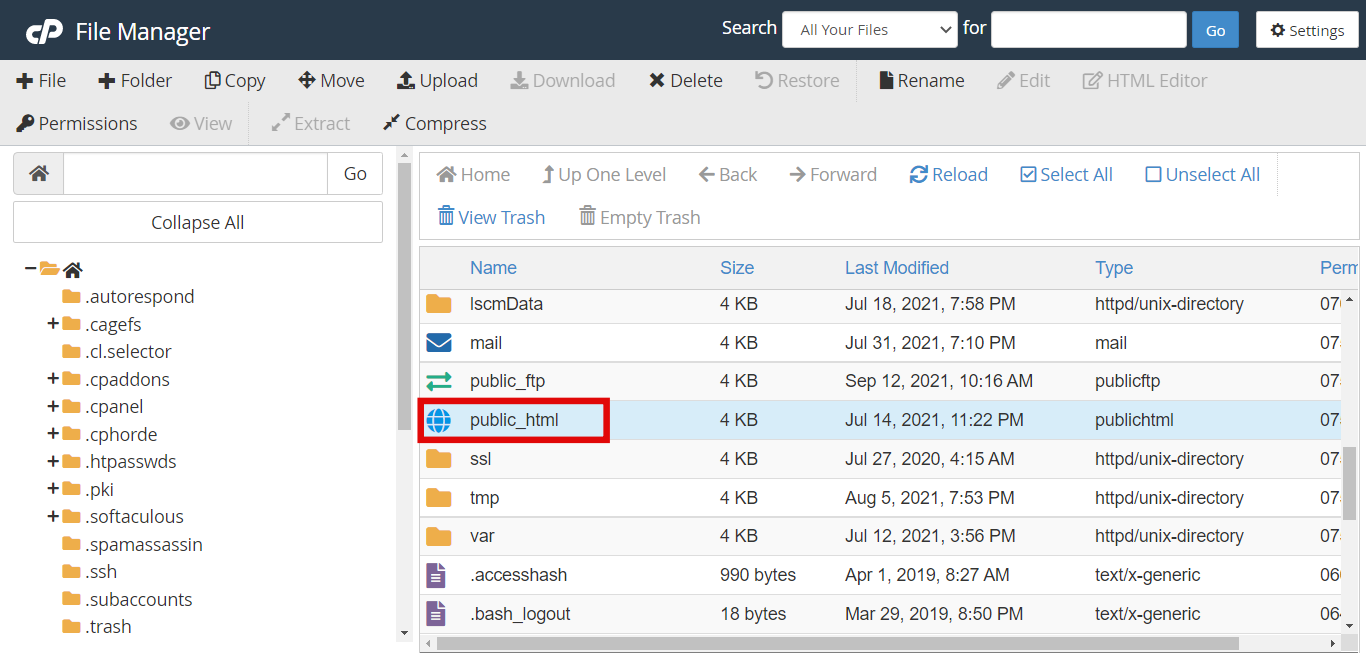
- Log in to your hPanel, scroll down to the Files section, and open the File Manager.
- Navigate to the public_html directory, right-click the .htaccess file, and select Edit. If you can’t find it, refer to our article to learn how to create the .htaccess file for your WordPress site.

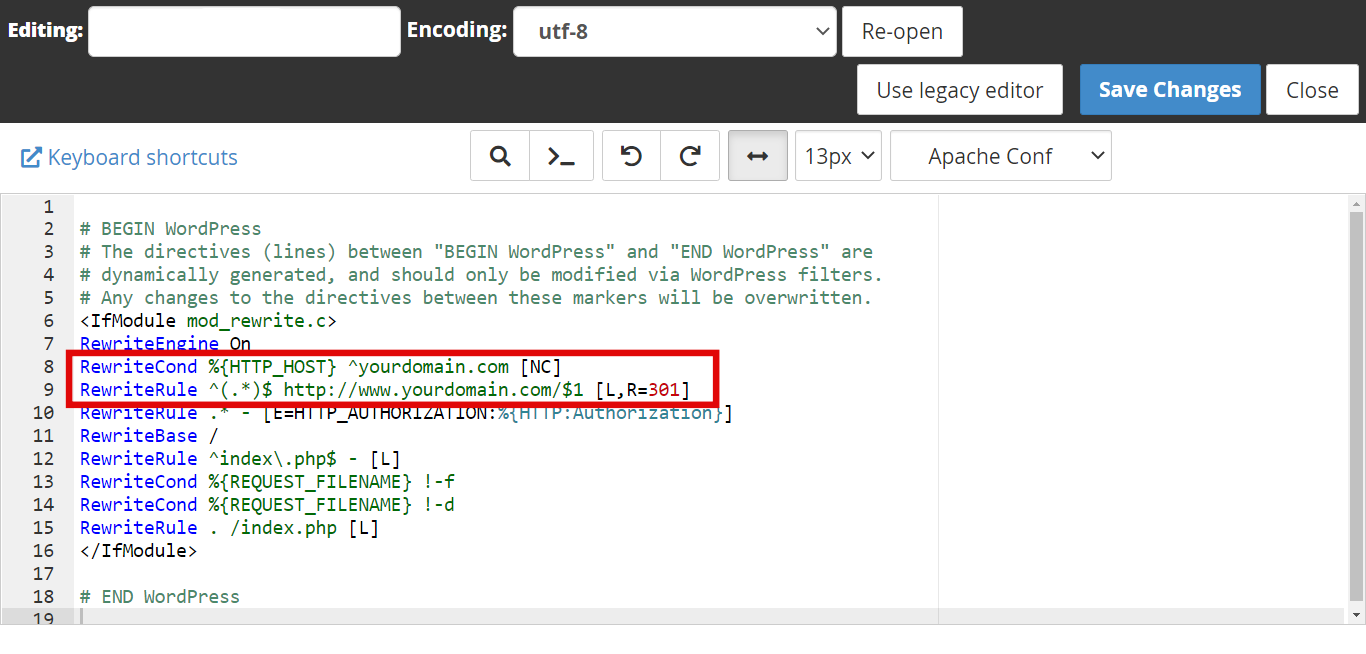
- Find the line
RewriteEngine Onand insert the following code after it:RewriteCond %{HTTP_HOST} ^yourdomain.com [NC]RewriteRule ^(.*)$ http://www.yourdomain.com/$1 [L,R=301]

- Don’t forget to replace yourdomain.com with your actual domain name. Once you’re done, save the changes.
This .htaccess rule will now redirect all visitors from the non-www to the www version of your website.
cPanel
cPanel users can redirect non-www URLs to www via the Redirect settings or editing the .htaccess file. If you are a beginner, we recommend following the first method:
- Access your cPanel, then navigate to Domains -> Redirects.

- Under Type, select the Permanent (301) option.
- On https?://, enter the domain you want to redirect. Leave the path section (/) empty.
- In the Redirects to field, type in your website’s www URL.
- Select Do Not Redirect www, and uncheck Wild Card Redirect.
- Press the Add button.

If the above method doesn’t work, you can set the redirect manually by editing the .htaccess file:
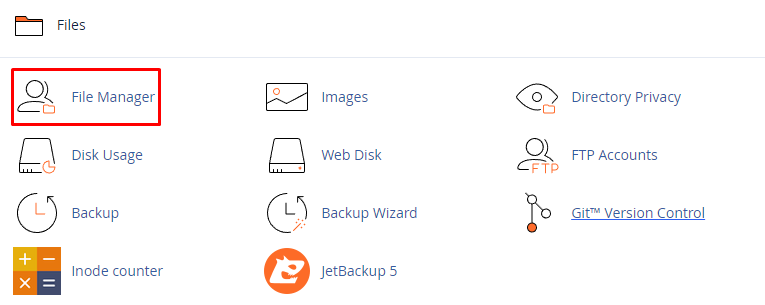
- From your cPanel dashboard, go to Files -> File Manager.
- Look for the public_html folder and double-click it.
- Right-click the .htaccess file and select Edit.

- Under
RewriteEngine On, insert the following lines of code:RewriteCond %{HTTP_HOST} ^yourdomain.com [NC]RewriteRule ^(.*)$ http://www.yourdomain.com/$1 [L,R=301]
Important! Don’t forget to replace yourdomain.com with your actual domain name.
- Save Changes
Cloudflare
If you’re planning on setting up a CDN like Cloudflare to improve the speed and performance of the site, you will also be able to use it to redirect the non-www to the www domain.
Expert Tip
You may want to check the following tutorials before proceeding:
Cloudflare setup process for WordPress sites
Cloudflare setup tutorial for general websites

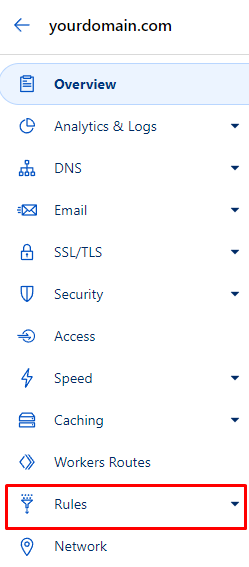
Once you’ve created an account, log in, and set up a page rule on your Cloudflare:
- On your Cloudflare dashboard, click on the Rules tab.
- Press the Create Page Rule button.
- Type in your current website URL without the www, then set the page rule as Forwarding URL.
- Select 301 – Permanent Redirect as the status code.
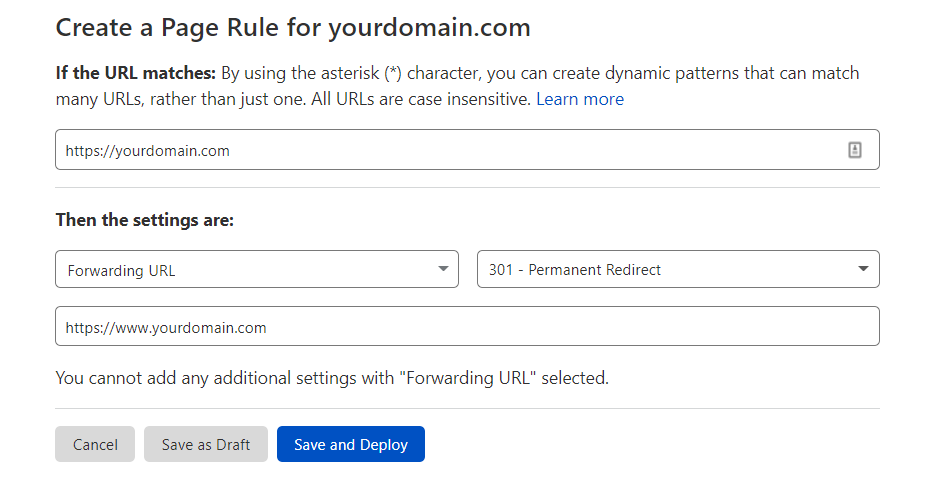
- Type in your website’s URL with the www, then click Save and Deploy.
Wait for the redirect to go live.
NGINX
If you use virtual server hosting and NGINX, follow the tutorial below to redirect non-www URLs to www:
- Log in to your VPS account using an SSH like PuTTY.
- Navigate to the directory /etc/nginx/.
- Type in the command below to view the directory content:
[server]$ sudo ls - la - Enter your NGINX password.
- Type in the following command to edit the nginx.conf file:
[server]$ sudo nano nginx.conf - Add the following lines of code, replacing yourdomain.com with your actual domain name:
server {server_name yourdomain.com;return 301 $scheme://www.yourdomain.com$request_uri;} - Enter the following command to restart the NGINX web server:
sudo systemctl restart Nginx
In addition to redirecting non-www to www URLs, you can also run other redirects through NGINX, such as HTTP to HTTPS and other page redirects.
Pro Tip
Hostinger users can manage their VPS from the new browser-based terminal, eliminating the need for additional software.
Apache
If you’re a VPS and Apache user, you’ll also need to edit the .htaccess file. Just like the previous tutorial, it can be done via an SSH terminal.
Important! Before continuing with the steps below, make sure you have root access with sudo privileges and a text editor like Nano.
By default, Apache doesn’t allow the use of .htaccess file, so the steps will be a little different:
- Enable mod_rewrite by running the following command:
$ sudo a2enmod rewrite
Then, restart the Apache web server:$ sudo systemctl restart apache2 - Enable .htaccess with the command:
$ sudo vi /etc/apache2/sites-available/000-default.conf
Add the following code before the<VirtualHost>line:<Directory /var/www/html>Options Indexes FollowSymLinks MultiViewsAllowOverride AllRequire all granted</Directory>
Then, restart Apache. - To create the .htaccess file, enter the command:
$ sudo vi /var/www/html/.htaccess - Add the following lines to the file:
RewriteEngine onRewriteCond %{HTTP_HOST} ^yourdomain.com [NC]RewriteRule ^(.*)$ http://www.yourdomain.com/$1 [L,R=301] - Restart the Apache server.
All site visitors using the non-www URL should now be redirected to the www version.
Conclusion
People tend to leave the www out when typing a website’s address. It might not cause significant issues since visitors will reach the same page, but it’s best to redirect site visitors to its www version.
This is because your site’s performance and SEO might be affected if you keep using non-www domains.
Though it may sound complicated, the redirect process will only take a minute or two. In this article, you’ve learned how to redirect non-www URLs to www in several ways:
- Via your hosting account’s control panel – hPanel and cPanel.
- Using Cloudflare.
- For VPS users, via NGINX and Apache.
Now, whenever someone accesses your site using http://yourdomain.com, they will be redirected to http://www.yourdomain.com.
We hope this article was helpful. Let us know in the comments below if you have any questions.
Suggested Reading
Check out our tutorial featuring The Best Tools For Website Optimization, ensuring a smoother and more engaging user experience.

Merkys is a server administrator and Linux expert. He keeps everything up & running while tackling advanced server management issues. Besides that, he’s a big fan of blockchain technology, web development, and bodybuilding.