How to install WordPress on Ubuntu automatically and with the LAMP stack
Mar 09, 2026
/
Aris S.
/
6 min Read
WordPress hosting service lets you quickly set up the content management system (CMS) to create a website. While such a solution is easy to use, the web host usually limits you from choosing the web server and database.
If you’re looking for extensive customization, you should install WordPress on a virtual private server (VPS) instead. This hosting type lets users choose any software to set up the CMS and tailor the server settings to their needs.
To help you get started, this tutorial will explain how to install WordPress on Ubuntu. We will provide two methods: automatically using the Hostinger VPS template and manually with commands.
Prerequisites for installing WordPress on Ubuntu
Before installing WordPress, ensure your VPS is running Ubuntu since the commands differ for another Linux operating system.
To avoid incompatibility issues, check your Ubuntu version and ensure you are running 22.04 or later. Your VPS should also support software required for WordPress, like a web server and database.
Since WordPress is relatively lightweight, you can use an entry-level server like Hostinger’s KVM 1 VPS platform. Starting at ₦10900.00/month, it offers 1 vCPU core, 4 GB of RAM, and 50 GB of NVMe SSD storage.
Hostinger VPS also supports Ubuntu and other software necessary for WordPress installation. Moreover, our operating system templates let you configure the CMS in one click. We will explain how to do so in the following section.
After purchasing a VPS, ensure you have pointed a domain name to your VPS since we will use it to access the WordPress admin panel and finish the setup process.

Install WordPress on Ubuntu automatically
Hostinger VPS users can easily install WordPress via their web browser using the pre-configured OS template. This method is suitable for beginners since it doesn’t use commands, making the process safer and simpler.
Important! Back up your VPS data before installing an OS template since it will wipe all your data permanently. However, this step is unnecessary if you are using a new, empty server.
Here’s how to do so:
- Log in to hPanel and click VPS on the sidebar.
- Click Manage on the VPS you want to install WordPress.
- Navigate to the side panel → OS & Panel → Operating System.
- In the operating system configuration menu, select Applications and choose WordPress.
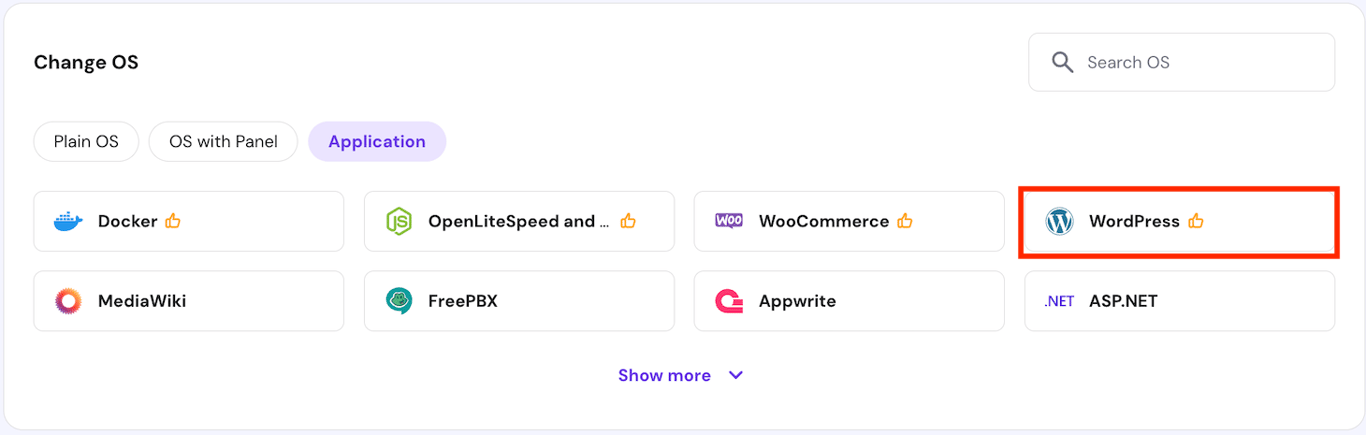
- Click Change OS to confirm.
- Check the confirmation box to acknowledge that the installation will wipe your data. Click Next.
- Enter a new Panel password and click Confirm.
Wait until the installation process is finished, which should take a few minutes. That’s it! You can now access the WordPress admin area by visiting this address. Remember to replace the VPS hostname with the actual value:
http://your-vps-hostname/wp-admin
If the address doesn’t work, edit your system’s hosts file and add your VPS IP address with its hostname. If you have connected a domain, you can also access the page with the following address:
http://domain.tld/wp-admin&
Note that you can’t choose the web server and database solution if you configure WordPress using Hostinger’s OS template.
Install WordPress on Ubuntu using a LAMP stack
Installing WordPress manually using commands is suitable if you need specific software for your website. For example, if you want to use Apache and MySQL, set up the LAMP stack on your Ubuntu server.
Pro tip
Hostinger VPS also offers a template that automates Ubuntu and LAMP stack setup, which you can install from the same menu as the WordPress one.
1. Connect to your server and create an account
Before installing WordPress, connect to your VPS using the PuTTY SSH client and create a new user. Alternatively, Hostinger users can easily access their system’s command-line interface via a web browser using the Browser terminal.
You will connect as root by default. However, using this account to manage your VPS can be unsafe since it can run any command without confirmation, including those that can alter important system settings.
Using a new user helps minimize the risk since it requires the sudo prefix and password to execute commands. To create one, run the following and replace username with your desired value:
adduser username
Add the user into the sudoers group to grant the superuser privilege:
usermod -a -G sudo username
Switch from root to the new user using this command:
su username
Enter cd to return to your system’s main directory.
2. Install WordPress dependencies
Once logged in to your server as a superuser, update your system repository to ensure you get the latest version of all packages. Here’s the command:
sudo apt update
Now, install WordPress’s dependencies – packages required for the platform to function properly. Here is the list:
- Apache – a web server that takes and processes user requests, enabling your WordPress instance to be accessible online.
- MySQL – a database for storing your WordPress data.
- PHP and its modules – a programming language that interprets WordPress and enables WordPress to run on your server.
To install all the dependencies, run the following command:
sudo apt install apache2 ghostscript libapache2-mod-php mysql-server php php-bcmath php-curl php-imagick php-intl php-json php-mbstring php-mysql php-xml php-zip
3. Download and install WordPress
Now we can proceed with the WordPress installation. To begin, create a folder called /srv/www using this command:
sudo mkdir -p /srv/www
This folder will contain all your WordPress website files. Now, assign your web server as the folder owner so the data is accessible online. Here’s the command:
sudo chown www-data: /srv/www
Then, download and extract the WordPress installation package using this command:
curl https://wordpress.org/latest.tar.gz | sudo -u www-data tar zx -C /srv/www
4. Configure the Apache web server
Set up your Apache web server so it can serve the WordPress files online. To do so, create a configuration file using the nano file editor:
sudo nano /etc/apache2/sites-available/wordpress.conf
Then, copy and paste the following configuration into the file. Once finished, hit Ctrl + X, Y, and Enter to save the changes.
<VirtualHost *:80>
    DocumentRoot /srv/www/wordpress
    <Directory /srv/www/wordpress>
        Options FollowSymLinks
        AllowOverride Limit Options FileInfo
        DirectoryIndex index.php
        Require all granted
    </Directory>
    <Directory /srv/www/wordpress/wp-content>
        Options FollowSymLinks
        Require all granted
    </Directory>
</VirtualHost>
Enable the WordPress site configuration so Apache can serve it by running these commands:
sudo a2ensite wordpress
sudo a2enmod rewrite
Next, disable the default Apache site so your web server will display the correct WordPress page by entering this:
sudo a2dissite 000-default
Refresh Apache to ensure all changes are applied properly:
sudo service apache2 reload
5. Set up the MySQL database
Set up a new MySQL database for your WordPress site to store and fetch user data. To do so, enter the SQL shell using the default root account by running:
sudo mysql -u root
Then, create a new database. In this tutorial, we will call it wordpress:
CREATE DATABASE wordpress;
Set up a new user for the wordpress database. Remember to replace your-password with the actual credential:
CREATE USER wordpress@localhost IDENTIFIED BY 'your-password';
Grant the user permission to access and modify the database by running the following:
GRANT SELECT,INSERT,UPDATE,DELETE,CREATE,DROP,ALTER ON wordpress.* TO wordpress@localhost;
Flush the database privileges to apply the changes:
FLUSH PRIVILEGES;
Exit the SQL shell using this command:
quit
6. Configure phpMyAdmin
In addition to MySQL, we will also install phpMyAdmin, a database administration panel that offers a graphical user interface to simplify management tasks. To do so, run:
sudo apt install phpmyadmin
Hit Space to check Apache as your web server and confirm using Enter. Then, set the phpMyAdmin panel password. After completing the configuration, enable the PHP Mbstring extension using this command:
sudo phpenmod mbstring
Restart Apache to apply the changes using this command:
sudo systemctl restart apache2
Now, log in to MySQL root account by entering the following. Enter the password you created during the phpMyAdmin installation:
sudo mysql -u root -p
Then, run the following command to grant phpMyAdmin privilege to enable database connection:
GRANT ALL PRIVILEGES ON *.* TO 'phpmyadmin'@'localhost';
Flush the privileges to refresh the configuration and enter quit to close the MySQL shell. To check whether phpMyAdmin is configured correctly, enter the following address in your web browser:
http://domain.tld/phpmyadmin
Remember to replace the domain with the actual value. On the login page, enter phpMyAdmin as the username and use the password you set during the panel installation.

Important!
If you encounter the “URL not found” error, run sudo dpkg-reconfigure phpmyadmin to rerun the installation and tick Apache by pressing space. Meanwhile, ensure you assign the correct user to the MySQL database if facing login issues.
7. Complete the WordPress setup wizard
The last step is to complete the WordPress setup from your web browser. Visit the following address with domain.tld being your actual domain name:
http://domain.tld/wp-admin
Click Let’s Go, and WordPress will ask you to enter information about your database. Enter the credentials you have created in the previous steps, but leave out the host and prefix fields. Click Submit once finished.
In the next screen, hit Run the installation. Enter information about your WordPress username, password, site title, and admin email address. Ensure you uncheck the “Discourage search engines from indexing this site” to make your website discoverable on the search engine result pages.
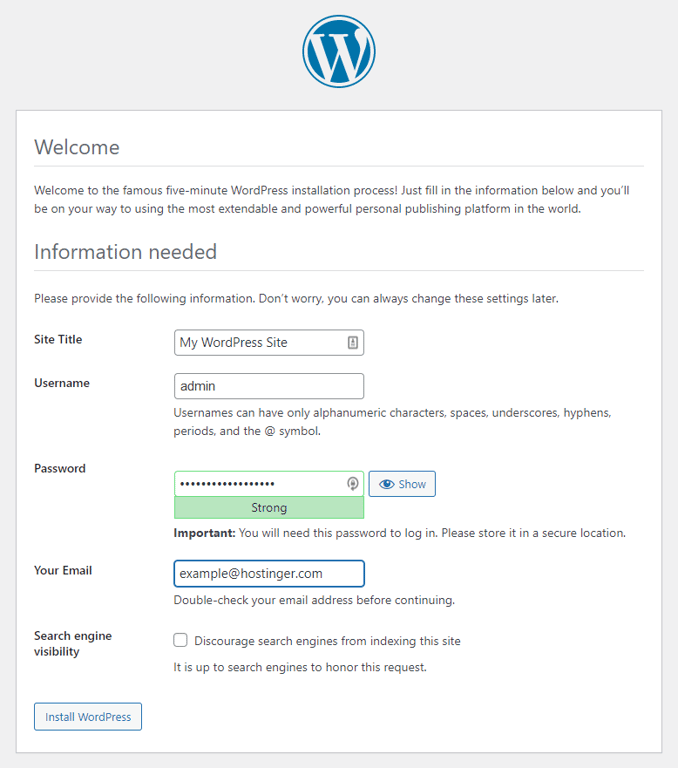
Click Install WordPress to proceed with the setup. Once finished, click Log in on the confirmation screen and enter your account credentials to access the WordPress dashboard. That’s it! You can now start creating your website using the CMS.
Conclusion
Hosting WordPress on a VPS provides more flexibility over dedicated CMS hosting since you can choose different web servers and database solutions. However, installing it can be difficult due to the need for commands.
Hostinger VPS users can easily install WordPress on an Ubuntu server without commands by selecting the WordPress template in hPanel’s operating system menu. Then, visit the VPS hostname followed by /wp-admin to access the dashboard.
Another method is to configure WordPress with LAMP stack using commands. After connecting to your server via SSH, install all the dependencies, including the Apache web server and MySQL database.
Once the web stack is set, download the WordPress installation and unpack it. Configure Apache and visit your domain name followed by /wp-admin to initiate the setup wizard.
How to Install WordPress on Ubuntu FAQ
Can I Install WordPress on Ubuntu Without Using the Command Line?
Yes! Hostinger users can install WordPress on Ubuntu without commands using our operating system template. To do so, log in to hPanel and manage the VPS in question. Navigate to the operating system configuration menu and select the WordPress template.
How Do I Secure My WordPress Site on Ubuntu?
Apply robust safety measures on your VPS, including enabling a firewall, installing SSL, and setting up Fail2Ban. To secure WordPress, install plugins like Wordfence, avoid untrusted extensions, regularly update the core files, and set up a blocklist.
How Can I Access My WordPress Site After Installation?
To access your WordPress site after installation, simply visit your VPS domain in a web browser. If you haven’t completed the setup wizard, add /wp-admin at the end of the URL. If you have finished the setup, using /wp-admin will open the WordPress dashboard page.

Aris is a Content Writer specializing in Linux and WordPress development. He has a passion for networking, front-end web development, and server administration. By combining his IT and writing experience, Aris creates content that helps people easily understand complex technical topics to start their online journey. Follow him on LinkedIn.