How to modify the PHP max upload size
Mar 09, 2026
/
Edvinas B. & Prasasti P.
/
3 min Read
When you try running a script, plugin, or uploading large files to your website, you might encounter an error. One of the possible causes of this issue – the upload exceeds the default maximum file size configuration on your web server.
In this article, we will show you three easy ways to increase the size limit by modifying the PHP maximum upload size.

Why Change the PHP Max Upload Size
The default maximum upload file size may vary depending on your hosting provider, usually staying around 128 MB. While this is typically enough for audio or picture files, you may encounter an error when uploading large files such as long videos.
If your site consists mainly of such content, you might want to increase the upload file size limit for more flexibility. On the other hand, you may wish to decrease the PHP max post size if you have limited storage.
How to Change the Maximum Upload Size for PHP Scripts
There are several methods to modify your site’s maximum upload file size, and they may vary depending on your circumstances and preferences. Users can change PHP parameters by using the PHP configuration menu on their hosting control panel or manually modifying specific scripts that handle file uploads.
In most cases, you can change the PHP maximum file size limit by editing the php.ini file. If you are using a shared or cloud hosting plan, you’ll want to modify the .htaccess file instead.
Warning!The PHP max post size can only be increased up to your hosting plan’s PHP memory limit. Take a look at the table below to know the PHP memory limit for your Hostinger hosting plan.
Let’s take a look at three easy ways to edit your PHP settings and adjust your upload file size limit.
Option 1. Changing Maximum Upload File Size via hPanel
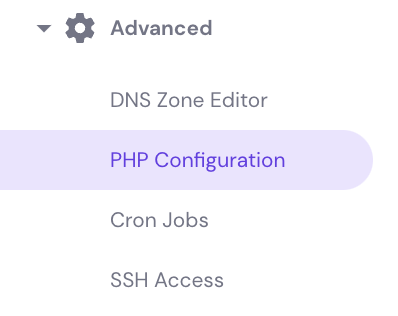
- To modify file upload limitations in Hostinger’s hPanel, click Manage on the Hosting panel and look up PHP Configuration in the Advanced section.
- Open the PHP Options tab. Users can change various limits and parameters on this page, including max execution time and memory limit.

- To change the maximum size for uploaded files, search for the uploadMaxFilesize field. Choose your desired data size from the drop-down menu. In the example below, the default size is set to 512 MB.

- Another option you might want to change here is postMaxSize. It controls the maximum size of files uploaded using the POST method.

- Don’t forget to click Save at the bottom right corner of the page after you finish editing the settings.
Important! Note that the postMaxSize should always be larger than uploadMaxFilesize to avoid errors when uploading data.
Option 2. Altering PHP Parameters Using cPanel
- Access your cPanel dashboard and find Select PHP Version in the Software section. In this menu, users can change their PHP version, choose which extensions to activate, and change other PHP-related settings.

- Click the Options tab and search for post_max_size and upload_max_filesize. Choose your desired file upload limits from the dropdown menu.

Option 3. Changing PHP Post Max Size via the .htaccess File
- To change your post size limits using PHP scripts, navigate to File Manager in your hPanel.
- Open the public_html folder and find .htaccess.

- Open the file and insert the following PHP scripts:
php_value upload_max_filesize  XXM
php_value post_max_size XXM
- Change the “XX” into your desired size.
- Once you’re done with the configuration, click Save & Close.
Pro Tip
You can also edit .htaccess via an FTP client like FileZilla. If you can’t find the .htaccess file, configure your control panel or FTP client to display hidden files.
How to Check the Maximum File Size Value
After changing the settings of your uploaded file size limits, we need to confirm them with the phpinfo() function to ensure they’re already implemented on the system. Simply create a new PHP file in the public_html directory of your site and insert the following PHP code:
<?php
    phpinfo();
     phpinfo();
You can name the file anything you want. In this example, we named it phpinfo.php. To access the file we just created, just add /phpinfo.php at the end of your site’s domain. It may look like this: http://yoursite.com/phpinfo.php.

You’ll see two columns — local value and master value. Local values are set within .htaccess and override the master values which are set within the php.ini file. Pay no mind to the master values and seek the local values for upload_max_filesize and post_max_size instead.
If the local values of both parameters are the same as you configured, you have successfully changed your website’s PHP file size limits.

Conclusion
By modifying PHP settings on your web server, you may no longer encounter errors during file upload processes. This method lets you submit larger files to the web server by increasing the default limit for uploads. Alternatively, you can decrease it to reserve storage space.
If you have questions or other tips and tricks about this topic, leave them in the comment section below.

Edvinas is a professional mentor and trainer of customer support agents. When he's not teaching the secrets of providing exceptional service, he likes to travel the world and play basketball.

Pras has a background in IT education and experience as a website administrator, he hopes to share his knowledge with other tech enthusiasts. In his free time, Pras likes to play video games.


Comments
21 responses