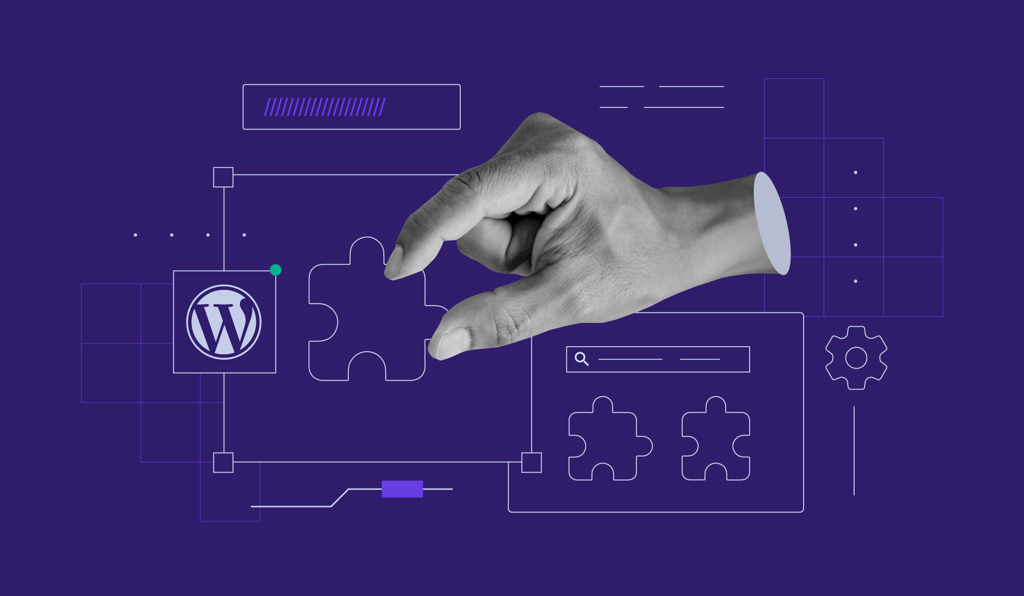
How to create a WordPress staging site using hPanel, A plugin, and a subdomain
Mar 09, 2026
/
Nadia & Marco C.
/
9 min Read
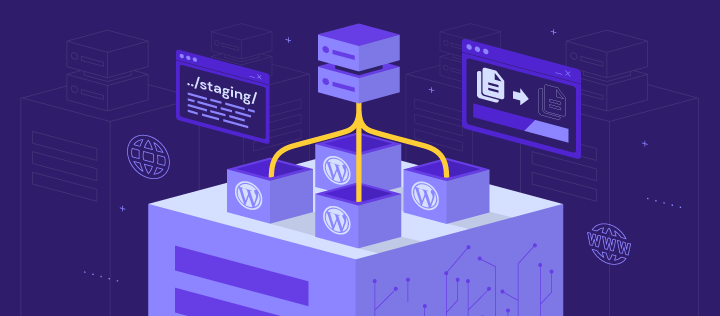
WordPress websites have a significant advantage – the possibility of creating a staging site for testing changes and updates before going live. As a duplicate of your live site, a staging environment lets you experiment with different designs, plugins, and content without affecting the user experience.
In this WordPress guide, we’ll cover three methods to create a staging site ‒ using Hostinger’s built-in staging tool, a staging plugin, and a subdomain website clone. We’ll also share tips for using and removing the staging site after updating your live WordPress site.
For those new to testing environments, we’ll go over their benefits and how they help enhance your website’s performance and user experience at the end of the article.
What Is a WordPress Staging Environment?
A WordPress staging environment is a private, test version of your entire site. With a staging website, you can safely test changes privately before implementing them on the live website.
How to Set up a WordPress Staging Environment
Regardless of your preferred method, keep in mind that publishing the staging content replaces files and databases on your original site. Back up your entire WordPress website before deploying staging changes to avoid any potential data loss.
Hostinger users can create and manage website backups in hPanel via Files → Backups. If your web host doesn’t have a backup feature, various backup plugins are available to secure your data.
How to Create a WordPress Staging Environment Using Hostinger’s Staging Tool
Hostinger’s WordPress Business and cloud hosting users can create staging sites from hPanel, their hosting account’s dashboard. This method is beginner-friendly, as you don’t need to install additional tools.

1. Setting up the Staging Site
Let’s start by creating a staging site on Hostinger’s hPanel:
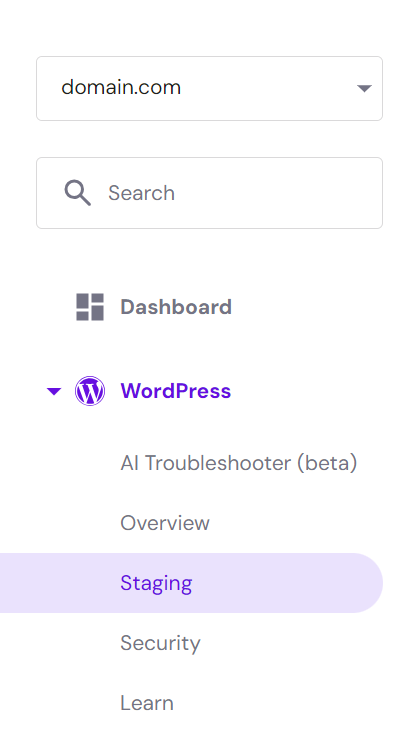
- Navigate to WordPress → Staging from your hosting control panel.
- In the Staging tab, select the Create staging button.

- Enter the subdomain name for the staging site and click Create.

- The duplication process can take up to 15 minutes, depending on the size of the production website. Hit the Close button to dismiss the confirmation message.
- Once done, scroll down to the staging site list and click Manage staging next to the newly created environment.

- In the staging dashboard, select Staging Admin Panel to access the WordPress admin area and start making changes.

2. Deploying the Changes to the Production Site
After making all the necessary changes, follow these steps to deploy them to the live website:
- On the staging site list, click the three dots icon next to the recently modified staging site and hit Publish.

- Read the disclaimer and hit Publish to confirm. The process may take around 15 minutes to complete.

- Our WordPress staging tool automatically backs up your entire WordPress website. Click the three dots icon and hit Revert to roll back to the pre-staging version if needed.
Did You Know?
Our WordPress web hosting plans feature an IP manager, WP-CLI and SSH access, and automatic backups, offering enhanced data safety and complete control over your test environment.
How to Create a WordPress Staging Environment Using the WP Staging Plugin
If your hosting provider doesn’t have a staging feature, you can create a WordPress staging website using a plugin. Luckily, many staging plugins are available to ease your work as a site owner.
In the following section, we’ll use the free version of WP Staging, one of the most popular WordPress plugins for streamlining staging and backups. However, pushing changes to the live site is a Pro feature. To get it, purchase WP Staging’s premium plan starting at $8.08/month.
After installing and activating the WordPress plugin, follow these steps to create a staging site:
- Navigate to the WP Staging tab from the WordPress dashboard and click the Create Staging Site button.

- Enter the site name to create a custom staging site URL. In this example, the staging site URL will be https://domain.tld/staging.

- The WordPress staging plugin automatically clones your live site’s data into the staging environment. Expand the Database Tables and Files sections to select items for duplication, streamlining the staging process. Otherwise, go with the default settings.

- Select Start Cloning and wait for a few minutes for the process to complete.
- If the cloning process is successful, you’ll receive a confirmation message with the staging site URL. Click Close to dismiss it.

- Return to WP Staging → Staging Sites and select Actions → Open to access the newly created staging site with your admin credentials.

How to Create a WordPress Staging Environment Manually Using a Subdomain
The manual method demands more technical expertise and time than using a staging tool. However, it provides full control over staging, enabling testing of custom codes or complex site setups within a tailored environment that mirrors the live site.
This guide will cover how to create a WordPress staging site manually using Hostinger’s File Manager.
1. Creating the Subdomain
Setting up a WordPress staging site in a subdomain ensures safer changes as it’s separate from the production website. Here’s how to do it:
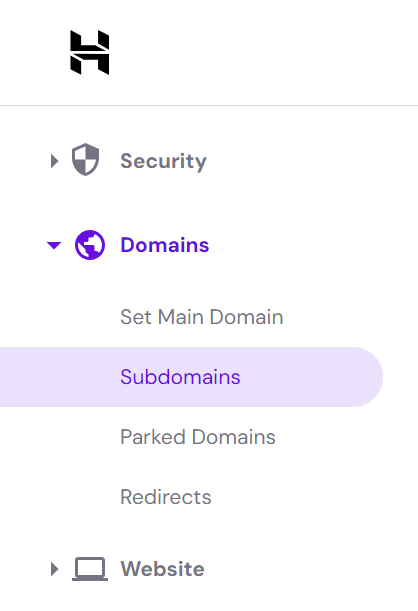
- Go to Domains → Subdomains from the hPanel dashboard.
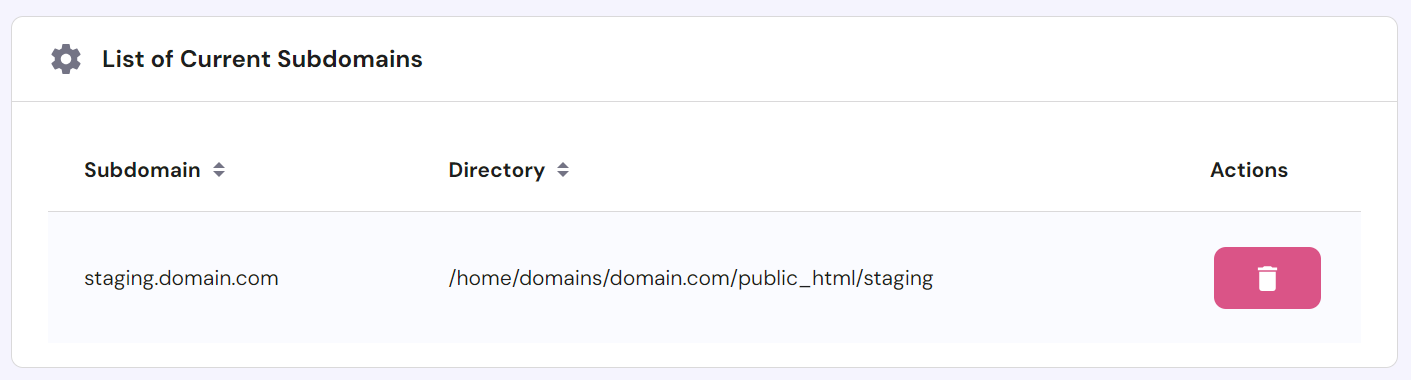
- Enter the subdomain name. This step creates a new folder in the public_html directory. Alternatively, check the Custom folder for subdomain option to create a new subdomain folder with a custom name. Click Create.
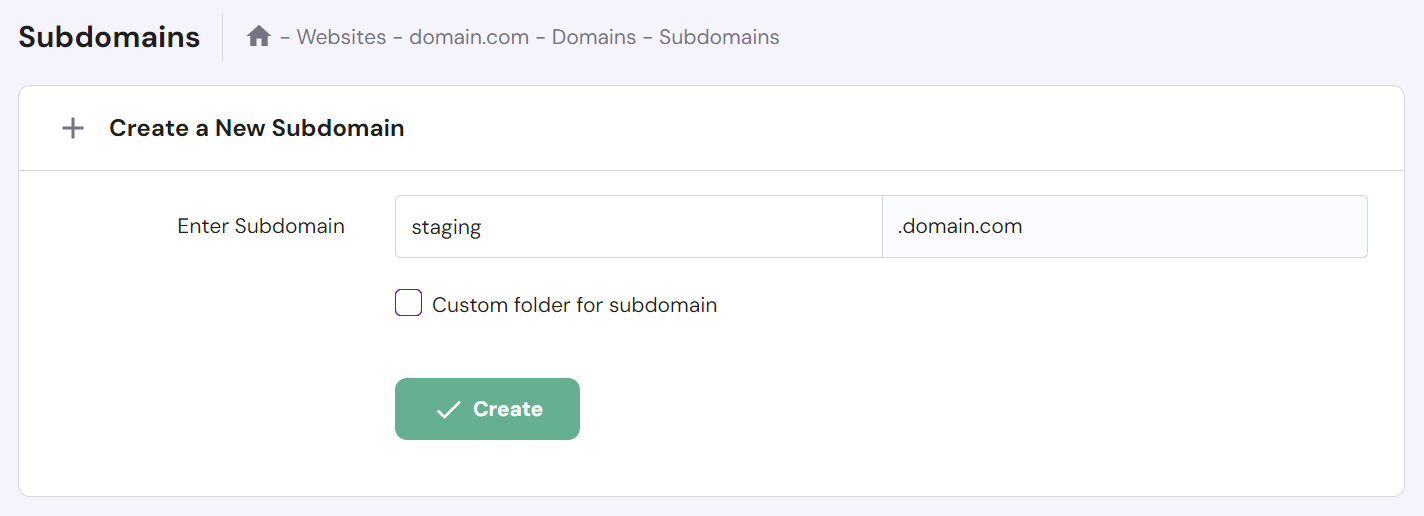
- The new subdomain will appear in the List of Current Subdomains section.
2. Copying the Website Files
The next step is to populate the new subdomain with your WordPress site’s files. You can copy the live site files using your hosting provider’s file manager or an FTP client like FileZilla.
Follow these steps to duplicate the live site files using Hostinger’s File Manager:
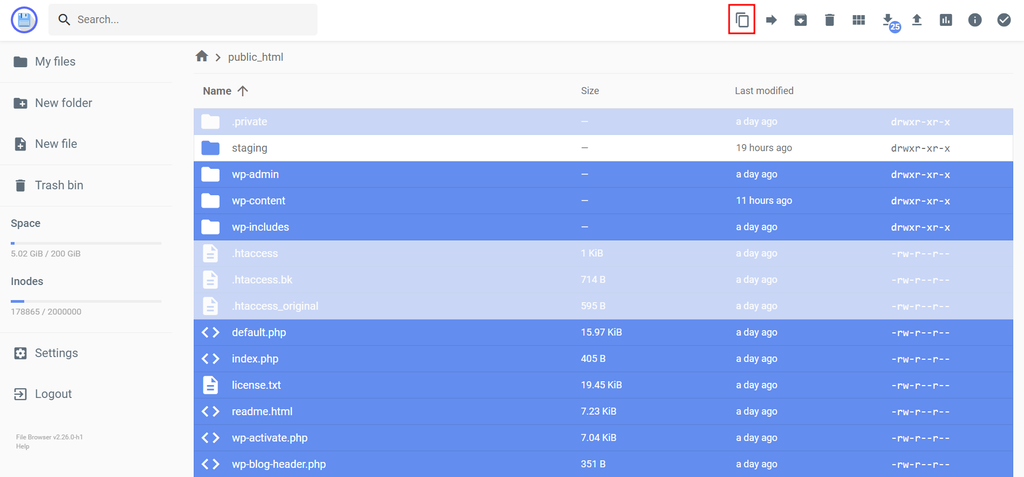
- Head to Files → File Manager from hPanel, and choose Access files of [your live site].

- Double-click public_html, the root directory, to access it.
- Copy all folders and files to the subdomain folder. The simplest method is to press Ctrl + A in Windows or Command + A in Mac, deselect the subdomain folder, and click the Copy file icon on the top toolbar.
3. Cloning the Database
After duplicating your WordPress files, do the same to the existing database.
Here’s how to clone your WordPress database using phpMyAdmin, a popular administration tool for MySQL databases:
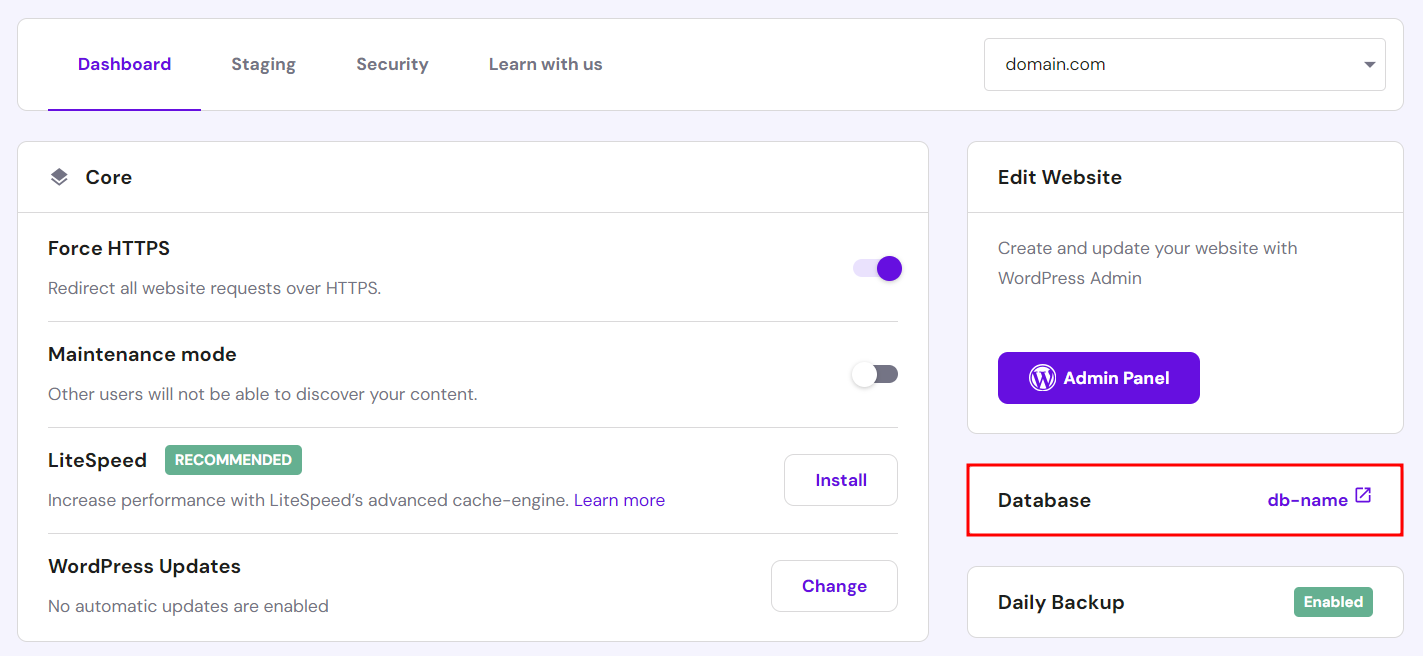
- Navigate to WordPress → Overview from hPanel. Open the Dashboard tab and check which database your main website is using.
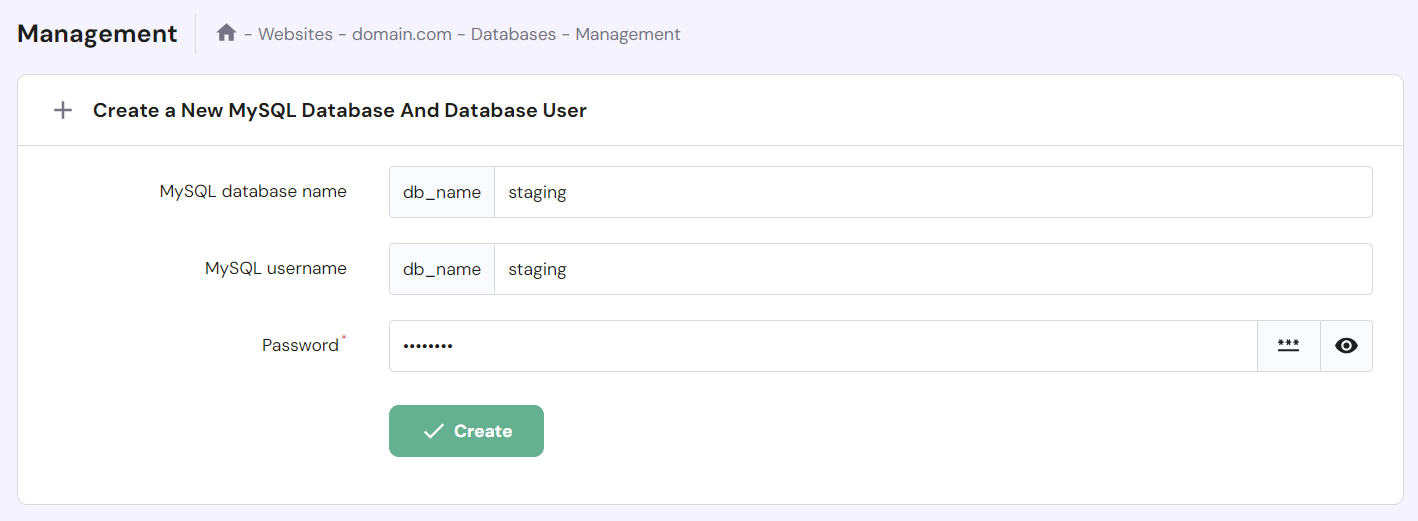
- Head to Databases → Management from hPanel and create a new database for the staging site. If the process is successful, the new database will appear in the List of Current MySQL Databases And Users.
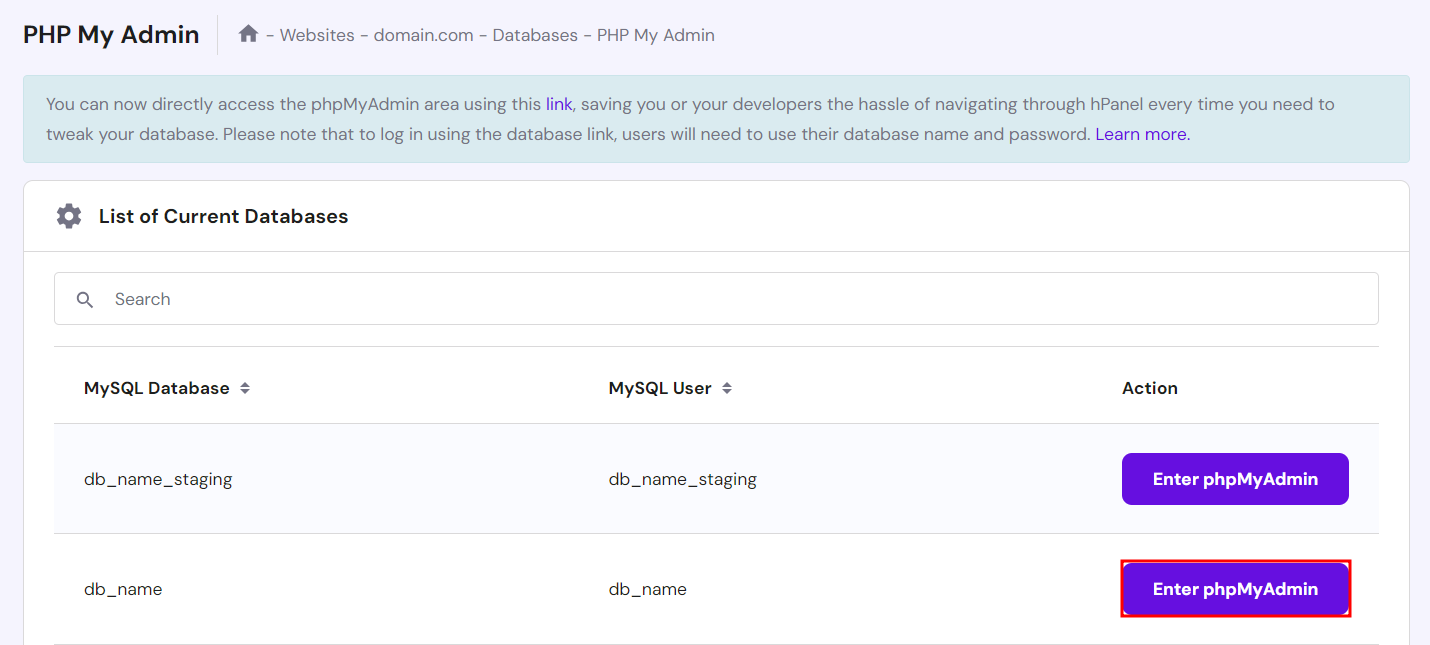
- Access Databases → phpMyAdmin and click Enter phpMyAdmin next to your live site’s database.
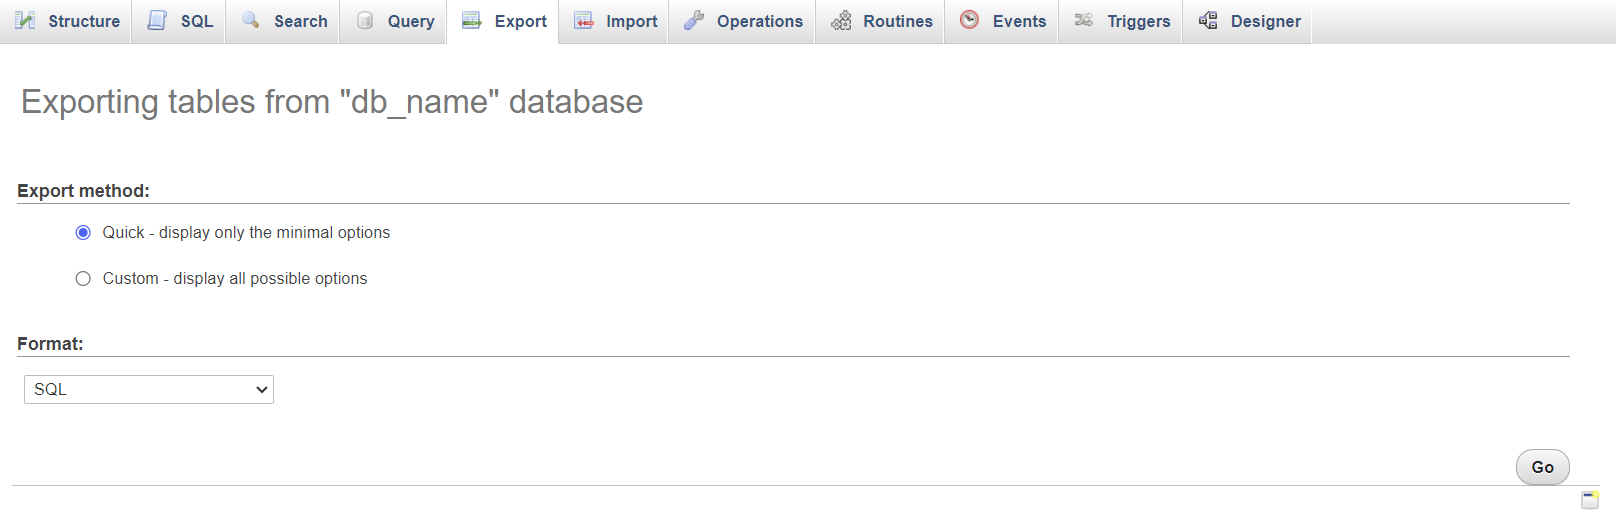
- Once hPanel redirects you to phpMyAdmin, open the Export tab and hit Go. Using default settings lets you download the database in SQL format to your computer.
- Return to the phpMyAdmin section in hPanel. This time, select Enter phpMyAdmin next to your staging database.
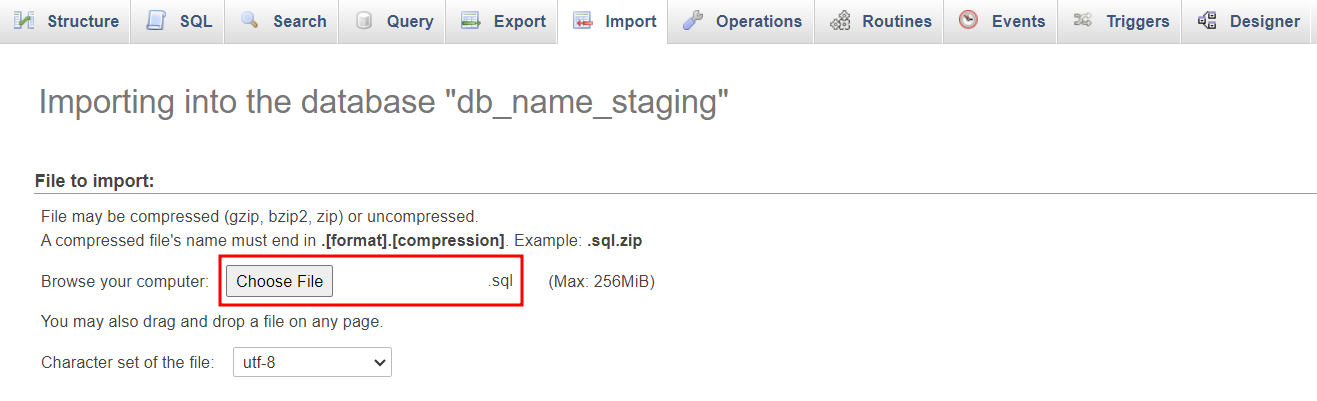
- Inside phpMyAdmin, open the Import tab and select the downloaded SQL file. Keep the default settings and hit Go.
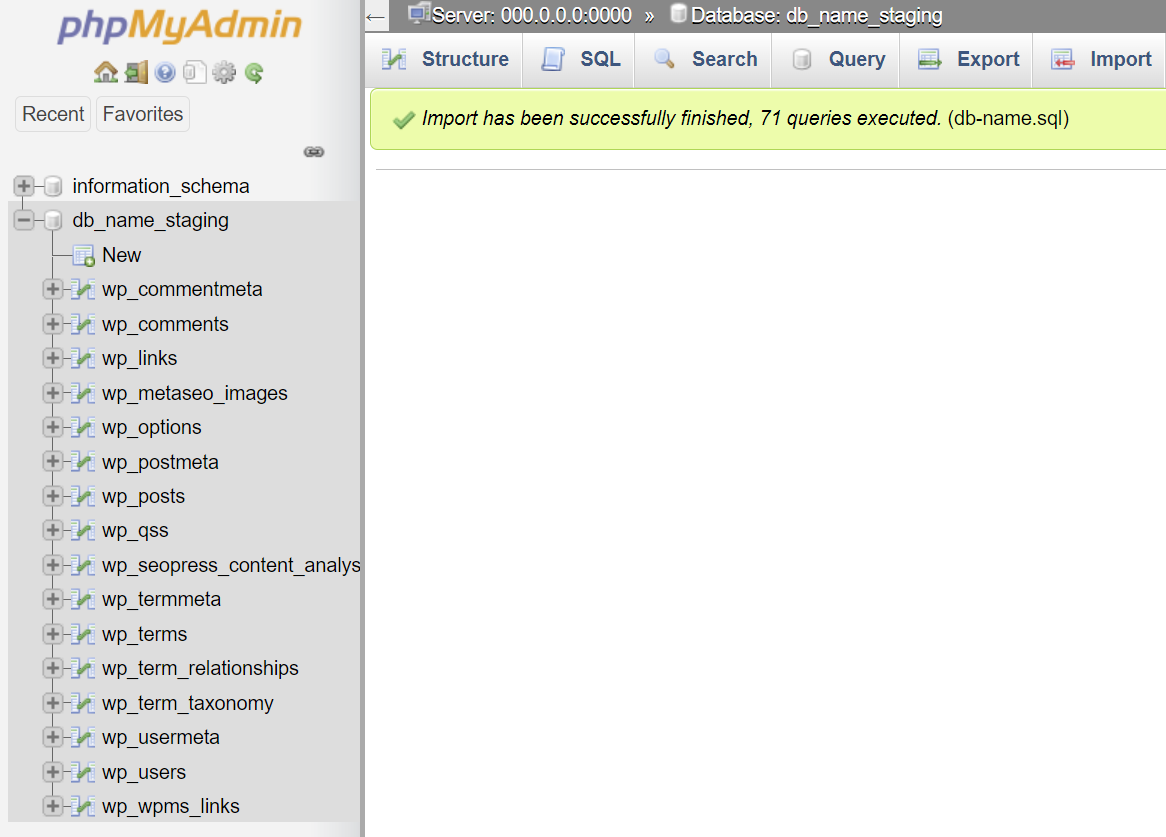
- If the import process is successful, a confirmation message will appear along with the database tables on the sidebar.
4. Configuring the Subdomain’s wp-config.php File
Now that you have a separate database for testing, connect it to your new staging site in the subdomain. You can do so by modifying the wp-config.php file, a core element of your WordPress installation that stores database information.
Follow these steps to establish a new database connection in the wp-config.php file:
- On File Manager, open public_html → staging → wp-config.php.

- Scroll down until you find a line of code that says Database settings – You can get this info from your web host. Add the following code above it:
define('WP_HOME','http://staging.domain.tld');
define('WP_SITEURL','http://staging.domain.tld');
Remember to change the staging.domain.tld placeholder to your staging subdomain.

- Change DB_NAME, DB_USER, and DB_PASSWORD values to match your staging site’s database information and credentials. Once you’re done, click the Save icon.

You can now use the staging environment.
5. Deploying the Changes to the Production Site
This step involves importing the staging site’s database and files to the production environment.
Since you can only import into an empty database, clear the live site’s database first. After backing up the original site’s database using phpMyAdmin’s export feature, follow these steps:
- Export your staging site’s database via Databases → phpMyAdmin.
- Open your live site’s database in phpMyAdmin.
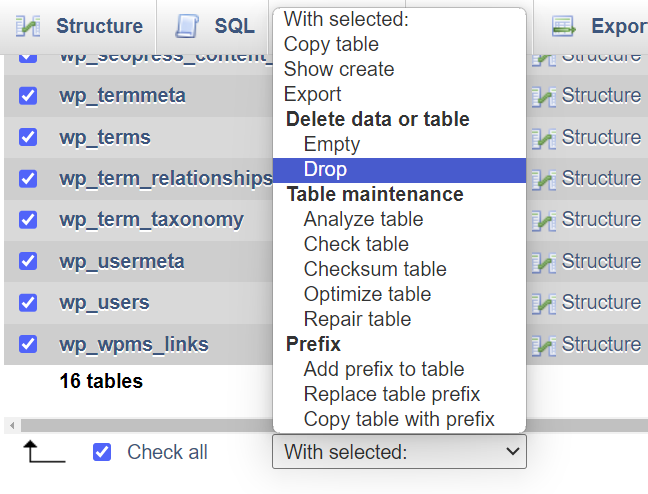
- In the Structure tab, tick the Check all box under the list of tables and choose Drop from the dropdown field next to it. Select Go to remove all tables from the database.
- Import the staging site’s database file to the live site.
For your website files, copy everything except wp-config.php from the staging folder to the public_html folder using File Manager.
How to Delete a Staging Site
Many WordPress users like the convenience of having staging sites ready at all times. However, deleting a staging site post-update can conserve server resources and streamline website management, focusing your efforts on the production environment.
Here’s a guide to removing a staging site, depending on how you created it:
Deleting a Staging Site in Hostinger’s Staging Tool
- Head to the staging site list in hPanel and locate the website you want to remove.
- Select the three dots icon and hit Delete.

- Read the disclaimer and select Delete to confirm.
Deleting a Staging Site in the WP Staging Plugin
- Head to WP Staging → Staging Sites from the WordPress admin dashboard and locate the website you no longer use for testing.
- Click Actions → Delete next to the chosen staging site.

- Select all the staging database tables and files you want to remove, then click Delete.

Deleting a Manual Staging Site in the Subdomain
- Delete the staging folder from the public_html directory via File Manager.

- Head to the List of Current MySQL Databases And Users in hPanel through Databases → Management. Click the three dots icon next to your staging database and choose Delete. Read the disclaimer and hit Confirm Delete.

- Access the List of Current Subdomains via Domains → Subdomains. Select the Delete icon next to the staging subdomain you no longer use. Read the disclaimer and hit Delete to confirm.

Helpful Tips for Working With a WordPress Staging Site
Here are some of the best practices to ensure a smooth and secure web development process:
- Restrict access to your staging site. Allowlist your IP address and those of relevant team members to protect the staging environment from external threats. Alternatively, block all access except yours by adding the deny from all command in your .htaccess file.
- Use different databases for production and staging sites. This practice prevents staging tests and changes from impacting your production site, avoiding accidental data overwrites or conflicts between the two environments.
- Clear cache before deploying changes. As caching can sometimes present an outdated version of your site, flushing them out forces the site to reload to show recent changes.
- Sync staging and live WordPress sites regularly. Conducting tests and developments on your live site’s current version ensures accurate results.
WordPress Staging vs Local Development Environments
Staging sites and local development environments serve different roles in website development and maintenance, so it’s crucial to choose the right one for your needs.
In this article, we focus on staging environments, which replicate your live site for safe update testing in an environment that closely mirrors the live setting. They’re perfect for conducting final checks before implementing changes, ensuring that everything works without any errors or downtime.
In contrast, local WordPress environments run offline on your computer. They’re best for early development phases, extensive coding work, and testing significant changes without incurring server costs or needing internet access.
If you aim to become a WordPress developer, a local staging environment can serve as your sandbox for hands-on learning. It lets you build and test sites under various conditions anytime, anywhere, without internet connectivity ‒ providing a cost-effective way to sharpen your skills.
See our tutorial on installing WordPress locally for detailed methods and steps.
Reasons to Use a WordPress Staging Site
You know that a WordPress staging site enables development and testing without impacting the live website. If you need more convincing, let’s dive deeper into the benefits of staging.
WordPress Core Updates
Implementing WordPress core updates is crucial for security, performance, and accessing new features. However, these updates can sometimes lead to site crashes, especially if there are compatibility issues with outdated plugins or themes.
Using a staging website lets you identify and resolve any conflicts or issues before affecting your live site. It helps prevent downtime and ensure site reliability during major updates.
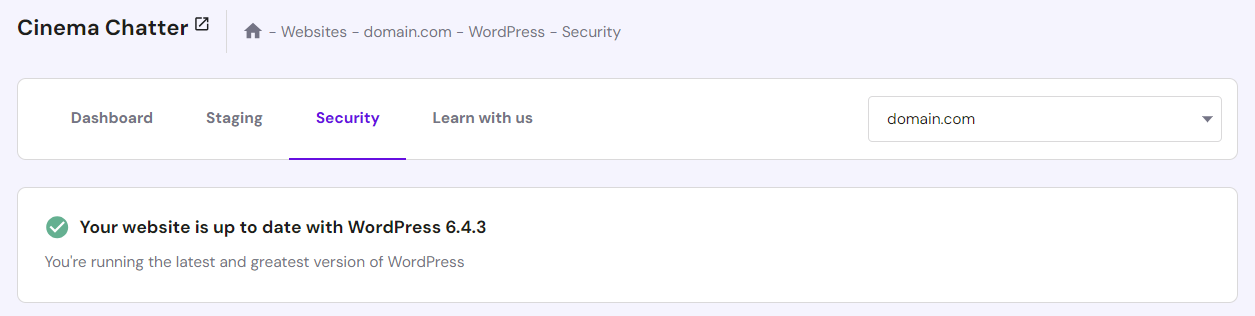
If you want to double-check your WordPress version, head to WordPress → Security from hPanel. Note that the location of this information varies depending on your web host.
WordPress Design and Functionality Customization
Integrating custom code into core files, themes, or plugins is crucial for scaling a WordPress site. However, making these changes directly on a live site carries the risk of errors or functionality issues.
A staging website provides a safe environment to test and refine these customizations without affecting the live site. This way, you maintain your site’s stability while freely experimenting with new features.
Plugin and Theme Testing
Testing plugins and themes in a staging website lets you safely assess their impact on your live site without risking its stability. This process helps identify compatibility issues, performance drops, or visual inconsistencies before they go live.
Additionally, developers can use staging to thoroughly test and refine their new plugins or themes, fixing bugs before the public release.
Conclusion
Creating a staging WordPress site enables you to test new features and designs safely. This feature promotes innovation and practical learning, as well as improves your security by preventing errors and downtime on the live site.
Let’s recap three effective methods for setting up your own WordPress staging site:
- Using Hostinger’s staging tool ‒ the easiest and fastest of the three, as it only takes a few clicks to complete without installing additional features.
- Using a WordPress plugin ‒ ideal for users without a staging tool on their hosting control panel. Several staging plugins offer a free version with varying features.
- Manually in a subdomain ‒ takes more time to set up but provides more flexibility and control over the staging environment.
We hope this article helped you learn how to set up a WordPress staging site for testing purposes. If you have any questions, check out the FAQ section or leave a comment below. Good luck!
WordPress Staging FAQ
This section answers some of the most common questions about WordPress staging sites.
What Is the Difference Between Staging and Production in WordPress?
In WordPress, the staging environment is a test area mirroring the production site for safe experimentation and testing. Meanwhile, the production environment is where the live website operates, implementing changes for all visitors to see.
Is the WordPress Staging Tool Necessary?
A WordPress staging tool benefits users of all levels by providing a secure platform to test changes without impacting the live site. It ensures all changes stay private until you decide to push them to the live or production environment, significantly reducing the risk of errors or downtime.
How Do I Synchronize Staging and Production in WordPress?
Most staging tools by hosting providers or plugins feature a one-click synchronization option, making it easy to push changes from staging to production. If your chosen tool lacks this feature, manually transfer files and database tables to the live site.

Maya is a Content Specialist and WordPress Contributor. With years of journalistic experience under her belt, her main goals are to help people understand complex processes in a simpler way, and tell the stories of people who thrive thanks to technology. When she’s not writing, you can find her watching sci-fi movies while eating ramen. Follow her on LinkedIn.

Marco Chiesi is the Head of WordPress at Hostinger, with over 20 years of experience as a software engineer in the web industry. He specializes in open-source technologies and the WordPress ecosystem, where he has contributed in different areas: Plugin Developer (with over 10 million downloads), WordCamp speaker and organizer, Meetup organizer, Translator, and Core Contributor. He is passionate about leading his team to create innovative solutions for Hostinger's web hosting product, which hosts over 5 million WordPress installations. Follow him on LinkedIn.
Comments
16 responses