How to transfer a domain from Namecheap to Hostinger in 2026
Mar 10, 2026
/
Akshay K. & Klaudijus J.
/
6 min Read
If you aim for advanced features, cost-effective plans, or a more intuitive user experience, Hostinger is a great alternative to Namecheap.
In case you have already migrated your website from Namecheap to Hostinger, it’s only fitting to transfer the domain as well and use all the services in one platform.
Transferring your domain from Namecheap to another website hosting service doesn’t need to be daunting. This detailed domain migration guide from Namecheap to Hostinger will help you seamlessly switch hosting providers.
Download guide to using Hostinger
How to transfer a domain from Namecheap to Hostinger
Here are the steps to migrate your domain name to Hostinger:
Suggested Reading
Before moving any further, check out our article on what a domain name is to understand this tutorial better. If you don’t have a domain, refer to our guide on how to buy a domain name in 6 simple steps.
1. Prepare Your Domain Name for Transfer
Before making a domain transfer request, it’s important to take a few preparatory steps. Doing so ensures a smooth and successful domain transfer process.
Ensure domain eligibility
First, confirm that your domain name has been with Namecheap for at least 60 days. Domains registered or transferred recently cannot be moved again within this period.
Furthermore, ensure that your domain’s status is active and hasn’t expired. If it’s close to its expiry date, consider renewing the domain name first to prevent potential transfer process issues.
Gather necessary information
Before the process, it is essential to have all the domain transfer essentials. One of the most important details is the authorization code, often referred to as the EPP code.
This unique code is specific to each domain and acts like a password that prevents unauthorized transfers.
Here’s how you can retrieve the domain transfer authorization code from Namecheap:
- Log in to your Namecheap account and click on Domain List in the left-hand sidebar.
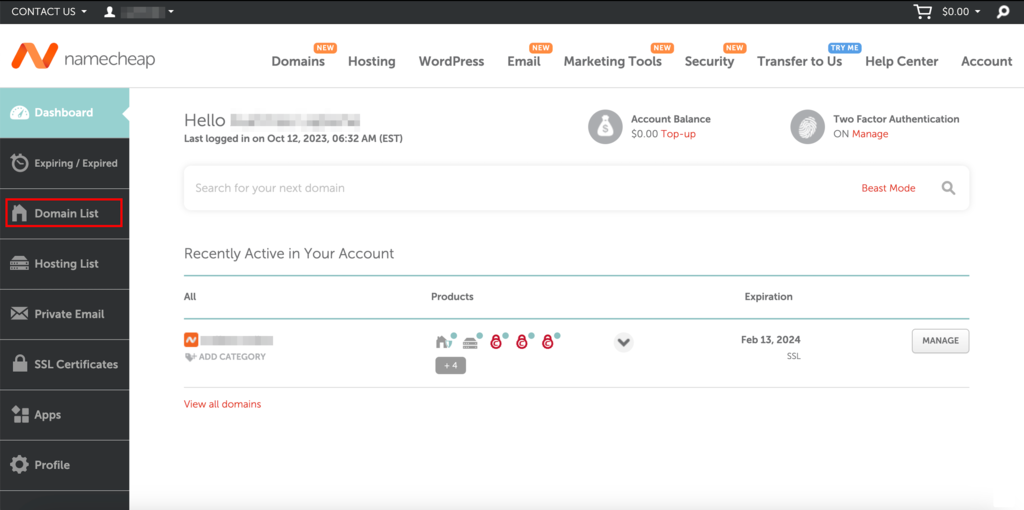
- Locate the intended domain name in the Domain List window and click on Manage.
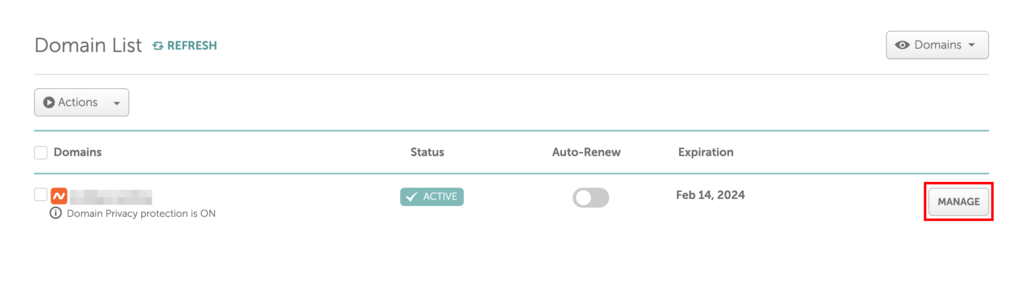
- In the next window, click on Sharing & Transfer.

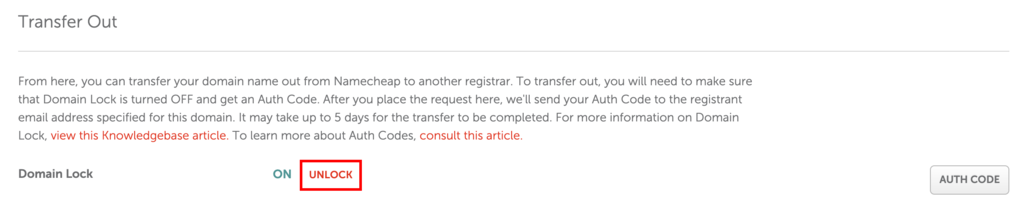
- Inside the Sharing & Transfer tab, scroll down to the Transfer Out section and click on the AUTH CODE button to request an EPP code.

- In the new dialog box that opens, select the reason you’re switching domain registrars and click on Send Code.

Once all the steps are complete, Namecheap will send the EPP code to the registrant’s email address associated with the domain name.
2. Unlock your domain
To start initiating the transfer, you have to unlock your domain name at Namecheap first.
Here’s a clear step-by-step guide on how to do so:
- Head to Domain List inside the Namecheap dashboard and click on the Sharing & Transfer tab.
- Scroll down to the Transfer Out section at the bottom of the tab to locate the Domain Lock area.
- By default, the domain lock is turned on. Click UNLOCK to make your domain name available for transfer.
- Next, you need to disable the domain’s WHOIS Privacy by heading to the Domain tab and toggling the WHOIS Privacy switch off.
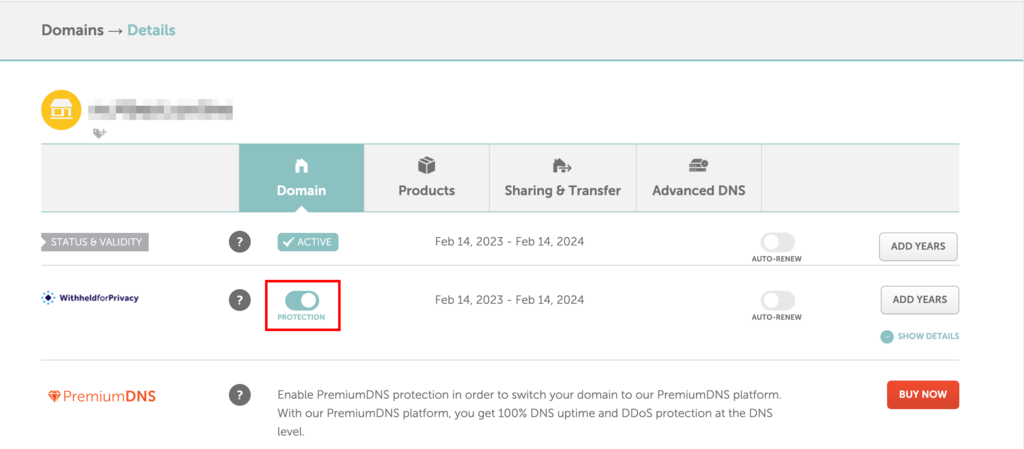
- Namecheap will display a warning after you’ve toggled the switch. Click Yes to disable your domain privacy.
3. Point your domain to Hostinger
Before proceeding with the transfer request, it’s important to update your Namecheap domain’s DNS settings and point it to Hostinger nameservers.
Updating nameservers in advance is vital for reducing downtime during the transfer process. This step ensures a smooth transition to your new domain registrar without hindering your website functionality.
Important! Once you direct your domain to a new hosting provider, the DNS settings can take about 24 hours to update worldwide.
Follow these steps to direct your domain to Hostinger:
Locate Hostinger’s nameservers
Hostinger uses two nameservers for optimal stability and connection. Each nameserver pairs with a specific IP address.
These are the nameservers for Hostinger, along with their IP addresses:
ns1.dns-parking.com (162.159.24.201)
ns2.dns-parking.com (162.159.25.42)
Usually, you’ll just need the nameserver names, but some registrars might also request the IP address.
Update DNS records at Namecheap
- Find the domain you want to transfer on the Domain List and click on Manage beside it.
- Scroll down to the NAMESERVERS area in the Domain tab.
- Select the Custom DNS option inside the dropdown list.
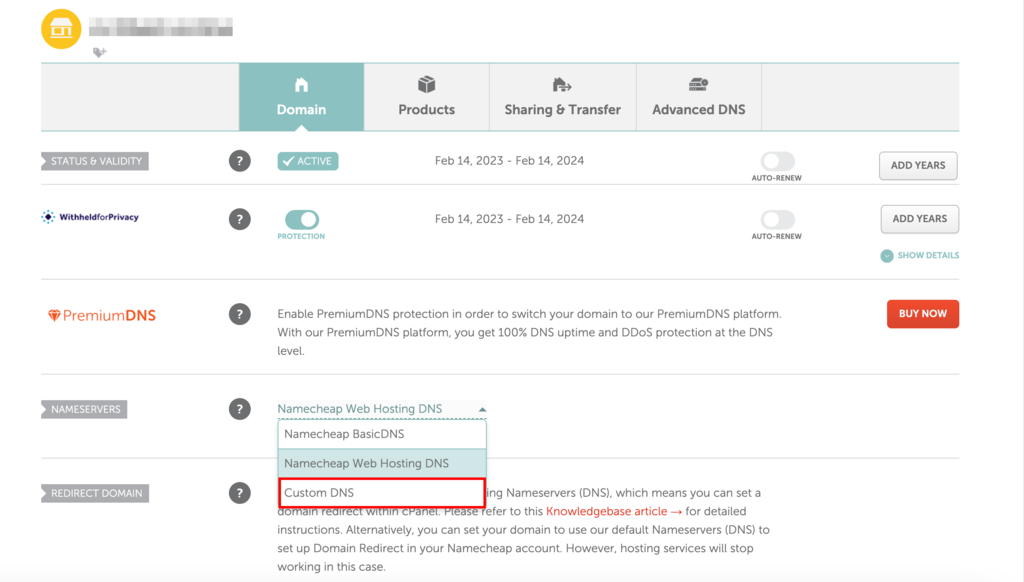
- Enter the Hostinger nameservers in the two fields that appear below.

- Click on the tick mark icon to the right of the area to save the changes.
Warning! If you don't update the nameservers before transferring a domain, you won’t be able to modify your DNS settings until the transfer is complete.
4. Purchase a domain transfer at Hostinger
Hostinger’s domain transfer service is user-friendly. Once logged in, the system guides you through the transfer initiation process, with clear instructions and prompts ensuring a smooth transition.
Here’s a step-by-step guide to purchasing a domain transfer at Hostinger:
- Open the Hostinger website and sign in to your account. If you don’t have it, creating your account will only take a few minutes.
- Once logged in, head to the Domains → Transfers, then click the Transfer to Hostinger button.
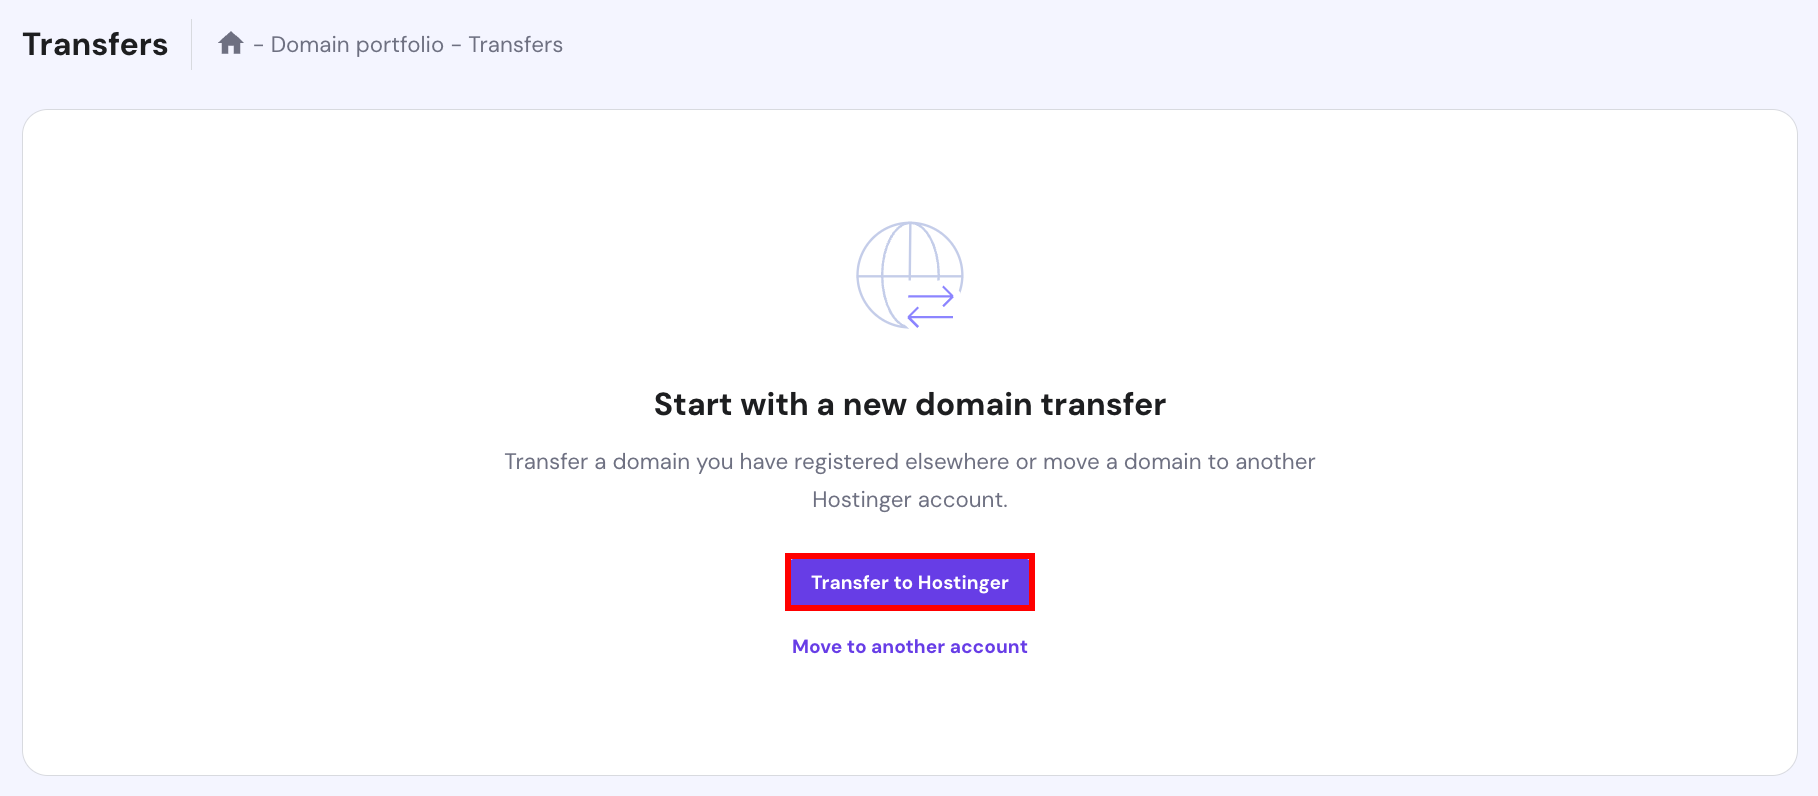
- Enter the domain name you want to transfer from Namecheap along with its top-level domain (TLD) and click Transfer. Ensure you enter the domain extension and name correctly to avoid any discrepancies.

- Provide the EPP code to prove your ownership of the domain.
- Once you’ve filled in all the required details, proceed to checkout. The domain transfer will officially begin after the payment.
5. Initiate the transfer
After you’ve submitted the required EPP code and domain details, Hostinger will send a confirmation email to the domain’s admin address with steps to finalize the transfer.
This process ensures a secure and seamless domain transfer from Namecheap. Note that transfer times can vary due to several factors. During this time, keep an eye on your email and Hostinger account for updates or additional verification requests.
If you encounter any issues or have questions, contact Hostinger’s Customer Success team for a quick resolution. Our Customer Success specialists will address any concerns to ensure a seamless domain transfer process from Namecheap.
6. Ensure the transfer is complete
Once your domain transfer request from Namecheap to Hostinger is successfully completed, ensure that everything is set up correctly. Here’s a checklist to guide you through the post-transfer tasks:
Verify domain ownership
- Review the domain settings within your Hostinger account.
- Ensure the domain details reflect your information accurately.
- For extra security, consider enabling the domain lock to prevent any unauthorized changes or transfers.
Configure email services
If you had email accounts associated with your domain before the transfer, you need to:
- Set up the required mailboxes on Hostinger.
- Configure your email client with the new mail server details provided by Hostinger.
- Verify email delivery by sending a test email to ensure it works properly.
- Migrate emails from the previous email provider to Hostinger.
SSL certificate configuration
- Install or renew the SSL certificate through Hostinger.
- Ensure your website defaults to the secure HTTPS protocol.
Backup and security
Ensure you have recent backups of your website data. Moreover, consider enabling additional security measures, such as two-factor authentication.
Review website functionality
Browse through your website to ensure all pages load correctly, and there are no broken links or missing assets.
Why transfer your domain from Namecheap?
You might consider transferring your domain due to higher-quality services, more competitive pricing, or a better user experience.
Here’s why Hostinger might be a better choice for your needs:
Cost-efficiency
Hostinger offers competitive initial domain registration fees and budget-friendly renewal rates. We aim to help businesses and individuals maintain their online presence without much financial strain.
One-stop solution
Hostinger offers a consolidated platform for domains, web hosting, SSL certificates, and email hosting, streamlining your website management. As a result, you won’t have to juggle multiple platforms.
Suggested Reading
Learn how to choose the best web hosting plan for your needs at Hostinger.
Top-notch support
Hostinger stands out for the expertise of its Customer Success specialists and their quick response times. With 24/7 assistance and multi-lingual support, you’re assured of an effective resolution of your issue.
Seamless renewals
The domain renewal process with Hostinger aims for transparency and simplicity, offering a contrast to other platforms that may introduce unexpected fees or complicated procedures.

Conclusion
Transferring your domain can initially seem like a daunting task, but with the right planning and guidance, the process is straightforward.
This guide simplifies the process of transitioning your domain from Namecheap to Hostinger.
Let’s do a quick recap on the transfer process:
- Prepare your domain for transfer – ensure your domain status is active and it has been with Namecheap for over 60 days.
- Unlock your domain – make your domain accessible for transfer by disabling WHOIS privacy and the domain lock.
- Point your domain to Hostinger nameservers – update the DNS records at Namecheap prior to initiating the transfer process to prevent any service disruptions.
- Purchase a domain transfer at Hostinger – the price might differ depending on your top-level domain.
- Initiate the transfer – respond to Hostinger’s verification emails to ensure a hassle-free migration.
- Ensure the transfer is successful – verify domain transfer, configure email services, and perform other essential checks to guarantee all services run seamlessly.
The steps covered ensure a smooth domain transfer process from Namecheap. If you have any questions about the domain transfer, leave a comment below.
Can I transfer my domain name from Namecheap to Hostinger?
Yes, transferring a domain name from Namecheap to Hostinger is a very straightforward process. You’ll just need to ensure that Domain Lock is disabled for the domain you want to transfer. Then, get the Auth Code for that domain from your Namecheap account, and enter it while you’re enabling the transfer in your Hostinger account.
How long does it take to transfer a domain name to Hostinger?
Moving a domain name to Hostinger usually takes about 5-7 days to complete. If you want to see how it’s going, just head over to hPanel, go to Domains → Transfers, and the status of your transfer will be displayed.
Is a domain name transfer free?
Technically, domain name transfers are usually free, but there will be a charge associated with registering the domain at the destination registrar. This will vary depending on the TLD, and you’ll be able to see and approve the fee during the transfer process.

Akshay is a Senior Content Writer who loves writing about technology. As a Computer Engineering graduate and a certified digital marketer, he aims to make tech easier for everyone. He also enjoys cooking, traveling, and learning new languages. Follow him on LinkedIn.

As Hostinger's Head of Domains, Klaudijus Januitis is a product leader but also a customer advocate ensuring the product meets user needs. He works closely with engineering, design, and marketing teams to develop and adapt the product and ensure alignment between product strategy and company goals. Klaudijus is also skilled in building relationships with registries and resellers to support joint marketing efforts and ensure successful partnerships. Follow him on LinkedIn.