How to make a booking website: A step-by-step guide
May 21, 2026
/
Matleena S. & Miglė C.
/
10 min Read
A convenient online booking system can provide a hassle-free user experience for your customers. Whether scheduling appointments or reserving a room at their favorite hotel, users can book services online in just a few clicks.
In this comprehensive guide, you will find the necessary steps to create a booking website, including designing your website without coding, setting up online booking systems, and integrating various payment providers to process payments.
How to make a website for booking appointments
Implementing an online booking system reduces the time consultants and small business owners spend making phone calls, emails, and reservations. As a result, they can focus on scaling their business.
Depending on your budget and technical know-how, there are several ways to create a website. Users with no prior experience can hire a web development team or try a content management system (CMS) like WordPress.
However, we recommend developing a reservation website using a website builder if you want to save precious time and money. These builders include ready-to-use templates and accessible editing features, simplifying the booking website setup process.
Read on to find out how to choose the best website builder to get your own website up and running.
1. Get a website builder
With so many options in the market, selecting the right website builder can take time and effort. To avoid investing in the wrong platform, consider the following factors before creating a reservation website:
- Ease of use. A user-friendly website builder makes the entire process of creating and customizing your appointment site simple. This helps you focus more on business growth than struggling with complex website development.
- Customization. Look for customizable templates and rich editing options to create a small business website that perfectly matches your brand’s identity.
- Scalability. As your site grows, it will need to handle increased traffic. Pick a website builder that allows you to upgrade resources as needed to avoid slow load times or prevent website downtime.
- Mobile responsiveness. Most users access websites and book appointments from their mobile devices. As such, the chosen platform should let you create a mobile-friendly website that looks and functions well on smartphones and tablets.
- Hosting and domain integration. Some website builders offer hosting and domain registration services in one package. This can save you the hassle of dealing with multiple service providers.
If you’re looking for a website builder that ticks all these boxes, Hostinger Website Builder is the way to go. The Business plan, costing CA$ 5.59/month, comes bundled with fast hosting solutions and free domain registration, including the popular .com extension.
Creating a booking website is also easy and fast – simply describe your business, and our AI-based system will generate the content and visuals in a matter of minutes.
Once the initial design is ready, use our drag-and-drop editor to customize the layout, add a booking page, set up your online booking system, and integrate over 20 payment gateways.
Hostinger Website Builder also offers a mobile editing feature, allowing you to edit your website on the go.
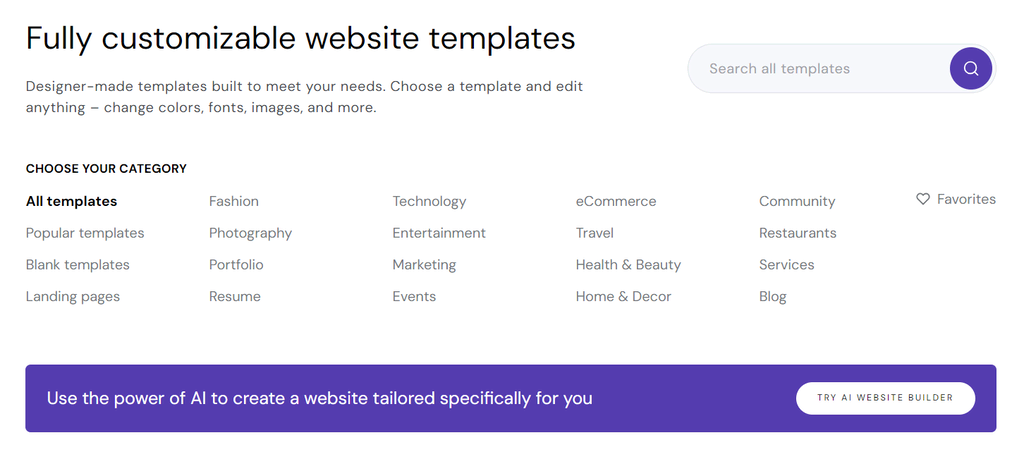
2. Choose a website template
An effective booking website design is vital to delivering a seamless browsing experience and attracting new customers. If you have no coding or design experience, look for a platform that offers website templates.
For example, Hostinger Website Builder offers over 150 pre-made designs for small businesses in various sectors, including beauty salons, travel agencies, healthcare providers, and restaurants.
Hostinger users can make a booking site using a template by following these steps:
- Sign up for our Business Website Builder plan. After completing the payment, you will be taken directly to the onboarding page.
- Hit Start creating to build a website with AI. If you want to choose from a booking website template selection instead, click Or use pre-made templates.
- Choose a category or use the search bar to find your desired template.
- Once you’ve found the perfect design, hover over it and click Start building.
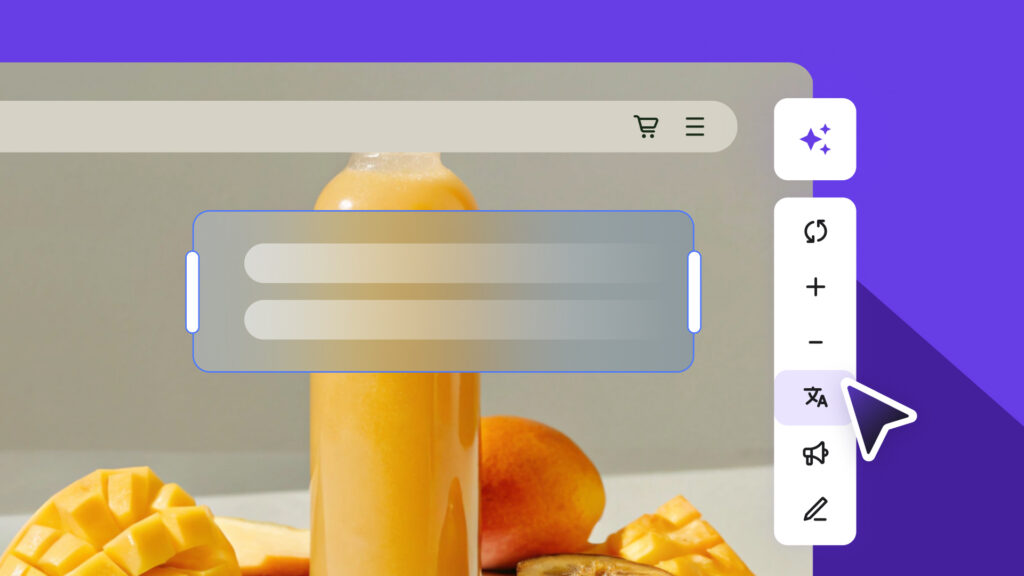
After that, the website builder interface will open. Here, you can find numerous customization settings and features for designing a booking platform:
- Website styles. Play around with different colors, fonts, button styles, and animations to achieve your desired look and feel.
- Drag-and-drop editor. Adjust the position of each heading, body text, image, and call-to-action button. You can also drag new elements and drop them anywhere on the editor, including social icons, maps, contact forms, videos, and galleries.
- Pages and navigation. Add new pages and manage your navigation menu. You can also create a dropdown menu by moving a sub-page below and slightly to the right of its parent page.
- AI Writer. Generate unique content for your pages, product descriptions, blog posts, and image alt texts.
- Logo Maker. Create a memorable logo for your business in seconds. Keep in mind that you need to purchase additional credits to use this feature.
- SEO tools. Optimizing your booking website for search engines is easy – select a website language based on your target audience and provide a brief description for each page. Then, our AI system will generate relevant keywords and metadata to help you create an SEO-friendly website.
Suggested reading
To make your booking website more visually appealing, follow these web design best practices.
3. Enable bookings and appointments
After customizing your site, it’s time to set up your online booking system so clients can easily book an appointment. Here’s how to build a booking website via our site editor:
- On the left sidebar, select the Online store icon and click Add store.
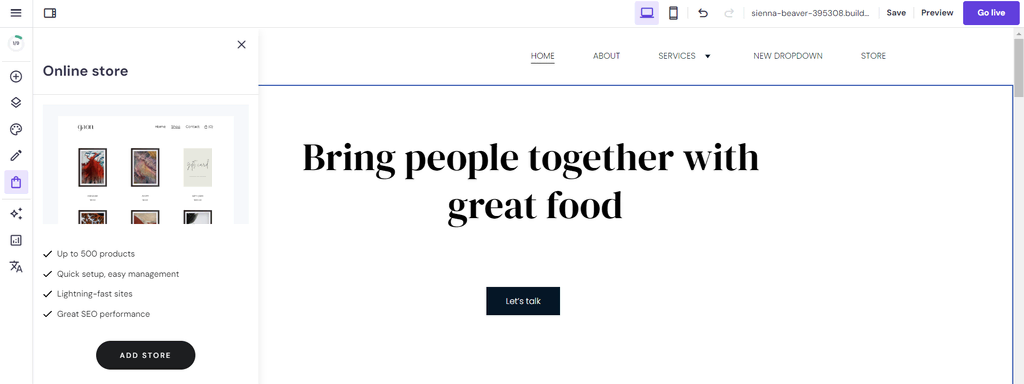
- Navigate to the Online store at the top left of your screen to access our eCommerce features.
- Enter the store details, such as name, country, and currency, to set up your account. Then click Continue.
- Once the store manager dashboard appears, choose Appointments on the left menu.
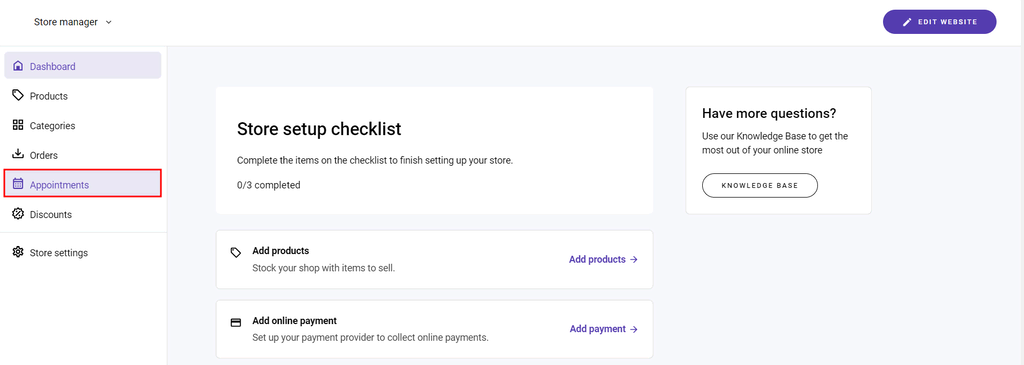
- Click Enable appointments.
4. Specify your availability
Setting up available time slots is the next critical step in building an appointment booking site. Ensure your online appointment scheduling is accurate to deliver the best user experience, such as helping prevent double bookings, where two clients choose the same time slot.
An accurate schedule lets public speakers, performers, and consultants plan their workload accordingly. Moreover, brick-and-mortar businesses like hotels or restaurants can allocate tables, staff, and meeting rooms to avoid overbooking.
Hostinger Website Builder offers advanced features that simplify managing appointments:
- Flexible and free booking options. Allow clients to book both free and paid appointments without requiring upfront payment. This feature offers greater flexibility and convenience, enabling users to schedule appointments for any reason, whether it’s a complimentary consultation or a paid service.
- Group booking management. Easily handle multiple bookings for the same time slots by setting the number of available slots for classes, group activities, and workshops. This makes it simple to accommodate larger groups and maximize your booking potential.
- Unavailable times management. Use this feature to block off times when you are unavailable due to holidays or other plans, ensuring your schedule accurately reflects your availability.
To prevent overlapping appointments and ensure a smooth scheduling process, it’s crucial to understand how time slots work. Hostinger Website Builder automatically adjusts available time slots based on your backend setup. Just ensure time slots are configured accurately.
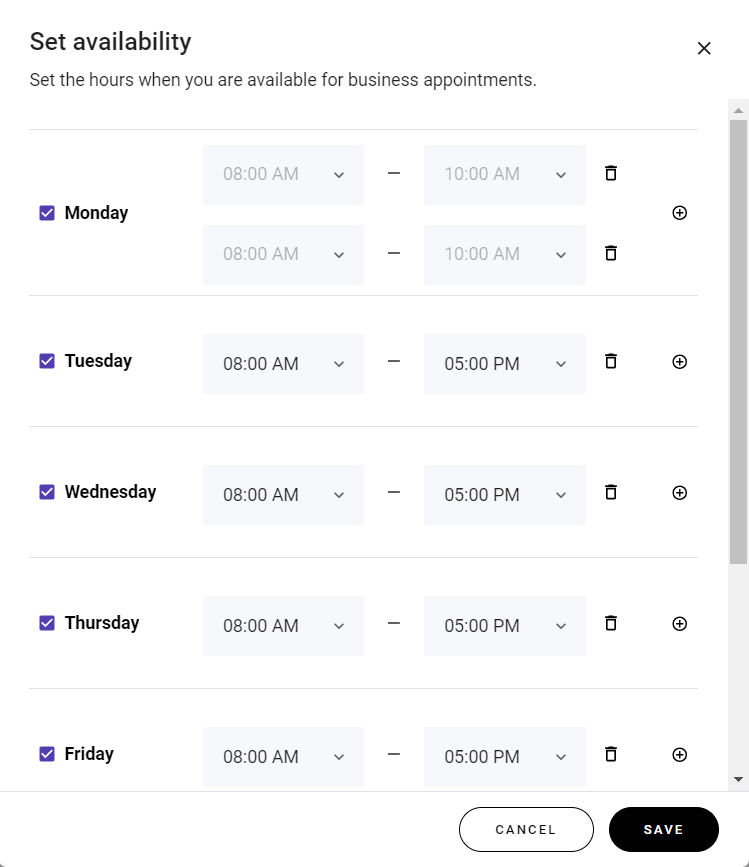
To specify your booking availability, click Edit in the appointment scheduler section.
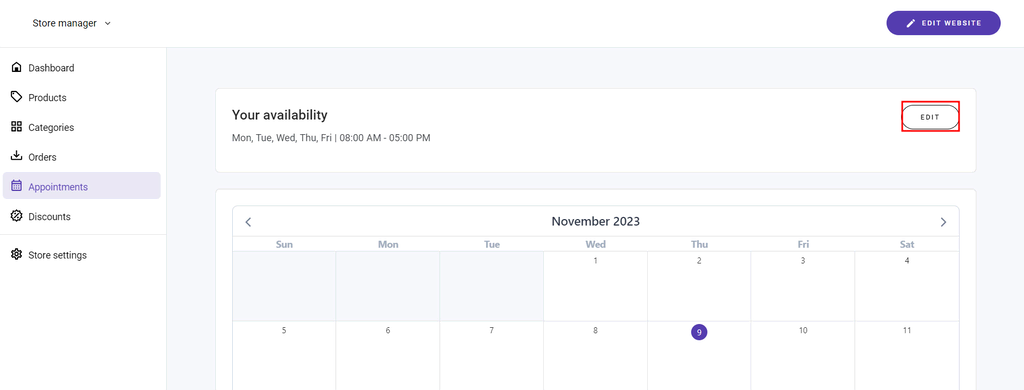
Set the time at which customers can make appointments. Tick the box for each available day and choose your business hours from the dropdown menu.
You can also click the plus (+) icon to add multiple time slots in one day. Once you’ve done this, remember to save your changes.
When specifying your availability, keep these general tips in mind:
- Set buffer times. Create an additional interval between each time slot to avoid overlaps. For instance, schedule appointments from 9:00 AM to 9:50 AM and 10:00 AM to 10:50 AM, leaving a 10-minute buffer for unexpected overruns.
- Adjust for time zones. Accommodating different time zones for booking sites is crucial, especially if you have a global clientele. Make sure clients see the available appointment slots adjusted to their local time.
- Precise availability. An accurate schedule enhances customer satisfaction and maintains your brand’s reputation. It also helps public speakers, performers, and consultants plan their workload efficiently.
5. Create an appointment product
An appointment product is a must-have element of any successful service-oriented business. It provides a clear description of each option on the online booking system, including payment information, time differences, and cancellation policy.
By offering several product choices, customers can choose a suitable plan based on their schedule, needs, and budget before booking online.
When making a booking site with Hostinger, you can easily create an appointment product from the store manager:
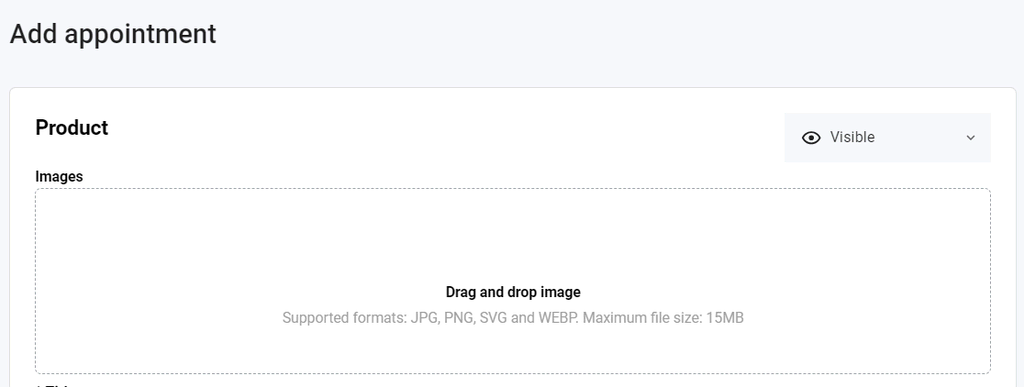
- Select Products from the left navigation menu, click Add product, and choose Appointment as your product type.
- Upload high-quality images that showcase your service. Supported formats include JPG, PNG, SVG, and WEBP.
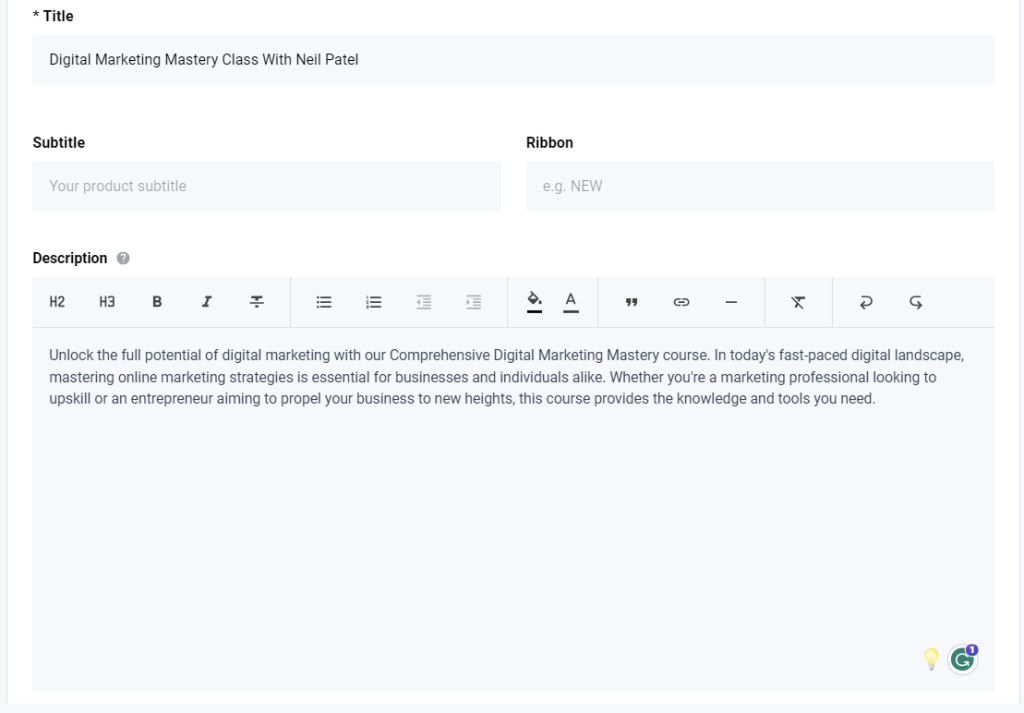
- Create a clear and descriptive title with essential details like the type of service, duration, and any unique selling point. For example, Digital Marketing Master Class With Our Top Expert.
- To highlight an important detail of your offering, enter a product ribbon. For instance, New, On Sale, and Best Deal.
- Provide a comprehensive description of your appointment product. Explain the unique benefits of buying your service to persuade new visitors and get more clients.
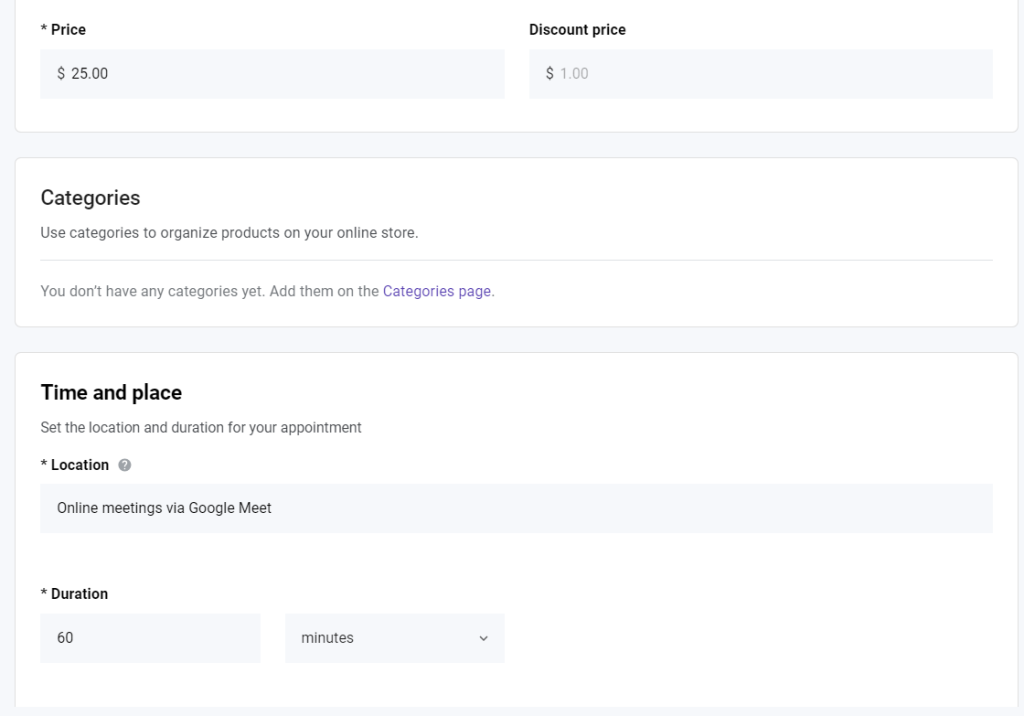
- Type in the product price and include a discount if you wish.
- Set the location and duration of your appointment. The minimum time length is 15 minutes.
- Set a minimum notice time to let clients know the registration closing date. This will help you avoid last-minute bookings.
- Double-check the availability settings you’ve previously configured for your online booking system. Make sure your working days and hours are accurate.
- To finish creating a booking form, click Save.
Repeat the same process to add another product. When you have multiple items, create a category to organize them better.
On the store manager interface, head to the left menu, select Categories, and add a new category. Input the category name, assign your products, and save the changes made to your online booking system.
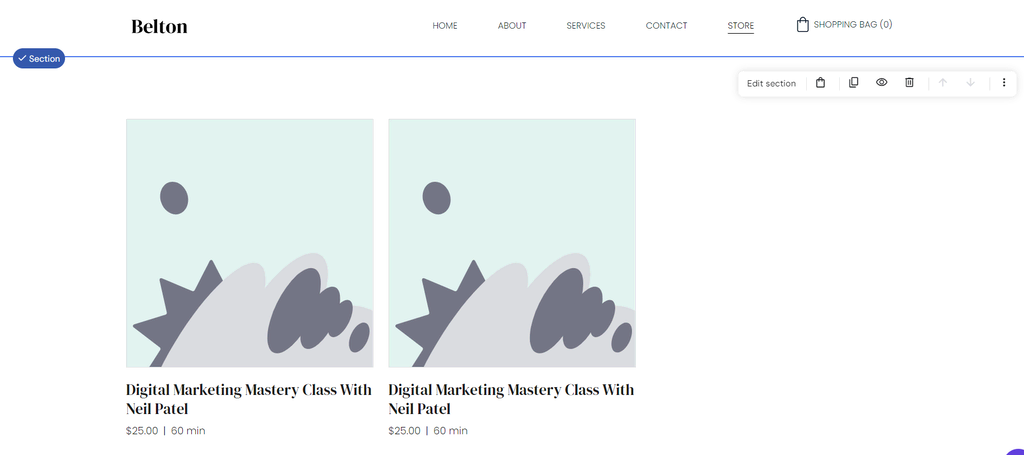
6. Display products on your website
Click Go to editor to begin publishing the newly created appointment products on your site. Navigate to Pages and navigation on the left sidebar and choose Store to open the product page.
Here, you can hide or show the product section for your online bookings on mobile devices or desktops. If you have many products and categories, you can also create multiple sections and move them up or down.
To customize the layout, simply select the intended area, click Edit section, and tweak your preferred settings:
- Category. Show all products or select only a specific category.
- Layout. Align product titles to the left or center, use an original or square image ratio, select the number of columns, and set the padding value.
- Style. Change the text color and section background. You can choose a color scheme or upload a custom image.
- Pagination. Determine how many products you want to display on a single page. The maximum amount is 50 items.
- Add to bag button. Show a call-to-action (CTA) button to encourage more clicks and conversions. You can customize the button’s text, shape, style, and size.
- Ribbons. Customize the background and text colors of your product ribbon.
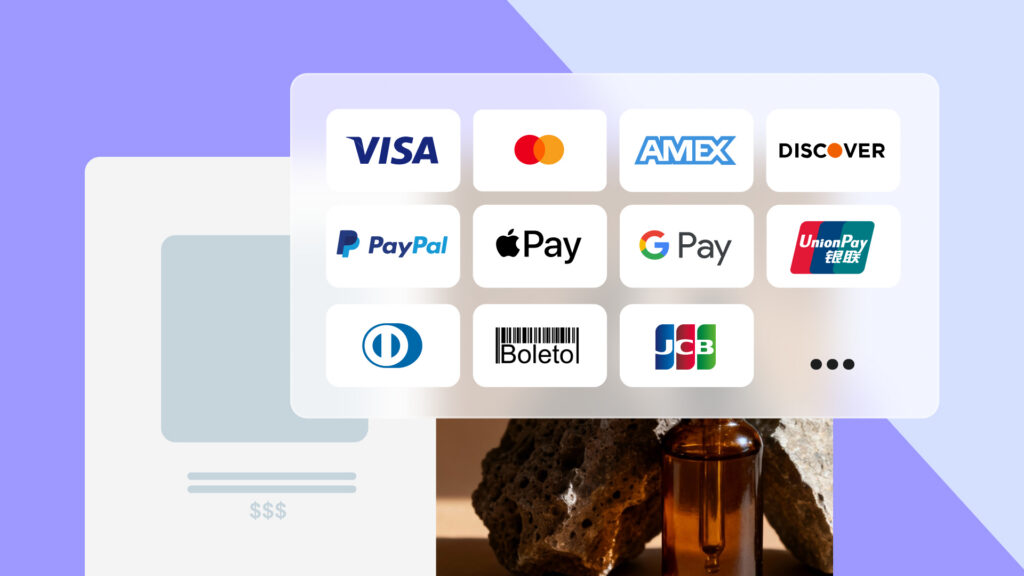
7. Integrate payment processing providers
After adding appointment products, the next step is to integrate payment gateways to make the payment process simple for customers:
- Access the store manager and navigate to Store settings on the left sidebar. Choose Payments.
- Connect with your PayPal and Stripe accounts to accept online payments. By integrating Stripe, customers can pay via digital wallets and credit or debit cards. Note that this method may come with additional processing fees.
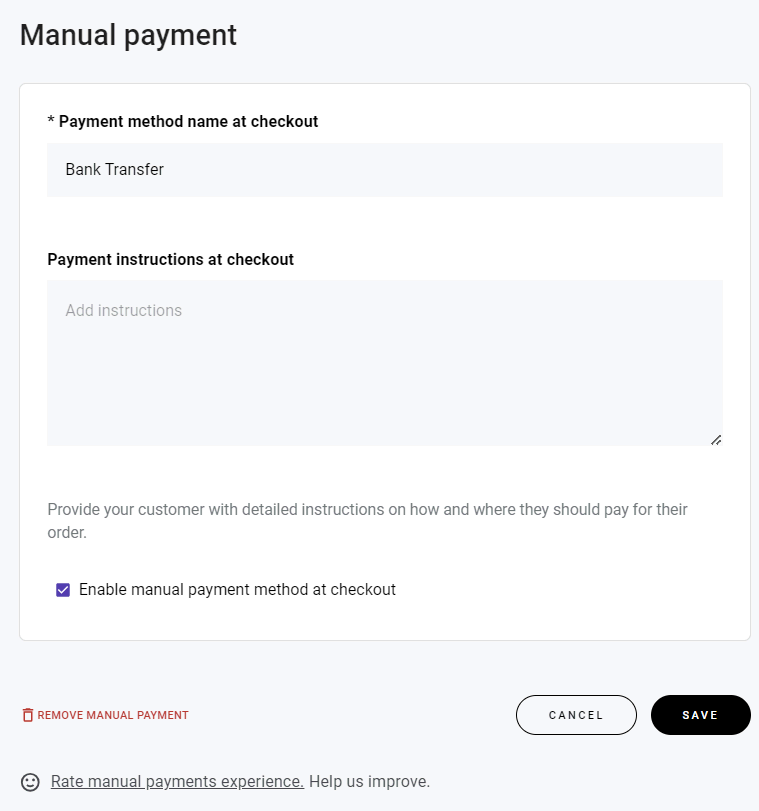
- If you prefer other methods, such as bank transfers or cash on delivery (COD), scroll down to Manual payment and click Add.
- Input your name and payment instructions for your payment method. Be as descriptive as possible to ensure a seamless checkout process.
- Tick the box that says Enable manual payment at checkout, then save your changes.
8. Set up legal pages
Creating legal pages, such as terms of service (TOC), cancellation policy, and data privacy, is crucial for several reasons:
- Transparency. Customers will have clear expectations regarding cancellations and refunds, significantly reducing misunderstandings and potential conflicts.
- Legal compliance. In some jurisdictions, having a privacy policy is non-negotiable if your website collects visitor information. It explains how customer data is collected, used, and protected, instilling user confidence.
- Dispute resolution. Terms and conditions provide a clear framework for issue resolution if there’s a disagreement between you and a customer. This can prevent disputes from escalating to legal action.
- Risk mitigation. Having these policies in place helps mitigate risks associated with financial transactions. For instance, a refund policy outlines the conditions under which refunds are issued, protecting your business from monetary loss.
To add legal pages to your online booking website, follow these steps:
- Open the site editor, head to Pages and navigation, and click Add page.
- Choose from the available templates – Privacy policy, Refund policy, or Terms and conditions.
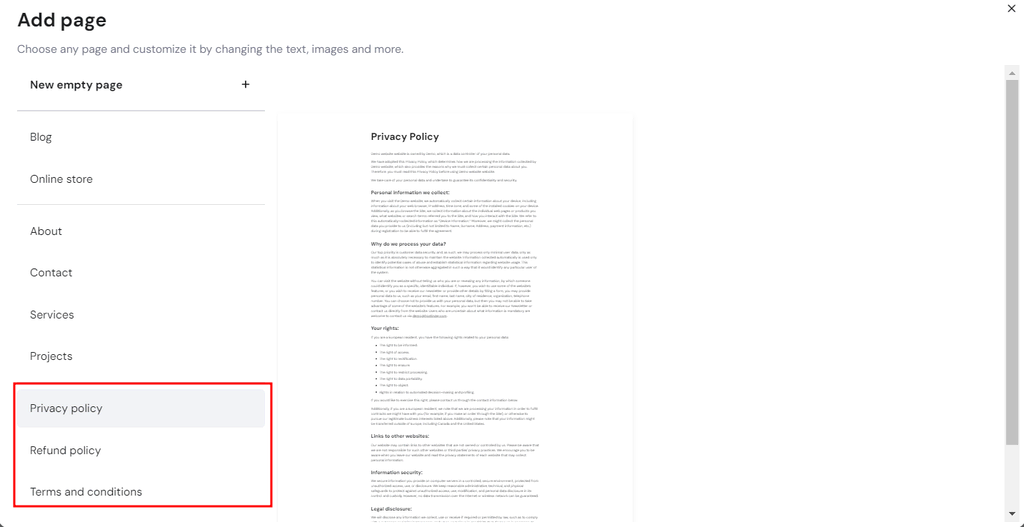
- Click the section thumbnail on the right and fill in the required details. For example, when using the Privacy policy template, users must enter the company name, website name, and email address.
- Once done, click Add page, and our AI will automatically generate the page content. You can customize it by selecting the whole text and clicking Edit text.

- Follow the same steps to create the remaining legal pages.
Add legal pages to the footer
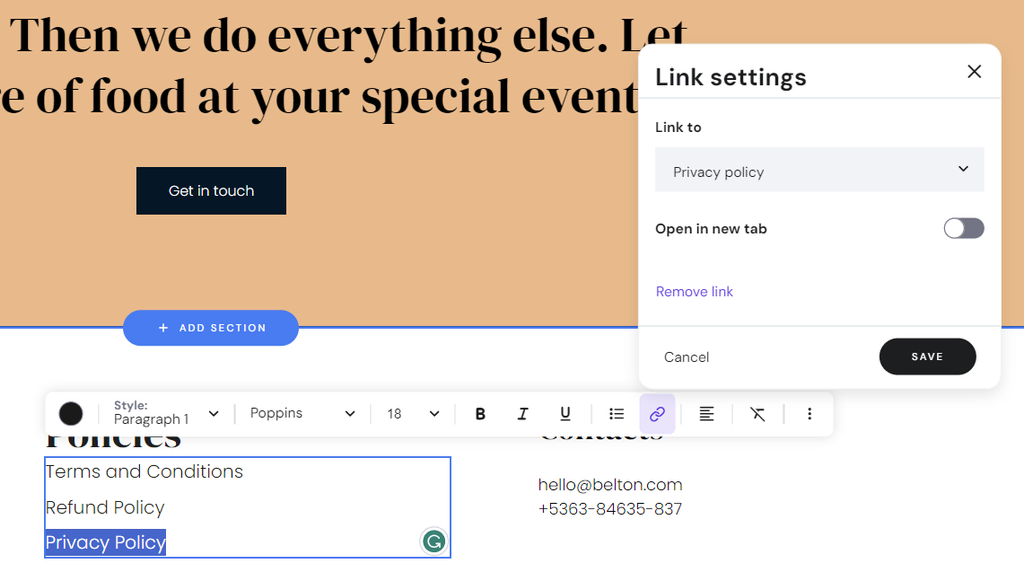
To display links to your legal pages in the footer, go back to the homepage and scroll down to the bottom section. Click the plus (+) icon on the left sidebar, drag and drop the text element anywhere in the footer area, and insert the titles of your legal pages.
Highlight your intended title and click the Link icon to create a hyperlink. Then, select the correct page from the dropdown menu and click Save.
If you want to hide the legal pages from the top menu bar, head to Pages and navigation and move them below the Hidden from navigation section.
9. Launch your booking website
At this point, your website is ready for launch. But before publishing your booking site, there are several settings you need to configure:
Provide your company details
A catchy business name and stunning logo are crucial to building a memorable brand.
Use Hostinger AI Business Name Generator to find the perfect name for your business and AI Logo Maker to create a bespoke logo in minutes.
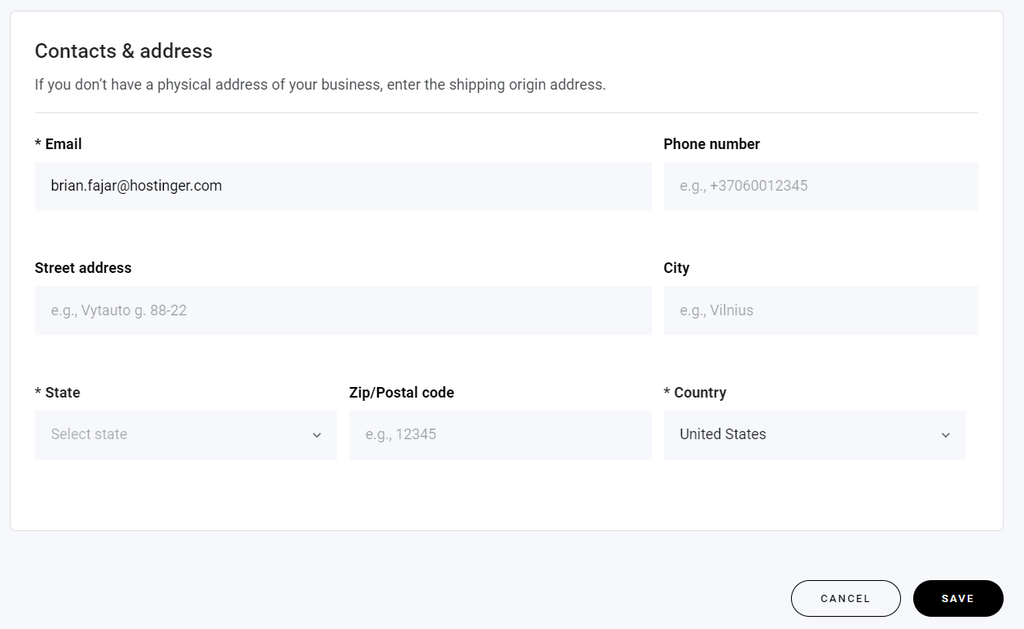
After that, navigate to Store settings → Company information, enter your brand name, and upload the logo. Remember to include your contact details to ensure seamless client communication.
Customize the checkout page
You can also personalize the checkout page from the Store settings section to deliver a better shopping experience.
Simply access Checkout to include legal page links you’ve created before, including terms and conditions and refund policy. You can also collect customer data through a custom field and choose a language for your shopping cart and checkout page.
Connect your domain name
Head back to the site editor and click Preview to see how your site looks on both desktop and mobile devices. Make sure there are no typos, misplaced images or buttons, or broken links.
Once you are happy with how everything looks, exit the preview mode and click Go live to publish your booking website.
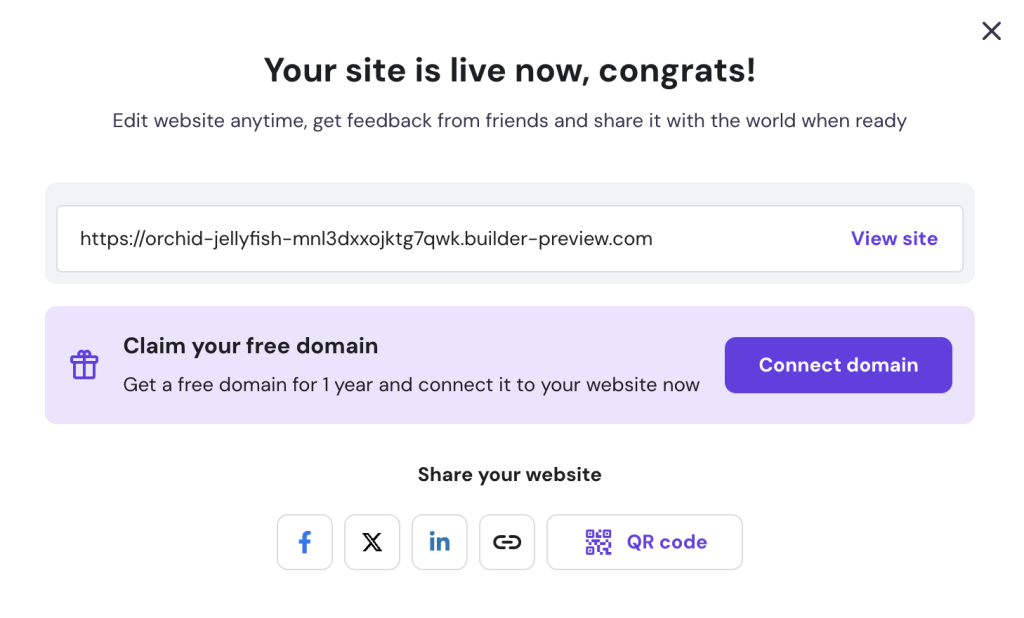
Click Connect domain and follow the on-screen instructions. If you need more help, follow our tutorial on how to choose the right domain name.
Keep in mind that you still have to optimize your website after launch to attract traffic and leads. Popular methods include speeding up your load times, fixing technical SEO issues, and investing in content marketing.
Also, don’t forget to share your booking website on social media platforms like Facebook, X, or LinkedIn to gain more exposure.
Conclusion
Thanks to booking websites, clients can book appointments with business consultants or reserve tables at restaurants with just a few clicks.
Integrating an online booking system eliminates the need for manual data entry during reservations, giving service providers more room for growth and business expansion.
If you don’t possess the necessary knowledge to make a site from scratch, Hostinger Website Builder offers a user-friendly booking site creation:
- Purchase a web hosting plan and register a free domain name.
- Choose a ready-to-use website template and customize it with the drag-and-drop editor.
- Enable bookings and specify your availability schedules.
- Display appointment products on the site and integrate various payment processing platforms into your booking system.
- Launch your booking website.
Next, optimize your site for search engines and engage your target audience with our built-in SEO tools and third-party marketing integrations. You can also use AI Writer to generate captivating copy for headings and CTA buttons to boost conversions.
We hope this article has provided the DIY booking website guide you’ve been looking for. Don’t hesitate to leave a comment below if you have any questions.
How to make a booking website FAQs
What information should I include on my booking website?
Your booking website should provide service details with clear pricing and explain the booking process, including your working hours and available slots. It should also include a booking form or contact information so users can easily reach out to you.
Do I need any coding skills to create an online booking website?
No, you don’t need coding skills for booking websites. Many site-building platforms provide a drag-and-drop editor to set up your booking website quickly. If you use Hostinger Website Builder, the process is even more straightforward, thanks to its suite of AI tools.
Can I accept payments on my booking website?
Yes, Hostinger Website Builder allows you to accept various payment methods, including credit cards, PayPal, and Stripe. This way, you can provide a seamless booking experience while ensuring secure transactions.

Matleena is a seasoned Content Writer with 5 years of content marketing experience. She has a particular interest in emerging digital marketing trends, website building, and AI. In her free time, Matleena enjoys cups of good coffee, tends to her balcony garden, and studies Japanese. Follow her on LinkedIn

Miglė Cicėnaitė-Jocė is a Product Manager for Hostinger's Website Builder. She is on a mission to redefine website creation, focusing on the AI flow and its features, and is always eager for product feedback and market insights to improve the user experience. Follow her on LinkedIn.