Learn vibe coding in 7 steps
May 08, 2026
/
Ksenija
/
15 min Read
Vibe coding is an AI-assisted programming approach where you describe what you want to build, test the result, and improve it step by step. Instead of writing every line of code manually, you guide the process with prompts and refine the output until it works.
In practice, vibe coding means guiding AI with prompts, testing what it produces, and improving it step by step. You still need basic logic and a willingness to experiment, but you don’t need deep technical experience to get started.
The process follows a practical flow. You begin by understanding the workflow, then set up a simple environment, write clearer prompts, build small projects, and refine them through testing and debugging. Over time, this turns coding with AI into a repeatable way to build real applications.
1. Understand what vibe coding is
Vibe coding is a way to build software with AI by writing prompts, running the code it generates, and refining it through testing. Vibe coding feels different from traditional coding, but it is still coding.
You still need to think like a builder. You need to know what you want the code to do, spot when the output is wrong, and keep improving it until it works.
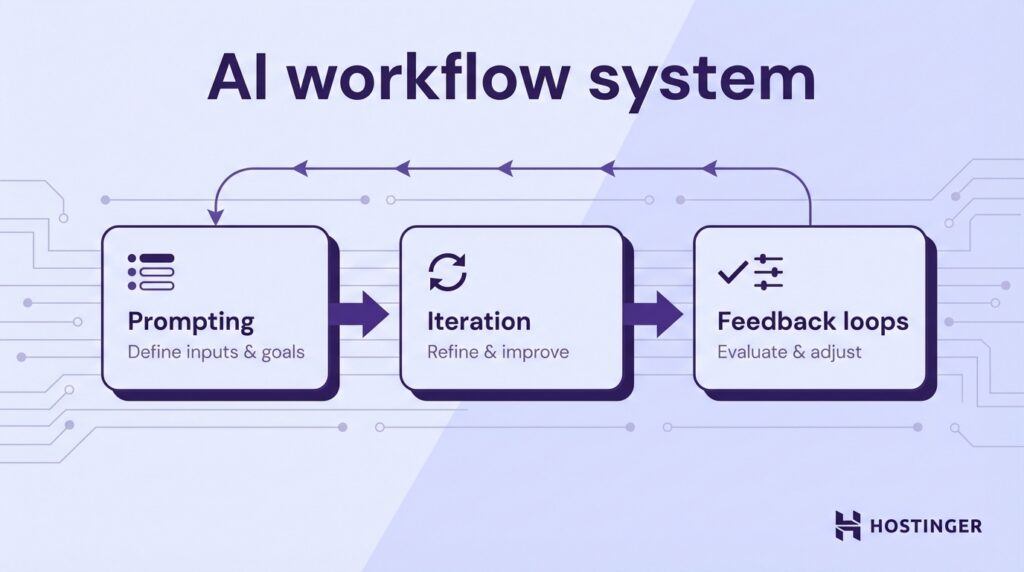
The workflow relies on three core actions:
- Prompting is how you tell the AI what to build using clear, direct language.
- Iteration is the process of improving the result step by step.
- Feedback loops describe the cycle of testing the output, spotting what is missing or broken, and using that input to guide the next version.
Say you want a basic to-do app. In a traditional workflow, you would plan the structure, write the interface, add the logic, and fix errors as you go.
In vibe coding, you might start with a prompt like: “Build a simple to-do app with a form, a task list, and a delete button using HTML, CSS, and JavaScript.”
Then run the code, notice that the tasks disappear after a refresh, and ask the AI to add local storage. That back-and-forth is the core of the process.
Vibe coding works best when you treat AI like a collaborator. You give direction. The AI produces a draft. You review it, ask better questions, and shape the result into something useful.
2. Set up your vibe coding environment
Your vibe coding environment is the set of tools you use to write, test, and shape ideas.
Start by choosing an AI vibe coding tool where you’ll write and run your code.
VS Code is a general-purpose code editor you install on your computer. You use it to build anything from simple scripts to full web apps. Extensions let you add support for languages, debugging, formatting, and testing.
It’s a good fit when you want full control over your project and local setup.
Cursor is a modified version of VS Code with AI built into the editing experience. You can highlight code and ask it to rewrite, fix, or extend it using plain language.
It works well when you want to move fast, explore ideas, or refactor large parts of a project without doing everything manually.
Replit runs entirely in your browser. You can start a project, write code, and run it without installation. It handles the environment setup for you, including dependencies and runtime.
It’s good for quick experiments, small apps, and learning when you want instant feedback.
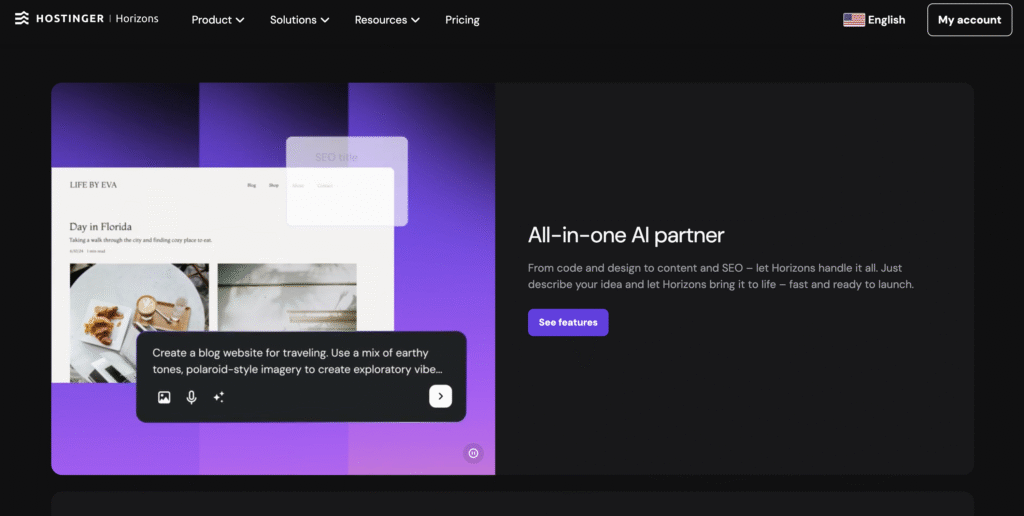
Hostinger Horizons vibe coding platform combines coding, hosting, and deployment in one place. You can build a project and deploy it to production without configuring servers, domains, or deployment pipelines.
It works well for landing pages, small web apps, and early-stage ideas where you want to go from concept to a working site quickly.
Next, decide how you want AI to support your workflow. Each option below helps in a different way:
- ChatGPT helps you plan, generate code, and debug step by step. Use it when you want clear explanations and control over each decision.
- GitHub Copilot suggests code as you type inside your editor. It’s a good choice when you already know the structure and want to move faster.
- Cursor AI lets you edit and generate code directly with prompts inside your files. It works well when you want to iterate quickly without switching between tools.
Your skill level determines how and which vibe coding tools to use:
- Beginner: Use Replit or Hostinger Horizons with strong AI guidance. Focus on understanding what the code does. Ask for clear explanations.
- Intermediate: Use VS Code with Copilot or ChatGPT. Write the structure yourself, then use AI to speed up repetitive work.
- Advanced: Combine tools. Use AI for exploration, scaffolding, and refactoring while keeping full control over decisions and architecture.
If you want a more structured learning path before choosing tools, explore our guide to vibe coding courses to find beginner-friendly options and practical programs that match your goals.
If you are unsure where to start with vibe coding, choose the setup with the fewest moving parts. Open one tool, build a small app, and improve it step by step. That is the fastest way to get comfortable with vibe coding.
3. Learn how to prompt effectively
To become a prompt engineer, you need to learn how to describe what you want in a way the tool can act on.
Start with the core idea in one sentence, then define the key details. Your prompt should answer five questions: what you’re building, who it’s for, what it should do, what it should use, and what to avoid.
Here is an example of a weak prompt:
“Make me a fitness app.”
Here is how to write a good AI prompt:
“Build a mobile-friendly fitness tracking app for beginners. Include a dashboard, a workout log, a progress chart, and a profile page. Use React for the frontend and keep the design clean and simple. Show sample data. Do not add social features or payment flows.”
The easiest way to stay specific is to describe three things clearly: features, inputs, and outputs.
Features are the parts of the product. For instance, a budgeting app needs expense tracking, monthly summaries, and category filters. A restaurant site needs a menu page, booking form, map, and opening hours.
Inputs are the pieces of information the user enters so the app can do something useful. A mortgage calculator needs numbers like the loan amount, interest rate, and repayment term. Without those, it cannot calculate anything. A resume builder needs details like work history, education, and skills. Without that, it has nothing to turn into a resume.
Outputs are what the user gets back. A mortgage calculator shows the monthly payment, total repayment, and interest. A resume builder generates a formatted preview and a downloadable file.
When you define these three clearly, the tool has enough direction to build something usable.
Include the language and framework when they affect the result. This prevents the tool from making unwanted choices.
Say exactly what you want to use:
- “Build this in Python with Flask”
- “Use React with simple state management”
- “Keep this as a static HTML, CSS, and JavaScript project”
A prompt with clear technical direction would look something like this:
“Create a simple expense tracker in React. Include a form to add expenses, a list view, and a monthly total. Store data in local storage. Use plain CSS. Make the layout mobile-friendly.”
Prompting is an iterative process. Start with a solid base, then improve it step by step.
When the result is close, give direct corrections instead of rewriting everything. Point to what needs to change.
Here is a simple refinement sequence:
First prompt: “Build a task manager for students with a dashboard, assignment list, and due date reminders.”
Refinement: “Simplify the dashboard. Show only upcoming, overdue, and completed tasks. Increase spacing and use larger text.”
Refinement: “Add a subject filter and color labels for priority. Keep the layout minimal.”
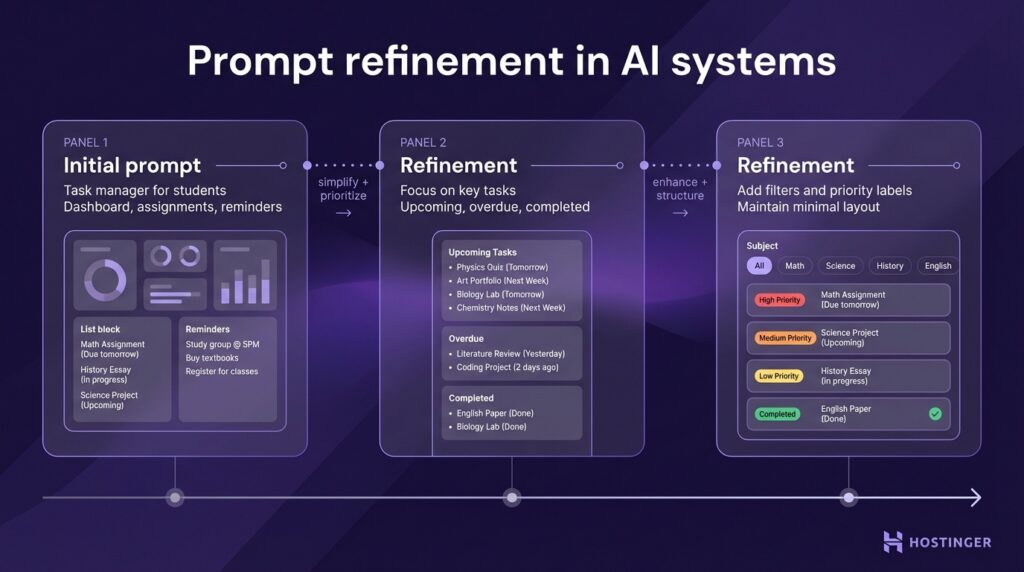
Each step improves a specific part of the result while keeping what already works.
You can also guide the tone and depth of the response by assigning a role. Ask the tool to act as a frontend developer, product designer, or tutor. This shapes how the output is written and explained.
Use this prompt pattern as a starting point:
“Build [project] for [user]. Include [features]. The user enters [inputs] and gets [outputs]. Use [language/framework]. Keep the design [style]. Limit the project to [constraints].”
Example:
“Build a meal planning web app for busy parents. Include a weekly planner, recipe cards, a shopping list, and saved meals. The user enters dietary preferences and ingredients, then receives a weekly plan. Use Next.js. Keep the design simple and mobile-friendly. Limit this to a frontend prototype with sample data.”
4. Build your first vibe coding project
Explore beginner-friendly web app ideas and choose a small project you can build first, so you can learn the workflow without getting stuck in too many moving parts.
Let’s say you want to build a to-do list app as your first project. It is simple, easy to test, and covers the core patterns you will use in most projects.
Start with a clear goal: the user can add a task, mark it as complete, and delete it.
Write a prompt like this:
“Build a mobile-friendly to-do list app. Let users add tasks, mark tasks as complete, and delete tasks. Use simple HTML, CSS, and JavaScript. Store tasks in local storage. Keep the design clean and easy to use.”
This gives you a working starting point without extra complexity.
Once you get the code, run it immediately. You want to see the result before making changes.
- In Replit or Hostinger Horizons, click Run or Preview
- In VS Code, open the HTML file in your browser or use a tool like Live Server
When the app opens, use it like a real user.
- Add a few tasks.
- Mark some as complete.
- Delete one.
Then push it a bit:
- Add an empty task and see what happens.
- Refresh the page and check if tasks are saved.
- Resize the screen to see how it looks on mobile.
When something breaks or feels off, fix one issue at a time. Give clear instructions based on what you see.
- “The delete button does not remove tasks. Fix the function.”
- “Tasks disappear after refresh. Save them in local storage.”
- “The layout looks cramped on mobile. Add spacing and stack items vertically.”
Take a few minutes to read the code after each step. Look at how tasks are stored, how buttons trigger actions, and how updates appear on the screen. If something is unclear, ask for a short explanation in plain language.
If the code feels too complex, simplify it with prompts like:
- “Rewrite this using smaller functions”
- “Use simpler variable names”
- “Add comments to explain each part”
This first project teaches the full loop of building an app with AI: write a prompt, run the code, test it, fix issues, and improve it step by step. Once you complete this cycle, you can apply the same process to any idea you want to build.
5. Learn to read and understand AI-generated code
Start by reading the code in small parts. Focus on one block at a time and ask a simple question: What does this do?
Break the code into three core elements: variables, functions, and logic.
Variables store data. They hold the information your app needs to work. In a to-do app, for instance, a variable might store the list of tasks or the text from an input field. If you see let tasks = [], that usually means the app is creating a place to store tasks.
Functions perform actions. Each function handles one job. You might see functions like addTask, deleteTask, or renderTasks. Read the function name first, then check what input it takes and what it changes.
Logic controls decisions. This includes conditions, loops, and event triggers. If you see if (email === “”), the code is checking for empty input. If you see a loop, the code is repeating an action across a list.
Here is a simple example:
function addTask(taskText) {
  if (!taskText) return;

  const task = {
    text: taskText,
    done: false
  };

  tasks.push(task);
}
You can break it down step by step:
- function addTask(taskText) creates a function called addTask. This function runs when the app tries to add a new task.
- taskText is the value passed into the function. In this case, it is the text the user typed.
- if (!taskText) return; checks whether the input is empty. If there is no text, the function stops here.
- const task = { … } creates a new task object and stores it in a variable called task.
- text: taskText sets the task text to whatever the user entered.
- done: false sets the completion status to false, which means the task starts as incomplete.
- tasks.push(task); adds the new task object to the tasks list.
Next, connect the code to what happens on the screen. Pick one action and trace it through the code. Click a button, find the function it triggers, check what data changes, and see how the interface updates. This gives you a full picture of how the app works.
Ask AI to explain specific parts of the code using prompts like:
- “Explain this function in simple terms.”
- “What does this variable store and where is it used?”
- “What happens after this button is clicked?”
- “Rewrite this with clearer names.”
- “Add short comments to explain each step.”
You can also check whether the code matches your goal:
- “Does this save data after refresh?”
- “Can this function be simpler?”
- “Is anything unnecessary here?”
These questions help you evaluate the code instead of accepting it as-is.
AI-generated code often includes hidden assumptions. A function may expect data in a certain format or rely on something that is not defined. Ask directly: “List every assumption this code makes about the data and environment.”
Once you see those assumptions, you know what to test.
Testing connects everything. Run the code and check whether it behaves as expected. If a function should block empty input, try submitting an empty field. If a value should update, trigger the action and confirm the result.
If something feels unclear, simplify the code before moving on.
Compare these two versions:
function x(a) {
  if (a.length > 0) {
    let y = a.map(z => z.price * z.qty);
    return y.reduce((m, n) => m + n, 0);
  }
  return 0;
}
function calculateCartTotal(items) {
if (items.length === 0) return 0;
const itemTotals = items.map(item => item.price * item.quantity);
return itemTotals.reduce((sum, total) => sum + total, 0);
}Both versions do the same thing, but the second one is easier to read because the names explain what is happening. When code is clear, you can understand it faster and make safer changes.
Your goal is to understand what the code stores, what it does, and what result it produces. Once you can explain that in your own words, you can safely change and improve it.
6. Debug and refine your projects
Debug and refine your projects by fixing one issue at a time, testing each change, and moving forward in small steps.
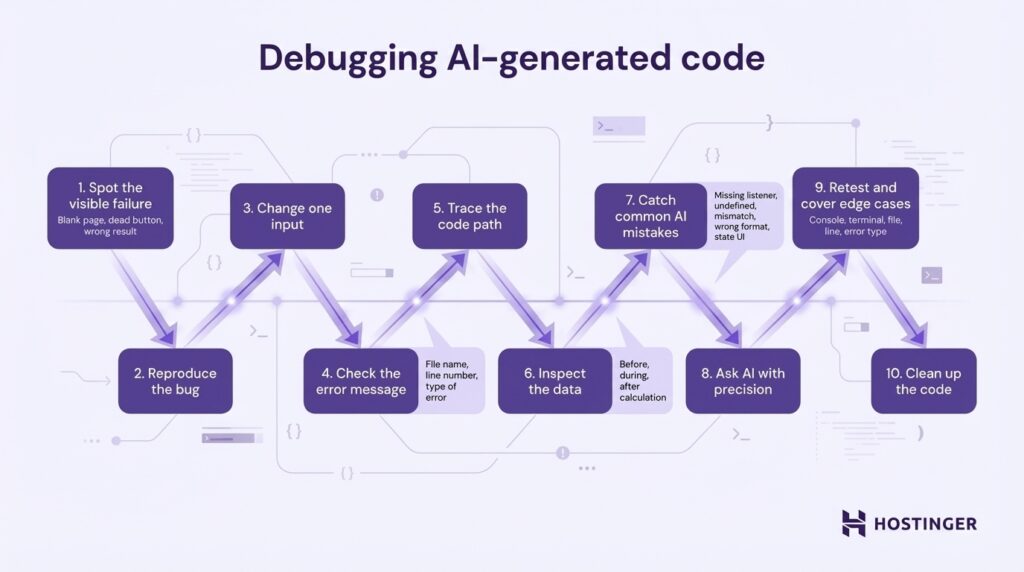
Start with the visible failure. Look at what actually breaks. The page might stay blank, a button might do nothing, or a form might return the wrong result. Begin with what you can see on the screen.
Reproduce the bug on purpose. Repeat the exact steps that caused the issue. Click the same button, enter the same values, and follow the same order.
Then change one input at a time to find what triggers the problem. Try an empty field, a longer value, or a different format. When the bug appears only under certain conditions, you’ve identified the cause.
Check the error message in the console or terminal. Open your browser’s developer tools or look at the terminal where your app is running. If something is broken, you will often see a red error message.
Read the message and look for:
- File name
- Line number
- Type of error
For example, if you see “undefined,” the code is trying to use a value that does not exist. If you see a syntax error, something is written incorrectly. These clues show you where to look in the code.
Trace the user action through the code. Start from the click or input, follow the function it triggers, check what data changes, and confirm how the interface updates.
Inspect the data at key points. Look at the actual values your code is working with while it runs. If a result looks wrong, check what goes into the calculation and what happens in the middle.
For example, if a total shows 0 instead of 50, check:
- What values are being passed into the function
- What those values look like before the calculation
- What is the result right after the calculation
This helps you find where the value changes or breaks.
Watch for common AI mistakes, such as:
- Missing event listeners – a button appears on the screen, but nothing happens when you click it.
- Variables used before they are defined – the code tries to use a value that hasn’t been created yet, often causing undefined errors
- Mismatched function or variable names – the code calls addTask, but the actual function is named createTask.
- Data saved in one format and read in another – data is stored as text but treated like a number, which breaks calculations.
- UI not updating after data changes – the data updates correctly, but the screen still shows old values.
Use AI to investigate the issue. Share the failing code and describe the behavior precisely:
- “This button does nothing when clicked. Find the issue.”
- “This function returns undefined. Where is the value lost?”
- “Check this logic when the input field is empty.”
Retest after every fix. Run the same action again and confirm the issue is resolved. Then check nearby features to ensure nothing else broke.
Test edge cases. Try empty inputs, large values, duplicate entries, and different screen sizes. This helps confirm the fix works in real use.
Clean up once the feature works. Rename unclear variables, split long functions, and remove duplicate or unused code. This makes future changes easier.
7. Practice real-world workflows
Practice real-world workflows by building projects that solve an actual task from start to finish.
Let’s say you are building an invoice generator for freelancers. The user enters a client name, project name, hourly rate, and hours worked. The app calculates the total and shows a clean invoice summary. This gives you a realistic workflow: collect data, process it, show the result, test it, and improve it.
Work through the project in the same order you would use in a real development cycle.
- Define the task clearly. Start with a short description of what the tool should do. In this case: “Build a simple invoice generator for freelancers that collects project details, calculates the total, and displays a ready-to-use invoice summary.”
- Build the first version. Start with the smallest version that works. For this project, that means a form with fields for client name, project name, hourly rate, and hours worked, plus a button to calculate the total.
- Run the code early. Test the basic flow as soon as the first version is ready. Enter sample values, click the button, and verify that the invoice summary shows the correct total.
- Fix the first round of problems. Check the calculation, empty fields, and output formatting. If the total is wrong, inspect the rate and hours values. If the form accepts blank fields, add validation. If the summary is hard to read, clean up the layout.
- Refine the output. Once the tool works, improve the experience. Add clearer labels, better spacing, cleaner headings, and more readable currency formatting. Then review the code and rename vague variables or split large functions.
- Add one upgrade at a time. Expand the tool only after the basic version works well. Consider adding tax fields, invoice numbers, due dates, PDF export, or a way to save previous invoices.
Your first version only needs to prove that the idea works. After that, improve one layer at a time. Fix the logic first, clean up the interface, and make the code easier to read. Then add small features that make the project more useful.
Why vibe coding works
Vibe coding works because it shortens the distance between an idea and a working result. You describe what you want, get a usable draft, and improve it step by step.
The difference between vibe coding and traditional coding is how the process begins. Traditional coding requires manual setup and the building of structures piece by piece. Vibe coding gives you a starting point that already works, so you can test and improve it right away.
Speed comes from starting with a draft instead of a blank file.
Let’s take a simple budget calculator as an example. In a traditional workflow, you would set up the project, structure the code, connect the inputs, handle the calculation, and then design the output.
With vibe coding, you can generate a working calculator with income and expense fields, run it, and focus on understanding how it behaves. That keeps the learning process tied to something concrete.
For experienced developers, the advantage is different. Vibe coding speeds up routine work. It can generate initial structure, write repetitive functions, suggest fixes, and help clean up existing code.
This allows developers to focus on higher-level decisions, such as architecture, performance, and overall product behavior.
This same approach carries over as projects become more complex. The way you work does not change when you switch tools or technologies.
The same workflow applies across languages and frameworks. You describe the goal, set the constraints, review the output, and refine it.
This works whether you are building a Python script, a JavaScript web app, or a backend service. It also applies to a range of frameworks, from simple HTML and CSS to React, Next.js, and Flask.
Because the process stays consistent, you can switch between tools and projects without changing how you work. That makes vibe coding useful for a wide range of tasks, including automation, websites, dashboards, and internal tools.
Vibe coding works best when you treat the output as a draft. You guide the direction, test how it behaves, and decide what to change next. The tool helps you move faster, while your decisions shape the final result.
Best practices for vibe coding
Follow these vibe coding best practices to build faster and get better at writing prompts through hands-on work:
- Start with a clear goal. Define what you want to build in one or two sentences before prompting. A clear goal leads to more accurate outputs and fewer revisions.
- Keep prompts specific and structured. Include features, inputs, outputs, and constraints. This reduces guesswork and gives you a usable first version.
- Build in small steps. Start with a basic version that works, then improve it in layers to keep the project manageable and easier to debug.
- Run and test early. Execute the code as soon as possible to see real behavior. Early testing helps you catch issues before they spread.
- Fix one issue at a time. Focus on a single problem, apply a targeted fix, and retest to maintain the cause-and-effect clear.
- Read the code before changing it. Understand what each part does so you can make safe edits without breaking working features.
- Use AI as a collaborator. Give it clear tasks, review the output, and guide the next step. Treat each prompt as part of an ongoing conversation.
- Ask for explanations when needed. Request simple, step-by-step explanations for unclear code. This helps you learn while building.
- Set limits to control scope. Keep early versions simple by avoiding complex features like authentication or databases. You can expand later once the core works.
- Test real use cases. Use realistic inputs and edge cases to check behavior to see how the project performs outside ideal conditions.
- Refactor after it works. Clean up variable names, split large functions, and remove unused code.
- Repeat the workflow across projects. Build multiple small projects using the same process. Repetition helps you recognize patterns and improve faster.
How to apply vibe coding in real projects
Apply vibe coding to real projects by integrating it into your workflow, not as a one-time shortcut. You still define the problem, build step by step, test the result, and refine the code.
Treat AI as a tool you use during planning, building, debugging, and refining:
- Outline the project, define features, and break work into steps. A clear plan gives you better prompts and more predictable results.
- Use AI to create a working starting point instead of writing everything from scratch. This gives you something you can run, test, and improve right away.
- Add features, fix bugs, and improve structure one change at a time. This keeps the project stable as it grows.
Vibe coding works especially well for rapid prototyping and creating minimal viable products (MVPs). You can turn an idea into a working version quickly, which helps you test whether the concept makes sense before investing more time.
Here is how to build an MVP with vibe coding:
- Define the core feature
- Generate a basic version
- Test the full user flow
- Fix issues
- Improve clarity and usability
For example, if you are building a booking tool, start by selecting a date and confirming a booking. Leave notifications, payments, and user accounts for later. This keeps the first version focused and usable.
As the project grows, shift from quick generation to more controlled development. At this stage, you focus on structure, reliability, and maintainability:
- Refactor generated code. Split large functions, rename unclear variables, and organize files into a clear structure.
- Add proper data handling. Move from temporary storage to a database or API when needed.
- Introduce validation and error handling. Make sure the app behaves correctly with real user input.
- Review dependencies and performance. Check how the app scales and whether parts of the code need optimization.
Scaling a project means tightening control over the codebase. You still use AI, but you guide it more carefully and review every change.
Documentation becomes more important as the project grows. Write down what each part of the system does, how data flows, and how key features work. This makes it easier to return to the project later or share it with others.
Version control is essential for managing changes. Use tools like Git to track updates, compare versions, and roll back if something breaks. Commit changes in small steps with clear messages, especially when working with AI-generated code.
Use AI as a consistent collaborator. Give it clear tasks, review the output, and guide the next step.
That approach lets you use vibe coding in real projects without losing control of the code or the product’s direction.

Ksenija is a digital marketing enthusiast with extensive expertise in content creation and website optimization. Specializing in WordPress, she enjoys writing about the platform’s nuances, from design to functionality, and sharing her insights with others. When she’s not perfecting her trade, you’ll find her on the local basketball court or at home enjoying a crime story. Follow her on LinkedIn.