What is WordPress taxonomy and how to create custom ones?
Aug 28, 2025
/
Domantas G.
/
6 min Read

WordPress taxonomy is a grouping mechanism for all of your content. In short, it allows you to group your posts based on shared characteristics.
Let’s say that you have a website about movies. Chances are you want to group the movies based on genre. Taxonomies allow you to do just that, thus helping users to navigate your site.
Although the term “Taxonomy” does come from biology, in this article, we will explain what WordPress Taxonomy is, what Custom Taxonomies are, and how to create them.
What is WordPress taxonomy?
WordPress Taxonomy is a way of grouping and organizing content types into categories and tags, making it easier for users to navigate a website. Taxonomies in WordPress include categories, tags, and custom taxonomies, which can be customized to meet specific website needs.
Types of WordPress taxonomies
In total, there are four taxonomies in WordPress that you can use to group your posts. Let’s take a look at each one.
1. Category
The category taxonomy in WordPress lets you group your post into hierarchical categories. There are two different ways to group your posts via Categories.
The first way is to log in to your Dashboard and head to Posts -> Categories. There, you can define your categories, as well as add in the WordPress slug and define child categories.

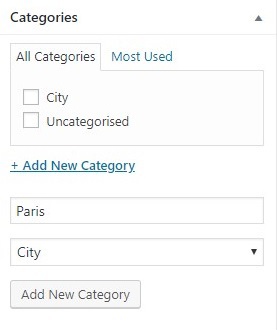
The second option is to head to Posts -> Add New. You can add multiple categories directly from the panel next to your visual editor. While it is the easier option, it doesn’t let you define the slug and description.
2. Tag
Tags are similar to categories – it groups your posts. However, a tag is different from a category as it doesn’t have a hierarchical structure.
A tag is a single parameter that puts your similar posts together, but it focuses on smaller details of your content, rather than overall themes.
Let’s say that you want to create genres and subgenres for your movie WordPress site. You can do that by using category like taxonomy, as it supports hierarchical structure. If you want to group movies of any genre with Brad Pitt as the main star, you can add tags.
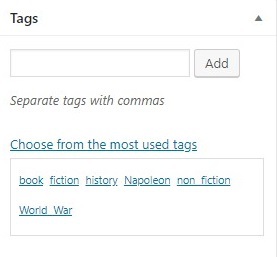
Creating WordPress tags is similar to creating categories. You can do it either from Posts -> Tags or panel next to the visual editor. Slug and description can also be defined.
Pro Tip
While tags are optional, categories are mandatory for your posts. Every post needs at least one category. By default, WordPress will automatically put your post under “Uncategorized” category.
The other 2 taxonomies are not visible to visitors. Although rarely used, they are still worth mentioning.
3. Link_category
This taxonomy lets you categorize your links. If you link to many sources on your posts, you’ll find this feature particularly useful.
4. Post_format
Post_format enables you to categorize your posts based on the types – videos, standard, audio, and more. You can find the panel next to your visual editor.

What are the benefits of WordPress taxonomies?
Taxonomies in WordPress — categories, tags, and custom taxonomies — give your content a clear structure so visitors and search engines can understand how everything connects. Here’s what you gain when you use them well:
- Organized content structure – Taxonomies group posts by topic or type, so every piece has a clear home. This keeps large libraries tidy and easier to maintain as your site grows.
- Faster navigation and discovery – Category and tag archives help readers jump straight to related content. Clear labels reduce pogo-sticking and keep people exploring more pages.
- Stronger SEO foundations – Grouping related posts creates topical clusters that signal relevance to search engines. Archive pages, internal links, and breadcrumbs all benefit from consistent terms.
- Scalable site architecture – A logical hierarchy (for example, Parent Category → Subcategory) keeps URLs clean and predictable. It also makes redesigns and content migrations less risky.
- Dynamic content and automation – You can query posts by taxonomy to auto-build landing pages, “related posts,” and menus. Update a term once and the change rolls out wherever that query appears.
- Powerful filtering and search – In WooCommerce or custom post types, taxonomies drive filters like brand, size, level, or topic. Visitors narrow results quickly without reading every page.
- Editorial consistency – Shared term lists keep writers aligned on naming and scope. It’s easier to spot content gaps and avoid duplicates when everything follows the same map.
- Cleaner analytics and insights – Segment performance by category or tag to see what resonates. These slices reveal winning topics and underperforming areas to improve.
Custom WordPress taxonomies
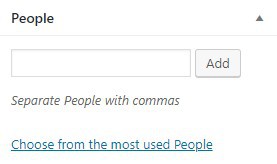
At the right side of your visual editor, you can see the “Categories” and “Tags” label. What if you want to have your own taxonomy that says “People”? Here’s where custom taxonomy saves the day. You can customize your taxonomy to better accommodate your needs.
For example, think of a fitness WordPress site. Instead of having a general taxonomy that says “categories”, it would be better to have custom taxonomies that say “Cardio” and “Floor Exercises”. Each taxonomy can be further modified with sub-categories like “Jogging”, “Intermittent running”, and “Crunches”. The same case goes with tags. You can have a tag that says “Fitness Instructor” instead of the default names.
How to create custom taxonomies in WordPress
There are two different ways of creating Custom Taxonomies in WordPress. You can do it with plugins, or you can do it through coding.
Using plugins to create custom taxonomies
Plugins make everything easy and creating a custom taxonomy is no exception. You don’t need any technical knowledge to do it.
The recommended plugins for creating custom taxonomies are Custom Post Types UI and Pods. Let’s try using the former for the example.
- Install and activate Custom Post Types UI
- Head to CPT UI -> Add/Edit Taxonomies
- Complete the box with your taxonomy name. In our case, we use “Floor Exercise”. Also, choose the custom post types on which you want to apply the new taxonomy.
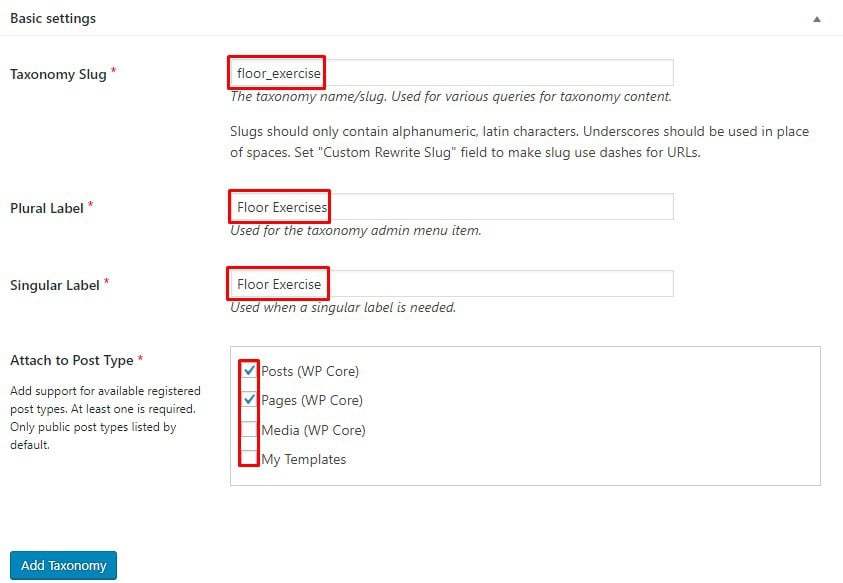
- Hit Add Taxonomy button at the bottom.
- If you head to Posts -> Add New, the new taxonomy will appear next to the visual editor.
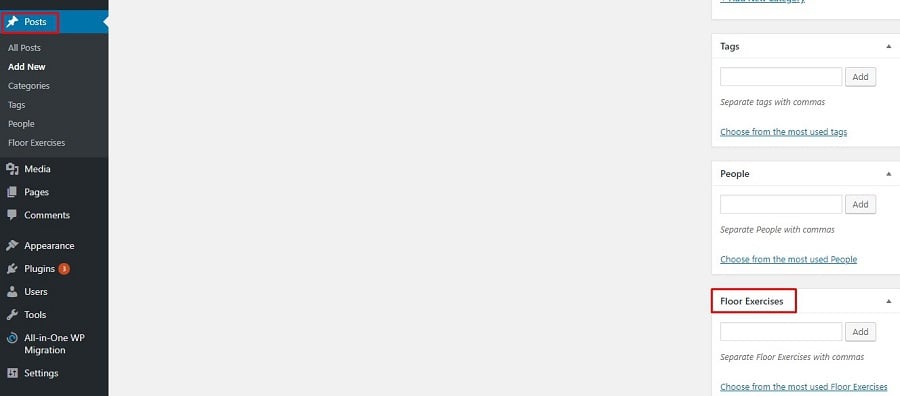
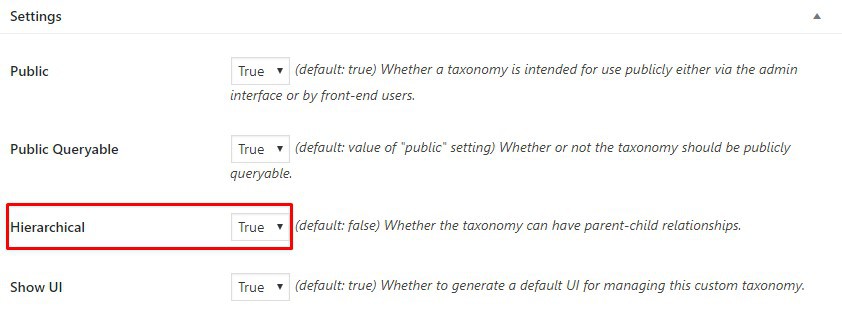
You may notice that the new taxonomy is a tag called “Floor Exercise”. What if you want to create a category instead? Easy! Scroll down a bit and change Hierarchical to True.
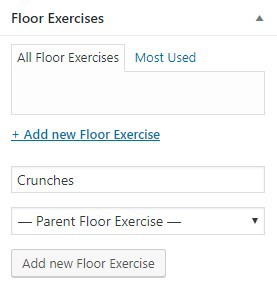
The result will look like this:
You can also use the plugin to create Custom Post Types.
Adding code to functions.php
You should choose this method only if you are comfortable with coding. If not, ignore this tutorial and stick to using plugins only.
For advanced users, you only need to add a few lines of the functions.php file of your theme’s directory. Please be aware that the codes for the hierarchical taxonomy are different from the non-hierarchical one.
Take a look at the example below.
Hierarchical taxonomy (category):
//hook into the init action and call create_book_taxonomies when it fires
add_action( 'init', 'create_topics_hierarchical_taxonomy', 0 );

//create a custom taxonomy name it topics for your posts
function create_topics_hierarchical_taxonomy() {

// Add new taxonomy, make it hierarchical like categories

//first do the translations part for GUI
 $labels = array(
   'name' =_x( 'Topics', 'taxonomy general name' ),
   'singular_name' =_x( 'Topic', 'taxonomy singular name' ),
   'search_items' =__( 'Search Topics' ),
   'all_items' =__( 'All Topics' ),
   'parent_item' =__( 'Parent Topic' ),
   'parent_item_colon' =__( 'Parent Topic:' ),
   'edit_item' =__( 'Edit Topic' ),
   'update_item' =__( 'Update Topic' ),
   'add_new_item' =__( 'Add New Topic' ),
   'new_item_name' =__( 'New Topic Name' ),
   'menu_name' =__( 'Topics' ),
 );

// Now register the taxonomy
 register_taxonomy('topics',array('post'), array(
   'hierarchical' =true,
   'labels' =$labels,
   'show_ui' =true,
   'show_admin_column' =true,
   'query_var' =true,
   'rewrite' =array( 'slug' = 'topic' ),
 ));
}
Non-hierarchical taxonomy (tag):
//hook into the init action and call create_book_taxonomies when it fires
add_action( 'init', 'create_topics_hierarchical_taxonomy', 0 );

//create a custom taxonomy name it topics for your posts
function create_topics_hierarchical_taxonomy() {

// Add new taxonomy, make it hierarchical like categories

//first do the translations part for GUI
 $labels = array(
   'name' =_x( 'Topics', 'taxonomy general name' ),
   'singular_name' =_x( 'Topic', 'taxonomy singular name' ),
   'search_items' =__( 'Search Topics' ),
   'all_items' =__( 'All Topics' ),
   'parent_item' =__( 'Parent Topic' ),
   'parent_item_colon' =__( 'Parent Topic:' ),
   'edit_item' =__( 'Edit Topic' ),
   'update_item' =__( 'Update Topic' ),
   'add_new_item' =__( 'Add New Topic' ),
   'new_item_name' =__( 'New Topic Name' ),
   'menu_name' =__( 'Topics' ),
 );

// Now register the taxonomy
 register_taxonomy('topics',array('post'), array(
   'hierarchical' =true,
   'labels' =$labels,
   'show_ui' =true,
   'show_admin_column' =true,
   'query_var' =true,
   'rewrite' =array( 'slug' = 'topic' ),
 ));
}
To show the new taxonomy in your visual editor, open single.php from Editor and copy this code:
the_terms( $post-ID, 'topics', 'Topics: ', ', ', ' ' );
That’s it! If the process is done correctly, a new taxonomy called “Topic” will appear on your visual editor.
Conclusion
WordPress Taxonomy is used to group your content. You can use categories for broad topics, and tags for details in your text. You can also create custom taxonomies using plugins or functions.php file.
Correctly utilizing WordPress taxonomies will help boost your website’s user experience.
Learn What Else You Can Do With WordPress
How to Login to WordPress
How to Schedule Posts in WordPress
How to Add WordPress Related Posts
2 Methods on Adding WordPress Menu Icons"
How to Reinstall WordPress
How to Add Facebook Like Button to WordPress
How to Install WordPress on a Subdomain
Guide to WordPress Favicons
How to Manage User Roles and Permissions in WordPress
All of the tutorial content on this website is subject to Hostinger's rigorous editorial standards and values.

Domantas leads the content and SEO teams forward with fresh ideas and out of the box approaches. Armed with extensive SEO and marketing knowledge, he aims to spread the word of Hostinger to every corner of the world. During his free time, Domantas likes to hone his web development skills and travel to exotic places.


